Table of Contents
Advertisement
Quick Links
NMP309-W
Network Media Player
User Guide
IMPORTANT: Please read this User Guide to obtain important information on installing
and using your product in a safe manner, as well as registering your product for future
service. Warranty information contained in this User Guide will describe your limited
coverage from ViewSonic Corporation, which is also found on our web site at http://
www.viewsonic.com in English, or in specific languages using the Regional selection box
in the upper right corner of our website. "Antes de operar su equipo lea cu idadosamente
las instrucciones en este manual"
Model No. VS16021
1
Advertisement
Table of Contents

Related Manuals for ViewSonic NMP309-W


Summary of Contents for ViewSonic NMP309-W
- Page 1 Warranty information contained in this User Guide will describe your limited coverage from ViewSonic Corporation, which is also found on our web site at http:// www.viewsonic.com in English, or in specific languages using the Regional selection box in the upper right corner of our website.
- Page 2 At ViewSonic, we believe that our products have the potential to make a positive impact in the world, and we are confident that the ViewSonic product you have chosen will serve you well. Once again, thank you for choosing ViewSonic !
- Page 3 Compliance Information FCC Statement This device complies with part 15 of FCC Rules. Operation is subject to the following two conditions: (1) this device may not cause harmful interference, and (2) this device must accept any interference received, including interference that may cause undesired operation. This equipment has been tested and found to comply with the limits for a Class B digital device, pursuant to part 15 of the FCC Rules.
- Page 4 Declaration of RoHS2 Compliance This product has been designed and manufactured in compliance with Directive 2011/65/ EU of the European Parliament and the Council on restriction of the use of certain hazardous substances in electrical and electronic equipment (RoHS2 Directive), and is deemed to comply with the maximum concentration values issued by the European Technical Adaptation Committee (TAC) as shown below: Proposed Maximum...
- Page 5 Copyright Information Copyright © ViewSonic Corporation, 2014. All rights reserved. ViewSonic and the three birds logo are registered trademarks of ViewSonic Corporation. Disclaimer:ViewSonic Corporation shall not be liable for technical or editorial errors or omissions contained herein; nor for incidental or consequential damages resulting from furnishing this material, or the performance or use of this product.
-
Page 6: Table Of Contents
Content 1. Introduction ..............1 1.1. Features ..............1 1.2. Package contents ............. 1 1.3. Physical view and features........2 1.4. Installation ..............2 2. Configuring the device ............. 4 2.1. System connections ..........4 2.2. Basic settings............5 2.3. Connecting the device to your network ..... 6 2.4. - Page 7 3. Content Management ............ 25 4. Authoring in HTML5 ............26 5. Working with SMIL ............26 5.1. Introduction ............. 26 5.2. www.a-smil.org for developers ........ 26 6. Technical Data ............... 27 6.1. Specifications............27 7. Troubleshooting ............. 29...
-
Page 8: Introduction
1. Introduction 1.1. Features • Support for HTML5 widgets for dynamic content (W3C Widgets standard) • Full-HD 1080p hardware decoding of MPEG, H.264, and VC-1 media formats • 8GB on-board flash local storage with micro SD card slot • Integrated audio and video output via HDMI •... -
Page 9: Physical View And Features
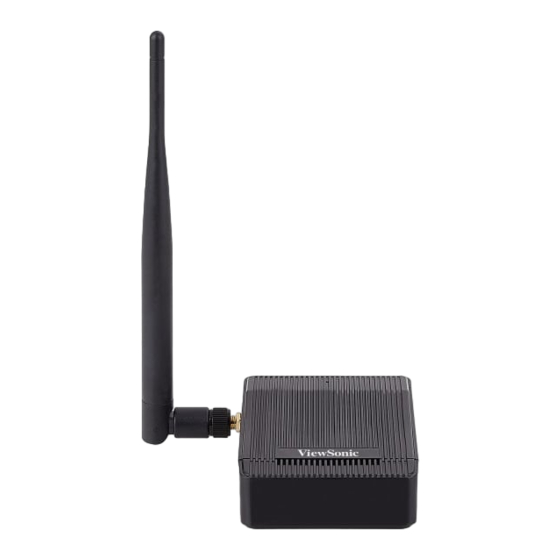
1.3. Physical view and features Wi-Fi Antenna Power/Status Micro USB Port for Reset DC in/ADB HDMI Micro SD USB x 2 Ethernet Wi-Fi Antenna Post Connector 1.4. Installation ATTACH the wireless antenna as shown below, and then screw antenna clockwise onto the post. - Page 10 Attach the player directly to the monitor via HDMI Attach the player on the back of the monitor using Velcro Separate the Velcro pads and stick one of them to the bottom of player. Stick the other Velcro pad onto the back of monitor, and then attach the player to it.
-
Page 11: Configuring The Device
Attach to the VESA mount plate Put the VESA mount plate on the bottom of the player, with the screw holes aligned. Make sure the countersunk holes are facing up, so when the screw goes in, the screw head is level with the surface. 2. -
Page 12: Basic Settings
Note: To enter the menu system at any time during playback, plug in a USB mouse and hold the left mouse key in the corner area as shown below for seconds. * You will be asked for a password if a password has been pre-configured. -
Page 13: Connecting The Device To Your Network
2.3. Connecting the device to your network Wireless connection Click the Wireless LAN setting, and the wireless configuration UI will be launched. (Fig. 2.3.1) Click the ON/OFF button as indicated below to turn the Wireless interface on (Ethernet will be disconnected when the signboard connects to a wireless network). - Page 14 The signboard will scan for wireless signals nearby and available AP stations will be listed. (Fig. 2.3.3) Click on the station name to connect. If the network requires authentication, you will be asked to provide the password for access. (Fig. 2.3.4)
- Page 15 Wired connection To use the wired Ethernet connection, first connect an Ethernet cable then disable the Wireless LAN interface. Click the Wireless LAN setting, the wireless configuration UI will be launched. (Fig. 2.3.1) Click the ON/OFF button as indicated below to turn the Wireless interface off.
- Page 16 DHCP – automatically assign network IP address Turn on the Ethernet interface. For DHCP environments, configuration will be finished in this step. (Fig. 2.3.5) Static IP – manually assign network IP address Click Modify Network to make a static IP configuration. (Fig.
- Page 17 Fill the form and click Connect to complete the setting. (Scroll down/ swipe to see the rest of the menu if needed ) (Fig. 2.3.8)
-
Page 18: Time Zone Settings
2.4. Time zone settings Click Time zone to launch the configuration menu. (Fig. 2.4.1) Click Select time zone. (Fig. 2.4.2) - Page 19 Choose the correct time zone from the available options. (Fig. 2.4.3)
-
Page 20: Content Settings
2.5. Content settings Click the Set content button to launch the configuration menu. (Fig. 2.5.1) Input the content source URL and click on Connect. The signboard will start playback immediately. (Fig. 2.5.2) The player will check the availability of SMIL/HTML5 content URL, with the Play button showing Checking…... - Page 21 (Fig. 2.5.3) If the SMIL/HTML5 content URL is available, the Play button will change to a 15-second countdown and the playback will start after the countdown. The countdown can be canceled by clicking the button. If it keeps showing Checking… for a long time, please go back to Set content to check the correctness of the URL.
-
Page 22: Player Information
2.6. Player information From the signboard you can check the basic information including Health status, Firmware version and Player ID. Click Advanced, and the advanced configuration menu will be launched. (Fig. 2.6.1) Click on Information to view Health Status definitions: Green –... -
Page 23: Content Configuration - Appstart
2.7. Content configuration – AppStart User can assign the URL and App after system start up. Click on the Advanced button. The advanced configuration menu will be launched. (Fig. 2.6.1) Click on Content, and then click AppStart. Enter the valid URL of HTML/SMIL in AppStart. (Fig. 2.7.1) Auto run can be disabled from here. -
Page 24: Content Configuration - Failsafe
2.8. Content configuration – FailSafe The URL and APP can also be assigned once the system has failed to play the assigned content. Click on the Advanced button. The advanced configuration menu will be launched. (Fig. 2.6.1) Click on Content, and then click on FailSafe. Enter the URL of HTML/SMIL/Media RSS in FailSafe. -
Page 25: Display Settings
2.9. Content configuration – USB Update User can enable/disable updates to the playlist through USB storage drive. Click on the Advanced button. The advanced configuration menu will be launched. (Fig. 2.6.1) Click on Content, and then click on USB Update. Enabled: If there is a SMIL folder in the USB drive that has been inserted to the player, the player will download the content to the internal storage and playback automatically. - Page 26 Click on the Advanced button. The advanced configuration menu will be launched. (Fig. 2.6.1) Click on Display/sound, and then click on Display. The Display Settings page will be launched. (Fig. 2.10.1) Click on Resolution and select a suitable resolution from the popup menu.
- Page 27 Brightness Level The default brightness is set to maximum, and it can be adjusted in the Display settings. Click on the Advanced button. The advanced configuration menu will be launched. (Fig. 2.6.1) Click on the Display/sound button, and then click on Display. The Display Settings page will be launched.
- Page 28 Screen orientation Screen orientation allows you to set the display to 90/180/270-degree rotation. Click on the Advanced button. The advanced configuration menu will be launched. (Fig. 2.6.1) Click on Display/sound, and then click on Display. The Display Settings page will be launched. (Fig. 2.10.1) Click on Screen orientation, as marked in red below.
-
Page 29: Sound Settings
2.11. Sound settings To control the output sound volumes and touch sounds: Click on the Advanced button. The advanced configuration menu will be launched. (Fig. 2.6.1) Click on Display/sound, and then click on Sound. The Sound Settings page will be launched. (Fig. -
Page 30: System Configuration - Time Server
2.12. System configuration – Time Server This feature allows the user to synchronize the player’s time with the webserver that is hosting the URL within the AppStart. Click on the Advanced button. The advanced configuration menu will be launched. (Fig. 2.6.1) Click on Scheduling, and then click on Time Server. -
Page 31: System Configuration - Scheduled Reboot
2.13. System configuration – Scheduled reboot Scheduled Reboot allows the signboard to reboot at an assigned time automatically every day. Click on the Advanced button. The advanced configuration menu will be launched. (Fig. 2.6.1) Click on Schedule, and then click on Scheduled Reboot. Click on the Enable daily reboot button to enable/disable the daily reboot function. - Page 32 2.14. System configuration - Firmware Update Firmware updates can be performed by using a USB flash drive. Please read the release notes carefully regarding the changes that will be made to your signboard before applying the upgrade. IMPORTANT: DO NOT unplug the USB drive or turn off the signboard while the system is performing a firmware update.
- Page 33 Manually install package from USB drive Download the latest firmware and copy it to the root directory of a USB drive. Plug the power cord into the device. Plug in a USB mouse to the device to enter the Basic settings menu. Click on the Advanced button.
-
Page 34: System Configuration - Factory Reset
2.15. System configuration - Factory reset If you forget your preset system password, you must reset the system to regain access to the signboard. Power/Status Using the reset button PRESS and HOLD the reset button with a pin. RECONNECT the power cord. WAIT for 16 seconds or until the status LED flashes. -
Page 35: System Configuration - Power Save
2.16. System configuration – Power save Power save allows the signboard to power off automatically from the Basic settings page if no actions occur after 10 minutes. Click on the Advanced button. The advanced configuration menu will be launched. (Fig. 2.6.1) Click on System, and then click on Power save. -
Page 36: System Configuration - Expand Storage
Insert the micro SD card and then check player information. The device will now have an expanded storage capacity. (Fig. 2.17.1) 3. Content Management The NMP309-W is designed to work with 3rd party management solutions. Please refer to the printed guide for related set up instructions. -
Page 37: Authoring In Html5
4. Authoring in HTML5 A major advancement in the NMP309-W media appliance is the ability to playback HTML5 content which can contain dynamic information. 5. Working with SMIL The NMP309-W uses open communications protocols for content presentation and playback control. SMIL-compliance means predictable results across multiple devices, and SMIL’s non-proprietary nature means that your... -
Page 38: Technical Data
6. Technical Data 6.1. Specifications POPAI Screen Media Standards S6 (MPEG-1 SIF, 3Mbps CBR) S7 (MPEG-1 480p, 10Mbps CBR) S8 (MPEG-1 720p, 15Mbps CBR) S9 (MPEG-2 480p, 6Mbps CBR) Video format support S10 (MPEG-2 720p, 12Mbps CBR) S11 (MPEG-4 AVC, 480p, 6Mbps CBR) S12 (MPEG-4 AVC, 720p, 10Mbps CBR) E4 (VC-1/WMV9, MP@ML, 720p) E7 (MPEG-4 ASP, 480p, 10Mbps CBR) - Page 39 8GB on-board flash memory (up to 6 hrs of typical 720p video @ 3 Mbps) Local storage Micro SD card expansion slot HDMI cable (male to female, 35cm) External WiFi antenna @5db AC Adapter Power plug USB power cable (1.2M) Accessories Velcro VESA mount (100 x 100 mm)
-
Page 40: Troubleshooting
If both connections are available, WiFi will be used. What is the maximum file size for a single video file? The maximum video file size for the NMP309-W is 2GB. We recommend reserving a safety margin to avoid exceeding the limit (i.e. limiting files to 1850MB). - Page 41 Why won’t some media files play properly? The video data bit-rate used may have exceeded the recommended bit rate. The video data bit-rate is the amount of video or audio data used per second to store or play the contents, usually expressed in Mbps (mega-bits per second).
- Page 42 Latin America C= http://www.viewsonic.com/ www.viewsonic.com/la/ soporte@viewsonic.com (Mexico) la/soporte/servicio-tecnico Nexus Hightech Solutions, Cincinnati #40 Desp. 1 Col. De los Deportes Mexico D.F. Tel: 55) 6547-6454 55)6547-6484 Other places please refer to http://www.viewsonic.com/la/soporte/servicio-tecnico#mexico Latin America C= http://www.viewsonic.com/ www.viewsonic.com/la/ soporte@viewsonic.com (Peru) la/soporte/servicio-tecnico service@hk.viewsonic. Macau www.hk.viewsonic.com...
- Page 43 Replacement product or parts may include remanufactured or refurbished parts or components. How long the warranty is effective: ViewSonic Network Media Player are warranted for 1 year for labor from the date of the first customer purchase. Who the warranty protects: This warranty is valid only for the first consumer purchaser.
Need help?
Do you have a question about the NMP309-W and is the answer not in the manual?
Questions and answers