Table of Contents
Advertisement
Quick Links
NMP660
Network Media Player
User Guide
IMPORTANT: Please read this User Guide to obtain important information on installing
and using your product in a safe manner, as well as registering your product for future
service. Warranty information contained in this User Guide will describe your limited
coverage from ViewSonic Corporation, which is also found on our web site at http://
www.viewsonic.com in English, or in specific languages using the Regional selection
box in the upper right corner of our website. "Antes de operar su equipo lea cu
idadosamente las instrucciones en este manual"
Model No. VS17358
Advertisement
Table of Contents

Related Manuals for ViewSonic NMP660


Summary of Contents for ViewSonic NMP660
- Page 1 Warranty information contained in this User Guide will describe your limited coverage from ViewSonic Corporation, which is also found on our web site at http:// www.viewsonic.com in English, or in specific languages using the Regional selection box in the upper right corner of our website.
- Page 2 Thank you for choosing ViewSonic As a world leading provider of visual solutions, ViewSonic is dedicated to exceeding the world’s expectations for technological evolution, innovation, and simplicity. At ViewSonic, we believe that our products have the potential to make a positive impact in the world, and we are confident that the ViewSonic product you have chosen will serve you well.
-
Page 3: Ce Conformity For European Countries
Compliance Information FCC Statement This device complies with part 15 of FCC Rules. Operation is subject to the following two conditions: (1) this device may not cause harmful interference, and (2) this device must accept any interference received, including interference that may cause undesired operation. -
Page 4: Declaration Of Rohs2 Compliance
If the batteries, accumulators and button cells included with this equipment, display the chemical symbol Hg, Cd, or Pb, then it means that the battery has a heavy metal content of more than 0.0005% Mercury or more than, 0.002% Cadmium, or more than 0.004% Lead. -
Page 5: Table Of Contents
Contents Compliance Information FCC Statement ..................i CE Conformity for European Countries ..........i Declaration of RoHS2 Compliance ............ii Copyright Information For Your Records ................1 1. PRODUCT OVERVIEW Package contents ................2 Front view ................... 3 Rear View ................... 3 Status indicators ................. - Page 6 4. Operting the Chromebox Navigating the desktop ..............11 Managing apps ................. 11 Wireless connections ............... 12 Connecting to a wireless access point ..........12 Connecting to Bluetooth devices ............12 Adjusting volume ................12 Configuring Chromebox settings ............13 Finding help ..................
-
Page 7: Copyright Information
Purchase Date: _______________________________________ Product disposal at end of product life ViewSonic respects the environment and is committed to working and living green. Thank you for being part of Smarter, Greener Computing. Please visit ViewSonic website to learn more. USA & Canada: http://www.viewsonic.com/company/green/recycle-program/ Europe: http://www.viewsoniceurope.com/eu/support/call-desk/... -
Page 8: Product Overview
1. PRODUCT OVERVIEW Package contents Please take a moment to check if all the necessary items are included in the package. If anything is missing or damaged, please contact your dealer immediately. NMP660 Power adapter Power cord... -
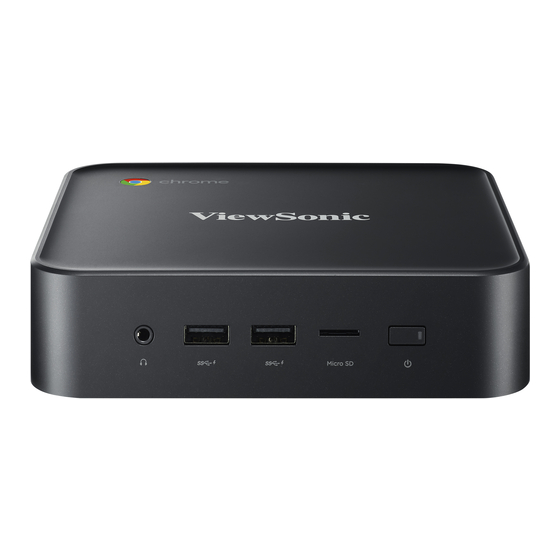
Page 9: Front View
Front view Description Description Audio jack (3.5mm) Power button with LED (2) USB type-A 3.0 ports* Kensington lock port MicroSD™ card reader Reset hole Note: *Supports battery charging. Rear View 4 5 6 1 2 3 5 6 7 8 Description Description LAN port*... -
Page 10: Status Indicators
Status indicators Indicator Color Status Description Power button Chromebox is switched on. White Chromebox is switched off. Flashing Activity on the link. Orange No activity on the link. LAN port Active link connection. Green No link connection. -
Page 11: Getting Started
2. Getting Started Connecting the AC power To connect your Chromebox to the power outlet, do the following: Connect one end of the power cord to the AC adapter and the other end to the power outlet. Connect the AC adapter to the DC-in jack of your Chromebox. Connecting a display device To establish the connection, you need to use an HDMI cable (not supplied). -
Page 12: Connecting A Mouse And Keyboard
Connecting a mouse and keyboard Your Chromebox supports both wired and wireless mouse and keyboard. Connecting a mouse and keyboard Connect the USB mouse and USB keyboard to the USB2.0 ports of your Chromebox. Connecting a wireless mouse and keyboard Connect the USB receiver that is supplied with your wireless mouse and keyboard to the USB port of your Chromebox. -
Page 13: Performing Additional Connections
3. Performing additional connections Connecting audio components Connect the audio component into the audio jack of your Chromebox. Connecting to local area network (LAN) Connect one end of the RJ-45 cable to the LAN port of your Chromebox. Connect the other end of the RJ-45 cable to a network connection device or a network wall connector. -
Page 14: Inserting A Memory Card
Inserting a memory card Note: Your Chromebox supports MicroSD™ cards. With the gold contacts facing down, insert the memory card into the card reader. Push the memory card all the way until you hear a locking sound. Connecting USB devices Note: Your Chromebox supports USB2.0, USB3.0, and USB type-C. -
Page 15: Mounting The Chromebox
Mounting the Chromebox Mount the Chromebox to the back of your display device. Note: Make sure your display device supports VESA mounting. Refer to the following illustration for size measurements: 100 mm 75 mm Secure the mounting plate (optional accessory) to the VESA mounting holes behind your display device with the four screws. -
Page 16: Powering On Your Chromebox
Align and install your Chromebox to the screw holes in the mounting plate. Powering on your Chromebox To power on your Chromebox, press the Power button on the front panel. The Power button LED lights solid white. After you power on the Chromebox for the first time, you are asked to configure some device’s basic settings, such as set the language, configure accessibility options, connect to the network, and finally sign in to your Chromebox. -
Page 17: Operting The Chromebox
4. Operting the Chromebox Navigating the desktop After the initial setup is configured, you will see the desktop. Click on any of the following items: • Launcher: Manage installed apps and perform search. • App launcher: Access most frequently used apps quickly. •... -
Page 18: Wireless Connections
Wireless connections Connecting to a wireless access point Click anywhere on the Status tray to open the tray. Click on next to the network icon. Click on . The Settings page opens. In Settings > Network > Wi-Fi menu, enable Wi-Fi and click on to select a desired access point. -
Page 19: Configuring Chromebox Settings
Configuring Chromebox settings Click anywhere on the Status tray to open the tray. Click on . The Settings page opens. Configure any of the following: • Network > Ethernet: LAN connection parameters. Note: Make sure your Chromebox is connected to the LAN. Refer to page 15. •... -
Page 20: Finding Help
• Appearance > Show Home button: Configure displaying Home button settings. • Appearance > Show bookmarks bar: Enable or disable displaying bookmarks bar on web browser. • Appearance > Font size: Set the font size. • Appearance > Customise fonts: Click to customise fonts. •... -
Page 21: Troubleshooting
5. Troubleshooting If you experience a problem with your Chromebox, refer to the following troubleshooting guide. If a problem persists, contact the service center. The power is switched on, but Chromebox does not start: • Make sure that the AC adapter is properly plugged into the DC-in jack of the Chromebox and to the power outlet. -
Page 22: Specifications
6. Specifications Item Description Processor CPU Intel Celeron 3865U Dual Core 1.8GHz BGA 2MB L3 HD 610 Operating system Google Memory 4G DDR4, 2 slots Memory type 2133 DDR4 SODIMM (DDR4-2133) Storage Storage capacity Storage type 2242 type Gigabit Networking 10 / 100 / 1000M GbE LAN 802.11ac, BT Combo (2x2) Intel Stone Peak 2 D1 7265 ac 2x2 +Bluetooth 4.2... -
Page 23: Other Information
C= http://www.viewsonic.com/la/ Latin America www.viewsonic.com/la/ soporte@viewsonic.com soporte/servicio-tecnico Nexus Hightech Solutions, Cincinnati #40 Desp. 1 Col. De los Deportes Mexico D.F. Tel: 55) 6547-6454 55)6547-6484 Other places please refer to http://www.viewsonic.com/la/soporte/servicio-tecnico#mexico Macau www.hk.viewsonic.com T= 0853-28338407 service@hk.viewsonic.com Middle East ap.viewsonic.com/me/ Contact your reseller service@ap.viewsonic.com... -
Page 24: Limited Warranty
If a product proves to be defective in material or workmanship during the warranty period, ViewSonic will, at its sole option, repair or replace the product with a like product. Replacement product or parts may include remanufactured or refurbished parts or components. - Page 25 Tel: (52) 999-925-1916 Tel: 01(52)95-15-15-22-22 E-Mail: rrrb@sureste.com Fax: 01(52)95-15-13-67-00 E-Mail. gpotai2001@hotmail.com Tijuana: FOR USA SUPPORT: ViewSonic Corporation Av Ferrocarril Sonora #3780 L-C 10 Pointe Dr. Suite 200. Brea, CA. 92821, UY.S.A Col 20 de Noviembre Tel: 800-688-6688 Tijuana, Mexico E-Mail: http://www.viewsonic.com...
Need help?
Do you have a question about the NMP660 and is the answer not in the manual?
Questions and answers