Table of Contents
Advertisement
Quick Links
Advertisement
Table of Contents

Related Manuals for Dexcom ONE


Summary of Contents for Dexcom ONE
- Page 1 Getting Started with receiver This is abbreviated instruction. For detailed instructions on how to use the Dexcom ONE Continuous Glucose Monitoring (CGM) System, refer to your instructions for use. Screens are representational only. Your product may look different...
- Page 2 • Inserting your sensor and attaching your transmitter • Starting your sensor and completing your 2-hour warmup • What you will see on your Dexcom ONE receiver • Features of the Dexcom ONE receiver • Removing your sensor and replacing transmitter •...
- Page 3 • Take action to help avoid high or low glucose values • No fingersticks* needed to make diabetes treatment decisions * If your glucose alerts and readings from Dexcom ONE do not match symptoms or expectations, use a blood glucose meter to make diabetes treatment decisions.
- Page 4 Setting Expectations • Two different types of body fluids: interstitial fluid (measured by Dexcom ONE) and blood (measured by blood glucose meter) • Readings can be different and still be considered accurate...
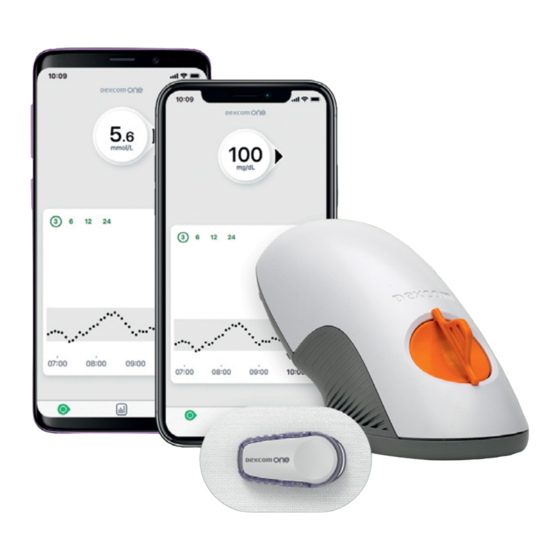
- Page 5 Applicator with built-in Sensor • Applicator inserts the sensor wire under your skin • Sensor gets glucose information • Wear for up to 10 days Transmitter • Sends glucose information from sensor to Dexcom ONE receiver • Use for 3 months...
- Page 6 Receiver Navigation The receiver screen tells you which button to use: • To scroll faster hold down the Scroll button • To move to next field, use the Select button Scroll Up Go Back Select Scroll Down...
-
Page 7: Receiver Setup
Receiver Setup • To turn the receiver on press and hold the Select button for 3-5 seconds. • Click Next to review and accept the terms of use and privacy policy in order to continue the setup and further usage. •... - Page 8 Receiver Setup: Educational Screens The receiver setup will walk you through a series of educational screens to learn about safety, treatment decisions and trend arrows. Then the receiver provides information on alerts and how to read the home screen.
- Page 9 Enter Transmitter SN • During the receiver setup, you will be prompted to enter your transmitter serial number (SN) • The transmitter SN is printed on the bottom of the transmitter and on the side of the transmitter box.
- Page 10 Enter Sensor Code • Then enter the sensor code. • The 4-digit code can be found on the applicator.
- Page 11 Insert Sensor and Attach Transmitter • Choose site for insertion. • Avoid: • Bones • Irritated skin • Tattoos • Areas that get bumped • Clean site with an alcohol wipe and let it air dry. • After sensor insertion, attach the transmitter.
-
Page 12: Inserting The Sensor
Inserting the Sensor Wash hands and sensor site with soap. Fold and break off Dry. Scrub sensor safety guard. Do not site with alcohol wipe. twist. Peel off adhesive backings from applicator. Press button to insert Do not touch adhesive. sensor. -
Page 13: Attaching The Transmitter
Once the transmitter is snapped in you can shower or swim as usual, but for best adhesion you might want to wait awhile before getting the patch wet § § Dexcom ONE sensor and transmitter are water-resistant and may be submerged under 2.4 meters of water for up to 24 hours without failure, when properly installed. - Page 14 Sensor Insertion confirmation and Transmitter Pairing In your receiver, select Sensor inserted and transmitter attached. Then wait for the transmitter to pair.
-
Page 15: Sensor Warmup
Sensor Warmup • Once communication is confirmed with the transmitter, the 2-hour sensor warmup will start. • There will not be any readings or alerts until warmup is done. • Keep receiver within 6 metes of the transmitter during the warmup. - Page 16 Beginning of Trend Graph • After the 2-hour warmup your first reading will appear • The receiver must be within 6 meters to receive glucose information. First Reading First Reading...
-
Page 17: Home Screen
Home Screen Bluetooth Charging Indicator Battery Current Glucose Trend Arrow High Glucose Alert Level Trend Graph Current Glucose Low Glucose Alert Level... - Page 18 Low Alert • You may choose to turn on Low Alert during setup. • Or change by going to Menu > Settings > Alerts > Low • Low alert will be activated when sensor reading is at or below the Low Alert level.
-
Page 19: High Alert
High Alert • You may choose to turn on High Alert during setup. • Or change by going to Menu > Settings > Alerts > High • High alert will be activated when sensor reading is at or above the High Alert level. - Page 20 Delay 1st High Alert If your sensor readings tend to be high after meals, your healthcare professional may advise you to delay your first High Alert to give your insulin a chance to work. • To set up Delay 1 High Alert, go to Menu >...
-
Page 21: Alert Sounds
Alert Sounds • You can change the alert sound under Menu > Settings > Alert Sounds... - Page 22 Glucose Summary Reports • The receiver shows summary reports of glucose information over the last 3, 7, 14, 30, and 90 days. • The reports can be used to spot trends and Average Glucose opportunities. mmol/L • To view reports, go to Menu >...
- Page 23 Sensor Transition • Your sensor expires automatically after 10 days. • Your receiver will alert you 24 hours, 6 hours, 2 hours and 30 minutes before this happens. • You might wait till the sensor session ends automatically or end it manually. •...
- Page 24 Removing Sensor and Transmitter 1. Peel the patch off 2. Bend and break the 3. Slide transmitter like a bandage lip to release the straight out of transmitter transmitter holder Keep transmitter for next sensor session...
- Page 25 3 weeks, 2 weeks left and then 1 session left. When the transmitter has less than one sensor session of battery life left, you will not be able to use it to start a new sensor session...
-
Page 26: Receiver Maintenance
Receiver Maintenance • Keep your receiver clean and dry. • Do not submerge the receiver in water or get dirt or water in the USB port. That could damage the receiver. To turn the receiver off go to Menu > Power Off... - Page 27 Receiver Product Specifications Memory Storage 180 days of glucose data Battery Longevity (Typical) 7 days Battery Charging Time Approximately 3 hours Operating Altitude -382 meters to 5,000 meters Data Communication Range 6 meters...
- Page 28 Diabetes Treatment Decisions No number or arrow? Always Symptoms don’t match readings? use your blood glucose meter. Use your blood glucose meter.
- Page 29 Security and Travel Use walk-in metal detectors Don’t use full Don’t put components or be hand-wanded body scanners through baggage x-ray machines...
-
Page 30: Any Questions
Any Questions? Take advantage of training videos where you can learn at your own pace and enhance your learning experience. Available on the Dexcom website. - Page 31 Dexcom, Dexcom One, Dexcom G6, Dexcom G7 and Dexcom CLARITY are registered trademarks of Dexcom, Inc. in the United States and/or other countries. ©2022 Dexcom, Inc. All rights reserved. LBL-1000985 Rev001...
Need help?
Do you have a question about the ONE and is the answer not in the manual?
Questions and answers