Table of Contents
Advertisement
Quick Links
Advertisement
Table of Contents

Related Manuals for GCC Technologies JV-240UV


Summary of Contents for GCC Technologies JV-240UV
- Page 1 JV-240UV User Manual http://www.GCCworld.com GCC Club V.2 2018 Sep.
- Page 2 JV-240UV User Manual Dear Sir / Madam, Thank you for choosing GCC and the JV-240UV Varnish Printer. You can be assured that this machine meets the highest safety standards while using technological innovations shared by no other UV printer. JV-240UV Varnish Printer is backed by GCC, a truly international company that is dedicated to help your business grow.
- Page 3 JV-240UV User Manual Release Note Version Change V.1 2017 Nov. Add 6.8 How to replace alignment rule V.2 2018 Dec. Use the lamilator with decurling device to keep the sheet flat Add 5.1.1 Add 5.1.6 How To Make Varnish Grayscale...
-
Page 4: Table Of Contents
Chapter 4 Control Panel ........................23 4.1 Control Panel Workflow ....................23 4.1 Control Panel Layout Description ................30 Chapter 5 Operating the JV-240UV ....................36 5.1 Hardware Operation ....................36 5.1.1 How to Set Flatbed Printing Mode ..............36 5.1.2... - Page 5 How To Pause/Clean/Delete The Job While Printing ........58 5.2 Tuning and Testing Procedure .................. 60 5.2.1 Read machine parameter values ................. 60 5.2.2 Introduction of JV-240UV VLCD .................. 61 5.2.3 Preliminary Calibration Parameters ................ 64 Chapter 6 Maintenance And Basic Service .................. 70 6.1 Check Remaining Ink and Refill Ink .................
-
Page 6: Chapter 1 Introduction
JV-240UV User Manual Chapter 1 Introduction 1.1 Warning These symbols are applied in the user manual for the safety precaution and to prevent equipment from damage. These symbols are informational notice. Please do understand meanings for each of these symbols and its related safety precautions prior operate the equipment. -
Page 7: Inks Safety Information
JV-240UV User Manual Ground Wire The symbol indicates the machine should be grounded before conducting any maintenance or cleaning operation due to possible electrostatic discharge. Printing The symbol indicates that during Warning the printing process do not put your hands in the printing area to avoid injury. -
Page 8: First-Aid Measures
JV-240UV User Manual Can cause dermatitis or irritation that may last for hours or days, but unlikely Skin to result in permanent harm. Can cause severe irritation, tearing, and burns that may eventually lead to permanent impairment, including blindness. Can cause severe irritation to mouth, throat, and stomach, may further inflict Swallow abdominal discomfort, nausea, vomiting and diarrhea. -
Page 9: Ink Operating And Storage Environment
* Please do ensure the ink storage temperature and humidity. Equipment Installation Precautions GCC JV-240UV shall be installed in a relatively clean, free from dust environment and the surface for the equipment to be installed shall be stable and flat. We suggest that you install the equipment in an air-conditioned environment to control the appropriate temperature and humidity. - Page 10 JV-240UV User Manual The operation environment for this equipment: 22 to 30°C (71.6°F to 86°F) 40% to 60% (humidity) Avoid locations with strong Avoid locations with vibration Avoid locations with flame air current...
-
Page 11: Chapter 2 Main Body Instruction
JV-240UV User Manual Chapter 2 Main body instruction JV-240UV spot varnish printer can be used in the materials of coated art paper, Curious Metallic Paper and rigid material, which is in line with your application/design of customized spot varnish printer. -
Page 12: Jv-240Uv Appearance
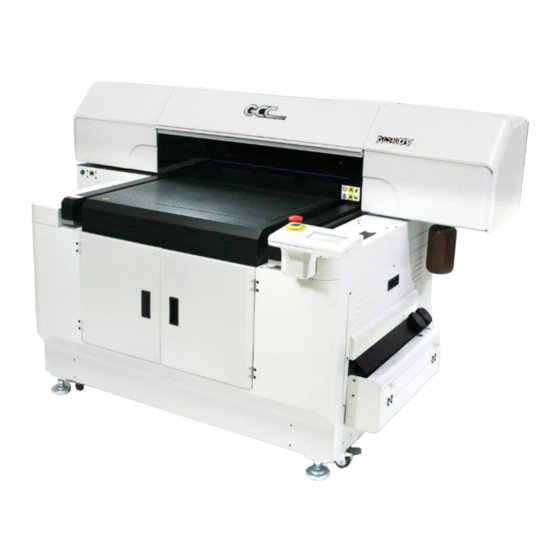
JV-240UV User Manual 2.1 JV-240UV Appearance 2.1.1 JV-240UV Front View M. Toolbox L. CCD K. Print head set A. Maintenance J. Printing area B. Barometer I. Waste ink bottle C. LED lamp H. Touch screen control panel D. Alignment ruler G. -
Page 13: Jv-240Uv Rear View
JV-240UV User Manual 2.1.2 JV-240UV Rear view T. Side cover N. Rear door O. Fuse P. Power socket Q. USB R. Ethernet S. Power switch... -
Page 14: Jv-240Uv Parts Description
(Please follow the local regulations to dispose the waste ink to prevent contaminating the environment) J. Printing Area The area where JV-240UV conducts the inkjet printing. K. Print Head Set Printing graphic image L. CCD CCD. -
Page 15: Chapter 3 Installation Procedure
JV-240UV User Manual Chapter 3 Installation Procedure 3.1 Machine Setup 3.1.1 Turn On The Power Step 1 Please check the ink chip is inserted properly into the corresponding slot. Step 2 Pour the Varnish into a large ink bottle labeled with a V label Step 3 Please plug in the power socket and turn on the power switch Note: Please wait for 5 seconds to turn on/turn off the power if you need to restart the machine. -
Page 16: Set Ink Flow To Printer Heads
JV-240UV User Manual 3.1.2 Set Ink Flow To Printer Heads Step 1 Remove the thumbscrew and open the left cover. Step 2 Open the ink valve. Ink valve is opened Ink valve is closed Step 3 2. Select MENU 3. Select MAINTENANCE 4. - Page 17 JV-240UV User Manual Step 4 Ink install flow: Start Ink Install Procedure? ENTER CANCEL 1.Empty waste ink bottle. 2.Open the ink valves of print Head. ENTER CANCEL Open the ink valves of ink bottle as shown ENTER CANCEL Insert the chips of each color. Do not...
-
Page 18: Install Jv-240Uv Vlcd
JV-240UV User Manual 3.2 Install JV-240UV VLCD Install CCD driver 3.2.1 Step 1 Insert JV-240UV installation disk, select JV-240UV-CcdLibrary.exe and perform installation Step 2 Select Next Step 3 Select installation path and then select Next Step 4 Select Next... -
Page 19: Install Plugininstall Driver
JV-240UV User Manual Step 5 Complete the JV-240UV-Ccd installation 3.2.2 Install PlugInInstall driver Step 1 Select CCDMarkPlugin.exe and perform installation Step 2 Select Install (The computer must have installed Corel Draw/Illustrator) Step 3 Select OK Step 4 Select OK... - Page 20 JV-240UV User Manual Step 5 Select OK, complete the CCDMarkPlugin installation...
-
Page 21: Set The Ip Address Of The Spot Varnish Printer
Step 5 Start (VLCD) and Press Open option Step 6 In the IP Address field of (VLCD), input the same values as those in the IP ADDRESS of the touch panel, and click Save. Step 7 Restart JV-240UV VLCD and the setting is complete. -
Page 22: How To Calibrate Ccd Mark Detection
Step 1 Place the material printed with Mark dot on the origin of the XY coordinates of the spot varnish printer Step 2 Select Move To Mark, JV-240UV spot varnish printer will start CCD automatically and move to Mark point... - Page 23 JV-240UV User Manual Step 3 At Learn ROI in CCD window, move the square frame to the average of the black Mark, and select Learn Mark Note:In CCD window, user can fine tune the Learn ROI through arrow keys Note:CCD brightness control can be implemented through Light Level pull-down menu, after the...
-
Page 24: Chapter 4 Control Panel
JV-240UV User Manual Chapter 4 Control Panel This section mainly describes JV-240UV Varnish Printer’s touch screen control panel, work flows and key operations. Control Panel Workflow Operating work flow:... - Page 25 JV-240UV User Manual Operating work flow:...
- Page 26 JV-240UV User Manual Control panel flow: USER SET NOZZLE CHECK POWER SAVE VACUUM SYSTEM INFO OPTION AUTO CLEANING MANUL CLEANING INK REMAINIING MAINTENANCE NETWORK RESTORE PH GAP AUTO DETECTION PARAMETER: DEFAULT SET1 VACUUM SET3 SET2 LED POWER X:_______ Y:_______ NORMAL POWERFUL MANUL CLEANIING:YES...
- Page 27 JV-240UV User Manual Operating work flow:...
- Page 28 JV-240UV User Manual Control panel flow: REAR: FRONT:...
- Page 29 JV-240UV User Manual Operating work flow: Control panel flow: IP:192.168.102.249 Sub Mask:255.255.255.0 Gateway:192.168.102.250 RESTORE DEFAULT:YES MAC Address: 00:CF:52:72:03:01...
- Page 30 JV-240UV User Manual PAUSE while printing: Users can pause on the printing job by pressing the PAUSE button and proceed to cleaning procedure to improve printing quality. Operating work flow: Control panel flow:...
-
Page 31: Control Panel Layout Description
JV-240UV User Manual 4.1 Control Panel Layout Description Control Panel Layout Description Function Description Setting Default Media sizing To hold the sheet media flat onto ON/OFF the work area by vacuum force; when the function is on, the vacuum will work when printing,... - Page 32 JV-240UV User Manual Perform print head nozzles checking NOZZLE CHECK → MENU CLEANING Normal print head cleaning NORMAL Powerful print head cleaning POWERFUL → MENU MANUL CLEANING When cleaning the print head manually, the cartridge will move to maintenance area on the left hand side automatically for cleaning.
- Page 33 JV-240UV User Manual → MENU VACUUM Vacuum function is to ensure ON/OFF material’s flatness. This setting can be enabled or disabled. Default is enabled. If choose disable, then VACUUM there will be no vacuum sucking during the printing operation. →...
- Page 34 JV-240UV User Manual Ink-drain flow → MENU SYSTEM INFO MODEL:Display the equipment dimension and model based on factory version settings FW:Display Firmware version serial number based on factory version SYSTEM INFO settings. FPGA:Display FPGA version serial number based on factory version settings.
- Page 35 JV-240UV User Manual IP address IP ADDRESS MAC address MCA ADDRESS → MENU RFACTORY DEFAULT Reset machine setting to factory default. FACTORY DEFAULT → MENU PH GAP AUTO DETECTION Automatically detect the gap between print head and media. PH GAP AUTO DETECTION MENU→...
- Page 36 JV-240UV User Manual PAUSE while printing Description → PRINT LED LAMP Set LED Lamp Curing energy while ON/OFF printing LED LAMP → PRINT CANCEL JOB Delete current print job CANCEL JOB → PRINT PAUSED Normal print head cleaning NORMAL CLEANING...
-
Page 37: Chapter 5 Operating The Jv-240Uv
JV-240UV User Manual Chapter 5 Operating the JV-240UV 5.1 Hardware Operation 5.1.1 How to Set Flatbed Printing Mode NOTICE: The factory setting of the height between print media and print head is 3mm. If the height between print media and print head is more than 3mm, it may cause ink droplet misting or splashing and lead to a grainy and uneven printing. -
Page 38: How To Set Ph Gap Auto Adjustment Mode
JV-240UV User Manual 5.1.2 How To Set PH Gap Auto Adjustment Mode The PH Gap Auto Adjustment mode: It is suggested to set the settings to be “ON” (the default setting). Turning on the PH Gap Auto Adjustment mode provides the fastest way for users to start printing on the media of which the surface may be not flat or even, and the definite highest position of the media for AMC cannot easily be found. - Page 39 JV-240UV User Manual Workflow A. Set the “PH Gap Auto Adjustment” to be “ON” on control panel: (The default setting)
- Page 40 JV-240UV User Manual B. Set the “PH Gap Auto Adjustment” to be “OFF” on the control panel:...
-
Page 41: How To Print On Rigid Material
Please load the rigid material correctly according to following steps. Step 1. Entre FLATBED mode. Step 2. Select MENU. Step 3. Select USER SET. Step 4. Select DEFAULT and select BACK icon . Step 5. Place print media on the lower right corner of the platen of JV-240UV. (CAUTION) - Page 42 JV-240UV User Manual Step 6. Select LOAD MADIA, and then adjust the height of platen of JF-240 to proper position. (Note: the printing side should always be adjusted BELOW the print head.) Step 7. Select AMC to autamatically detect the height between print media and print head.
- Page 43 JV-240UV User Manual Step 5. Place print media on platen of JV-240UV. Step 6. Select LOAD MADIA, and then adjust the height of platen of JF-240 to proper position. (Note: the printing side should always be adjusted BELOW the print head.) Step 7.
-
Page 44: How To Make A Varnish File
JV-240UV User Manual How to make a Varnish file 5.1.4 Note:Varnish solution is to print a thin and uniform transparent layer on the surface of the printed matter, and then to be solidified by UV. The varnishing can protect the printing pattern and increase its scratch resistance. - Page 45 JV-240UV User Manual Step 3 Margin(10~50mm) setting:10mm, Size(3~10mm) setting:5mm Step 4 Complete the 4 Mark points and open the finished Varnish layer Note:Varnish layer is suggested to be filled with black Step 5 Select File→Export→Export As…..
- Page 46 Step 6 Save as Tiff file, set the settings in TIFF Options window then click OK. Color Model:Grayscale Resolution:Other、720ppi Anti-aliasing:None Check LZW Compression Step 7 Open JV-240UV VLCD and click Add job Step 8 Select the .tiff file that just created and click Open...
- Page 47 JV-240UV User Manual Step 9 Right click on the file and click Job Properties Step 10 Select AAS Scan type: 4 Markers Step 11 Select print mode parameters → OK...
- Page 48 Shape Pinning: It can improve some material printing Varnish easily overflowing, to effectively prevent the Varnish overflowing printing scope. Step 12 Select the file, and then select Send Step 13 Complete the setting of JV-240UV spot varnish printer and start printing CorelDraw Example: Step 1 Build Varnish images...
- Page 49 JV-240UV User Manual Step 2 Select Tools→ Macro→ Run Macro…, select GlobalMacros (JV-240UV_CCD_Mark.gms), and then select→ Run Step 3 Thickness(5~10mm) setting:5mm, Margin(10~50mm) setting:10mm Explanation:Make By Object:Select the locating point at the edge of the object...
- Page 50 JV-240UV User Manual Make By Page:Select the locating point at the page Step 4 Complete the 4 Mark points and open the finished Varnish layer Note:Varnish layer is suggested to be filled with black Step 5 After the Varnish layer is opened, select File→Export→select Save as type:Tiff Step 6 Set Resolution in Convert to Bitmap window:720dpi, Color mode:Grayscale(8bit), select OK,...
-
Page 51: How To Create Custom Pattern For Varnish Printing
JV-240UV User Manual Step 7 Please refer to 5.1.4 “How to make the glazing printing file”, Step 8~13 How to build Add job in JV-240UV VLCD 5.1.5 How To Create Custom Pattern for Varnish Printing Users are allowed to use graphic design software to create a preferred pattern and apply it for varnish printing to produce unique effect on the print media. - Page 52 JV-240UV User Manual 2. Select Pixels in Units column and set Width/Length value. The Width/Length value must be a multiple of 8, i.e. 8 x 8 or 160 x 160 pixels 3. Create a desired pattern.
- Page 53 JV-240UV User Manual 4. Save the file as .tiff format and .jpeg format. 5. Save the .tiff file to the location C:\Program Files (x86)\FlexiPRINT 10.5.1 GCC Edition\Program\GCCJF240UV\TestPattern\Varnish\Mark 6. Save the .jpeg file to the location C:\Program Files (x86)\FlexiPRINT 10.5.1 GCC Edition\Program\GCCJF240UV\TestPattern\Varnish\Preview 7.
-
Page 54: How To Make Varnish Grayscale
JV-240UV User Manual 5.1.6 How To Make Varnish Grayscale Step 1 Open Photoshop Step 2 Create a new file and set the parameter. Note:Resolution 720dpi、Color Mode: Grayscale Step 3 Use Gradient Tool to fill the color... - Page 55 JV-240UV User Manual Step 4 Go to Image → Mode → Bitmap… Step 5 Set the Output: 720, Method: select Diffusion Dither, and then click ok. Step 6 Complete gradient grayscale...
- Page 56 JV-240UV User Manual Step 7 Go to file → Save Step 8 Define the file name and select file type as TIFF and click Save. Step 9 The process is complete.
-
Page 57: Simplified Output Procedure
JV-240UV User Manual 5.1.7 Simplified Output Procedure Basic Output Message Please make sure test tuning / printing / quality / LED lamp are ok. Note: The tuning setting confirmation prior machine printing is very important; please double check to ensure they are correct. -
Page 58: Check Print Head Condition
3. Set X and Y coordinates of NOZZLE CHECK pattern on the material and select CONFIRM. Step 2. JV-240UV will execute Nozzle Check automatically to ensure the print head quality. If there is blocked pixel in print head, recommend to conduct following steps:... -
Page 59: How To Pause/Clean/Delete The Job While Printing
JV-240UV User Manual Step 3. Conduct normal cleaning (Suggest for first time cleaning). If the problem persisted, please repeat the cleaning process. 1. Select MENU on the control panel. 2. Select CLEANING 3. Select NORMAL and the machine will proceed to NORMAL Cleaning. - Page 60 JV-240UV User Manual Pause while printing: Step 1. Select PASUE on the control panel. Step 2. To resume the job, press PAUSE button on the control panel again to continue the job. Clean while printing: (when cleaning print heads is required while printing) Step1: Select PAUSE button on the control panel.
-
Page 61: Tuning And Testing Procedure
Follow the steps below to read the parameters from the machine when operating the machine for the first time. Step 1 Start JV-240UV VLCD, press Open option and select “Parameters backup from machine”, and then JV-240UV VLCD will automatically read the parameters from the machine. -
Page 62: Introduction Of Jv-240Uv Vlcd
JV-240UV User Manual 5.2.2 Introduction of JV-240UV VLCD GCC JV-240UV Spot varnish printer VLCD Introduction Job Properties Quality Mode Production Quality Light Density Print Direction Uni directional: Uni directional printing mode Bi directional: Bi-directional printing mode AAS Scan Type None: No AAS detection before printing... - Page 63 JV-240UV User Manual count Print Varnish OPEN Activate the spot varnish printer connection CLOSE Deactivate the spot varnish printer connection IP ADDRESS IP address SAVE Store the IP address Add job Add job menu Send Send job menu Stop Stop job menu...
- Page 64 JV-240UV User Manual Over Print:a number of layers will be printed The parameter adjustment of the inkjet Color Offset head one way alignment correction, to select one way is to print the image from right to left, so as to confirm the accuracy of one-way set.
-
Page 65: Preliminary Calibration Parameters
This calibration is primarily used to ensure the uni-directional / bi-directional printing precision. Uni-Directional Calibration: 1. Start JV-240UV VLCD, select Color Offset→Color Offset and press Print 2. JV-240UV will automatically start Color Offset Test Pattern printing Following are horizontal alignment calibration examples: 3. - Page 66 JV-240UV User Manual Step 1 Use a magnifying glass to observe that the V2 color and black lines are aligned to the "-3" line. Please record this number. Step 2 Use a magnifying glass to observe that the V3 color and black lines are aligned to the "+5"...
- Page 67 JV-240UV User Manual Bi-Directional Calibration: 1. Start JV-240UV VLCD, select Color Offset→Bidirectional offset and press Print 2. JV-240UV will automatically start Color Offset Test Pattern printing 3. Select Color Offset Offset→ Bidirectional offset option...
- Page 68 JV-240UV User Manual Following are horizontal alignment calibration examples: 4. Use black to correct other colors. 5. A total of 32 correction lines will be displayed on the horizontal calibration pattern, and the numbers are showed from left to right with the 16th line (0) showing the initial number.
- Page 69 JV-240UV User Manual Step 1 Use a magnifying glass to observe that the V1 color and black lines are aligned to the "-3" line. Please record this number. Step 2 Use a magnifying glass to observe that the V2 color and black lines are aligned to the "+5"...
- Page 70 JV-240UV User Manual...
-
Page 71: Chapter 6 Maintenance And Basic Service
JV-240UV User Manual Chapter 6 Maintenance And Basic Service This chapter provides the basic maintenance information for the JV-240UV Varnish printer (i.e. clean up operations for the flatbed printer). Other than the operations described here, the rest of the service must be carried out by trained maintenance professionals. -
Page 72: How To Replace Bulk Ink
JV-240UV User Manual 6.1.2 How To Replace Bulk Ink When the Ink runs out, the touch panel appears the indicate “Ink run out”. Please immediately pour in a new ink. (Make sure that the ink bottle is marked in the same color as the poured ink before pouring in) Note : Be caution when replace the ink bottle: 1) Please install the ink bottle to the position according to the color label. -
Page 73: Daily / Weekly / Monthly Maintenance
JV-240UV User Manual 6.2 Daily / Weekly / Monthly Maintenance 6.2.1 Ink Print Head Cleaning Required daily cleaning: Check whether the print head in good condition. It is required to use sponge swabs with Cleaner (26501007G) to clean print head and print head area everyday. -
Page 74: How To Turn On/Off Power Save Function
The function of POWER SAVE is to save energy. When the device idles longer than a set period of time, JV-240UV will automatically enter POWER SAVE mode. Select POWER SAVE on the control panel to activate POWER SAVE and press it again to deactivate it. -
Page 75: How To Dispose Waste Ink Bottle
JV-240UV User Manual 6.2.3 How To Dispose Waste Ink Bottle When the waste ink bottle is full, control panel will display “Waste ink bottle is full” message. It is recommended that remove the waste ink bottle and dispose the waste ink to a waste ink collecting area. -
Page 76: Cleaning
Warning: Do not use gasoline, alcohol, or solvent … etc. flammable materials, as they are abrasive and hazardous, and could damage the equipment. Note: Please make sure power and ink valve are turned off and JV-240UV is done the printing job before cleaning process starts. -
Page 77: Print Head Maintenance And Clean Up
JV-240UV User Manual 6.3 Print Head Maintenance And Clean Up Print head maintenance and clean up are important to ensure machine printing quality. Generally it can be divided into daily maintenance and periodically maintenance. Required daily maintenance: Apply automatic basic cleaning up maintenance. - Page 78 JV-240UV User Manual Step3 Press the clip of ink valve to close it and turn off the machine. Step4 Switch on the ink tube Step5 Take in cleaner (26501007G) in syringe.
- Page 79 JV-240UV User Manual Step6 Inject cleaner (26501007G) into ink tube of print head Step 7 Switch off the ink tube Step 8 Close the tool carriage cover. Step 9 Complete...
-
Page 80: Automatic Basic Cleaning Up Maintenance
2. Select NOZZLE CHECK 3. Enter X, Y value and press ENTER Step 2 JV-240UV will print out Nozzle Check test pattern, if the printing quality is similar to the figure below, please clean it up according to the following steps. -
Page 81: Automatic Advanced Cleaning Up Maintenance
JV-240UV User Manual 1. Select MENU on the control panel 2. Select CLEANING 3. Select NORMAL, and the machine will carry out automatic basic cleaning up procedure. Step 4 Repeat step 1~2 to confirm whether the basic cleaning can meet the required printing quality. - Page 82 JV-240UV User Manual 3. Enter X, Y value and press ENTER Step 2 JV-240UV will print out Nozzle Check test pattern, if the printing quality is similar to the figure below, please clean it up according to the following steps.
-
Page 83: Manual Maintenance
Note: Some reminders for manual clean up procedures: 1) Before the manual clean up, please remove any media on the JV-240UV printing platform. 2) Don’t use any tool other than the cleaning swab, as it might damage the print head. - Page 84 JV-240UV User Manual 1. Select MENU 2. Select MANUL CLEANING 3. Select ENTER (The cartridge will move to maintenance area on the left side) Step 3 Remove thumbscrews and open up the left cover Thumbscrew Cover Step 4 Press Purge switch for 3 seconds and wait for 20 seconds, then press and close ink valve.
-
Page 85: How To Replace The Filter Of Led Lamp
JV-240UV User Manual Step 7 Use sponge swabs to clean the area and wipe residues from back to front. Step 8 Open ink valve, close up the left cover and fix it with thumbscrews and select Thumbscrew Cover 6.4 How To Replace The Filter Of LED Lamp Note: It is suggested to change the filter of LED lamp every six months. - Page 86 JV-240UV User Manual Step 2 Remove the thumbscrews and open the right cover. Screw Cover Step 2 Turn off all ink valves. Step 3 Turn off the power and unplug the power cord. Step 4 Disconnect the Led Lamp wire.
- Page 87 JV-240UV User Manual Step 5 Take apart the screw at the upper position which is connected with Led lamp set. Step 6 Take apart the screws at the side position which is connected with Led lamp set. Step 7 Take apart the screws (2 pieces).
-
Page 88: Ink Drain Away
Step 8 Replace a new led lamp filter and fasten the screws. Step 9 Follow the procedures in reverse order from step 8 to step 5 to assemble the Led lamp. Step 10 Plug in the power cord and restart JV-240UV. The process is done. 6.5 Ink Drain Away Step 1 Remove thumbscrews and open the left cover. - Page 89 JV-240UV User Manual Step 2 Turn on all ink valves. Step 3 1 Select MENU 2 Select MAINTENANC 3 Select INK INSTALL/DRAIN 4 Select INK DRAIN AWAY Step 4 Fill flush into flush channel by order of the instruction on control panel to complete the workflow of ink drain.
- Page 90 JV-240UV User Manual Start Ink Drain Procedure? ENTER CANCEL 1.Empty waste ink bottle. 2.Open the ink valves of print Head. ENTER CANCEL Close the ink valves of ink bottle as shown ENTER CANCEL Ink purging… 1.Empty the waste ink bottle 2.Open the ink valves of print head...
-
Page 91: Reset Pressure Gauge With Atmospheric Pressure
JV-240UV User Manual 6.6 Reset Pressure Gauge with Atmospheric Pressure Manually adjust the barometer underneath the machine on the left side to reset the pressure gauge with atmospheric pressure. Step 1 Close all tube clip above print heads Step 2 Open the right side cover (above main ink tank bottles) Step 3 Remove the plugs at the bottom of air pressure buffer tank, as soon as removed the plug, the pump will keep pumping. - Page 92 JV-240UV User Manual Step 4 Open the cover of pressure gauge. Step 5 Pressand buttons at the same and hold for 2 seconds. Release after “0Rd” is shown on the display and adjust the pressure gauge with andbuttons. Note: the default setting for pressure gauge is between 3~4 kpa according to local environment.
-
Page 93: Lubrication Of The X Rails
JV-240UV User Manual 6.7 Lubrication of the X Rails The procedure of Lubrication: Step 1 Power off the machine Step 2 Move the carriage rightwards or leftwards to allow the grease being injected. Step 3 Inject 10ml of grease to the injection opening inside the linear bearing on both side. -
Page 94: How To Replace Alignment Rule
JV-240UV User Manual 6.8 How to replace alignment rule Step 1 Use cross screwdriver to remove the screws on the alignment rules on X and Y axis. Replace the thin alignment rule by the thick one and fix it. Step 2 The replacement of the alignment rules is complete. -
Page 95: Chapter 7 Reference Parameter Settings
JV-240UV User Manual Chapter 7 Reference Parameter Settings The following reference parameter is used on GCC verified materials. GCC JV-240UV material parameter table Material Print Mode Print Color Directional Power Chrome paper Production mode Bi-Directional 100% Matt finish paper Production mode... -
Page 96: Appendix A: Jv-240Uv Specification
JV-240UV User Manual Appendix A: JV-240UV Specification Model JV-240UV Printing method On-demand Piezo head Printing area (W x L) 24 x 15 in. (609 x 380 mm) Sheet 24 x 15 in. (609 x 380 mm) Flatbed mode: 11.8 in. (300mm)(standard)/ 6.7in. - Page 97 Based on 4 print heads with draft mode. Higher varnish thickness will reduce print speed. Media load time is not included. JV-240UV can achieve up to 320 microns in one print job with GCC recommended media. Repeat the same print job can accumulate the varnish thickness to higher level.
Need help?
Do you have a question about the JV-240UV and is the answer not in the manual?
Questions and answers