
Related Manuals for Avidsen 112249


Summary of Contents for Avidsen 112249
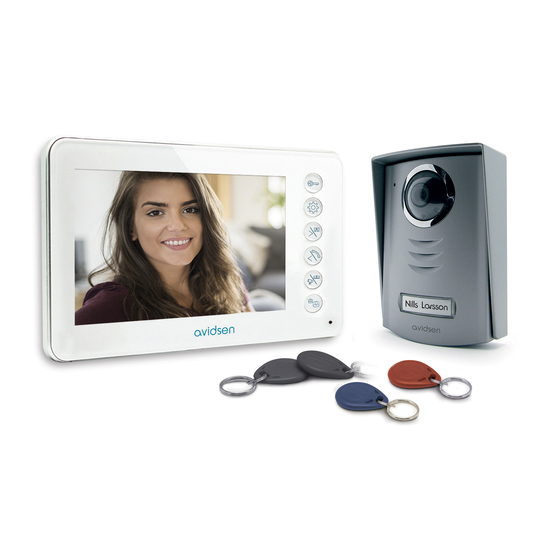
- Page 1 YLVA 2+ Colour video intercom 2 wires - RFID feature ref. 112249 7” RFID Picture memory feature Mémorisation des visiteurs www.avidsen.com...
-
Page 2: Table Of Contents
Colour video interCom TABLE OF CONTENTS A - SAFETy iNSTruCTiONS 1 - INTRODUCTION 2 - maINTeNaNCe aND CleaNINg 3 - ReCyClINg B - prOduCT dESCripTiON 1 - CONTeNTs Of The kIT 2 - mONITOR 3 - DOORplaTe 4 - Wall bRaCkeT 5 - maINs aDapTOR C - iNSTALLATiON 1 - DOORplaTe INsTallaTION... - Page 3 d - uSiNg ThE prOduCT 1 - IDeNTIfy aND speak TO The VIsITOR 2 - aCTIVaTe The INTeRCOm paNel fROm The mONITOR 3 - OpeNINg aN eleCTRIC lOCk aND aN aUTOmaTIC CONTROl sysTem (OpTIONal) 4 - INTeRCOm feaTURe 5 - mONITOR seTTINgs 6 - UNlOCkINg UsINg a baDge 7 - CheCkINg phOTOs TakeN IN yOUR abseNCe E - TEChNiCAL ANd LEgAL iNFOrmATiON...
-
Page 5: A - Safety Instructions
Colour video interCom A - SAFETy iNSTruCTiONS 1 - INTRODUCTION as computers, televisions or video recorders. • Do not install near acidic chemicals, ammonia this video intercom system pairs two modules: a or sources of toxic gases. receiver-monitor and an easy-to-install and use •... -
Page 6: B - Product Description
Colour video interCom B - prOduCT dESCripTiON 1 - CONTENTs OF THE KIT monitor Screws (2 for the monitor, 3 for the intercom panel) intercom panel screws for the intercom panel Monitor wall bracket mains adapter Dowels (2 for the monitor, 3 for the intercom RFID badges (red x1, grey x1, blue X2) panel) 2 - MONITOR... -
Page 7: Doorplate
Colour video interCom B - prOduCT dESCripTiON right arrow / receiver button: enables Connection terminals the values on the monitor's menu to be power supply input increased, enables communication with the Loudspeaker visitor. entryway / video camera button: enables an electric entryway to be opened intercom button: enables communication with a second monitor (ref. -
Page 8: C - Installation
Colour video interCom C - iNSTALLATiON The recommended installation height for the intercom panel is about 160 cm from the ground and 150 cm from the floor for the indoor unit. 50cm 70° 160cm 150cm WARNING: For obvious safety reasons, the connections must only be made after shutting off the power supply. -
Page 9: Installing The Monitor
Colour video interCom C - iNSTALLATiON then screw the doorplate to the hood with the screw provided. put on the name label. 2 - INsTALLING THE MONITOR Attach the wall mount to the wall using the screws and wall plugs suited to the support (the screws and plugs supplied are suitable for solid walls). -
Page 10: Connections
Colour video interCom C - iNSTALLATiON 3 - CONNECTIONs • Do not increase the number of insulating screw joints or connectors on the connecting wire between the doorplate and the monitor • Keep the connecting wire between the doorplate and the monitor more than 50 cm away from any electromagnetic interference (230 V cable, WiFi device, microwave ovens, etc.) •... -
Page 11: Connection Between The Monitor And The Intercom Panel
Colour video interCom C - iNSTALLATiON 3.1 - ConneCtion between the monitor and the interCom panel Contacts used to connect an additional monitor (ref. 112252, not included) not used on this model Master Monitor 17 VDC power supply (included) 3.2 - with eleCtriC loCk Master Monitor Contacts used to connect an additional monitor (ref. -
Page 12: With Automatic Entryway Control
Colour video interCom C - iNSTALLATiON Relay with 12 V coil and NO contact ref. 104765 12 VDC 230 VAC 3.3 - with automatiC entryway Control IMpORTANT: connect sw1 and sw2 directly to the opening/closing contact of the automatic control system (automated entryway wired control system input). -
Page 13: A - Initialisation
Colour video interCom d - uSiNg ThE prOduCT a - initialisation With the video doorkeeper powered on, press on the “REsET” button on the back of the intercom panel. the intercom panel will beep 4 times. Within the next 10 seconds, bring the administrator badge (red) in front of the camera. Within the next 10 seconds, bring the add badge (grey) in front of the camera. -
Page 14: C - Deactivating All Badges
Colour video interCom C - iNSTALLATiON the intercom panel will beep 1 time. C - deaCtivating all badges Hold the administrator badge in front of the camera to deactivate all of the recognized badges. (including the add badge). d - seleCting the aCtion assoCiated with the user badges At the back of the intercom panel, select the electric strike plate or dry contact output to control one or the other at the swipe of a user badge. -
Page 15: D - Using The Product
Colour video interCom d - uSiNg ThE prOduCT 1 - IDENTIFY AND spEAK TO THE VIsITOR then appear on the screen for 60 seconds. if you wish to communicate directly with the outside, the visitor presses on the intercom panel's press once on the button when the external video camera is displayed. -
Page 16: Monitor Settings
Colour video interCom d - uSiNg ThE prOduCT BRT. CON. COL. CALL. INCOME. RING. DATE. 2016.09.13 TIME. 11:01:52 DEL. EXIT. • DATE: press the buttons to adjust the 5 - MONITOR sETTINGs highlighted value and the button to switch to the next value. -
Page 17: E - Technical And Legal Information
Colour video interCom E - TEChNiCAL ANd LEgAL iNFOrmATiON 1 - TECHNICAL CHARACTERIsTICs MONITOR ultra-flat 7" colour lCd Screen pal/ntsC Video standard 800 x 3 (RGB) x 480 Resolution with 230 VAC 50 Hz / 17 VDC 1.5 A Power supply mains adapter included 17 VDC 1.5 A (adapter included) Supply voltage... -
Page 18: Warranty
• The parts of this product must not be opened or repaired by any persons not employed by Avidsen undertakes to keep a stock of spare parts avidsen. for this product throughout the contractual warranty • The warranty will be void if the device is period. - Page 20 France s.a.s - 32, rue augustin Fresnel 37170 Chambray les tours - France...
Need help?
Do you have a question about the 112249 and is the answer not in the manual?
Questions and answers