Table of Contents
Advertisement
About this User Manual
This User Manual is the initial version, and the text (the English version is
temporarily translated by software, and will be revised manually later), drawings,
and typesetting are not the final version.
This book will be updated from time to time, please pay attention to our latest
version.
1
Advertisement
Table of Contents

Subscribe to Our Youtube Channel
Related Manuals for Snapmaker J1


Summary of Contents for Snapmaker J1
- Page 1 About this User Manual This User Manual is the initial version, and the text (the English version is temporarily translated by software, and will be revised manually later), drawings, and typesetting are not the final version. This book will be updated from time to time, please pay attention to our latest version.
-
Page 2: Safety Label
Security summary This chapter provides important information about security. Read and follow the guidelines carefully before starting to use the Snapmaker J1 3D printer. Safety label Be careful, there may be potential danger. Do not touch the surface during printing or until it has cooled completely after printing. - Page 3 Do not pile up objects here, otherwise it may cause collision during the operation of the machine. Identification symbol The following identification symbols are used in this manual: CAUTION Failure to follow these instructions may result in a malfunction of the machine or injury to the user.
-
Page 4: Safety Instructions
Safety instructions General safety information The use of this product and the specific use should comply with the laws and regulations of the user's location. This product is for indoor use only. Do not place this product in rain or moisture. Prepare a table or work surface that is stable and level for the use of this product. - Page 5 - Additional safety measures may be required when using materials other than those provided with the Snapmaker J1. Before use, be sure to review the Safety Data Sheet (SDS) for each specific material for appropriate safety guidance. Emergency measures Burns from hot surfaces Touching hot surfaces (including hot nozzles, hot ends, heated beds, PEI glass platforms, and uncured filaments) can burn the skin.
-
Page 6: Product Introduction
Next, slice the model in the slicing software and generate G-code, which tells Snapmaker J1 how to behave. Finally, the G-code is transferred to the Snapmaker J1 and printing begins on the printer. Snapmaker J1 will heat the molten material and extrude it onto the PEI glass platform and stack it layer by layer to create a 3D object corresponding to the model. - Page 7 Molding size (length × width Default mode, Backup mode: × height) 300mm × 200mm × 200mm Copy mode: 160mm × 200mm × 200mm Mirror mode: 150mm × 200mm × 200mm Print speed 10mm/s to mm/s mm/s² Acceleration 10000 Layer height (when 0.4 mm 0.05mm to 0.3mm nozzle is used) Print platform...
- Page 8 Connection mode Wi-Fi, USB cable, USB flash drive < 50dBA Operating noise Machine properties 539mm × 401mm × 464mm Overall dimensions (L × W × 25kg Net weight Size: 5 inches (12.7 cm) touchscreen System: Android Resolution: 1280 × 720 pixels 1GB RAM,8GB eMMC Memory Work environment...
- Page 9 2.4GHz: < 17.05 dBm (US, Canada), < 17.24 dBm (EU) 5.2GHz: < 11.96 dBm (US, Canada), < 15.09 dBm (EU) 5.8 GHz: < 6.00 dBm (US, Canada), < 11.16 dBm (EU) Software Supporting software Snapmaker official software (supports other third-party slicing software) Windows、macOS Operating systems are supported STL、OBJ、3MF...
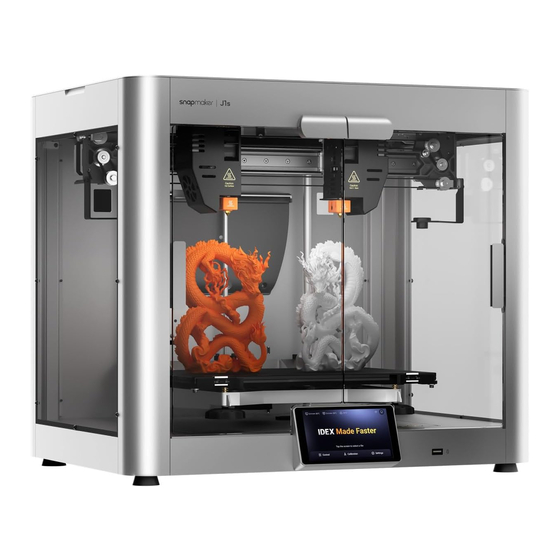
- Page 10 Machine diagram 1. Top panel 2. Left extruder 3. Nozzle wiper 4. Enclosure door 5. PEI Glass Platform 6. Foot 7. touchscreen 8. USB flash drive port 9. Leveling wheel 10. Plate clamp 11. Right extruder 12. Side panels...
-
Page 11: First Use
First use When using the Snapmaker J1 3D printer for the first time, you need to complete the hardware installation and initial setup of the touchscreen as described in this chapter. Unpacking steps... -
Page 12: Packing List
Packing list 1. Snapmaker J1 3D Printer × 1 Quick Start Guide × 1 3. Safety Guidelines × 1... - Page 13 Calibration Card × 1 Used for heated bed leveling and Z-axis offset calibration (in manual mode). 5. Wiping Cloth × 1 And is use for daily cleaning of that print. Filaments × 2 Materials needed for 3D printing. 7. Left Door × 1 8.
-
Page 14: Hardware Installation
For hanging filaments h. USB-B Cable × 1 Used to connect a printer to a computer. i. M3 × 6 Screw × 16 j. M4 × 8 Screw × 4 k. Hot End Sock × 2 Silicone sock wrapped around the hot end to maintain a stable printing temperature and prevent bleeding contamination. - Page 15 In order to facilitate refueling, it is recommended to leave a space of more than 30 cm around the fuselage. 2. Install the filament holder.
- Page 16 3. Install the enclosure door with the provided green hex key (specification: H2.5) and M4 × 10 screws in the tool box.
- Page 17 When using an hex key, you can hold the longer end first to loosen the screw, and then switch to the shorter end to unscrew the screw quickly. 4. Install the left and right side plates with the provided pink hex key (specification: H2.0) and M3 ×...
- Page 18 5. Install the PEI glass platform.
- Page 19 The PEI glass platform is fragile, so please handle it carefully. 6. Make sure the power switch is off, and then connect the power cable.
- Page 20 Make sure the power switch is turned off before connecting the power cable, or the printer may be damaged.
- Page 21 When you first boot the Snapmaker J1, you need to complete a series of initial settings under the guidance of the touchscreen. Turn on the power switch on the back of the fuselage, and the touchscreen will automatically run the initial setup process.
-
Page 22: Touch Screen
With the touchscreen, you can control the Snapmaker J1 and manage its printing process. Main interface 1. Left Nozzle Type & Temperature Right Nozzle Type & Temperature heated bed temperature Wireless network Connection status with Snapmaker software Click to select a file to start printing Control page: set the extruder temperature, feed &... - Page 23 Set, View Terms of Use Control page Load Filament & Unload Filament Load Filament Refer to Load Filament. Unload Filament Refer to Unload Filament. Moving the extruder and the heated bed Click Control > Move, and then click the button in the corresponding direction to control the movement of the left and right extruders and the heated bed in the X, Y, and Z directions.
- Page 24 Calibration page leveling heated bed See Leveling the heated bed. Calibrate the Z-axis offset See Calibrating the Z-Axis Offset. Calibrate the XY axis offset See Calibrating XY Offset. Verify the calibration results See Verifying the Calibration Results. Calibrate vibration compensation Set up the page Update the firmware See Updating Firmware.
-
Page 25: Print Menu
Room, system log, and compliance statement. To change the machine name, click the machine name and enter the new name. To export the system log, scroll down and find the system log column, click Export, and then click the export method you want. Change the machine settings To re-enter the wizard process, click Setup >... - Page 26 When printing, click Adjust Parameters in the print menu interface to enter the print parameter setting page. To adjust the extruder temperature, tap extruder > Slide to Target Temperature > tap Heat. To adjust the hotbed temperature, click on the hotbed > slide to target temperature >...
- Page 27 Printing Adjust the parameters...
- Page 28 Recommended printing parameters for use. Filament warehouse The filaments supported by Snapmaker J1 3D printer include PLA, ABS, HIPS, PC, TPU, TPE, PETG, ASA, PP, PVA, PA (Nylon), PA-GF, PA-CF, and more are being tested. You can go to our Online filaments warehouse Choose and buy all kinds of filaments.
- Page 29 Applicability of filaments under specific conditions. Filament characteristics 1.75mm Diameter 1.17 G/cm ³ at 23 ˚ C Density Melt index 7-11 G/10 min 61°C Glass transition temperature 150°C Melting temperature 46.6 ± 0.9MPa Tensile strength 3283 ± 132MPa Flexural modulus 85.1 ±...
- Page 30 Recommended printing parameters 55˚C,6h Drying temperature & duration 190˚C–220˚C Print temperature 50˚C–60˚C heated bed temperature 100mm/s–200mm/s Print speed 0-2mm Retraction distance 20-50mm/s Retraction speed Open 160˚C Standby temperature filaments are recommended PLA, easy-peel PLA, PVA When printing with PLA, it is recommended to remove the top cover of the printer.
- Page 31 Easily stripped PLA filament characteristics 1.75mm Diameter 1.22 G/cm ³ at 23 ˚ C Density Melt index 3-6g/10min Recommended printing parameters 55˚C,6h Drying temperature & duration 220˚C–230˚C Print temperature 25˚C–60˚C heated bed temperature 0-2mm Retraction distance 20-50mm/s Retraction speed 20mm/s–40mm/s Print speed Open...
- Page 32 120˚C Standby temperature PLA、PC、PVA、TPU filaments are recommended Easy-Peel PLA can be easily peeled off after molding, making it ideal for print support. filament characteristics 1.75mm Diameter 1.12 G/cm ³ at 23 ˚ C Density Melt index 9-14 G/10 min 101.1°C Glass transition temperature 33.3 ±...
- Page 33 2.7 ± 0.4% Elongation at break 12.6 ± 1.1KJ/㎡ Impact strength Recommended printing parameters 245˚C–265˚C Print temperature 90˚C–100˚C heated bed temperature 0-2mm Retraction distance 20-50mm/s Retraction speed 30mm/s–50mm/s Print speed Close 160˚C Standby temperature filaments are recommended ABS produces smoke and particulate matter that is harmful to the human respiratory system when printing.
- Page 34 TPU95 filament characteristics 1.75mm Diameter 1.20-1.24 G/cm ³ at 23 ˚ C Density Melt index 3-6g/10min 9.4 ± 0.3MPa 100% modulus 330.1 ± 14% Elongation at break Shore hardness Recommended printing parameters Storage Ambient Temperature & Room temperature, relative humidity < 25% Humidity 65˚C,8h Drying temperature &...
- Page 35 25˚C–60˚C heated bed temperature 0-1mm Retraction distance 10-30mm/s Retraction speed 20mm/s–40mm/s Print speed Open 120˚C Standby temperature filaments are recommended Easily stripped PLA, TPU, PVA TPU absorbs moisture from the air very easily. Store it in a dry place. High flow TPU95 filament characteristics 1.75mm Diameter...
- Page 36 1.16g/cm ³ at 23 ˚ C Density Melt index 9.3g/10 min Tensile strength 23.11 ± 0.63MPa 100% modulus 13.24 ± 0.29MPa Elongation at break 462.3 ± 21.1% Shore hardness Recommended printing parameters Storage Ambient Temperature & Room temperature, relative humidity < 25% Humidity Drying temperature &...
- Page 37 Retraction speed 20-50mm/s Print speed 40mm/s–100mm/s Open Standby temperature 120˚C filaments are recommended Easily stripped PLA, TPU, PVA TPU absorbs moisture from the air very easily. Store it in a dry place. filament characteristics Diameter 1.75mm 1.37 G/cm ³ at 21.5 ˚ C Density Melt index 7.8g/10 min...
- Page 38 Storage Ambient Temperature & Room temperature, relative humidity < 25% Humidity Drying temperature & duration 80˚C,12h Operating ambient temperature & Room temperature, relative humidity < 25% humidity Print temperature 215˚C–225˚C heated bed temperature 25˚C–60˚C Retraction distance 0-1mm Retraction speed 10-30mm/s Print speed 30mm/s–40mm/s Close...
- Page 39 PETG filament characteristics Diameter 1.75mm 1.25 G/cm ³ at 21 ˚ C Density Melt index 10.8g/10 min Glass transition temperature 81°C Tensile strength 31.9 ± 1.1MPa Flexural modulus 1174 ± 64MPa Flexural strength 53.7 ± 2.4MPa Elongation at break 6.8 ± 0.9% Impact strength 5.1 ±...
- Page 40 Drying temperature & duration 65˚C,6h Print temperature 230˚C–240˚C heated bed temperature 70˚C–80˚C Retraction distance 0-2mm Retraction speed 20-50mm/s Print speed 30mm/s–50mm/s Close Standby temperature 140˚C filaments are recommended PVA、PETG PA (Nylon) filament characteristics Diameter 1.75mm 1.12 G/cm ³ at 23 ˚ C Density...
- Page 41 Melt index 12 G/10 min Glass transition temperature 67°C Melting temperature 190°C Tensile strength 66.2 ± 0.9MPa Flexural modulus 1667 ± 118MPa Flexural strength 97 ± 1.1MPa Elongation at break 9.9 ± 1.5% Impact strength 9.6 ± 1.4KJ/㎡ Recommended printing parameters Drying temperature &...
- Page 42 Retraction speed 20-50mm/s Print speed 30mm/s–60mm/s Close Standby temperature 180˚C filaments are recommended PVA、PA PA absorbs moisture from the air very easily. Store it in a dry place. How to store filaments Most filaments absorb moisture from the air, particularly and PA.
- Page 43 24 months. How to identify damp filaments You can check and confirm according to the following three descriptions. If you meet any of the requirements, it means that your filaments have been accepted. Tide: 1. filaments become brittle and easier to break; 2.
- Page 44 Put the damp filament into the filament dryer, and set the appropriate drying temperature and drying time. After the dryer has completed its work, recheck that the filament is sufficiently dry. Please note that drying temperatures and drying times vary by filament type, brand and quantity.
-
Page 45: Printing Operation
01 Prepare the machine 02 Prepare G-code file Check the working environment Prepare the model file Calibration Slice the model using Snapmaker software (third-party software supported) and generate G-code Load Filament Select the Glass Platform Print Side 03 Select file to start printing... - Page 46 Fused Filament Fabrication (FFF) technology is very sensitive to temperature. To ensure ideal printing results, place the 3D printer at the recommended ambient temperature. The Snapmaker J1 has a recommended operating ambient temperature of 10 ° C to 35 ° C (50 ° F to 95 ° F) If the ambient temperature is too high, it may affect the printing effect of some filaments (such as PLA), and there is a risk of damaging the 3D printer components.
- Page 47 Keep the workbench clean and dry.
- Page 48 Calibration How it works The heated bed and the PEI glass platform on it are the basis for the formation of prints. By leveling the heated bed, you can ensure that the print adheres smoothly to the PEI glass platform. By calibrating the Z-axis offset, you can ensure that the left and right printheads always work at the correct and consistent height during printing, avoiding problems such as poor first-layer adhesion, nozzle scraping the platform, and head bumping.
-
Page 49: Load Filament
Load Filament Before you can start printing with Snapmaker J1, you need to load the printer. filaments need to enter the extruder inside the extruder and be extruded from the nozzle after being heated by the heating block. - Page 50 Auxiliary loading In the auxiliary loading mode, the motor will automatically start to extrude after the filament is inserted into the extruder and engaged. To perform an auxiliary loading, proceed as follows: 1. Tap Control > extruder > Slide to Target Temperature > Tap Heat. By default, the nozzle will be heated to 200°C (392°F).
- Page 51 The filament entry of the left extruder is located on the right side of the body, and the filament entry of the right extruder is located on the left side. 5. Push and hold the toggle on the side of the printhead outward, insert the filament into the printhead until resistance is felt, and then release the toggle.
- Page 52 Use care to avoid contact with hot nozzles, which may result in burns. It is recommended to wear insulated gloves for operation. 6. When the extruder reaches the target temperature, click Feed until the filament flows out of the nozzle, and then click Stop Feed. Insert the guide tube into the extruder and snap into the tube clip.
- Page 53 8. Clean excess filaments from the nozzle with a wire brush.
- Page 54 Manual loading In manual loading mode, after the filament is inserted into the extruder and engaged, you need to continue to insert the filament manually and forcefully until the filament flows out of the nozzle. To perform manual loading, proceed as follows: 1.
- Page 55 By default, the nozzle will be heated to 200°C (392°F). The Load button can only be clicked when the nozzle has been heated to around the preset temperature. Different filaments require different heating temperatures. If the temperature is not matched, the filament may not be extruded smoothly.
- Page 56 The filament entry of the left extruder is located on the right side of the body, and the filament entry of the right extruder is located on the left side. 7. Press down on the idler latch on the front of the printhead to Unload it.
- Page 57 Use care to avoid contact with hot nozzles, which may result in burns. It is recommended to wear insulated gloves for operation. 8. When the extruder reaches the target temperature, insert the filament into the extruder until the filament flows out of the nozzle.
- Page 58 Close the idler latch on the front of the printhead. Insert the guide tube into the extruder and snap into the tube clip. Then re-fix the top panel.
- Page 59 10. Clean excess filaments from the nozzle with a wire brush.
- Page 60 Select the Glass Platform Print Side The PEI glass platform is made of glass, with the side bearing the Snapmaker J1 logo covered by a PEI coating. In general, it is recommended to print with a PEI coated surface. You can use a PEI-free coating surface in the following scenarios:...
- Page 61 It is necessary to obtain the printing effect of the bottom surface of the model which is extremely flat; The adhesion effect of some filaments (such as PA and PA filaments) on the PEI coating surface may not be ideal. In this case, the non-PEI coating surface can be used for printing.
-
Page 62: Start Printing
Snapmaker software supports model files in STL, OBJ, 3MF formats, and more formats to be added. Generate G-code files To slice the model and generate a G-code file in the Snapmaker software, follow these steps: Install the Snapmaker software and connect to Snapmaker J1. - Page 63 After generating the G-code file in the Snapmaker software, click Send to Workspace. Click the Run button to start printing. After printing, please pay close attention to the printing of the first layer of the model, so as to find problems in time and avoid wasting filaments.
- Page 64 the glass platform. The direction of force should be away from the body to prevent printing from the edge of the Palette knife or falling off.
- Page 65 Scratch on the edge of the product. The edge of the Palette knife is sharp. Be careful during operation to prevent scratches. Rinse with cold water If the glass platform and print have cooled to room temperature and cannot be easily removed with a spatula, you can wash the glass platform with cold water to help it cool quickly.
- Page 66 structure. For models that include a support structure, it is necessary to remove the support structure from the print after it is removed.
- Page 67 Dissolve the PVA support If a PVA filament print support is used, warm water can be used to dissolve the PVA. The dissolution process may take several hours. Manually remove the part of the support structure that is easier to peel off (see Removing the Support Manually).
- Page 68 Needle-nose pliers Not provided. Long, narrow needle-nose pliers can penetrate deep into the print, but are less suitable for removing finer structures. Carving knife...
- Page 69 Power off and continue to play To resume a print job if the Snapmaker J1 unexpectedly loses power during printing: 3. Make sure the power cable is plugged in correctly, and then turn on the power switch.
- Page 70 Auxiliary loading After the material is returned, load the material according to the following steps: 1. Remove the top panel. 2. Hang the new filament on the filament holder and trim the end of the filament with diagonal pliers to form a sharp angle of about 45°. 3.
- Page 71 4. Slide on the touchscreen to the target temperature for heating the filament. 5. Push and hold the toggle on the side of the extruder outward, and insert the filament into the feed port until you feel resistance, and then release the toggle.
- Page 72 Use care to avoid contact with hot nozzles, which may result in burns. It is recommended to wear insulated gloves for operation. 6. When the extruder reaches the target temperature, click Feed until the filament flows out of the nozzle, and then click Stop Feed. Insert the guide tube into the extruder and snap into the tube clip.
- Page 73 8. Clean excess filaments from the nozzle with a wire brush.
- Page 74 Manual Loading Manually Unload Filament 1. Tap Control > extruder > Slide to Target Temperature > Tap Heat. By default, the nozzle will be heated to 200°C (392°F). The Unload and Load buttons can only be clicked when the nozzle has been heated to approximately the preset temperature.
- Page 75 3. Press down on the idler latch on the front of the printhead to Unload it. Use care to avoid contact with hot nozzles, which may result in burns. It is recommended to wear insulated gloves for operation. 4. When the extruder reaches the target temperature, remove the filaments from the extruder.
- Page 76 5. Pull the filament out of the guide tube and remove it from the filament holder. Manual loading After the material is returned, load the material according to the following steps: 1. Remove the top panel. 2. Click Control > Motor, then click to turn off the motor. 3.
- Page 77 4. Hang the new filament on the filament holder and trim the end of the filament with diagonal pliers to form a sharp angle of about 45°. 5. Insert the filament into the filament entry until it protrudes from the other end of the guide tube.
- Page 78 6. On the touchscreen, slide to the temperature required to heat the filament. 7. When the extruder reaches the target temperature, push and hold the toggle on the side of the extruder outward, insert the filaments into the feed port until the filaments flow out of the nozzle, and then release the toggle.
- Page 79 Use care to avoid contact with hot nozzles, which may result in burns. It is recommended to wear insulated gloves for operation. 8. Close the idler latch on the front of the printhead. Insert the guide tube into the extruder and snap into the tube clip. Then re-fix the top panel.
- Page 81 9. Clean excess filaments from the nozzle with a wire brush. Replace the hot end The Snapmaker J1's hot end is highly integrated and can be easily replaced. To buy a hot end, go to Snapmaker official Mall. Left extruder To replace the hot terminal of the left printhead: 1.
- Page 82 2. Wait for the current nozzle temperature displayed on the touchscreen to drop to room temperature. The nozzle temperature can be as high as 300 ℃. Make sure that the nozzle has cooled to room temperature before proceeding, otherwise burns may result. It is recommended to wear insulated gloves for operation.
- Page 83 6. Clip in the new hot end upwards.
- Page 84 7. Tighten the two screws on the printhead with an hex key, and then close the side cover of the printhead.
- Page 85 8. Redo the heated bed leveling, Z offset calibration, and XY offset calibration. Right extruder To replace the hot junction of the right printhead: 1. Unload (see Auxiliary Unload or Manual Unload). 2. Wait for the current nozzle temperature displayed on the touchscreen to drop to room temperature.
- Page 86 6. Snap the new hot end up (the standard position after the hot end is secured is that the heat block is barely exposed) and turn the thumb wheel clockwise to secure the hot end.
- Page 87 7. Tighten the two screws on the printhead with an hex key, and then close the side cover of the printhead. 8. Redo the heated bed leveling, Z offset calibration, and XY offset calibration.
-
Page 88: Waste Disposal
Packing The packing box of Snapmaker J1 is made of corrugated cardboard, and the filling inside the packing box is EPP (expanded polypropylene) and EPE. (Expanded Polyethylene). These materials are recyclable and environmentally friendly. -
Page 89: Machine Maintenance
Machine maintenance To ensure that your Snapmaker J1 is in top condition, follow the guidelines in this chapter to maintain the printer regularly to achieve the desired print results. Update the firmware Maintenance scenario To ensure that your Snapmaker J1 is in top working condition, keep the machine firmware up to date. - Page 90 At each calibration and before each print. During calibration, the nozzle shall rebound quickly after touching the calibration point on the heated bed surface. If the nozzle does not rebound quickly, clean the nozzle and recalibrate. Maintenance method 1. Prepare the cleaning tool: wire brush (provided, see tool box). 2.
- Page 91 The nozzle is hot, so be careful during operation to prevent burns. It is recommended to wear insulated gloves for operation. Maintenance Scenario of cleaning glass platform and removing filament residues If you use highly sticky 3D printing filaments, or the nozzle is too close to the glass platform when printing, some filaments may still adhere to the surface of the glass platform after removing the print.
- Page 92 If it is difficult to remove the residue, you can click Control > heated bed on the touchscreen, heat the heated bed to 50℃ and then try to scrape it. It is recommended to wear insulated gloves to avoid hot hands.
- Page 93 Maintenance method...
- Page 94 Prepare the cleaning tool: wiping cloth (provided, see tool box). Lift the glass platform out of the printer. Before removing the glass platform, please make sure that the glass platform has been cooled to room temperature to prevent hot hands. Wash the glass platform with clean water and clean the surface of the glass platform with wiping cloth until the surface of the platform is free of visible grease, dust or other impurities.
- Page 95 5. Install the glass platform. Clean the extruder gear Maintenance scenario When extruding the filament, the gear needs to rub and engage the filament, which will produce waste in the process. With the accumulation of waste materials, the friction between filaments and gears decreases, and the extrusion efficiency will also decrease, or even can not be extruded.
- Page 96 4. Remove the waste material from the drive gear with a cotton swab until there is no visible residue, and then close the idler latch.
- Page 97 Clean the bottom plate Maintenance scenario During everyday use of the printer, some of the filament debris or small parts collect on the backplane. Accumulated filament debris may prevent the printer from working properly if it is not cleaned in time. Maintenance frequency At least once a month.
- Page 98 Belt is an important part of printer transmission system. If the belt is too loose, it may affect the printing effect; If it is too tight, it may affect the life of the belt. Maintenance frequency At least once every three months, or when you: When it is found that the printing effect is not good, such as the first layer can not adhere to the glass platform, and the phenomenon of staggered layers occurs when using double materials for printing.
- Page 99 Respectively remove the left and right side plates with an hex key.
- Page 100 When using an hex key, you can hold the longer end first to loosen the screw, and then switch to the shorter end to unscrew the screw quickly. 7. Clip the measuring device onto the X-axis belt in turn as shown in the figure.
- Page 101 8. Use a 5.5mm wrench to adjust the hexagon screws at the left and right ends of the X-axis linear rail in turn until the two sides of the measuring instrument are closed and there is no obvious gap.
- Page 103 9. Reinstall the left and right side plates with an L-type wrench. Y-axis 1. For firmware V2.2.2 and above, obtain the G code in the Local folder of the screen and print the Y-axis belt tension gauge using the PLA filaments. 2.
- Page 104 5. Respectively remove the left and right side plates with an hex key. Clip the measuring device into the Y-axis belt on the left side as shown in the figure. 7. Turn the screw in the upper left corner on the back of the printer by hand until the two sides of the measuring instrument are closed and there is no obvious gap.
- Page 105 8. Remove the measuring unit and clip it onto the right-hand Y-axis belt in the same way.
-
Page 106: Shaft Lubrication
9. Turn the screw in the upper right corner of the back of the printer by hand until the two sides of the measuring instrument are closed and there is no obvious gap. Shaft lubrication Maintenance scenario To ensure smooth movement of the extruder and heated bed, the shaft needs to be lubricated regularly, otherwise the printing results may be affected. - Page 107 Maintenance method X-axis and Y-axis Prepare lubricant and tools by yourself: High temperature resistant solid grease; Brush. Start the printer, click Control > Motor on the touchscreen, and click to turn off the motor for subsequent manual movement of the extruder. Turn the printer off and power off.
- Page 108 Distribute the grease evenly. Replace the hot end sleeve Maintenance scenario The hot end sleeve is a silicone sleeve that wraps around the heating block, which helps the hot end maintain a stable temperature during printing and prevents the leakage of filaments from contaminating the heating block.
-
Page 109: Maintenance Schedule
Start the machine, click Control > Move on the touchscreen, and then tap Home Button After the left and right extruders have returned to their original positions, observe whether the nozzle end has completely entered the wiping pad and is pressed into the wiping pad for about 1mm-2mm. - Page 110 Remove grease and dust from the glass platform Clean the extruder gear Clean the bottom plate Every three months Update the firmware Adjust the tension of the belt Shaft lubrication Check Nozzle Wiper Position Check the glass platform plate clamp...
-
Page 111: Troubleshooting
To get the system log, on the touchscreen, click Settings > About, click Export in the System Log column, and you can choose to export to a USB stick or Snapmaker software. You can determine the problem by yourself based on the exception information recorded in the system log, or you can send the problem description and system log to our technical support (support@snapmaker.com)。... - Page 112 Clean the nozzle. Clean the heated bed. Reset the following print parameters on the Snapmaker software: Sets the print deck attachment type to Single Adhesion. Single-layer adhesion can effectively improve the adhesion of the first layer. You can also increase the trace count at the same time to further improve adhesion.
- Page 113 Orient and angle the model to maximize its contact area with the glass platform. Check the filaments for quality problems such as moisture (see How to identify damp filaments). If any, dry the filament or replace it with a new filament and try again. If there is still no improvement in the adhesion of the first layer, apply a thin layer of solid glue on the glass platform before printing (provided, see tool box).
- Page 114 Before printing, check if the filaments used for printing are within the support range of Snapmaker J1 (refer to the filaments library). Set the correct printing temperature according to the information provided by the filament manufacturer.
- Page 115 Start the printer, click Control > extruder on the touchscreen, and heat the nozzle to 200 °C (392 °F). Set the correct heating temperature according to the information provided by the filament manufacturer. After the nozzle reaches the target temperature, insert the needle into the end of the nozzle from the bottom and carefully unclog it up and down until the blockage is removed.
- Page 116 2. Check if the filament has become damp (see How to identify a damp filament). 3. When slicing in the Snapmaker software, the Retraction is set, and the filament will be actively retracted for a certain distance when the extruder is empty, so as to improve the flash or wiredrawing.
-
Page 117: Technical Support
Snapmaker Academy and so on. In addition, we are committed to providing you with timely and friendly technical support. If you have any problems with the Snapmaker J1, feel free to contact us support@snapmaker.com through...
Need help?
Do you have a question about the J1 and is the answer not in the manual?
Questions and answers