Table of Contents
Advertisement
Quick Links
ORIGINAL LANGUAGE
3-IN-1 WET & DRY
VACUUM CLEANER
WITH SHAMPOO VALETING
75442
These instructions accompanying the product are the original instructions. This document is part of the product,
keep it for the life of the product passing it on to any subsequent holder of the product. Read all these instructions
before assembling, operating or maintaining this product.
This manual has been compiled by Draper Tools describing the purpose for which the product has been designed,
and contains all the necessary information to ensure its correct and safe use. By following all the general safety
instructions contained in this manual, it will ensure both product and operator safety, together with longer life of the
product itself.
All photographs and drawings in this manual are supplied by Draper Tools to help illustrate the operation of the
product.
Whilst every effort has been made to ensure the accuracy of information contained in this manual, the Draper
Tools policy of continuous improvement determines the right to make modifications without prior warning.
Advertisement
Table of Contents

Subscribe to Our Youtube Channel
Related Manuals for Draper SWD1500


Summary of Contents for Draper SWD1500
- Page 1 All photographs and drawings in this manual are supplied by Draper Tools to help illustrate the operation of the product.
-
Page 2: Specification
Warning! – Information that draws attention to the risk of injury or death. Stock no ..............75442 Caution! – Information that draws attention to the risk of Part no ..............SWD1500 damage to the product or surroundings. Motor: 1.3 EXPLANATION OF SYMBOLS Rated voltage .......... - Page 3 atmospheres, such as in the presence of e) Do not overreach. Keep proper footing and flammable liquids, gases or dust. Power tools balance at all times. This enables better control create sparks which may ignite the dust or fumes. of the power tool in unexpected situations. c) Keep children and bystanders away while f) Dress properly.
-
Page 4: Residual Risk
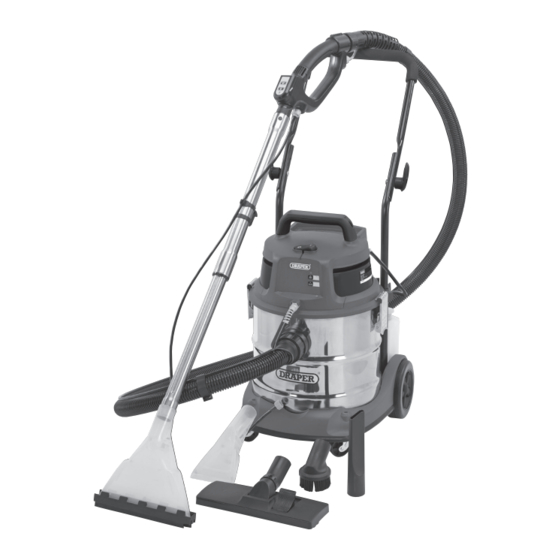
Fig A. If any part is damaged unexpected situations. or missing, please contact the Draper Help Line (see back page). Do not attempt to use the product! 5) Service... - Page 5 IDENTIFICATION – FIG.A (12) (13) (14) (18) (10) (16) (19) (11) (20) (17) (15) (22) (24) (23) (25) (21) Tank. (10) Shampoo inlet hose and filter. (19) Retractable extension tube. (1) Shampoo delivery socket. (11) Shampoo tank. (20) Shampoo delivery hose. (2) Vacuum port.
- Page 6 (17) (29) (20) (19) (13) (27) (18) (28) (23.1) (25) (16) (10) (26) (22.1) (33) (16) (21) (23) (31) (24) (15) (32) (30) (11) (22) Shampoo inlet hose and filter. (20) Shampoo delivery hose (main). (25) Brush attachment for delicate (10) surfaces.
- Page 7 (13) (15) (1.1) (16.1) FIG. FIG. − To secure on each side, tighten the supplied screw VACUUMING DRY DUST through the hole situated inside the rear wheel housing (16.1) and on through into the hole in the AND DIRT tubular frame of the handle (13).
- Page 8 ensure a longer service life and higher suction power. If The vacuum attachment for floors and carpets (21) can the cartridge filter is not used when vacuuming dry dust be used on hard floors - parquet, cork, vinyl, ceramic, and dirt the motor wil be damaged. etc.
- Page 9 become noisier, at this point turn off and empty the tank. 8.3 FITTING THE LARGE FLUID NOZZLE – FIG. 13 Fit the large fluid nozzle (23) to the retractable extension tube (19). (18.1) (4.1) (19) FIG. Attention: EXPLOSION AND FIRE HAZARD! Never vacuum asbestos, inflammable fluids, such as petrol, oil, solvents, etc.
- Page 10 − Fill the shampoo tank (11) with as much correctly Note: To ensure the air flow is adequate we recommend diluted anti-foam shampoo (Draper Stock No.28801) that the end of the nozzle is not totally immersed. as required. Always follow the shampoo manufacturer’s direction ratios.
- Page 11 Note: Follow the same procedure above when using the shampoo upholstery attachment. (23.1) (10.1) (23.2) (10) (23.3) (11) (23) FIG. FIG. (10.2) 9.5 ATTACHING THE SMALL FLUID NOZZLE – FIG. 22 The small fluid nozzle (22) connects directly onto the shampoo/vacuum control handle grip (18) without need for the retractable extension tube.
-
Page 12: Maintenance
11. WARRANTY 11.1 WARRANTY FIG. Draper tools have been carefully tested and inspected Note: Always clean a small hidden piece of carpet/ before shipment and are guaranteed to be free from material that you are going to clean to check the defective materials and workmanship. - Page 13 This warranty applies in lieu of any other warranty expressed or implied and variations of its terms are not authorised. Your Draper warranty is not effective unless you can produce upon request a dated receipt or invoice to verify your proof of purchase within the warranty period.
Need help?
Do you have a question about the SWD1500 and is the answer not in the manual?
Questions and answers