
Subscribe to Our Youtube Channel
Related Manuals for Draper 80947


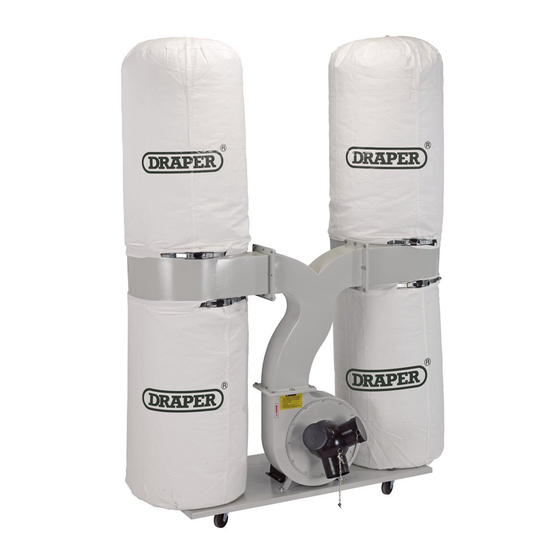
Summary of Contents for Draper 80947
- Page 1 Original Instructions Version 1 2200W DUST EXTRACTOR 80947 WARNING! Read this manual in full before attempting to use this machine.
-
Page 2: Preface
All photographs and drawings within this manual are document is part of the product; retain it for the life supplied by Draper Tools to help illustrate correct of the product, passing it on to subsequent holders. operation of the product. -
Page 3: Table Of Contents
2. Contents 1. Preface Product Reference Revisions Understanding the Safety Content Copyright © Notice 2. Contents 3. Warranty 4. Product Introduction Scope Specification 5. Health and Safety Information General Health and Safety Instructions Additional Safety Instructions for this Dust Extractor Connection to the Power Supply 6. -
Page 4: Warranty
This warranty period covers parts and labour for 12 months from the date of Your Draper Tools guarantee is not effective until you can purchase. Where tools have been hired out, the warranty produce, upon request, a dated receipt or invoice to period covers 90 days from the date of purchase. -
Page 5: Product Introduction
WARNING! This product is not a toy and must application beyond the conditions established for use be respected. will be considered misuse. Draper Tools accepts no responsibility for improper use of this product. Read this manual in full before attempting to assemble, operate or maintain the product, and retain it for later use. -
Page 6: Health And Safety Information
If the supply cord is damaged, it must be replaced by Draper Tools, its service agent or • DO NOT use the machine to extract any materials that similarly qualified persons in order to avoid a may be hazardous, exceedingly hot or burning. -
Page 7: Connection To The Power Supply
5. Health and Safety Information Important: If this dust extractor is used to reduce airborne wood dust, the wood dust levels must be regularly monitored and the machine must be emptied and maintained with a higher frequency than is required for normal use. -
Page 8: Identification And Unpacking
6. Identification and Unpacking 6.1 Product Overview (1) Motor/ducting unit (5) Collection bag duct (2) No-volt on/off switch (6) Collection bag (3) Extraction chute (7) Base (4) Filter bag (8) Castors (x4) (9) Extractor inlet – 8 –... -
Page 9: What's In The Box
If any part is occurred during shipment. damaged or missing, do not attempt to use the product. Please contact the Draper Helpline; contact details can be found at the back of this manual. (O) (N) (R) (P) -
Page 10: Assembling The Dust Extractor
7. Assembling the Dust Extractor Important: Before use, read and understand all the safety instructions listed in this manual. WARNING! DO NOT connect the product to a power (R, Q) supply until it is fully assembled. (B2, B4) (O, Q) (B3) Fig. - Page 11 7. Assembling the Dust Extractor 7. Attach the collection bag ducts and upper support rods: Fig. 5 5. Remove the M5 x 8mm screw (P) from the circular Fig. 7 opening on the motor, then use it to attach the extractor inlet (E) (Fig.
- Page 12 7. Assembling the Dust Extractor (O, Q) Fig. 9 Fig. 11 e. Pass two M8 x 16mm bolts (O) each through a c. Hook the strap spring over the toothed end and washer (Q) and secure both support rods to the close the clamp for a tight but comfortable fit collection bag duct (Fig.
-
Page 13: Operating Instructions
8. Operating Instructions Important: Before use, read and understand all the In the event of a power supply disruption, the machine safety instructions listed in this manual. will require manually restarting once power has been returned. WARNING! ALWAYS ensure that the product is • To switch the extractor on, open the yellow switch switched off and disconnected from the power cover and press the GREEN ( | ) button. -
Page 14: Maintenance
9. Maintenance Important: ALWAYS ensure that the dust extractor is switched off, disconnected from the power supply and has come to a complete stop before attempting to maintain or repair this product. Maintenance and repair should only be carried out by authorised and suitably qualified personnel. -
Page 15: Disposal
10. Disposal At the end of its working life, or when it can no longer be repaired, dispose of the product according to local regulations. Contact your local authority for details of collection schemes in your area. In all circumstances: • DO NOT dispose of this product with domestic waste • DO NOT dispose of this product in unsorted municipal waste... -
Page 16: Explanation Of Symbols
11. Explanation of Symbols Continuous A-Weighted Sound Read the instruction manual Pressure Level Class I appliance Wear face mask and safety glasses WEEE – Wear ear defenders Waste Electrical & Electronic Equipment Do not dispose of Waste Electrical & Electronic Equipment in with domestic rubbish Do not abandon in the environment UK Conformity Assessed... - Page 17 Notes – 17 –...
- Page 18 Notes – 18 –...
- Page 19 Notes – 19 –...
- Page 20 General Enquiries: +44 (0) 23 8026 6355 General Fax: +44 (0) 23 8026 0784 Service / Warranty Repair Agents For aftersales servicing or warranty repairs, please contact the Draper Tools Product Helpline for details of an agent in your area. © Published by Draper Tools Limited...
Need help?
Do you have a question about the 80947 and is the answer not in the manual?
Questions and answers