Advertisement
Quick Links
Advertisement

Subscribe to Our Youtube Channel
Related Manuals for Draper 13785


Summary of Contents for Draper 13785
- Page 1 Original Instructions Version 1 WET & DRY VACUUM CLEANER 13785...
- Page 2 All photographs and drawings within this manual are document is part of the product; retain it for the life supplied by Draper Tools to help illustrate correct of the product, passing it on to subsequent holders. operation of the product.
- Page 3 2. Contents 1. Preface 1.1 Product Reference 1.2 Revisions 1.3 Understanding the Safety Content of This Manual 1.4 Copyright © Notice 2. Contents 3. Product Introduction 3.1 Intended Use 3.2 Specification 4. Explanation of Symbols 5. Health and Safety Information 5.1 General Health and Safety Precautions 5.2 Additional Health &...
- Page 4 3. Product Introduction 3.1 Intended Use Any other application beyond the conditions established for use will be considered misuse. Draper Tools accepts This vacuum cleaner is designed to pick up wet and dry no responsibility for improper use of this product.
- Page 5 4. Explanation of Symbols Read the instruction manual Continuous A-weighted sound power level Class II construction Mandatory action required (Double insulated) Net product weight Warning! WEEE – Waste Electrical & Electronic Equipment Rated voltage Do not dispose of Waste Electrical & Electronic Equipment in with domestic rubbish European conformity Rated input...
- Page 6 If the power supply cord is damaged, it must be replaced and knowledge if they have been given supervision or by Draper Tools, an authorised service agent or similarly instruction concerning use of the appliance in a safe qualified personnel in order to avoid a hazard.
- Page 7 5. Health and Safety Information The value of the fuse fitted is marked on the pin face of the plug. Should the fuse need replacing, use a small plain-slot screwdriver to remove the fuse cover. Ensure the substitute is of the correct rating, approved to BS 1363/A and ASTA or BS Kite marked.
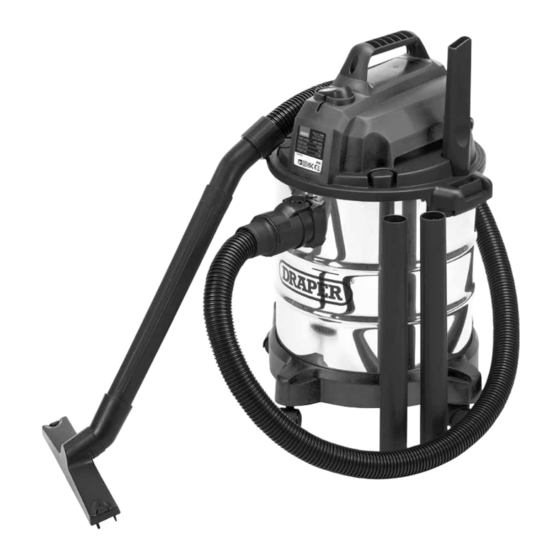
- Page 8 6. Identification and Unpacking 6.1 Product Overview (16) (10) (14) (11) (1a) (1b) (12) (15) (13) Double function floor brush Blower port. – (1a) Main brush nozzle (10) Suction hose. – (1b) Squeegee attachment. (11) Castors × 4. Extension tube × 3. (12) Crevice tool.
- Page 9 Before assembling the product, lay the contents out and check them against the parts shown below. If any part is damaged or missing, do not attempt to use the product. Please contact the Draper Helpline; contact details can be found at the back of this manual.
- Page 10 7. Assembly Instructions Important: Before preparing or adjusting this product, read and understand all the safety instructions listed in this manual. 7.1 Fitting the Castors Important: Check that the vacuum cleaner is unplugged (11) from the power supply before assembling. Press the castors (11) into the base of the tank.
- Page 11 8. Setting Up the Vacuum Cleaner • Note: Replace the dustbag when the suction power • The brush & squeegee attachment (1b) can be fitted to decreases. the main brush nozzle (1a) and used for both and wet dry cleaning. Suitable for use on hard floor, parquet, 4.
- Page 12 9. Operation 9.2 Crevice Tool/High Water Level 1. Set up the vacuum cleaner as detailed in Section 8. Setting up the Vacuum cleaner. • The Crevice tool (12) should be used when the water level is too high for the normal brush head. To ensure 2.
- Page 13 • If the plug or power supply cord is damaged it must, for safety reason be replaced by Draper tools, an • Clean and maintain the vacuum correctly and authorised repairer or similarly qualified person in regularly to ensure optimum performance.
- Page 14 Draper Tools Product Helpline for details of your nearest authorised agent. Draper Tools will endeavour to hold any spare parts, if applicable, for seven years from the date that it sells the final matching stock item.
- Page 15 This warranty period covers parts and labour for 12 months from the date of purchase. Your Draper Tools guarantee is not effective until you can Where tools have been hired out, the warranty period produce, upon request, a dated receipt or invoice to covers 90 days from the date of purchase.
- Page 16 Product Helpline: +44 (0) 23 8049 4344 Telephone Sales Desk: +44 (0) 23 8049 4333 General Enquiries: +44 (0) 23 8026 6355 Please contact the Draper Tools Product Helpline for repair and servicing enquiries. © Published by Draper Tools Limited © Published by Draper Tools Limited...
Need help?
Do you have a question about the 13785 and is the answer not in the manual?
Questions and answers