Arjo Miranti Instructions For Use Manual
Hide thumbs
Also See for Miranti:
- Instructions for use manual (84 pages) ,
- Quick reference manual (3 pages) ,
- Quick reference manual-use (3 pages)
Table of Contents
Advertisement
Quick Links
Advertisement
Table of Contents

Related Manuals for Arjo Miranti


Summary of Contents for Arjo Miranti
- Page 1 INSTRUCTIONS FOR USE · Miranti 04.CE.02_24ZH • 11/2022...
- Page 2 To avoid injury, always read this Instructions for Use and accompanied documents before using the product. Design Policy and Copyright ® and ™ are trademarks belonging to the Arjo group of companies. © Arjo 2022. As our policy is one of continuous improvement, we reserve the right to modify designs without prior notice.
-
Page 3: Table Of Contents
Contents Foreword ...................4 Intended Use ................5 Safety Instructions ..............6 Preparations ................7 Part Designations ..............8 Product Description/Function ..........10 Lifting ...................10 Central Brake ...............10 Control Panel ...............10 Hand Control ...............10 Positioning Handle ...............10 Side Guard and Patient Security Grip .........11 Powered Backrest/Hook Rope ..........11 Thigh Support Cushion ............12 Headrest ................12 Emergency Stop ..............12... -
Page 4: Foreword
Foreword Service and Support Thank you for purchasing Arjo equipment. Your Miranti lift bath trolley is a part of a series of A service routine must be performed on your Miranti quality products designed especially for hospitals, lift bath trolley every year by qualified personnel to nursing homes and other health care use. -
Page 5: Intended Use
Expected service life This equipment must be used in line with its intended use and in accordance with these The expected service life of Miranti is the maximum safety instructions. Anyone using this period of useful life. equipment must also have read and... -
Page 6: Safety Instructions
Safety Instructions WARNING WARNING To avoid falling, make sure that the patient To avoid explosion or fire, never use the is positioned correctly and that the safety equipment in oxygen rich environment, in belt is being used, properly fastened and presence of heat source or flammable tightened. -
Page 7: Preparations
4 Read the IFU. 4 Make sure that the battery is fully charged. 5 Disinfect the product according to section Miranti Lift Bath Trolley Directions Cleaning and Disinfection Instructions on page 24. The driving direction during the transfer is according to the illustration below. -
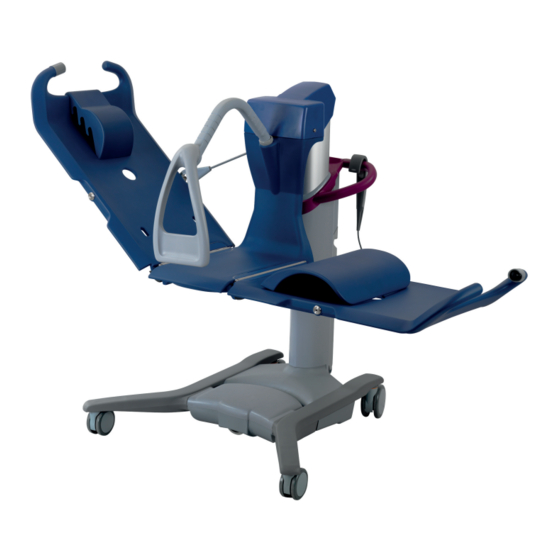
Page 8: Part Designations
Part Designations 1 Stretcher and frame 2 Headrest 3 Thigh-support cushion 4 Transfer handle 5 Positioning handle 6 Battery 7 Hand control 8 Side guard 9 Patient security grip 10 Pillar 11 Emergency High/Low 12 Hook rope 13 Central brake (placed under the chassis) 14 Control panel 15 Chassis 16 Castor... -
Page 10: Product Description/Function
Fig. 2 Hand Control The hand control has an integrated hook which makes it easy to attach to various parts of the Miranti lift bath trolley. (See Fig. 2) • Unhook the hand control and hold it in your hand. -
Page 11: Side Guard And Patient Security Grip
Side Guard and Patient Security Grip Fig. 1 (3 steps) The side guard, which prevents the patient falling to the side and the patient security grip, which the patient can hold, are integrated in a hinged bar. 1 Lift the bar upwards. (See Fig. 1) Fig. -
Page 12: Thigh Support Cushion
(See Fig. 6) Emergency Stop Fig. 7 If, for any reason, the Miranti lift bath trolley does not respond to the control buttons, you can quickly stop lift movement by pressing the button on the battery and disconnect it. (See Fig. 7) Contact your local Arjo representative before re-using the Miranti lift bath trolley. -
Page 13: Emergency High/Low
Emergency High/Low Fig. 8 (2 steps) If, for any reason, the Miranti lift bath trolley does not respond to the control buttons, raise or lower the Miranti lift bath trolley by using the Emergency High/Low. 1 Unplug the hand control. (See Fig. 8) -
Page 14: Power Drive (Optional)
(A). (See Fig. 12) The Miranti lift bath trolley can only move forwards. The wheel is spring-mounted so it can handle different floor levels e.g. -
Page 15: Safety Belts
The Miranti lift bath trolley has two safety belts, one to be used over the chest and one over the legs. They are identical and are used in the same way. - Page 16 4 Buckle the safety belt by inserting the buckles into each Fig. 5 other. Make sure the fastening clip has the arrow shaped side upwards (A). (See Fig. 5) 5 Unbuckle the safety belt by pressing the spring knobs (A), Fig.
- Page 17 When not in use (1 step) Fig. 12 1 Make sure that the safety belts are buckled over the stretcher when the Miranti lift bath trolley is not in use. (See Fig. 12). Remove (1 step) Fig. 13 1 Pull the hook rope (upper safety belt only) and the safety...
-
Page 18: Transfer The Patient
3 Undress the patient in bed and dress him/her in a bathrobe, preferably one with buttons up the back. 4 Choose one end of the Miranti lift bath trolley to function as the backrest and fasten the hook rope in that end. If possible, approach the patient from the right side of the Miranti lift bath trolley for transfer to the bath. - Page 19 Let the patient put his/her hands on the patient security grip. (See Fig. 4) 13 Raise the Miranti lift bath trolley’s stretcher enough to move it away from the bed. 14 Release the Miranti lift bath trolley central brake.
- Page 20 Fig. 1 2 Fold down the bed rail. 3 If the Miranti lift bath trolley comes from a bath: place a towel on the bed to avoid making the bed wet. 4 Adjust the Miranti lift bath trolley height so the stretcher is at a safe distance from the bed.
- Page 21 12 Raise stretcher to separate it from the bed. 13 Release the central brake. 14 Pull the Miranti lift bath trolley away from the bed. 15 Turn the patient so he/she lays on the back. 16 Fold up the bed rail.
-
Page 22: Bathe The Patient
Bathe the patient Read the separate instructions for your bathing Fig. 1 equipment. Power Drive (9 steps) 1 Raise the stretcher to clear the edge of the bath. (See Fig 1) Fig. 2 2 Activate the power drive and move the patient along the side of the bathtub and finally push transversely to it. - Page 23 8 Dry the patient, as well as the underside of the stretcher, to Fig. 5 prevent water from dripping onto the floor prior to moving the Miranti lift bath trolley away from the bath. Raise the stretcher. (See Fig 5) Fig.
-
Page 24: Cleaning And Disinfection Instructions
Cleaning and Disinfection Instructions For the best results, only use Arjo branded WARNING disinfectant. If you have any questions regarding disinfecting the equipment or wish to order disinfectant (see section Parts and Accessories on page 42), contact you local Arjo representative. - Page 25 2 Position the Miranti lift bath trolley over the bathtub and lower it down. (See Fig. 2) 3 Clean: • the upper part of the Miranti lift bath trolley (start from top and move downwards) • all removed parts from visible residue with a cloth soaked in water.
- Page 26 Cleaning (step 4-11 of 17) Fig. 3 4 Put on protective gloves and glasses. 5 Most Arjo baths are equipped with a spray handle for disinfecting purposes. Read the bath instructions on how to use the disinfectant. Check the level of the disinfectant.
- Page 27 • the upper part of the Miranti lift bath trolley Fig. 6 • all removed parts • all other areas of the Miranti lift bath trolley, such as chassis The cloth should occasionally be rinsed in running water during removal of disinfectant. (See Fig. 6) 16 If all disinfectant cannot be removed, spray water on the affected part and wipe off with disposable towels.
-
Page 28: Battery Instructions
Battery Instructions Installation of Charger WARNING See the Battery Charger IFU. To avoid bodily injury, do NOT crush, puncture, open, dismantle or otherwise How to Charge the Battery mechanically interfere with the battery. See the Battery Charger IFU. • Should the battery casing crack and cause contents to come in contact with skin or clothing, rinse immediately with plenty of water. -
Page 29: Care And Preventative Maintenance
Care and Preventative Maintenance The Miranti lift bath trolley is subject to wear and tear, and the following actions must be performed when specified to make sure that the product remains within its original manufacturing specification WARNING To avoid malfunction resulting in injury, make sure to conduct regular inspections and follow the recommended maintenance schedule. - Page 30 Miranti lift bath trolley knowledge following the instructions in this IFU. Every day • Disinfect. The Miranti lift bath trolley has to be disinfected immediately after every use. Arjo disinfectants and shampoos should be used in recommended concentrations. See section Cleaning and Disinfection Instructions on page 24.
- Page 31 Check attachment and locking of side guard and patient security grip. All attachments shall shape-in firmly into all positions. (See Fig 8). Yearly The Miranti lift bath trolley has to be serviced according to the table QUALIFIED PERSONNEL Action/Check on page 32.
-
Page 32: Troubleshooting
In case of this scenario stop using the equipment and contact qualified personnel for repair of the equipment. NOTE If the product does not work as intended, immediately contact your local Arjo representative for support. -
Page 33: Technical Specifications
Fuse F1 F10AL 250 V Fuse F2 T2.5AL 250 V Allowed combinations The Miranti lift bath trolley panels integrate with Generic hospital/care facility bed with a the following Arjo products clearance of 150 mm (5 7/8”) System 2000 baths No other combinations are allowed. - Page 34 Recycling Package Wood and corrugated cardboard recyclable End of Life Disposal • All batteries in the product must be recycled separately. Batteries are to be disposed in accordance with national or local regulations. • Slings including stiffeners/stabilizers, padding material, any other textiles or polymers or plastic materials etc.
-
Page 35: Dimensions
Dimensions Chassis Lowest position Highest position... -
Page 37: Labels
Labels Label explanation Classified by Underwriters Laboratories Inc. with respect to Attention Important user information for correct electrical shock, fire, mechanical, use. Label hazards and other specified hazards Battery States safety and environmental only in accordance with: AAMI ES60601-1:2005,ES60601- information for the battery. Label 1:2005/AMD1 1:2012, Data Label... - Page 38 Scale label Attention Label Identification Label Approval Label Battery Label Data Label Applied Part...
- Page 39 UK Symbol explanation This section is only applicable to United Kingdom (UK) market when UK marking is applied to the Arjo medical device labelling. UK marking indicating conformity with UK Medical Devices Regulations 2002 (SI 2002 No 618, as amended) Figures indicate UK Approved Body supervision.
-
Page 40: Electromagnetic Compatibility
Portable RF communications equipment (including peripherals such as antenna cables and external antennas) should be used no closer than 30 cm (12 inches) to any part of the Miranti, including cables specified by the manufacturer. Otherwise, degradation of the performance of this equipment could result. - Page 41 Guidance and manufacturer’s declaration – electromagnetic immunity Immunity test IEC 60601-1-2 test level Compliance level Electrostatic discharge ±2kV, ±4kV, ±8kV, ±15kV air ±2kV, ±4kV, ±8kV, ±15kV air (ESD) EN 61000-4-2 ±8kV contact ±8kV contact Conducted disturbances 3V in 0,15 MHz to 80 MHz 3V in 0,15 MHz to 80 MHz inducted by RF fields 6V in ISM and amateur radio bands...
-
Page 42: Parts And Accessories
Parts and Accessories Electronic scale Safety belt For disinfectant contact CDA2100-01 8664559 the Arjo local representative Battery and battery Head rest Thigh support cushion charger Power drive... - Page 43 ...................4 ..................5 ..................6 ..................7 ..................8 ................10 ..................10 ................10 ................10 ...............10 ................10 ............11 ..............11 ................12 ..................12 ................12 ..............13 ..................13 ............13 ............14 ................14 .................15 ..................18 ..................22 ...............24 ..................28 ..............29 ..................32 ..................33 ..................35 ..................37 ................39 ................41...
- Page 44 Arjo Miranti Miranti Arjo Arjo Arjo Arjo (IFU) Miranti (IFU) Arjo Arjo Arjo...
- Page 45 Miranti (IFU) Arjo Miranti (IFU) • 160 kg/353 lbs •...
- Page 46 1:50 (1.15°) (SWL)
- Page 47 Miranti Arjo...
- Page 48 IEC 60601-1...
- Page 50 • Miranti • Miranti • • Miranti • • Miranti • Miranti • • • • Miranti...
- Page 52 Miranti Miranti Arjo...
- Page 53 Miranti Miranti • Miranti • Miranti Miranti Arjo...
- Page 54 Miranti 10 mm —— Miranti...
- Page 55 Miranti...
- Page 57 1 Miranti...
- Page 58 Miranti Miranti Miranti Miranti Miranti...
- Page 59 Miranti Miranti Miranti Miranti...
- Page 60 Miranti Miranti Miranti Miranti...
- Page 61 Miranti Miranti...
- Page 63 Miranti Miranti Miranti...
- Page 64 Arjo Arjo (MSDS) Arjo Miranti • • • • • • • •...
- Page 65 Miranti • Miranti •...
- Page 66 4-11 Arjo • Miranti • Miranti 25 °C (77 °F) Miranti Miranti...
- Page 67 12-17 • Miranti • Miranti 25 °C (77 °F) • Miranti • • Miranti...
- Page 68 • • • • • • • • • -0 °C +30 °C 32 °F 86 °F • 50 °C (122 °F)
- Page 69 Miranti Miranti...
- Page 70 Miranti • Miranti Arjo • • • • •...
- Page 71 • • • • Miranti...
- Page 72 Arjo...
- Page 73 Miranti CEB8X0X 160 kg (353 lbs) (SWL) 103 kg (227 lbs) +20 °C +45 °C +68 °F +113 °F +10 °C +40 °C +50 °F +104 °F –20 °C +70 °C -4 °F +158 °F –20 °C +70 °C -4 °F +158 °F...
- Page 74 • • • WEEE...
- Page 77 Underwriters Laboratories Inc. AAMI ES60601-1:2005 ES60601- 1:2005/AMD1 1:2012 ES60601- 1:2005/AMD2:2021 CSA-C22.2 No. 60601-1:14 2:2022 (MOD) - CAN/CSAC22.2 No. 60601-1:14 IEC 60601-1:2005+A1:2012+A2:2020 IEC 60601-1 2017/745 160 kg (353 lbs) —— 263 kg/ 580 lbs 103 kg/ 160 kg/ 227 lbs 353 lbs 590 mm (23 1/4") 24V DC 150 VA...
- Page 79 (EMI) • (RF) Miranti 30 cm CISPR 11 Class B CISPR 11...
- Page 80 IEC 60601-1-2 (ESD) ±2kV ±4kV ±8kV ±2kV ±4kV ±8kV ±15kV ±15kV ±8kV ±8kV EN 61000-4-2 0.15 MHz 80 MHz 0.15 MHz 80 MHz 0.15 MHz 80 MHz 0.15 MHz 80 MHz EN 61000-4-6 1 kHz 80% AM 1 kHz 80% AM 3 V/m 3 V/m EN 61000-4-3...
- Page 81 CDA2100-01 8664559 Arjo...
- Page 83 AUSTRALIA FRANCE Arjo Australia Arjo SAS Arjo Polska Sp. z o.o. Building B, Level 3 2 Avenue Alcide de Gasperi 11 Talavera Road CS 70133 Macquarie Park, NSW, 2113, FR-59436 RONCQ CEDEX Tel: +48 61 662 15 50 Australia Tél: +33 (0) 3 20 28 13 13...
- Page 84 At Arjo, we are committed to improving the everyday lives of people affected by reduced mobility and age-related health challenges. With products and solutions that ensure ergonomic patient handling, personal hygiene, disinfection, diagnostics, and the effective prevention of pressure ulcers and venous thromboembolism, we help professionals across care environments to continually raise...
Need help?
Do you have a question about the Miranti and is the answer not in the manual?
Questions and answers