Table of Contents
Advertisement
Quick Links
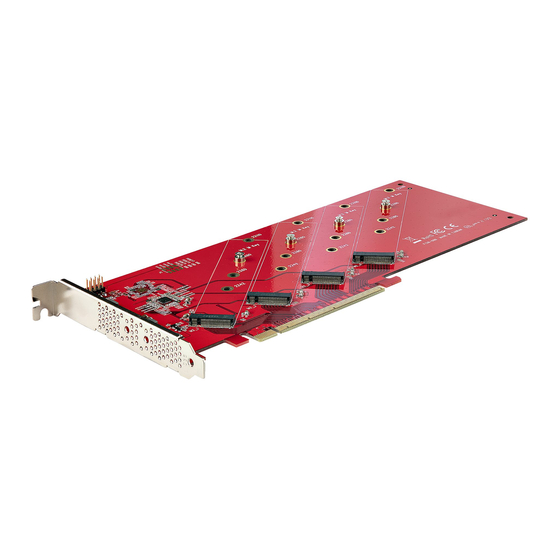
PCI Express x16 to Quad M.2 PCIe SSD Adapter with Bifurcation
Product ID
QUAD-M2-PCIE-CARD-B
1
3
4
Component
1
LED Jumper Pins
Standoffs (x 4),
Standoff Installation
2
Screws (x 4), and Drive
Mounting Screws (x 4)
3
M.2 Connectors
4
PCIe x16 Connector
Product Information
For the latest manuals, product information, technical specifications, and declarations of
conformance, please visit:
www.StarTech.com/QUAD-M2-PCIE-CARD-B
To view manuals, FAQs, videos, drivers, downloads, technical drawings, and more, visit www.startech.com/support.
2
Function
Connect LED Lights to the PCIe to M.2 Adapter
•
Card to show Drive activity
Secure M.2 Storage Devices to the PCIe to M.2
•
Adapter Card
Compatible PCIe M.2 SSDs (NVMe and AHCI):
•
2242, 2260, 2280, and 22110 drives
Connect M Keyed M.2 Storage Devices to the
•
PCIe to M.2 Adapter Card
Connect the PCIe to M.2 Adapter Card to the
•
PCIe Slot in a Computer
Package Contents
PCIe to M.2 Adapter Card x 1
•
Quick-Start Guide x 1
•
Requirements
Computer x 1
•
PCIe x16 Slot with Bifurcation Support
•
Phillips Head Screwdriver x 1
•
PCI Express M.2 SSD x 4
•
Pliers x 1
•
Installation
Warning: PCIe Cards can be damaged by static electricity. Ensure that the Installer
is properly grounded before they open the Computer Case or touch the PCIe to M.2
Adapter Card. The Installer should wear an Anti-Static Strap when installing any
computer component. If an Anti-Static Strap is not available, discharge any built-up
static electricity by touching a large Grounded Metal Surface for several seconds.
Only handle the PCIe to M.2 Adapter Card by its edges and do not touch the gold
connectors.
Note: Consult the documentation that came with the Computer/Motherboard for
details regarding how to enable and configure PCIe Bifurcation.
Install the M.2 Storage Drives
Place the Drive next to the Adapter and note the Drive Installation Holes that
1.
match the length of the Drive. If the Standoffs and Installation Screws are already
installed in the correct position, proceed to step 5.
On the front of the M.2 Adapter Card, use Pliers to hold the Standoff in place while
2.
using a Phillips Head Screwdriver to remove the Screw, located on the back of the
Adapter.
Use the Phillips Head Screwdriver to remove the Screw on the front of the M.2
3.
Adapter Card.
Remove the Standoff.
4.
Repeat steps 2 - 3 to remove the remaining Standoffs and Standoff Installation
5.
Screws as needed.
Install the Standoff in the Drive Installation Hole that matches the length of the
6.
Drive.
Gently slide the M.2 Drive Connector into the corresponding M.2 Connector,
7.
located on the M.2 Adapter Card, and press the Drive down toward the adapter
until the Drive is properly seated
Note: The M.2 Connector on the Drive is M Keyed so that it only fits M Keyed M.2
Storage Devices
Replace the Standoff Installation Screw, removed in step 2, and tighten using a
8.
Philips Head Screwdriver.
Quick-Start Guide
Manual Revision: February 8, 2022 11:08 AM
Advertisement
Table of Contents

Related Manuals for StarTech.com QUAD-M2-PCIE-CARD-B


Summary of Contents for StarTech.com QUAD-M2-PCIE-CARD-B
- Page 1 Replace the Standoff Installation Screw, removed in step 2, and tighten using a Philips Head Screwdriver. To view manuals, FAQs, videos, drivers, downloads, technical drawings, and more, visit www.startech.com/support. Manual Revision: February 8, 2022 11:08 AM...
- Page 2 StarTech.com. Where they occur these references are for illustrative purposes only Industry Canada Statement and do not represent an endorsement of a product or service by StarTech.com, or an endorsement of the product(s) to which This Class B digital apparatus complies with Canadian ICES-003.
Need help?
Do you have a question about the QUAD-M2-PCIE-CARD-B and is the answer not in the manual?
Questions and answers