Table of Contents
Advertisement
Quick Links
Quick start guide
x4 PCIe Expansion Card to M.2 PCIe SSD Adapter
PEX4M2E1
FR: Guide de l'utilisateur - fr.startech.com
DE: Bedienungsanleitung - de.startech.com
ES: Guía del usuario - es.startech.com
NL: Gebruiksaanwijzing - nl.startech.com
PT: Guia do usuário - pt.startech.com
IT: Guida per l'uso - it.startech.com
Packaging contents
• 1 x PCI Express® adapter card to M.2 NVMe PCIe SSD
• 1 x low-profile bracket
• 1 x full-profile bracket (pre-installed)
• 1 x SSD standoff and installation screw
• 1 x quick start guide
System requirements
• PCI Express M.2 NGFF SSD
• Computer system with a x4 or larger slot
• Phillips head screwdriver
• Small set of pliers
The PEX4M2E1 is OS independent and doesn't require any additional
drivers or software.
Note: Some drives are not compatible with certain operating
systems. Before you install a drive in the adapter, check with the
drive manufacturer to make sure that the drive is compatible with
the OS that your computer system is running.
System requirements are subject to change. For the latest
requirements, please visit www.startech.com/PEX4M2E1.
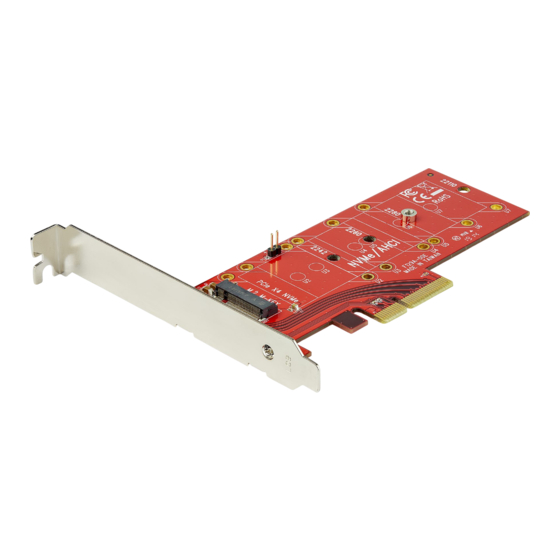
Product diagram
Mounting bracket
(full-profile bracket pictured)
M.2 NGFF connector
Bracket
PCIe x4
screws
connector
For the latest information, technical specifications, and support for
this product, please visit www.startech.com/PEX4M2E1.
Drive installation holes
SSD standoff and
installation screw
*actual product may vary from photos
Install a drive in the adapter
Warning! Drives and adapters should be handled carefully,
especially when they're transported. If you're not careful with your
drives, you may lose data as a result. Always handle storage devices
with caution. Make sure that you're properly grounded by wearing
an anti-static strap when you install any computer component. If an
anti-static strap isn't available, touch a large grounded metal surface
for several seconds to discharge any built-up static electricity.
1. Depending on the length of the drive that you want to install, you
may need to move the preinstalled SSD standoff and installation
screw. Place your drive next to the adapter and note the drive
installation hole that matches the height of your drive. If the SSD
standoff and installation screw are already installed in the correct
position, proceed to step 6.
2. On the back of the PEX4M2E1, use a small set of pliers to remove
the nut that is holding the SSD standoff and installation screw in
place.
3. On the front of the adapter, remove the SSD standoff and
installation screw.
4. Place the SSD standoff in the drive installation hole that matches
the length of your drive.
5. Replace the nut that you removed in step 2 and tighten it in place.
6. Gently slide the M.2 connector on the drive into the
corresponding connector on the adapter and press the drive
down toward the adapter until the drive is in place.
Note: The connector on your drive is keyed so that it only fits in the
adapter one way.
7. Insert the installation screw into the SSD standoff and tighten it
into place.
Install the low-profile bracket
The PEX4M2E1 can be mounted in both low-profile and full-profile
computer systems. The full-profile bracket comes preinstalled in the
adapter but you can install the low-profile bracket instead.
1. Use a Phillips head screwdriver to remove the two bracket screws
from the PEX4M2E1.
2. Remove the full-profile bracket from the adapter.
3. Line up the low-profile bracket with the bracket holes on the back
of the adapter.
4. Insert the two bracket screws you removed in step 1 and tighten
them in place.
Install the adapter in a computer
1. Turn off the computer that you want to install the PEX4M2E1 into.
2. Remove the case from your computer. For more information
about how to properly do this, consult the documentation that
came with your computer system.
3. Place the adapter into an available expansion slot.
4. Insert a computer case screw (not included) into the case-
Manual Revision: 09/10/2019
Advertisement
Table of Contents

Related Manuals for StarTech.com PEX4M2E1


Summary of Contents for StarTech.com PEX4M2E1
- Page 1 • 1 x quick start guide position, proceed to step 6. 2. On the back of the PEX4M2E1, use a small set of pliers to remove the nut that is holding the SSD standoff and installation screw in System requirements place.
- Page 2 This manual may make reference to trademarks, registered trademarks, and other protected names and/or symbols of third-party companies not related in any way to StarTech.com. Where they occur these references are for illustrative purposes only and do not represent an endorsement of a product or service by StarTech.com, or an endorsement of the product(s) to which this manual applies by the third-party company in question.
Need help?
Do you have a question about the PEX4M2E1 and is the answer not in the manual?
Questions and answers