Advertisement
Quick Links
INSTRUCTION SHEET
Surface Mount Corner Bracket
QUESTION...
1•847•780•6120
PACKAGING CONTENTS
ITEM
DESCRIPTION
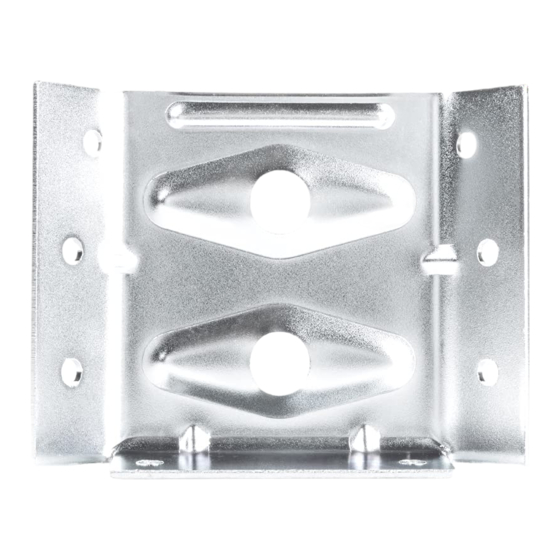
A
Bracket, 2-5/8" tall and 3-1/4" wide
HARDWARE NEEDED (SOLD SEPARATELY)
ITEM
DESCRIPTION
B
Hanger bolts 5/16"-18 x 3"
C
5/16"-18 Nuts
D
Pan head screws #8 x 5/8"
NOTE: Figure 1 shows the hardware (sold separately) needed
for the assembly of one bracket (supplied).
Figure 1
A
TOOLS NEEDED
Phillips screw driver
1/2" wrench or socket
Drill bits for Pilot holes
#8 wood screw - 5/64" for soft wood and 3/32" for hard wood
5/16"-18 hanger bolt - 9/32" for soft wood, 19/64" for
hard wood
Hand planer - to cut the chamfers on the corner of the legs
MOUNTING INSTRUCTIONS
1.
Cut a stopped 1/2" chamfer on the top inside corners of
each table leg.
2.
Position a table leg and the adjoining apron pieces upside
down on a flat surface. Make sure the apron pieces are
positioned with the desired setback and are square to
the leg.
3.
Place a corner bracket so the large mounting holes are
centered on the chamfer of the table leg and the flat areas
are flush with the apron pieces.
Figure 2
QUANTITY
12
4.
QUANTITY
5.
24
24
6.
96
7.
B
8.
9.
C
Figure 3
D
Figure 4
10. When all four brackets are assembled and the apron is
11. Make sure all hardware is tight.
Table leg
Mark hole
location
Repeat Steps 2 and 3 for other table legs.
Mark mounting hole locations for #8 x 5/8" pan head screws
and drill the pilot holes. NOTE: Pilot holes should be 5/64"
for softwood or 3/32" for hardwood.
Position the table legs and mark the pilot hole locations for
the hanger bolts. NOTE: The distance from the top of the
bracket (end with flange) to the centerline of the first hole is
3/4" and 1-7/8" to the second.
Secure the corner brackets to the apron pieces with the
#8 x 5/8" pan head screws.
Drill the pilot holes into the legs.
Use two 5/16"-18 nuts to drive the hanger bolts in place.
After the hanger bolts are set, remove the nuts. Place the
table leg with hanger bolts in place and secure each hanger
bolt with a single 5/16"-18 nut.
5/16"-18 Nuts
complete use the two holes in the top of the bracket to
mount the table top to the apron.
Model No. 71699
Stopped 1/2" Chamfer
on inside corner of leg
Apron piece
Table Leg
Table Top
Advertisement

Related Manuals for PowerTec 71699


Summary of Contents for PowerTec 71699
- Page 1 INSTRUCTION SHEET Model No. 71699 Figure 2 Surface Mount Corner Bracket Table leg Stopped 1/2" Chamfer on inside corner of leg Apron piece QUESTION... 1•847•780•6120 PACKAGING CONTENTS ITEM DESCRIPTION QUANTITY Bracket, 2-5/8" tall and 3-1/4" wide Mark hole HARDWARE NEEDED (SOLD SEPARATELY) location Repeat Steps 2 and 3 for other table legs.
- Page 2 Visit us on the web at powertecproducts.com Put these instructions and the original sales invoice in a safe, dry place for future reference. Southern Technologies, LLC Waukegan, IL 60087 21-0503...
Need help?
Do you have a question about the 71699 and is the answer not in the manual?
Questions and answers