Advertisement
Quick Links
INSTRUCTION SHEET
Table Saw Sled Kit
QUESTION...
1•847•780•6120
WARNING
To reduce the risk of injury, turn table saw off and disconnect it
from power source before installing and removing accessories.
An accidental start-up can cause injury.
WARNING
Some dust created by operation of power tool contains
chemicals known to the State of California to cause cancer, birth
defects or other reproductive harm. To reduce your exposure
to these chemicals, work in a well ventilated area and work
with approved safety equipment. Always wear OSHA/NIOSH
approved, properly fitting face mask or respirator when using
such tools.
WARNING
For your own safety, read and follow all safety procedures listed
in the table saw instruction manual.
WARNING
Do not use the table saw sled kit until it is completely assembled
and you have read and understood this entire operating manual
and the operating manual of the table saw being used with this
table saw sled kit.
NOTE: These instructions are only a general guide for building
your own table saw sled. The dimensions and materials used
in these instructions reflect the design we chose. They can be
changed or altered to meet your design or requirements.
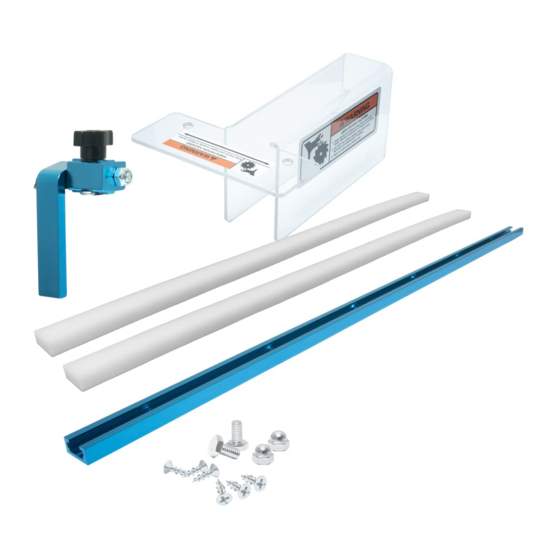
PACKAGING CONTENTS
ITEM DESCRIPTION
A
Universal T-Track (24" long)
B
HDPE (High Density Polyethylene) bars, 19"
long x 3/4" x 3/8"
C
3" Flip stop
D
Flat Head Wood Screws, #6 x 1/2"
E
Blade guard
F
1/4"-20 x 1/2" hex bolts
G
1/4"-20 acorn hex nuts
Instruction Sheet (not shown)
Figure 1
C
D
Additional materials will be needed to build the table saw sled.
The things listed under Tools Needed and Other Materials
Needed are NOT included in the kit. Gather all tools and
materials before starting.
NOTE: Because your sled may vary in size and appearance
depending on your needs, an exact cut list can not be provided.
The example in these instructions will be for 18" x 24" base.
TOOLS NEEDED
• Drill
• Square
OTHER MATERIALS NEEDED
• CA Glue (Cyanoacrylate Adhesives)
• #8 x 3/4" flat head wood screws (quantity depends on
your design)
• Flat head wood screws (size and quantity depends on
your design)
• 1/2" Baltic Birch for the base (our example will cut the base
to 18" x 24", purchase the size needed for your needs).
NOTE: Other stock may be used, using the 1/2" Baltic Birch
will make the sled lighter and easier to handle.
• Stock for Front and Back Fence, needs to be 24" long and
2-5/8" tall. This will allow the flip stop to work, without a gap
between the end of the fence, the sled and the blade when it
is fully raised. (In our example we used the stock size shown
in Figure 2.) NOTE: The use of 3/4" wide stock will make
mounting the T-Track to the front fence easier.
Figure 2
QTY
1
Front Fence
24" x 2-5/8" x 3/4"
2
1
6
1
2
2
1
Model No. 71703
B
A
E
• Clamps
• Countersink
bit, forstner bit
Mark
3/4"
G
F
(depends on the
screws used)
• Router table
Back Fence
24" x 2-5/8" x 1-1/2"
18"
Advertisement

Related Manuals for PowerTec 71703


Summary of Contents for PowerTec 71703
- Page 1 INSTRUCTION SHEET Model No. 71703 Figure 1 Table Saw Sled Kit QUESTION... 1•847•780•6120 WARNING To reduce the risk of injury, turn table saw off and disconnect it Additional materials will be needed to build the table saw sled. from power source before installing and removing accessories.
- Page 2 Figure 5 CROSSCUT SLED-BASE Cut the 1/2" Baltic Birch to 18" by 24" for the base. The short side (18") should be going with the grain of the stock. Mark the center point on the 24" side of the base. With the saw turned off and disconnect from the power source, raise the saw blade until it is visible.
- Page 3 INSTALL THE FRONT FENCE After the screws are all tight, make sure the bars will slide freely in the saw table tracks. Adjust the screws until the In the example used, the front fence is cut to 24" long, 2-5/8" tall bars slide freely.
- Page 4 INSTALL GUARD Flip Stop The 3" fence flip stop is extremely versatile and quickly converts Slide the 1/4"-20 x 1/2" hex bolts into the T-Slot in the top of from inboard to outboard position for a variety of applications. the front fence. In addition, the flip arm can be moved from right to left to match Place the blade guard onto the 1/4"-20 x 1/2"...
Need help?
Do you have a question about the 71703 and is the answer not in the manual?
Questions and answers