Table of Contents
Advertisement
Quick Links
Advertisement
Table of Contents

Related Manuals for Ronix 8605


Summary of Contents for Ronix 8605
- Page 1 CORDLESS MINI COMPRESSOR 8605...
-
Page 2: Technical Specifications
Maximum Air Flow 16 L/min Continuous Working Time 23min (All Diodes) Inflator Hose Length 40cm Battery Charging Time 60min Flux 120Lm Weight 1.3kg Supplied in Ronix color box Includes Ball Adaptor, Tire Vale Adaptor,1pc 2.0Ah Battery, 1pc 2.0A Charger USER MANUAL... -
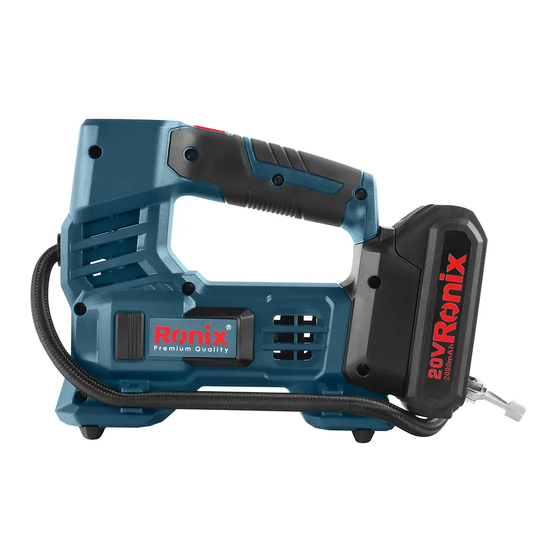
Page 3: Part List
PART LIST Start switch Lamp Switch Battery Lamp Hose Hose holder Unit but ton Sport ball needle Plus, button Main power switch Minus button Cone interface GENERAL SAFETY RULES FOR ALL BATTERY-OPERATED TOOLS WARNING! READ AND UNDERSTAND ALL INSTRUCTIONS. Failure to follow all instructions listed below may result in electric shock, fire and/or serious personal injury. -
Page 4: Work Area
WORK AREA 1) Keep your work area clean and well lit. cluttered benches and dark areas invite accidents. 2) Flammable liquids, gases, or dust. Power tools create sparks which may ignite the dust or fumes. Do not operate power tools in explosive atmospheres, such as in the presence of flammable liquids, gases, or dust. - Page 5 9) Avoid accidental starting. Be sure switch is in the locked or off position before inserting battery pack. Carrying tools with your finger on the switch or insetting the battery pack into a tool with the switch on invites accidents. 10) Remove adjusting keys or wrenches before turning the tool on.
-
Page 6: Important Charging Notes
to another. Shorting the battery terminals together may cause sparks, burns, or a fire. 19) Maintain tools with care. Keep cutting tools sharp and clean. Properly maintained tools with sharp cutting edge are less likely to bind and are easier to control. 20) Check for misalignment or binding of moving parts, breakage of parts, and any other condition that may affect the tool’s operation. - Page 7 To cool the battery pack after use, avoid placing the charger in a warm environment such as in a metal shed or non-insulated trailer. Ronix service Authorized Service Center. CORDLESS INFLATOR SAFETY WARNING 1) When inflating objects, connect the air chuck, adapter, and valve tightly.
- Page 8 22) Do not disassemble the tool. 23) Use only standard accessories provided by Ronix. The use of any other accessories or attachments might present a risk of injury to persons.
-
Page 9: Functional Description
FUNCTIONAL DESCRIPTION CAUTION! Always be sure that the tool is switched off and the battery cartridge is removed before adjusting or checking function on the tool. INSTALLING OR REMOVING BATTERY CARTRIDGE 1. Button 2. Battery cartridge To remove the battery cartridge, slide it from the tool while sliding the button on the front of the cartridge. -
Page 10: Battery Protection System
INDICATING THE REMAINING BATTERY CAPACITY Press the check button on the battery cartridge to indicate the remaining battery capacity. The indicator lamps light up for a few seconds. NOTE! Depending on the conditions of use and the ambient temperature, the indication may differ slightly from the actual capacity. BATTERY PROTECTION SYSTEM The tool is equipped with a battery protection system. -
Page 11: Main Power Switch
MAIN POWER SWITCH WARNING! Always turn off the main power switch when not in use. CAUTION! When carrying the tool, turn off the main power switch. Otherwise, pulling the switch trigger unintentionally may cause an injury. To turn on the tool, press the main power switch. To turn off the tool, press the main power switch again. -
Page 12: Operation
If the object to be inflated is connected to the tool, the air pressure of the object is displayed on the pressure gauge when you turn on the tool. If nothing is connected to the tool, the pressure gauge displays “0”. You can set the air pressure on the pressure gauge. - Page 13 1.Handle 2. Air Chuck 3.Air Chuck Clamp 4. Valve Stem USING THE SPORT BALL NEEDLE OR TAPERED ADAPTER You can inflate small items such as sport balls or floating tubes. To inflate sport balls, use the sport ball needle. To inflate floating tubes, use the tapered adapter.
-
Page 14: Battery Charger Operation
NOTE! Never use gasoline, benzine, tinner, alcohol or the like. Discoloration, deformation or cracks may result. BATTERY CHARGER OPERATION 1) You MUST understand the whole Instruction Manual before any operation1. Slide the Battery into the Battery Charger by lining up the terminals on both.
Need help?
Do you have a question about the 8605 and is the answer not in the manual?
Questions and answers