Stelpro Maestro Quick Start Manual
Smart controller -thermostat
Hide thumbs
Also See for Maestro:
- Quick start manual (16 pages) ,
- Quick start manual (16 pages) ,
- Quick start manual (16 pages)
Table of Contents
Advertisement
Quick Links
Advertisement
Table of Contents

Related Manuals for Stelpro Maestro


Summary of Contents for Stelpro Maestro
- Page 1 QUICKSTART GUIDE SMART CONTROLLER THERMOSTAT •...
-
Page 2: The 360° Comfort Experience
Create your own ecosystem in your home and take full control of your comfort with the Maestro mobile app. MADE AND DESIGNED IN NORTH AMERICA Established in Quebec, Canada for more than 35 years, the Stelpro family business understands the specific needs our climate imposes on us as well as our concerns regarding safety and environmental protection. - Page 3 • 2 - Install your Maestro thermostats 3 - Install the Maestro application and create your Maestro account 4 - Build your Maestro network For further information or to consult the complete User Guide, please visit our website. www.stelpro.com/en-US/support-maestro...
-
Page 4: What's In The Box
WHAT’S IN THE BOX SMART CONTROLLER THERMOSTAT • QUICKSTART GUIDE MOUNTING PLATE | SCREWS (2) | CAPS (2) TOOLS REQUIRED NO. 2 PHILLIPS SCREWDRIVER... - Page 5 BEFORE YOU START WHERE TO INSTALL YOUR MAESTRO CONTROLLER THERMOSTAT • Install the controller thermostat in a central room where it is easily accessible, • at approximately 1.5 m (5 ft.) from the floor, on an indoor wall that faces the heating system.
- Page 6 INSTALLING THE MAESTRO CONTROLLER THERMOSTAT • Before you begin, take a few minutes to watch the step-by-step video on installing the Maestro controller thermostat. • www.stelpro.com/en-US/maestro IMPORTANT: The controller thermostat must be installed by a qualified electrician. • NOTE: A Maestro controller thermostat cannot control more than 4000 Watts in total.
- Page 7 TURN OFF THE HEATING SYSTEM’S ELECTRICAL CURRENT...
- Page 8 REMOVE PREVIOUS THERMOSTAT...
- Page 9 SECURE THE MAESTRO CONTROLLER THERMOSTAT • MOUNTING PLATE TO THE ELECTRICAL BOX...
- Page 10 CONNECT THE WIRES INSIDE THE CAPS PROVIDED 2 WIRES 4 WIRES...
- Page 11 SECURE THE CONTROLLER THERMOSTAT • ON THE MOUNTING PLATE...
- Page 12 TURN ON THE ELECTRICAL CURRENT...
-
Page 13: Set-Up Basic Options On First Start
SET-UP BASIC OPTIONS ON FIRST START 4 SETTINGS TO BE SET: > LANGUAGE (Francais / English) > TEMPERATURE FORMAT (°Celsius / °Fahrenheit) > TIME FORMAT (12 hours / 24 hours) > HEATING MODE (Baseboard / Fan-forced heater) ENGLISH... -
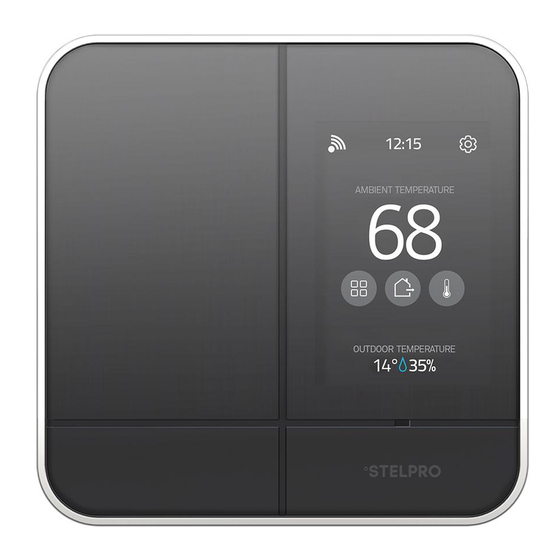
Page 14: Thermostat Interface
WI-FI CONNECTED ACTIVE ALERTS LOCAL TIME HEATING POWER KEYBOARD LOCKED ACCESS SETTINGS ACCESS THERMOSTAT OUTDOOR RELATIVE HUMIDITY OUTDOOR TEMPERATURE ACCESS STATUS & ACTIVITIES ACCESS GROUPS ROOM TEMPERATURE From the home screen, you can access all Maestro controller thermostat functionalities. •... - Page 15 USING THE CONTROLLER THERMOSTATS • TO CHANGE SETTINGS SETTINGS > OPTIONS to: Choose language (English or Français) Activate/deactivate open window detection • • Choose temperature display type Lock/unlock keyboard • • (°Celsius or °Fahrenheit) Configure screen saver (1, 5, 10 or 30 minutes) •...
- Page 16 For further information or to consult the complete User Guide, please visit our website. stelpro.com/en-US/maestro...
Need help?
Do you have a question about the Maestro and is the answer not in the manual?
Questions and answers