Stelpro Maestro Quick Start Manual
Hide thumbs
Also See for Maestro:
- Quick start manual (16 pages) ,
- Quick start manual (16 pages) ,
- Quick start manual (16 pages)
Table of Contents
Advertisement
Quick Links
Advertisement
Table of Contents

Related Manuals for Stelpro Maestro


Summary of Contents for Stelpro Maestro
- Page 1 QUICKSTART GUIDE SMART THERMOSTAT...
- Page 2 THE 360° COMFORT EXPERIENCE CONGRATULATIONS! You’ve chosen to entrust the heating of your home to the MAESTRO smart thermostat. The comfort of your family is now in your hands. Elegant, accurate and highly efficient, your new MAESTRO smart thermostat will help you reduce your energy bill and ecological footprint, so you can do your part for the environment.
- Page 3 3 - Install the MAESTRO application and create your MAESTRO account 4 - Build your MAESTRO network For further information, to discover all the possibilities that MAESTRO offers you or to consult the complete User Guide, please visit our website.
- Page 4 The signal may have a hard time getting to the master bathroom as the washer/dryer (3) and shower (4) could be barriers. If a MAESTRO thermostat is placed in the master bedroom (5), it will help relay the signals between the controller and the master bathroom thermostat.
- Page 5 BATHROOM DINING ROOM KITCHEN BEDROOM 9’ x 13’1” 9’10” x 8’ 11’2” x 12’1” LIVING ROOM 13’2” x 16’ MASTER BEDROOM 15’ x 10’10” For further information, please visit: www.stelpro.com/en-US/maestro/planning-of-network...
-
Page 6: Installation
INSTALLATION WARNING: The thermostat must be installed by a qualified electrician. A MAESTRO thermostat cannot control more than 4000 Watts in total. WHAT’S IN THE BOX Twist-on wire connectors (3) Mounting screws (2) Smart thermostat Mounting plate Tools required: no. 2 Phillips screwdriver... - Page 7 Turn off the heating system’s power supply. WARNING: To avoid the risk of fire, electric shock, or electrocution, turn off the power at the electrical panel and make sure the circuit is properly shut down. Follow the electrical code effective in your region.
- Page 8 Remove the old thermostat and secure the MAESTRO ther mostat mounting plate to the electrical box.
- Page 9 Connect the wires using the provided twist-on wire connectors. White if 120V LOAD 120 VAC 240 VAC...
- Page 10 Secure the ther mostat on the mounting plate.
- Page 11 Turn on the power supply.
-
Page 12: Quick Start
QUICK START SET-UP BASIC OPTIONS ON FIRST START 3 settings to be set: Temperature format (°C / °F) • Heating mode (Baseboard / Fan-forced heater) • Lobby Mode (Standard room / Lobby) • NOTE: Lobby mode only available if the heating mode is Fan forced heater Temperature format Heating mode Lobby mode... -
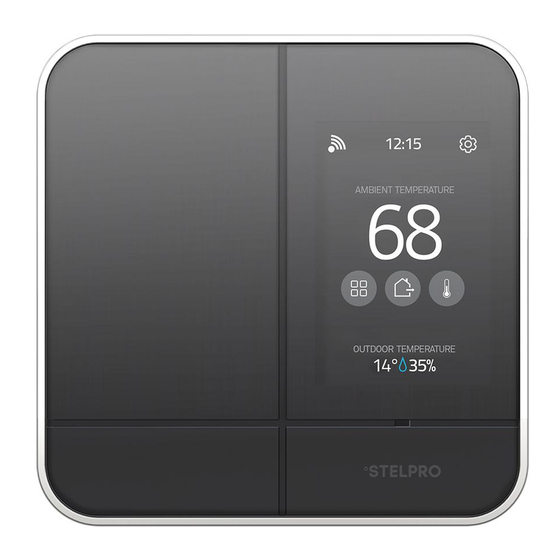
Page 13: Thermostat Interface
THERMOSTAT INTERFACE ZIGBEE CONNECTED HEATING MODE HEATING POWER OVERHEATING APPLIANCE KEYBOARD LOCKED ROOM TEMPERATURE RELATIVE AMBIENT HUMIDITY/ OUTDOOR TEMPERATURE SETPOINT IS LOW OR OPEN WINDOW DETECTED (BLINKING ICON) ADVANCED MENUS INDICATOR ADJUST THE PROXIMITY DETECTION ADJUST THE ROOM TEMPERATURE / MODIFY THE MENU SELECTION TOGGLE BETWEEN RELATIVE AMBIENT HUMIDITY AND OUTDOOR TEMPERA TURE... -
Page 14: Connecting A Thermostat To The Controller
CONNECTING A THERMOSTAT TO THE CONTROLLER THERMOSTAT • 1 - On the controller thermostat, access: • – SETTINGS – ZIGBEE SETUP – ADD A NEW THERMOSTAT. The screen ADD A NEW THERMOSTAT on the controller thermostat will display the • Zigbee channel being used. 2 - On the thermostat, access menu 1 and select the the auto-connect option (ON). -
Page 15: To Change Settings
TO CHANGE SETTINGS To access the advanced menus, hold the center button for 3 seconds. Menu 10: Zigbee connectivity ( • Menu 20: Temperature format (°C or °F) • Menu 30: Heating mode ( • Menu 31: Lobby mode (Standard room / Lobby) - Option only available if the heating •... - Page 16 For further information, to discover all the possibilities that MAESTRO offers you or to consult the complete User Guide, please visit our website. www.stelpro.com/en-US/maestro...
Need help?
Do you have a question about the Maestro and is the answer not in the manual?
Questions and answers