Table of Contents
Advertisement
Advertisement
Table of Contents

Related Manuals for Stelpro Maestro SMC402AD


Summary of Contents for Stelpro Maestro SMC402AD
- Page 1 USER GUIDE SMART CONTROLLER THERMOSTAT • Model: SMC402AD...
-
Page 2: Table Of Contents
TABLE OF CONTENTS Managing geofencing THE 360° COMFORT EXPERIENCE Activating or deactivating geofencing COMPATIBILITY Deleting mobile devices WHAT’S IN THE BOX AND TOOLS REQUIRED Defining the setpoint temperature of the controller thermostat • Temporarily modifying the setpoint temperature WARNING of a group of thermostats BEFORE YOU START Temporarily modifying the setpoint temperature of a thermostat Make the most of your MAESTRO... -
Page 3: The 360° Comfort Experience
MADE AND DESIGNED FOR CANADA Established in Quebec for more than 35 years, the °STELPRO family business understands both the specific needs our climate imposes on us and Canadians' concerns regarding safety and environmental protection. -
Page 4: Compatibility
COMPATIBILITY Your MAESTRO controller thermostat can control electric baseboards, convectors and fan-forced heaters. • IMPORTANT: This controller thermostat is not compatible with: • • Systems with inductive loads • Central heating systems • Systems with resistive loads that are: o inferior to 150 W at 120 VAC, 260 W at 208 VAC or 300 W at 240 VAC o superior to 2000 W at 120 VAC, 3400 W at 208 VAC or 4000 W at 240 VAC Your controller thermostat is compatible with 802.11 b/g/n Wi-Fi networks. -
Page 5: Warning
NOTE: °STELPRO reserves the right to modify its product without notice to improve operability. Therefore, the instructions in this user guide many not entirely match all the functions of your controller thermostat. -
Page 6: Before You Start
MAESTRO thermos- • tats and the MAESTRO app. By using the complete MAESTRO system, you’ll benefit from maximum comfort, flexibility and energy savings. For more information on the MAESTRO system, visit www.stelpro.com/en-CA/maestro - 6 - - 6 -... -
Page 7: Where To Install Your Maestro Controller
WHERE TO INSTALL YOUR MAESTRO CONTROLLER THERMOSTAT? • A bit of planning will optimize Maestro’s mesh network and ensure that devices communicate well. The controller thermostat • allows you to control the other MAESTRO thermostats in your home. Plan to install the controller in a central location. Doing so will facilitate communication with the various rooms. - Page 8 You must install the controller thermostat at approximately 1.5 m (5 ft.) from the floor, on an indoor wall that faces the heating • system. The controller thermostat must be mounted on an electrical box. • ATTENTION : To avoid any risk of overheating, leave a clearance of at least 30 cm (12 in.) around the controller thermostat to •...
-
Page 9: Read This Guide And Watch The Installation Video
It will ensure safe and easy installation. • The installation video is at the bottom of this page: www.stelpro.com/en-CA/maestro Take full advantage of your MAESTRO controller thermostat by also using the MAESTRO thermostats and the MAESTRO • mobile app. Using the complete MAESTRO system enables you to create your own ecosystem in your home and control it at any time, from anywhere. -
Page 10: Install The Maestro App And Create Your Maestro Account
• In the MAESTRO app, the “Connect a thermostat to my MAESTRO system” feature will activate and set the controller thermostat in thermostat pairing mode (see www.stelpro.com/en-CA/support-maestro for more details • on how to use the MAESTRO app). Connect the thermostats to the controller thermostat, one at a time (see the “Connecting a thermostat to the... -
Page 11: Installing The Maestro Controller Thermostat
INSTALLING THE MAESTRO CONTROLLER THERMOSTAT • IMPORTANT INSTALLATION OF THE CONTROLLER THERMOSTAT MUST BE DONE BY A QUALIFIED ELECTRICIAN. • CUT OFF POWER SUPPLY To avoid any risk of electric shock, cut off the power supply on the lead wires from the electrical panel. Make sure the power is off by checking, for example, that the heating system remains off even if the setpoint temperature is higher than the ambient temperature (mechanical thermostat). -
Page 12: Remove Existing Thermostat
If an existing thermostat is being replaced, please follow these steps: NOTE : These instructions apply to a thermostat with a °STELPRO mounting plate. Loosen the screw at the base of the thermostat, without completely removing it, to separate the thermostat from the mounting plate. -
Page 13: Secure The Maestro Controller
SECURE THE MAESTRO CONTROLLER • THERMOSTAT MOUNTING PLATE Secure the MAESTRO controller thermostat mounting plate to the electrical box using the screws supplied. • Loosen the screw at the base of the MAESTRO controller thermostat, without completely removing it, until the •... -
Page 14: Connect The Wires
CONNECT THE WIRES Using the caps supplied (3), connect the wires of the MAESTRO controller thermostat to those of the heating system • and power supply according to the corresponding connection diagram. Tighten the caps onto the wires to ensure the connection is secure. -
Page 15: Secure The Controller • Thermostat On The Mounting Plate
SECURE THE CONTROLLER THERMOSTAT ON THE MOUNTING PLATE • Align and secure the controller thermostat on the mounting plate. • Ensure the air vents in the controller thermostat are clean and clear of any obstruction. • Align the slot on the top of the controller thermostat with the slot on the mounting plate. -
Page 16: Turn Power Back On
TURN POWER BACK ON Restore power to the heating system and controller thermostat. Then ensure the controller thermostat turns on. • • If the controller thermostat does not turn on, touch the screen. The controller thermostat should turn on. If it •... -
Page 17: Set-Up Basic Options On First Start
SET-UP BASIC OPTIONS ON FIRST START 5 SETTINGS TO BE SET: > Language (Francais / English) > Temperature format (°Celsius / °Fahrenheit) > Time format (12 hours / 24 hours) > HEATING MODE (Baseboard / Fan-forced heater) > LOBBY MODE (Standard room / Lobby) NOTE: Lobby mode only available if the heating mode is Fan forced heater ENGLISH... -
Page 18: Enjoy The Full 360° Comfort Experience
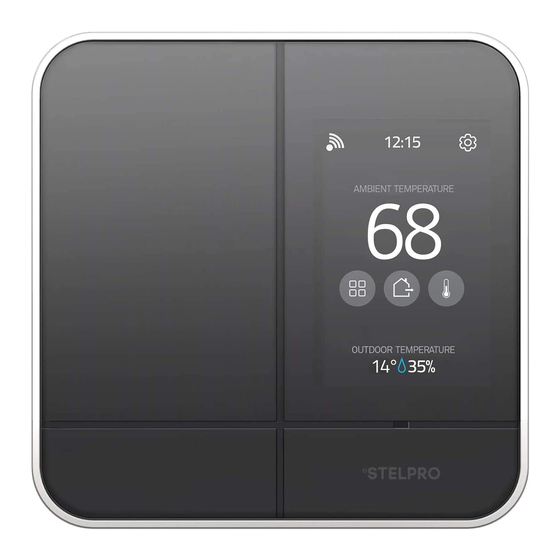
ENJOY THE FULL 360° COMFORT EXPERIENCE HOME SCREEN From the home screen, you can access all MAESTRO controller thermostat functionalities. • WI-FI CONNECTED ACTIVE ALERTS 12:15 12:15 LOCAL TIME HEATING POWER AMBIENT TEMPERATURE KEYBOARD LOCKED ACCESS SETTINGS ACCESS THERMOSTAT OUTDOOR RELATIVE HUMIDITY WEATHER CONDITIONS WEATHER CONDITIONS OUDOOR TEMPERATURE... -
Page 19: Using The Controller
USING THE CONTROLLER THERMOSTAT • CONTROLLING YOUR MAESTRO SYSTEM WITH THE MAESTRO APP If you wish to use the MAESTRO app to control the temperature of your home from wherever you are, you must connect your controller thermostat to your home’s Wi-Fi network and register the controller thermostat in the MAESTRO app. -
Page 20: Obtaining The Registration Code For The Controller
WI-FI SETUP A message will appear on the screen informing you that the connection has been established. Tap REGISTRATION confirm the connection. The registration code of your controller thermostat will appear in the screen. • Enter the code in the MAESTRO app when prompted by the app’s start-up wizard. Once your home is registered, you can start connecting your thermostats. -
Page 21: Creating Your Home's Maestro Network
CREATING YOUR HOME’S MAESTRO NETWORK Your controller thermostat communicates with the MAESTRO thermostats through a Zigbee network for which it is the coordinator. • To create your MAESTRO account, you must connect your thermostats to the MAESTRO controller thermostat. Make sure to •... -
Page 22: Without The Maestro App
Without the MAESTRO app The thermostat can be connected to the controller thermostat even if the controller thermostat is not linked to a Wi-Fi • • network. SETTINGS > ZIGBEE SETUP > ADD A NEW THERMOSTAT ADD A On the controller thermostat, access . -
Page 23: Changing Statuses Or Activities
CHANGING STATUSES OR ACTIVITIES In the MAESTRO system, your home can be in one of the four following statuses: I am away; I am home; I am on vacation; Standby. Statuses serve to automatically adjust the temperature of your home regardless of whether someone is home. DESCRIPTION OF STATUSES I am away: I am on vacation:... -
Page 24: Examples Of Status And Activity Changes
EXAMPLES OF STATUS AND ACTIVITY CHANGES I am home I am away Setpoint active Setpoint programmed Setpoint programmed at 21 °C (70 °F) at 17 °C (63 °F) Example 1 STATUS 21°C (70°F) 21°C (70°F) 17°C (63°F) 21°C (70°F) MANUAL 18°C (64°F) 18°C (64°F) 18°C (64°F) -
Page 25: Selecting A Status For Your Home
SELECTING A STATUS FOR YOUR HOME STATUS STATUS Access on the home screen. I am Away Tap the desired status (I am away, I am home, I am on vacation, Standby). I am Home The setpoint temperature for all thermostat groups will adjust based on the selected status, and the controller thermostat will return to the home screen. -
Page 26: Managing Geofencing
MANAGING GEOFENCING NOTE : Geofencing only works when you are using the MAESTRO app. Geofencing establishes a boundary of 2 km (1.2 mi) radius around the home. If you activate geofencing, the MAESTRO app will geolocate your mobile devices (with the “Use this mobile device” option activated) to determine if someone is inside the geofence boundary. -
Page 27: Activating Or Deactivating Geofencing
ACTIVATING OR DEACTIVATING GEOFENCING GEOFENCING You can activate and deactivate geofencing directly on your controller ther- • mostat or in the MAESTRO app. However, you must first set your geofencing Geofencing off boundary and select the option “Use this mobile device” in the MAESTRO app. Geofencing on SETTINGS >... -
Page 28: Defining The Setpoint Temperature Of The Controller
DEFINING THE SETPOINT TEMPERATURE OF THE CONTROLLER THERMOSTAT • Your controller thermostat controls the temperature of the room in which it is installed. By default, the setpoint temperature • is defined at 21 °C (70 °F). THERMOSTAT Access Use the arrow buttons to adjust the setpoint temperature. -
Page 29: Temporarily Modifying The Setpoint Temperature Of A Group Of Thermostats
TEMPORARILY MODIFYING THE SETPOINT TEMPERATURE OF A GROUP OF THERMOSTATS The purpose of groups is to link together several thermostats so that their temperature can be controlled simultaneously. For example, you could create a group for all the thermostats in your home’s shared living spaces and another for those in the bedrooms. -
Page 30: Temporarily Modifying The Setpoint Temperature Of A Thermostat
TEMPORARILY MODIFYING THE SETPOINT TEMPERATURE OF A THERMOSTAT In the MAESTRO system, each thermostat is part of a group and all the thermostats in a given group will share the same temporarily setpoint temperature for a status or activity. You can, however, modify the temperature of a single thermostat to increase or lower the temperature in a room. -
Page 31: Removing A Thermostat From The Home
REMOVING A THERMOSTAT FROM THE HOME You may need to remove a thermostat from your home; for example, if you need to replace it. The thermostat will then be disconnected from the controller thermostat and you will no longer be able to control it from the controller thermostat or •... -
Page 32: Activating Or Deactivating Open Window Detection
ACTIVATING OR DEACTIVATING OPEN WINDOW OPEN WINDOW DETECTION The MAESTRO controller thermostat can detect a drastic drop in tempe- Detection Off • rature, like an open window in winter. The controller thermostat then auto- • matically fixes the setpoint temperature at 7 °C (44 °F) to avoid heating the Detection On SETTINGS >... -
Page 33: Thermostat Screen
LOCKING OR UNLOCKING THE CONTROLLER • THERMOSTAT SCREEN You can lock or unlock the screen of the controller thermostat or the keyboards of all thermostats connected to the control- • thermostat to prevent the setpoint temperature from being modified directly on these units. •... -
Page 34: Viewing Active Alerts
VIEWING ACTIVE ALERTS The controller thermostat displays different types of alerts. Alerts generally serve to inform you of a system malfunction that • needs to be resolved. SETTINGS > ALERTS ALERTS On the home screen, tap or access . The screen will display all active alerts. -
Page 35: Viewing Technical Information On The Controller
°STELPRO screen displays the following technical information on the controller thermostat: • NOTE : You may need to provide the following information when contacting °STELPRO technical support. • Thermostat Version • Zigbee Version • Wi-Fi Version • Produced on (yyyy/mm/dd) • Control Checksum... -
Page 36: Modifying Display Options On The Controller
MODIFYING DISPLAY OPTIONS ON THE CONTROLLER THERMOSTAT • You can modify some display options on the controller thermostat to suit your preferences. • For more details on other options, read “Activating or deactivating open window detection” on page 32, “Activating or deactivating proximity sensor”... -
Page 37: Configuring The Heat Mode
MODIFYING THE HEAT MODE The heat mode corresponds to the type of heating system that the controller thermostat controls as a thermostat: baseboard/ • convector or fan-forced heater. SETTINGS > OPTIONS > HEAT MODE Access Baseboard Fan-Forced Heater . The icon will appear to the right of the selected option APPLY to confirm the selection. -
Page 38: Modifying The Time Format Display
MODIFYING THE TIME FORMAT DISPLAY SETTINGS > OPTIONS > TIME FORMAT Access 24 Hours 12 Hours . The icon will appear to the right of the selected option. APPLY to save the selection. MODIFYING THE “SCREEN SAVER” OPTION The “screen saver” option allows you to choose the time of inactivity before the display goes off. The times options are 1, 5, 10 and 30 minutes. -
Page 39: Resetting The Controller
RESETTING THE CONTROLLER THERMOSTAT • You can reset the controller thermostat to its initial parameters (see “Controller thermostat default values” on page 44). • • Follow these steps to reset the controller thermostat: • SETTINGS > RESET TO DEFAULT Access CONFIRM , then The settings are automatically reset to their initial parameters and the controller... -
Page 40: Controller Thermostat Troubleshooting
The following table lists the most common problems and alerts that you may encounter with your controller thermostat. • If your problem does not appear in this table or if the suggested solutions do not solve the problem, visit the support section on our website (www.stelpro.com/en-CA/support-maestro) or contact our customer service team at: 1-866-628-5776 450-441-6988 s.technique@stelpro.com... - Page 41 The iCloud service may also be down. In this case, the controller thermostat will not be able to connect to • the °Stelpro cloud. Make sure the wires of the controller thermostat are properly connected. (See instructions in “Installing the •...
-
Page 42: Deactivating The Zigbee Network From A Controller
DEACTIVATING THE ZIGBEE NETWORK FROM A CONTROLLER THERMOSTAT • To re-build your network without losing your home configurations (groups, activities, Wi-Fi, etc.), you must first deactivate the Zigbee network on your controller thermostat. • SETTINGS > ZIGBEE SETUP > LEAVE NETWORK Access to confirm the deactivation. -
Page 43: Menu Tree
C or Time format Heat mode OPTIONS Lobby Mode Open window Lock/unlock keyboard Screen saver Proximity sensor ALERTS GEOFENCING RESET TO DEFAULT Thermostat Version Zigbee Version Wi-Fi Version °STELPRO Produced on (yyyy/mm/dd) Control Checksum - 43 - - 43 -... -
Page 44: Controller • Thermostat Default Values
CONTROLLER THERMOSTAT DEFAULT VALUES • Setpoint temperature 21.0 °C (70 °F) Wi-Fi connection Disconnected Zigbee connection Disconnected Home status I am home Temperature format Degrees Celsius Time format 24 Hours Heat mode Baseboard Lobby Mode Standard room Open window detection Deactivated Locking Keyboard unlocked... -
Page 45: Technical Specifications
TECHNICAL SPECIFICATIONS ELECTRICAL DATA Supply voltage 120 - 240 VAC, 60 Hz Resistive only 150 W at 120 VAC, 60 Hz Minimum load 260 W at 208 VAC, 60 Hz 300 W at 240 VAC, 60 Hz Resistive only 2000 W at 120 VAC, 60 Hz Maximum load 3400 W at 208 VAC, 60 Hz 4000 W at 240 VAC, 60 Hz... -
Page 46: Warranty
The warranty is limited to the factory repair or the replacement of the unit, and does not cover the cost of disconnection, transport and installation. contact@stelpro.com Email: Website : www.stelpro.com...
Need help?
Do you have a question about the Maestro SMC402AD and is the answer not in the manual?
Questions and answers