Advertisement
Quick Links
Multi Adapter Kit (Mitchell-Euro/Elemac-Bowl)
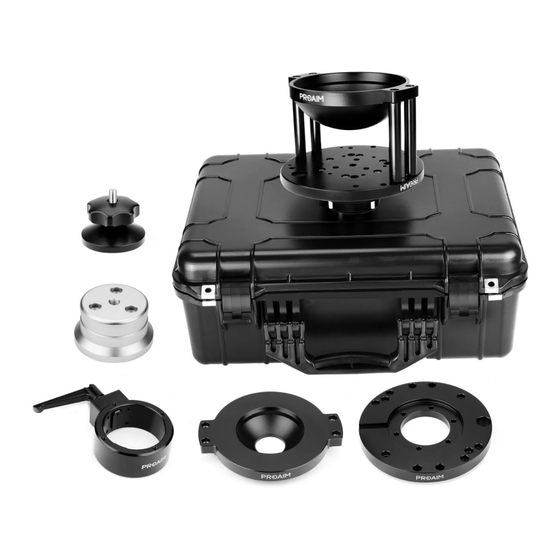
What's In The Box
Please inspect the contents of your shipped package to ensure you have received everything that is listed
below.
1 x Bowl adapter
Size: 100 mm
1x Euro Adapter
4 x Distance Rods
2 x L-Type Allen Key
(Size:5mm & 6mm)
No part of this document may be reproduced, stored in a retrieval system, or transmitted by any form or by any means,
electronic, mechanical, photo-copying, recording, or otherwise, except as may be expressly permitted by the applicable copyright
A s s e m b l y M a n u a l
1 x Mitchell plate
1 x Bowl adapter
Size: 150 mm
1 x Mitchell
Lock
Allen Bolts
(8 x 50mm=3pc)
All rights reserved.
statutes or in writing by the Publisher.
1 x Adapter Plate
Clamping
knob
(6 x 25mm=12pc) Allen Bolts
(6 x 12mm=6pc) Allen Bolts
1 x Spanner (Size:13)
1
(P-MLAK-01)
1 x Euro Flange
Advertisement

Summary of Contents for PROAIM Mitchell-Euro
- Page 1 Multi Adapter Kit (Mitchell-Euro/Elemac-Bowl) (P-MLAK-01) A s s e m b l y M a n u a l What’s In The Box Please inspect the contents of your shipped package to ensure you have received everything that is listed below.
- Page 2 Hard Case Multi Adapter Kit Setup • Attach the Euro Flange by matching it with the thread of the Adapter Plate and then insert the bolt. • Secure all the bolts by tightening them using the Allen Key. Bowl-Euro • Attach the Distance Rods by matching them with the side thread on the Adapter Plate and then secure them using the Allen Key.
- Page 3 • Tighten the bolt using the Allen Key, so that bowl euro can be attached properly. Mitchell-Euro • Attach the Distance Rods on the Adapter Plate at equal distance from each other according to your requirement and then secure them with the help of the bolt.
- Page 4 Lock with the threads of the Adapter Plate and then properly tighten it with the Allen Key. • Then Mitchell-Mitchell plate is ready to use. Mitchell-Euro Adapter • Attach the Mitchell Lock by matching it with the bolt thread of the Adapter Plate. •...
- Page 5 • Place the Euro Adapter on the Adapter Plate by matching it with the thread of the Plate and then insert the bolts. • After inserting the bolts, tighten them properly using the Allen Key. Mitchell-Bowl Adapter • Place the bowl adapter (150mm) plate on the rods.
- Page 6 • Mount the Bowl-Mitchell on the tripod stand. (Not Included). • Secure the Bowl-Mitchell using the castle nut from the bottom of the Tripod Stand (Not Included). • Mount 150mm fluid head (Not Included) & insert it into the bowl through the screw. •...
- Page 7 • The Camera (Not Included) has been properly attached to the Fluid head. Euro-Mitchell Setup • Mount the Euro Mitchell on the Bazooka (Not Included). • Then properly secure the Euro Mitchell with the help of the provided ratchet knob. •...
- Page 8 • Remove the Plate by pushing the knob of the Fluid Head (Not Included). • Attach plate Fluid Head (Not Included) to the bottom of the Camera (Not Included) and then properly tighten it using the screw driver. • Mount the Camera (Not Included) by sliding it onto the Fluid Head, as shown in the image.
- Page 9 YOUR PROAIM MULTI ADAPTER KIT (MITCHELL-EURO/ELEMAC-BOWL) ALL DRESSED UP AND READY TO GO! (SHOWN WITH OPTIONAL ACCESSORIES) Warranty: We offer one year warranty for our products from date of purchase. Within this period of time, we will repair it without charge for labor or parts. Warranty doesn’t cover transportation costs nor does it cover a product subjected to misuse or accidental damage.


Need help?
Do you have a question about the Mitchell-Euro and is the answer not in the manual?
Questions and answers