
Related Manuals for Xerox WorkCentre 6655i/X


Summary of Contents for Xerox WorkCentre 6655i/X
- Page 1 ® ® Xerox WorkCentre 6655/6655i Color Multifunction Printer ® ® 2016 Xerox ConnectKey Technology User Guide...
- Page 2 © 2016 Xerox Corporation. All rights reserved. Unpublished rights reserved under the copyright laws of the United States. Contents of this publication may not be reproduced in any form without permission of Xerox Corporation. Copyright protection claimed includes all forms of matters of copyrightable materials and information now allowed by statutory or judicial law or hereinafter granted, including without limitation, material generated from the software programs which are displayed on the screen such as styles, templates, icons, screen displays, looks, and so on.
-
Page 3: Table Of Contents
Internet Services ......................28 Automatic Data Collection ..........................29 Billing and Usage Information ........................29 Finding the IP Address of the Printer ........................30 Xerox ConnectKey Apps ............................. 31 More Information ................................. 32 Welcome Center ..............................33 Installation and Setup Installation and Setup Overview .......................... - Page 4 Printing Overview ................................72 Selecting Printing Options ............................73 Print Driver Help ..............................73 Windows Printing Options ..........................74 Macintosh Printing Options ..........................75 Linux Printing Options ............................76 Managing Jobs ................................77 ® ® Xerox WorkCentre 6655/6655i Color Multifunction Printer User Guide...
- Page 5 Managing Jobs at the Control Panel ......................77 Managing Secure and Held Print Jobs ......................78 ® ® Managing Jobs in Xerox CentreWare Internet Services ..............79 Printing Features ................................80 Printing on Both Sides of the Paper ....................... 80 Selecting Paper Options for Printing ......................
- Page 6 Sending an Internet Fax ............................176 Basic Internet Fax Settings ..........................177 Selecting Internet Fax Options ........................179 Building a Fax Job ............................... 184 Sending a LAN Fax ..............................185 ® ® Xerox WorkCentre 6655/6655i Color Multifunction Printer User Guide...
- Page 7 Solving Print-Quality Problems ........................235 Copy and Scan Problems ............................242 Fax Problems ................................243 Problems Sending Faxes ........................... 244 Problems Receiving Faxes ..........................245 Selecting the Starting Rate ..........................245 ® ® Xerox WorkCentre 6655/6655i Color Multifunction Printer User Guide...
- Page 8 Copy Regulations ................................ 269 United States ................................ 269 Canada ..................................271 Other Countries ..............................271 Fax Regulations ................................272 United States ................................ 272 Canada ..................................274 European Union ..............................274 ® ® Xerox WorkCentre 6655/6655i Color Multifunction Printer User Guide...
- Page 9 European Union ................................280 Domestic/Household Environment ......................280 Professional/Business Environment ......................280 Collection and Disposal of Equipment and Batteries ................281 Battery Symbol Note ............................281 Battery Removal ..............................281 Other Countries................................282 ® ® Xerox WorkCentre 6655/6655i Color Multifunction Printer User Guide...
-
Page 11: Safety
• Environmental, Health, and Safety Contact Information ................18 Your printer and the recommended supplies have been designed and tested to meet strict safety requirements. Attention to the following information ensures the continued safe operation of your Xerox printer. ®... -
Page 12: Electrical Safety
The printer causes a circuit breaker, fuse, or other safety device to activate. If any of these conditions occur, do the following: Turn off the printer immediately. Disconnect the power cord from the electrical outlet. Call an authorized service representative. ® ® Xerox WorkCentre 6655/6655i Color Multifunction Printer User Guide... -
Page 13: Power Cord
Emergency Turn Off If any of the following conditions occur, turn off the printer immediately and disconnect the power cord from the electrical outlet. Contact an authorized Xerox service representative to correct the problem if: • The equipment emits unusual odors or makes unusual noises. -
Page 14: Operational Safety
Ozone is heavier than air and is not produced in amounts large enough to harm anyone. Install the printer in a well-ventilated room. For more information in the United States and Canada, go to www.xerox.com/environment. In other markets, please contact your local Xerox representative or go to www.xerox.com/environment_europe. -
Page 15: Printer Supplies
Total Satisfaction Guarantee do not cover damage, malfunction, or degradation of performance caused by use of non-Xerox supplies, or the use of Xerox supplies not specified for this printer. The Total Satisfaction Guarantee is available in the United States and Canada. Coverage could vary outside these areas. -
Page 16: Maintenance Safety
• Do not use aerosol cleaners. Clean with a dry lint-free cloth only. • Do not burn any consumables or routine maintenance items. For information on Xerox supplies recycling programs, go to www.xerox.com/gwa. ® ® Xerox... -
Page 17: Printer Symbols
Do not touch the part or area of the printer. Warning: Wait for the printer to cool for the specified time before touching the fuser. This item can be recycled. For details, see Recycling and Disposal on page 277. ® ® Xerox WorkCentre 6655/6655i Color Multifunction Printer User Guide... -
Page 18: Environmental, Health, And Safety Contact Information
Safety Environmental, Health, and Safety Contact Information For more information on Environment, Health, and Safety in relation to this Xerox product and supplies, contact the following customer help lines: United States and Canada: 1-800-ASK-XEROX (1-800-275-9376) Europe: +44 1707 353 434 For product safety information in the United States and Canada, go to www.xerox.com/environment. -
Page 19: Features
Parts of the Printer ................................20 • Information Pages ................................25 • Administration Features ..............................26 • Finding the IP Address of the Printer ........................30 • Xerox ConnectKey Apps ..............................31 • More Information ................................32 ® ® Xerox WorkCentre 6655/6655i Color Multifunction Printer... -
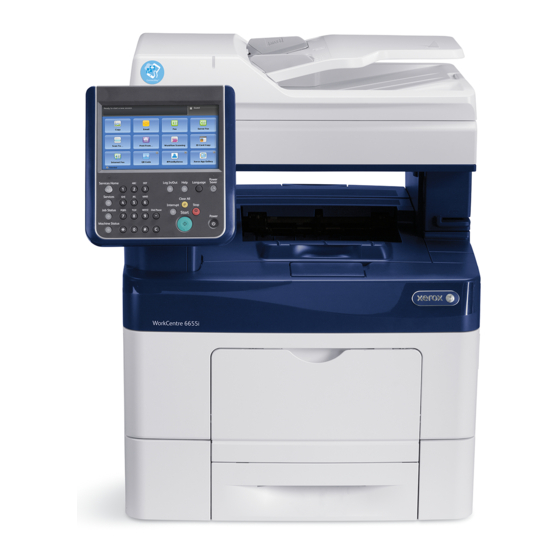
Page 20: Parts Of The Printer
Front View Tray 1 Duplex Automatic Document Feeder Bypass Tray Staple Cartridge Door Front Door Output Tray Output Tray Paper Stop Front Door Handle Control Panel 10. Optional 550-Sheet Feeder ® ® Xerox WorkCentre 6655/6655i Color Multifunction Printer User Guide... -
Page 21: Rear View
USB Type B Port Duplex Unit Ethernet Connector Transfer Roller USB Type A Port Fuser USB Type A Port 10. USB Memory Port Power Connector 11. Fax Line Connector Rear Door ® ® Xerox WorkCentre 6655/6655i Color Multifunction Printer User Guide... -
Page 22: Internal Parts
Features Internal Parts Output Tray Paper Stop Document Glass Front Door Staple Cartridge Toner Cartridges Waste Cartridge Lock Duplex Automatic Document Feeder Imaging Units Document Cover 10. Waste Cartridge ® ® Xerox WorkCentre 6655/6655i Color Multifunction Printer User Guide... -
Page 23: Control Panel
This button returns to the active service from the Job Status or Machine Status screens, Services Button or to a preset service. Job Status Button This button displays lists of all active, secure, or completed jobs on the touch screen. ® ® Xerox WorkCentre 6655/6655i Color Multifunction Printer User Guide... - Page 24 This button enters and exits the low-power mode. Help Button This button displays information about the current selection on the touch screen. Log In/Out Button This button provides access to password-protected features. ® ® Xerox WorkCentre 6655/6655i Color Multifunction Printer User Guide...
-
Page 25: Information Pages
Touch Print. ® ® Note: Information pages can also be printed from Xerox CentreWare Internet Services. Printing the Configuration Report At the printer control panel, press the Machine Status button. On the Machine Information tab, touch Information Pages > Configuration Report > Print. -
Page 26: Administration Features
If the administrator configures local or network authentication, you identify yourself by typing your user ® ® name and password at the control panel or in Xerox CentreWare Internet Services. If the administrator configures card reader authentication, you identify yourself by swiping a magnetic or proximity card at the control panel and typing a passcode. - Page 27 The administrator can also generate reports listing usage data for individual users and groups. For details, see the System Administrator Guide at www.xerox.com/office/WC6655docs. Logging In Logging in is the process by which you identify yourself to the printer for authentication.
-
Page 28: Xerox ® Centreware ® Internet Services
Services or at the control panel. Most printer models have a default configuration that restricts access to ® ® some settings. Access is restricted for settings on the Properties tab in Xerox CentreWare Internet Services, and settings on the Tools tab on the control panel touch screen. -
Page 29: Automatic Data Collection
Xerox cannot read, view, or download the content of your documents residing on or passing through your printer or any of your information management systems. -
Page 30: Finding The Ip Address Of The Printer
To print a Configuration Report: At the printer control panel, press the Machine Status button. On the Machine Information tab, touch Information Pages > Configuration Report > Print. Touch Close after the report prints. ® ® Xerox WorkCentre 6655/6655i Color Multifunction Printer User Guide... -
Page 31: Xerox Connectkey Apps
Apps extend the capabilities of your ConnectKey devices. • Xerox QR Code: You can use this App to link your mobile applications with ConnectKey devices. You ® can also use the QR Code App to access information about related Xerox Mobile Apps. -
Page 32: More Information
Press the control panel Help (?) button. Information pages To print from the control panel, press Machine Status > Machine Information > Information Pages. ® ® To print from Xerox CentreWare Internet Services, click Status > Information Pages. ® ®... -
Page 33: Welcome Center
The name and location of your company. Locating the Serial Number To contact Xerox for assistance, you need the printer serial number. The serial number is located at the rear of the printer. To view the serial number at the printer control panel, press the Machine Status button, then touch the Machine Information tab. -
Page 35: Installation And Setup
Configuring Network Settings ............................. 43 • Modifying General Settings ............................44 • Installing the Software ..............................47 See also: Installation Guide packaged with your printer. System Administrator Guide at www.xerox.com/office/WC6655docs. ® ® Xerox WorkCentre 6655/6655i Color Multifunction Printer User Guide... -
Page 36: Installation And Setup Overview
Routers, network hubs, network switches, modems, Ethernet cables, and USB cables are not included with your printer and must be purchased separately. Xerox recommends an Ethernet ® connection because it is typically faster than a USB connection, and it provides access to Xerox ® CentreWare Internet Services. -
Page 37: Selecting A Location For The Printer
To find the clearance requirements for your printer, see Clearance Requirements on page 257. After positioning the printer, you are ready to connect it to the power source and computer or network. ® ® Xerox WorkCentre 6655/6655i Color Multifunction Printer User Guide... -
Page 38: Power Cord Safety Information
Installation and Setup Power Cord Safety Information Carefully read the following instructions before operating your printer. For details, contact your Xerox representative. WARNINGS: • The electrical supply for the device must meet the requirements stated on the data plate on the rear of the device. -
Page 39: Connecting The Printer
It must be connected through a router or hub. An Ethernet network can be used for one or more computers and supports many printers and systems simultaneously. Ethernet connection is typically ® faster than USB and allows you direct access to the settings of the printer using Xerox ® CentreWare Internet Services. -
Page 40: Physically Connecting The Printer To The Network
Use a Category 5 or better Ethernet cable to connect the printer to the network. An Ethernet network is used for one or more computers and supports many printers and systems simultaneously. An Ethernet ® ® connection provides direct access to printer settings using Xerox CentreWare Internet Services. To connect the printer: Connect the power cord to the printer, and plug the cord into an electrical outlet. -
Page 41: Turning The Printer On And Off
• Do not plug or unplug the power cord while the printer is powered on. • Ensure that there are no jobs in the queue. ® ® Xerox WorkCentre 6655/6655i Color Multifunction Printer User Guide... - Page 42 After 10 seconds, the touch screen goes dark and the Power Saver button flashes until the printer has completed powering down. Note: When all of the control panel lights are off, the printer power off sequence is complete. Turning the power switch off is optional. ® ® Xerox WorkCentre 6655/6655i Color Multifunction Printer User Guide...
-
Page 43: Configuring Network Settings
IP address to every computer and printer on the network that is configured to use DHCP. If you use a Cable or DSL router, see the documentation for your router for information on IP addressing. ® ® Xerox WorkCentre 6655/6655i Color Multifunction Printer User Guide... -
Page 44: Modifying General Settings
Language/Keyboard Selection: This option allows you to set the language and keyboard layout. − Custom Keyboard Button: This option allows you to assign text to the custom key on the virtual keyboard. Touch OK. ® ® Xerox WorkCentre 6655/6655i Color Multifunction Printer User Guide... -
Page 45: Setting Energy Saver Mode
Touch OK. To specify the time that the printer sleeps on the specified day, touch Energy Saver Time, then to select the time, touch the arrows. Touch OK. Touch OK. • Touch OK. ® ® Xerox WorkCentre 6655/6655i Color Multifunction Printer User Guide... -
Page 46: Setting The Date And Time At The Control Panel
Note: The date and time are set automatically through Network Time Protocol (NTP). To modify ® ® these settings, go to the Properties tab in Xerox CentreWare Internet Services and change the Date and Time Setup to Manual (NTP Disabled). -
Page 47: Installing The Software
Server 2008, Windows Server 2008 R2, and Windows Server 2012. • Macintosh OS X version 10.7 and later. • UNIX and Linux: Your printer supports connection to various UNIX platforms through the network interface. For details, see www.xerox.com/office/WC6655drivers. ® ® Xerox WorkCentre... -
Page 48: Installing Drivers And Utilities For Windows
Installation and Setup Installing Drivers and Utilities for Windows ® ® To access all the features of your printer, install the Xerox print driver and the Xerox scan driver. To install the print and scan driver software: Insert the Software and Documentation disc into the appropriate drive on your computer. The installer starts automatically. -
Page 49: Installing Print Drivers And Utilities For Macintosh Os X Versions 10.7 And Later
Installing Print Drivers and Utilities for Macintosh OS X Versions 10.7 and Later ® ® To access all the features of your printer, install the Xerox print driver and the Xerox scan driver. To install the print and scan driver software: Insert the Software and Documentation disc into the appropriate drive on your computer. -
Page 50: Installing Scan Drivers For Macintosh
All operating systems include the Office Standard print driver, which can print to a wide range of Xerox devices that share common features. You can use a Linux-based print driver to print to a specific model. - Page 51 Print Driver Package Before you begin: ® Ensure that you have root or superuser privileges to install Xerox Printer Manager. Note: When installing drivers for a network printer, if you do not see your printer in the list, click the IP Address or DNS Name button.
-
Page 52: Other Drivers
Installation and Setup Other Drivers The following drivers are available for download at www.xerox.com/office/WC6655drivers. ® • The Xerox Global Print Driver works with any printer on your network, including those printers made by other manufacturers. It configures itself for your individual printer upon installation. -
Page 53: Paper And Media
Paper and Media This chapter includes: • Supported Paper ................................54 • Loading Paper ................................... 58 • Printing on Special Paper .............................. 66 ® ® Xerox WorkCentre 6655/6655i Color Multifunction Printer User Guide... -
Page 54: Supported Paper
Recommended Media List (Europe) Ordering Paper To order paper or other media, contact your local reseller or visit www.xerox.com/office/WC6655supplies. General Paper Loading Guidelines • Do not overfill the paper trays. Do not load paper above the maximum fill line in the tray. -
Page 55: Paper That Can Damage Your Printer
The Xerox Warranty, Service Agreement, or Xerox Total Satisfaction Guarantee does not cover damage caused by using unsupported paper or specialty media. The Xerox Total Satisfaction Guarantee is available in the United States and Canada. Coverage could vary outside these areas. -
Page 56: Supported Paper Types And Weights
127 x 178 mm, 5 x 7 in. Postcard (100 x 148 mm, 3.9 x 5.8 in.) Postcard (102 x 152 mm, 4 x 6 in.) Postcard (148 x 200 mm, 5.8 x 7.9 in.) ® ® Xerox WorkCentre 6655/6655i Color Multifunction Printer User Guide... -
Page 57: Supported Paper Types And Weights For Automatic 2-Sided Printing
Automatic 2-sided Printing • Width: 148.0–215.9 mm (5.8–8.5 in.) • Length: 210–355.6 mm (8.3–14 in.) Duplex Automatic Document Feeder • Width: 148.0–215.9 mm (5.8–8.5 in.) • Length: 210–355.6 mm (8.3–14 in.) ® ® Xerox WorkCentre 6655/6655i Color Multifunction Printer User Guide... -
Page 58: Loading Paper
Open the bypass tray. If the bypass tray is loaded with paper already, remove any paper that is a different size or type. Move the width guides to the edges of the tray. ® ® Xerox WorkCentre 6655/6655i Color Multifunction Printer User Guide... - Page 59 For 1-sided and 2-sided printing, to load letterhead or pre-printed paper, place letterhead face down with the top edge going into the printer. Note: Do not load paper above the maximum fill line. Overfilling the tray can cause the printer to jam. ® ® Xerox WorkCentre 6655/6655i Color Multifunction Printer User Guide...
-
Page 60: Configuring Trays 1 Or 2 For The Paper Length
To extend the tray, with one hand, hold the back of the tray. With the other hand, at the front of the tray, press the release latch and pull the ends outward until they latch. ® ® Xerox WorkCentre 6655/6655i Color Multifunction Printer User Guide... - Page 61 Load paper into the tray, then insert it back into the printer. For details, see Loading Paper in Trays 1–2. ® ® Xerox WorkCentre 6655/6655i Color Multifunction Printer User Guide...
-
Page 62: Loading Paper In Trays 1-2
Flex the sheets back and forth and fan them, then align the edges of the stack on a level surface. This procedure separates any sheets that are stuck together and reduces the possibility of jams. ® ® Xerox WorkCentre 6655/6655i Color Multifunction Printer User Guide... - Page 63 Do not load paper above the maximum fill line. Overfilling the tray can cause the printer to jam. Adjust the length and width guides to fit the paper. Slide the tray back into the printer. ® ® Xerox WorkCentre 6655/6655i Color Multifunction Printer User Guide...
-
Page 64: Changing Paper Size, Type, And Color
To confirm the paper size, type, and color when a tray is set to Fully Adjustable, touch Confirm. − To select a new paper size, touch Size. To select a new paper type, touch Type. To select a new paper color, touch Color. When finished, touch Confirm. ® ® Xerox WorkCentre 6655/6655i Color Multifunction Printer User Guide... -
Page 65: Changing Paper Size, Type, And Color
If that tray is empty, the printer uses paper from the Priority 2 tray. Touch OK. Note: To access the Paper Management menu, you can be required to log in as the system administrator. For details, see the System Administrator Guide at www.xerox.com/office/WC6655docs. ® ® Xerox WorkCentre... -
Page 66: Printing On Special Paper
• Envelopes .................................... 66 • Labels ....................................69 • Glossy Cardstock ................................70 To order paper or other media, contact your local reseller or visit www.xerox.com/office/WC6655supplies. See also: www.xerox.com/rmlna Recommended Media List (United States) www.xerox.com/rmleu Recommended Media List (Europe) Envelopes You can print envelopes from the bypass tray only. - Page 67 Move the width guides to the edges of the tray. Note: If you do not load envelopes in the bypass tray right after they have been removed from the packaging, they can bulge. Flatten them to avoid jams. ® ® Xerox WorkCentre 6655/6655i Color Multifunction Printer User Guide...
- Page 68 − To load envelopes with non-adhesive short edge flaps, place print side up, flaps open and down, with the bottom edge entering the printer. ® ® Xerox WorkCentre 6655/6655i Color Multifunction Printer User Guide...
-
Page 69: Labels
Before loading labels, remove all other paper from the tray. CAUTION: Do not use any sheet where labels are missing, curled, or pulled away from the backing sheet. It could damage the printer. ® ® Xerox WorkCentre 6655/6655i Color Multifunction Printer User Guide... -
Page 70: Glossy Cardstock
Rotate stock frequently. Long periods of storage in extreme conditions can cause glossy cardstock to curl and jam in the printer. • In the print driver software, select the desired glossy cardstock type or select the tray loaded with the desired paper. ® ® Xerox WorkCentre 6655/6655i Color Multifunction Printer User Guide... -
Page 71: Printing
Selecting Printing Options ............................73 • Managing Jobs .................................. 77 • Printing Features ................................80 • Printing Special Job Types ............................91 • Held Print Jobs ................................... 96 • Print From ................................... 97 ® ® Xerox WorkCentre 6655/6655i Color Multifunction Printer User Guide... -
Page 72: Printing Overview
Select your printer. ® Access the print driver settings by selecting Properties or Preferences for Windows, or Xerox Features for Macintosh. The title of the button can vary depending on your application. Modify the print driver settings as necessary, then click OK. -
Page 73: Selecting Printing Options
Printing options, also called print driver software options, are specified as Printing Preferences in ® Windows, and Xerox Features in Macintosh. Printing options include settings for 2-sided printing, page layout, and print quality. Printing options that are set from Printers and Faxes Printing Preferences become the default setting. -
Page 74: Windows Printing Options
Click a tab in the Properties window, then make selections. To save your selections and close the Properties window, click OK. To send the job to the printer, click OK. ® ® Xerox WorkCentre 6655/6655i Color Multifunction Printer User Guide... -
Page 75: Macintosh Printing Options
With the document open in your application, click File > Print. Select your printer. ® Select Xerox Features from the Copies & Pages menu. Select the desired printing options from the drop-down lists. Click Print to send the job to the printer. -
Page 76: Linux Printing Options
You can also submit print requests through the command line using lp/lpr. ® To create a job ticket using the Xerox GUI print driver: ® Open the Xerox GUI print driver. -
Page 77: Managing Jobs
Managing Secure and Held Print Jobs ........................78 ® ® • Managing Jobs in Xerox CentreWare Internet Services ................79 Managing Jobs at the Control Panel From the control panel Job Status, you can view lists of active jobs, secure jobs, or completed jobs. You can pause, delete, print, or view job progress or job details for a selected job. -
Page 78: Managing Secure And Held Print Jobs
Examples are a job sent from a DOS or UNIX window ® ® using LPR, Port 9100, or from the Jobs tab in Xerox CentreWare Internet Services. To view a list of the unidentified jobs and release them: Touch the Unidentified Print Jobs tab. -
Page 79: Managing Jobs In Xerox ® Centreware ® Internet Services
Internet Services ® ® You can view a list of active jobs and delete print jobs from the Active Jobs list in Xerox CentreWare ® Internet Services. You can also print, copy, move, or delete saved jobs. For details, see the Help in Xerox ®... -
Page 80: Printing Features
Printing a 2-Sided Document Options for Automatic 2-Sided Printing are specified in the print driver. The print driver uses the settings for portrait or landscape orientation from the application for printing the document. ® ® Xerox WorkCentre 6655/6655i Color Multifunction Printer User Guide... -
Page 81: Selecting Paper Options For Printing
When printing a multiple-page document, you can print more than one page on a single sheet of paper. Print 1, 2, 4, 6, 9, or 16 pages per side by selecting Pages Per Sheet on the Page Layout tab. Page Layout is on the Document Options tab. ® ® Xerox WorkCentre 6655/6655i Color Multifunction Printer User Guide... -
Page 82: Printing Booklets
High-Resolution print-quality mode: 2400 x 600 dpi • Toner Saver print-quality mode − This mode reduces the amount of toner used for print jobs. − You can use this feature for draft quality output. ® ® Xerox WorkCentre 6655/6655i Color Multifunction Printer User Guide... -
Page 83: Using Image Options
Printing Overview on page 72. The Color Correction tab provides standard color modes. Xerox Black and White: This feature converts all color in the document to black and white or • shades of gray. Xerox Automatic Color: This feature applies the best color correction to text, graphics, and images. -
Page 84: Using Special Pages
Paper, click the arrow, then select an option. • Job Setting: Displays the attributes of the paper for the remainder of the job. ® ® Xerox WorkCentre 6655/6655i Color Multifunction Printer User Guide... - Page 85 Job Setting: Displays the attributes of the paper for the remainder of the job. Note: Some combinations of 2-sided printing with certain paper types and sizes can produce unexpected results. ® ® Xerox WorkCentre 6655/6655i Color Multifunction Printer User Guide...
-
Page 86: Scaling
The Original Document Size is scaled to fit on the selected output paper size shown in the Output Paper Size field. Manually Scale: You can use this option to change the output print size by a specified − percentage. ® ® Xerox WorkCentre 6655/6655i Color Multifunction Printer User Guide... -
Page 87: Printing Watermarks
Place a watermark on the first page or on every page in a document. • Print a watermark in the foreground or background or blend it with the print job. ® ® Xerox WorkCentre 6655/6655i Color Multifunction Printer User Guide... -
Page 88: Printing Watermarks
• Watermarks are not supported for some print drivers when booklet is selected or when more than one page is printed on a sheet of paper. ® ® Xerox WorkCentre 6655/6655i Color Multifunction Printer User Guide... - Page 89 Print on Page 1 Only: This option prints the watermark only on the first page of the document. Print on All Pages: This option prints the watermark on all pages of your document. − Click OK. ® ® Xerox WorkCentre 6655/6655i Color Multifunction Printer User Guide...
-
Page 90: Printing Mirror Images
This feature is available on a computer printing to a network printer. To be notified when your print job completes: In the print driver, click the Advanced tab. Click Notification > Notify for Completed Jobs > Enabled. Click OK. ® ® Xerox WorkCentre 6655/6655i Color Multifunction Printer User Guide... -
Page 91: Printing Special Job Types
The passcode is associated with your user name. After you set a passcode, it becomes the ® default passcode for any print job that requires a passcode on all Xerox printers. You can reset the passcode at any time from any window that contains the passcode. -
Page 92: Sample Set
You can use Sample Set as a part of the Earth Smart settings. In Earth Smart settings, set Sample Set as your default Job Type. To print the job, select it from the job list on the printer control panel. Press OK. ® ® Xerox WorkCentre 6655/6655i Color Multifunction Printer User Guide... -
Page 93: Delay Print
Select other desired printing options and click OK. Click OK or Print. Note: To print the job after you send it but before the scheduled time, release the job at the printer control panel. ® ® Xerox WorkCentre 6655/6655i Color Multifunction Printer User Guide... -
Page 94: Saved Job
A sample copy prints immediately. The sample copy is not counted as part of the print job. After the job is saved, you can print it as needed. For details, see Printing from Saved Jobs. ® ® Xerox WorkCentre 6655/6655i Color Multifunction Printer User Guide... - Page 95 In the Passcode field, type a passcode. The passcode is associated with your user name. After you set a passcode, it becomes the default passcode for any print job that requires a passcode on all ® Xerox printers. You can reset the passcode at any time from any window that contains the passcode.
-
Page 96: Held Print Jobs
To determine why a job was held, touch the job, then touch Details. Do one of the following: To release a held job, touch the job, then touch Print. − To release all held jobs, touch Print All. − ® ® Xerox WorkCentre 6655/6655i Color Multifunction Printer User Guide... -
Page 97: Print From
• The system administrator must set up this feature before you can use it. For details, see the System Administrator Guide at www.xerox.com/office/WC6655docs. To print from a USB Flash drive: Insert your USB Flash drive in a USB port on the printer. The Print from USB window appears. -
Page 98: Printing From Mailbox
Select Mailbox, then touch the name of the folder containing the document. ® ® Note: If Mailbox is not displayed, use Xerox CentreWare Internet Services to enable the Scan to Mailbox and Print From Mailbox features. Then create a scan to mailbox folder. For details, see the System Administrator Guide at www.xerox.com/office/WC6655docs. -
Page 99: Printing From Xerox ® Centreware ® Internet Services
CentreWare Internet Services ® ® You can print .pdf, .ps, .pcl, and .xps files directly from Xerox CentreWare Internet Services without having to open another application or the print driver. The files can be stored on a local computer hard drive, mass storage device, or network drive. -
Page 101: Copying
Copying This chapter includes: • Basic Copying .................................. 102 • Selecting Copy Settings ............................... 104 ® ® Xerox WorkCentre 6655/6655i Color Multifunction Printer User Guide... -
Page 102: Basic Copying
• Align the originals to the matching paper size printed on the edge of the glass. • The document glass accommodates original sizes up to 216 x 356 mm (8.5 x 14 in.). ® ® Xerox WorkCentre 6655/6655i Color Multifunction Printer User Guide... -
Page 103: Document Glass Guidelines
Adjust the paper guides so that they fit against the originals. • Only Insert paper in the duplex automatic document feeder when ink on the paper is dry. • Do not load originals above the MAX fill line. ® ® Xerox WorkCentre 6655/6655i Color Multifunction Printer User Guide... -
Page 104: Selecting Copy Settings
Basic Settings .................................. 105 • Image Quality Settings ..............................110 • Layout Settings ................................113 • Output Format Settings ............................... 116 • ID Card Copying ................................124 • Advanced Copying ................................. 127 ® ® Xerox WorkCentre 6655/6655i Color Multifunction Printer User Guide... -
Page 105: Basic Settings
To enter the number of copies, use the keypad on the touch screen. To delete an incorrect entry, touch the X backspace key that appears in the entry field. Touch OK. The number of copies appears in the upper right corner of the touch screen. ® ® Xerox WorkCentre 6655/6655i Color Multifunction Printer User Guide... - Page 106 More: This option provides an additional choice. − • Single Color: This option copies in shades of a single color. In the color palette window, select a color. Touch OK. ® ® Xerox WorkCentre 6655/6655i Color Multifunction Printer User Guide...
- Page 107 If Paper Supply is set to Auto Paper Select, the Paper Conflict screen appears. Select the Note: desired paper tray, then touch OK. • To center the image on the page, select the Auto Center check box. Touch OK. ® ® Xerox WorkCentre 6655/6655i Color Multifunction Printer User Guide...
- Page 108 1, 2, 3, 4, 5, 6; 1, 2, 3, 4, 5, 6; 1, 2, 3, 4, 5, 6 To select collated copies: Press the Services Home button, then touch Copy. For Collation, touch Collated. ® ® Xerox WorkCentre 6655/6655i Color Multifunction Printer User Guide...
- Page 109 1, 1, 1, 2, 2, 2, 3, 3, 3, 4, 4, 4, 5, 5, 5, 6, 6, 6 To select uncollated copies: Press the Services Home button, then touch Copy. For Collation, touch Uncollated. ® ® Xerox WorkCentre 6655/6655i Color Multifunction Printer User Guide...
-
Page 110: Image Quality Settings
Adjusting the saturation makes the image colors more vivid or pastel. To adjust the image: Press the Services Home button, then touch Copy. Touch the Image Quality tab, then touch Saturation. Adjust the sliders as needed. Touch OK. ® ® Xerox WorkCentre 6655/6655i Color Multifunction Printer User Guide... - Page 111 This feature is not available when Output Color is set to Black and White. On the Color Presets screen, touch the desired preset color effect. The sample images show how the colors are adjusted. Touch OK. ® ® Xerox WorkCentre 6655/6655i Color Multifunction Printer User Guide...
- Page 112 On the Color Balance screen, touch Advanced Color. Touch the color you want to adjust. Move the sliders to adjust the levels for highlights, midtones, and shadows. Repeat the previous two steps for additional colors. Touch OK. ® ® Xerox WorkCentre 6655/6655i Color Multifunction Printer User Guide...
-
Page 113: Layout Settings
Custom Scan Area: You can specify the height and width of the area to scan. To specify an − area, touch the Length (Y) and Width (X) arrows. Touch OK. ® ® Xerox WorkCentre 6655/6655i Color Multifunction Printer User Guide... - Page 114 You can use preset values that were previously saved by the system administrator. Touch Presets in the lower left corner of the screen, and select a preset from the drop-down menu. Touch OK. ® ® Xerox WorkCentre 6655/6655i Color Multifunction Printer User Guide...
- Page 115 On the Invert Image screen, select an option: Mirror Image reflects each image left to right on the page. − − Negative Image reverses the black and white values. Touch OK. ® ® Xerox WorkCentre 6655/6655i Color Multifunction Printer User Guide...
-
Page 116: Output Format Settings
To specify 2-sided originals: Touch Original Input. Touch 2-Sided Originals or 2-Sided, Rotate Side 2. To select a paper tray: Touch Paper Supply. Touch the desired tray. Touch OK. Touch OK. ® ® Xerox WorkCentre 6655/6655i Color Multifunction Printer User Guide... - Page 117 Touch OK. The options that you select appear on the Special Pages screen. To edit or delete a special page entry, touch the entry in the list, then from the menu, touch the desired action. 10. Touch OK. ® ® Xerox WorkCentre 6655/6655i Color Multifunction Printer User Guide...
- Page 118 Touch Close. The options that you select appear on the Special Pages screen. To edit or delete a special page entry, touch the entry in the list, then from the menu, touch the desired action. 10. Touch OK. ® ® Xerox WorkCentre 6655/6655i Color Multifunction Printer User Guide...
- Page 119 10. Touch Close. The options that you select appear on the Special Pages screen. 11. To edit or delete a special page entry, touch the entry in the list, then from the menu, touch the desired action. 12. Touch OK. ® ® Xerox WorkCentre 6655/6655i Color Multifunction Printer User Guide...
- Page 120 Touch Close. The options that you select appear on the Special Pages screen. To edit or delete a special page entry, touch the entry in the list, then from the menu, touch the desired action. 10. Touch OK. ® ® Xerox WorkCentre 6655/6655i Color Multifunction Printer User Guide...
- Page 121 Touch an arrow to position the date in the header or footer. The sample page shows the location of the date. Touch OK. To change the text formatting, touch Format & Style, choose the desired settings, then touch ® ® Xerox WorkCentre 6655/6655i Color Multifunction Printer User Guide...
- Page 122 To rotate the pages, for Rotate Background, select the check box. Note: The right side of the screen displays a diagram of the image layout. Touch Original Orientation, then Portrait or Landscape. Touch OK. ® ® Xerox WorkCentre 6655/6655i Color Multifunction Printer User Guide...
- Page 123 Touch Original Orientation, then from the menu, select the orientation option desired. The sample page shows the image layout. Touch OK. ® ® Xerox WorkCentre 6655/6655i Color Multifunction Printer User Guide...
-
Page 124: Id Card Copying
Change the settings as needed. Touch OK. 11. Press the green Start button, or touch Scan Back on the touch screen. 12. Lift the document cover and remove the ID card or document. ® ® Xerox WorkCentre 6655/6655i Color Multifunction Printer User Guide... - Page 125 Plus (+) and Minus (-) buttons. • Preset (Y / X): This option allows you to select from a list of preset values. Touch OK. Touch OK. ® ® Xerox WorkCentre 6655/6655i Color Multifunction Printer User Guide...
- Page 126 To change Background Suppression: Press the Services Home button, then touch ID Card Copy. For Front Side Features or Back Side Features, touch Edit. For Background Suppression, touch Auto Suppression. Touch OK. ® ® Xerox WorkCentre 6655/6655i Color Multifunction Printer User Guide...
-
Page 127: Advanced Copying
For Quantity for Final Job, to enter the number of copies, use the alphanumeric keypad. In the corner of the Build Job screen, touch Submit Job. To cancel the job, touch Delete All Segments. ® ® Xerox WorkCentre 6655/6655i Color Multifunction Printer User Guide... - Page 128 Touch the desired saved setting. Note: To delete a saved setting, touch the setting, then touch Delete Settings. Touch Load Settings. The saved settings are loaded for the current copy job. ® ® Xerox WorkCentre 6655/6655i Color Multifunction Printer User Guide...
-
Page 129: Scanning
The system administrator must set up this feature before you can use it. For details, see the System Administrator Guide at www.xerox.com/office/WC6655docs. ® ® If the system administrator enables Remote Start in Xerox CentreWare Internet Services, you can scan images directly from the scanner to a PC. Using Microsoft Clip Organizer, you can scan, import, and store images from the printer. -
Page 130: Basic Scanning
The printer must be connected to a network to retrieve a scan file remotely. ® ® • For details, see the Help in Xerox CentreWare Internet Services. • Print, copy, and fax jobs can print while you are scanning original documents or downloading files from the printer hard drive. -
Page 131: Document Glass
139.7 x 139.7 mm (5.5 x 5.5 in.) through 215.9 x 355.6 mm (8.5 x 14 in.). • The maximum document feeder capacity is approximately 60 sheets of 80 g/m² paper. ® ® Xerox WorkCentre 6655/6655i Color Multifunction Printer User Guide... -
Page 132: Duplex Automatic Document Feeder Guidelines
Adjust the paper guides so that they fit against the originals. • Only Insert paper in the duplex automatic document feeder when ink on the paper is dry. • Do not load originals above the MAX fill line. ® ® Xerox WorkCentre 6655/6655i Color Multifunction Printer User Guide... -
Page 133: Scanning To A Folder
Scanning to a folder is the simplest scanning method. When you scan an image at the printer, the scan ® ® file is stored in a folder on the internal hard drive. You then use Xerox CentreWare Internet Services to retrieve the stored scan file to your computer. -
Page 134: Scanning To A Private Folder
In the Confirm Folder Password field, type the password again. Click Apply. ® ® Your private folder appears in the folder list in Xerox CentreWare Internet Services and on the printer touch screen under Pick a Workflow. The contents are stored on the printer hard drive. -
Page 135: Retrieving Scan Files
Scanning Retrieving Scan Files ® ® To retrieve your scanned images, use Xerox CentreWare Internet Services to copy the scan files from the printer to your computer. To retrieve your scan files: At your computer, open a Web browser, in the address field, type the IP address of the printer, then press Enter or Return. -
Page 136: Scanning To Network File Repositories
When using this feature, the images you scan are sent to a file repository on a network server. The system administrator configures the file repository settings. ® ® Using Xerox CentreWare Internet Services, you can add your own scan destinations to templates. Scanning to a Predefined Network File Repository To scan an image and send it to a predefined network file repository: Load the original on the document glass or in the document feeder. -
Page 137: Adding A Scan Destination
Use the login name for the computer that holds the destination folder. The login name can include the domain name also, such as domain name\login name. 12. Click Add. The template is stored on the printer hard drive. ® ® Xerox WorkCentre 6655/6655i Color Multifunction Printer User Guide... -
Page 138: Scanning To Your Home Directory
To change any of the scan settings, on the Workflow Scanning screen, select options. For more options, touch the Advanced Settings tab. For details, see Selecting Advanced Settings. Press the green Start button. ® ® Xerox WorkCentre 6655/6655i Color Multifunction Printer User Guide... -
Page 139: Setting Scan Options
Selecting Filing Options ............................... 143 • Building a Scan Job ............................... 144 The scanning features in your printer use templates that define the scan settings and the destination for an image. ® ® Xerox WorkCentre 6655/6655i Color Multifunction Printer User Guide... -
Page 140: Changing The Basic Scan Settings
No: This option creates an unsearchable image of the scanned document. • Yes: This option creates a searchable document of the scanned pages. If you select Yes, select the language for the search from the menu. Touch OK. ® ® Xerox WorkCentre 6655/6655i Color Multifunction Printer User Guide... -
Page 141: Selecting Advanced Settings
To adjust brightness and sharpness: Touch Image Options. On the Image Options screen, adjust the sliders as needed: Lighten/Darken: Lightens or darkens the image. • • Sharpness: Sharpens or softens the image. Touch OK. ® ® Xerox WorkCentre 6655/6655i Color Multifunction Printer User Guide... -
Page 142: Selecting Layout Adjustments
Touch Blank Page Management. Select an option: • Include Blank Pages: This option includes scanned pages that are blank. Remove Blank Pages: This option omits scanned pages that are blank. • Touch OK. ® ® Xerox WorkCentre 6655/6655i Color Multifunction Printer User Guide... -
Page 143: Selecting Filing Options
Document Management and Add File Destinations can be modified only after scanning to network file repositories or scanning to home are set up. For details, see the System Administrator Guide at www.xerox.com/office/WC6655docs. To select the action to take if a file already exists: Touch If File Already Exists. -
Page 144: Building A Scan Job
Program and scan all segments, then touch Submit Job. The Job Progress screen appears, and the individual segments are scanned as a single job. If necessary, touch Delete > Delete Job to cancel the job. Note: ® ® Xerox WorkCentre 6655/6655i Color Multifunction Printer User Guide... -
Page 145: Scanning To A Usb Flash Drive
Do not remove the USB Flash drive until prompted. If you remove the Flash drive before the transfer is complete, the file can become unusable and other files on the drive can be damaged. ® ® Xerox WorkCentre 6655/6655i Color Multifunction Printer User Guide... -
Page 146: Scanning To An Email Address
Sending a Scanned Image to an Email Address ....................147 • Setting Email Options ..............................148 • Changing the Attachment Name and Format ....................148 When using this feature, the images you scan are sent as email attachments. ® ® Xerox WorkCentre 6655/6655i Color Multifunction Printer User Guide... -
Page 147: Sending A Scanned Image To An Email Address
Touch OK. To change any of the scan to Email settings, use options on the Email, Advanced Settings, Layout Adjustment, and Job Assembly tabs. Press the green Start button. ® ® Xerox WorkCentre 6655/6655i Color Multifunction Printer User Guide... -
Page 148: Setting Email Options
No: This option creates an unsearchable image of the scanned document. − Yes: This option creates a searchable document of the scanned pages. If you select Yes, select the language for the search from the menu. Touch OK. Touch OK. ® ® Xerox WorkCentre 6655/6655i Color Multifunction Printer User Guide... - Page 149 Touch OK. Changing the Message To change the message: Touch the Email Options tab. Touch Message. Type the message to include with the images using the touch screen keyboard. Touch OK. ® ® Xerox WorkCentre 6655/6655i Color Multifunction Printer User Guide...
- Page 150 Encryption helps ensure that email messages cannot be read by anyone other than the intended recipient. Note: The system administrator must set up this feature before you can use it. For details, see the System Administrator Guide at www.xerox.com/office/WC6655docs. To set encryption: Touch the Email Options tab. Touch Encryption.
-
Page 151: Scanning To A Destination
Touch Search, then use the touch screen keyboard to type part of the name. Touch Search. Select the desired contact from the list, then touch Add to Recipients. Touch OK. ® ® Xerox WorkCentre 6655/6655i Color Multifunction Printer User Guide... - Page 152 Size to Lowest Compression/Largest File Size. Touch OK. Press the green Start button. The Job Progress screen appears, and the original is scanned. The file is stored as a file at the destination. ® ® Xerox WorkCentre 6655/6655i Color Multifunction Printer User Guide...
-
Page 153: Faxing
• Sending a LAN Fax ................................ 185 • Using the Address Book ............................... 187 The system administrator must set up this feature before you can use it. For details, see the System Administrator Guide at www.xerox.com/office/WC6655docs. ® ® Xerox WorkCentre... -
Page 154: Configuring The Printer For Faxing
Note: Not all options listed are supported on all printers. Some options apply only to a specific printer model, configuration, operating system, or driver type. For details, see the System Administrator Guide at www.xerox.com/office/WC6655docs. ® ® Xerox... -
Page 155: Basic Faxing
Paper with paper clips or staples attached • Paper with wrinkles, curls, folds, tears, or notches • Coated or carbonless paper or items other than paper such as cloth or metal • Envelopes • Books ® ® Xerox WorkCentre 6655/6655i Color Multifunction Printer User Guide... -
Page 156: Document Feeder
Adjust the paper guides so that they fit against the originals. • Only Insert paper in the duplex automatic document feeder when ink on the paper is dry. • Do not load originals above the MAX fill line. ® ® Xerox WorkCentre 6655/6655i Color Multifunction Printer User Guide... -
Page 157: Sending An Embedded Fax
To pause the job, press the Stop button. On the touch screen, touch Resume Scanning to Note: continue the job, or Cancel Scanning to cancel the job completely. If you do not make a selection within 60 seconds, the job automatically resumes. ® ® Xerox WorkCentre 6655/6655i Color Multifunction Printer User Guide... -
Page 158: Basic Fax Settings
Press the Services Home button, then touch Fax. To enter recipient details, touch an option or touch Skip. Touch Original Type. On the Original Type screen, touch the content type of the original document. Touch OK. ® ® Xerox WorkCentre 6655/6655i Color Multifunction Printer User Guide... - Page 159 Press the Services Home button, then touch Fax. To enter recipient details, touch an option or touch Skip. Touch the Image Quality tab, then touch Image Enhancement. For Background Suppression, touch Auto Suppression. Touch OK. ® ® Xerox WorkCentre 6655/6655i Color Multifunction Printer User Guide...
- Page 160 Touch an option. − Reduce to Fit: This option shrinks large documents to fit on smaller paper. − Split Across Pages: This option continues a single image across several pages. Touch OK. ® ® Xerox WorkCentre 6655/6655i Color Multifunction Printer User Guide...
- Page 161 Left Page Only: Scans the left page of the book. − − Right Page Only: Scans the right page of the book. To set the amount to erase, touch the Binding Edge Erase arrows as needed. Touch OK. ® ® Xerox WorkCentre 6655/6655i Color Multifunction Printer User Guide...
-
Page 162: Selecting Fax Options
Print Confirmation: This option generates a report for all fax jobs. − Print on Error Only: This option generates a report only for fax jobs that fail to send. Touch OK. ® ® Xerox WorkCentre 6655/6655i Color Multifunction Printer User Guide... -
Page 163: Selecting The Starting Rate
• Delete. To edit an existing comment, touch the comment, then touch the Edit icon. To change the • comment, use the touch screen keyboard, then touch OK. Touch OK. ® ® Xerox WorkCentre 6655/6655i Color Multifunction Printer User Guide... -
Page 164: Sending Header Text
Faxing Sending Header Text The system administrator must set up this feature before you can use it. For details, see the System Administrator Guide at www.xerox.com/office/WC6655docs. To include the fax header text: Press the Services Home button, then touch Fax. -
Page 165: Storing A Fax In A Local Mailbox
Storing a Fax in a Local Mailbox The system administrator must create a mailbox before you can use this feature. For details, see the System Administrator Guide at www.xerox.com/office/WC6655docs. To store a fax in a local mailbox: Press the Services Home button, then touch Fax. -
Page 166: Printing Local Mailbox Documents
Touch the Mailbox Number field, then use the alphanumeric keypad to enter the mailbox number. Touch the Mailbox Passcode field, then use the alphanumeric keypad to enter the four-digit mailbox passcode. Touch Print. The documents in the remote mailbox print. Touch Close. ® ® Xerox WorkCentre 6655/6655i Color Multifunction Printer User Guide... -
Page 167: Deleting Local Mailbox Documents
Continue to enter fax numbers for all of the remote devices that require access. Touch OK. To confirm, touch Update Setting. Select additional options as needed. Touch Start. The originals are scanned and stored for polling. ® ® Xerox WorkCentre 6655/6655i Color Multifunction Printer User Guide... -
Page 168: Printing Faxes Stored For Polling
If your printer is set to display the 12-hour clock, touch AM or PM. • Touch OK. Touch Print. The faxes that are stored on the remote device for polling print. Touch Close. ® ® Xerox WorkCentre 6655/6655i Color Multifunction Printer User Guide... -
Page 169: Deleting Faxes Stored For Polling
Touch an option. Touch Empty Fax Polling. To confirm, touch Empty Fax Polling again. Touch OK. Building a Fax Job For details, see Building a Fax Job on page 184. ® ® Xerox WorkCentre 6655/6655i Color Multifunction Printer User Guide... -
Page 170: Sending A Server Fax
Select more options as needed. For details, see Selecting Server Fax Options on page 173. Press the green Start button. The printer scans the pages and transmits the document when all pages have been scanned. ® ® Xerox WorkCentre 6655/6655i Color Multifunction Printer User Guide... -
Page 171: Basic Server Fax Settings
Upright Images and Sideways Images refer to the direction the originals are loaded in the − document feeder. Note: If you use the document glass, place the original in the same orientation face down as it was face up. Touch OK. ® ® Xerox WorkCentre 6655/6655i Color Multifunction Printer User Guide... - Page 172 Preset Scan Area: This option specifies the area to scan when it matches a standard paper size. In the scrolling list, touch the desired paper size. − Custom Scan Area: You can specify the height and width of the area to scan. Touch OK. ® ® Xerox WorkCentre 6655/6655i Color Multifunction Printer User Guide...
-
Page 173: Selecting Server Fax Options
Press the Services Home button, then touch Server Fax. To enter recipient details, touch an option or touch Skip. Touch the Image Quality tab, then touch Image Enhancement. For Background Suppression, touch Auto Suppression. Touch OK. ® ® Xerox WorkCentre 6655/6655i Color Multifunction Printer User Guide... - Page 174 Press the Services Home button, then touch Server Fax. To enter recipient details, touch an option or touch Skip. Touch the Image Quality tab, then touch Original Type. Touch the content type of the original document. Touch OK. ® ® Xerox WorkCentre 6655/6655i Color Multifunction Printer User Guide...
- Page 175 If your printer is set to display the 12-hour clock, touch AM or PM. Touch OK. The fax is scanned and saved, then sent at the specified time. Building a Fax Job For details, see Building a Fax Job on page 184. ® ® Xerox WorkCentre 6655/6655i Color Multifunction Printer User Guide...
-
Page 176: Sending An Internet Fax
Press the green Start button. 10. The printer scans the pages, then after all pages are scanned, it sends the document as an email attachment in .pdf or .tif file format. ® ® Xerox WorkCentre 6655/6655i Color Multifunction Printer User Guide... -
Page 177: Basic Internet Fax Settings
Upright Images and Sideways Images refer to the direction the originals are loaded in the document feeder. Note: If you use the document glass, place the original in the same orientation face down as it was face up. Touch OK. ® ® Xerox WorkCentre 6655/6655i Color Multifunction Printer User Guide... - Page 178 PDF: This option produces a Portable Document Format (.pdf). − PDF Archival: This option produces a Portable Document Format (.pdf) with embedded fonts. TIFF: This option produces a Tagged Image File Format (.tif) − Touch OK. ® ® Xerox WorkCentre 6655/6655i Color Multifunction Printer User Guide...
-
Page 179: Selecting Internet Fax Options
Press the Services Home button, then touch Internet Fax. To enter recipient details, touch an option or touch Skip. Touch the Advanced Settings tab, then touch Image Enhancement. For Background Suppression, touch Auto Suppression. Touch OK. ® ® Xerox WorkCentre 6655/6655i Color Multifunction Printer User Guide... - Page 180 Touch the Advanced Settings tab, then touch Image Options. On the Image Options screen, adjust the sliders as needed: − Lighten/Darken: Lightens or darkens the image. − Sharpness: Sharpens or softens the image. Touch OK. ® ® Xerox WorkCentre 6655/6655i Color Multifunction Printer User Guide...
- Page 181 Preset Scan Area: This option specifies the area to scan when it matches a standard paper size. In the scrolling list, touch the desired paper size. Custom Scan Area: You can specify the height and width of the area to scan. − Touch OK. ® ® Xerox WorkCentre 6655/6655i Color Multifunction Printer User Guide...
- Page 182 OK. − Device Address Book: This option allows you to select an entry from your address book. Touch the desired name then touch OK. ® ® Xerox WorkCentre 6655/6655i Color Multifunction Printer User Guide...
- Page 183 To enter recipient details, touch an option or touch Skip. Touch the Internet Fax Options tab, then touch Acknowledgment Report. Touch Print Report. Touch OK. Building a Fax Job For details, see Building a Fax Job on page 184. ® ® Xerox WorkCentre 6655/6655i Color Multifunction Printer User Guide...
-
Page 184: Building A Fax Job
The Job Progress screen appears, and the individual segments are sent as a single job. On the Job Progress screen, to view a summary of the job, touch Details. Note: If necessary, touch Delete > Delete Job to cancel the job. ® ® Xerox WorkCentre 6655/6655i Color Multifunction Printer User Guide... -
Page 185: Sending A Lan Fax
Click the folder icon, navigate to the file location, then select the desired picture file. To include the file, click Open. Click OK. ® ® Xerox WorkCentre 6655/6655i Color Multifunction Printer User Guide... - Page 186 Credit Card: To use a credit card, debit card, or calling card to charge for faxes, select Credit Card. Type the card number in the field. Click OK. 10. In the Printer Properties window, click OK. 11. In the Print window, click OK or Print. ® ® Xerox WorkCentre 6655/6655i Color Multifunction Printer User Guide...
-
Page 187: Using The Address Book
To change the display name for the contact, touch the i button, edit the information in the fields, then touch OK. To mark any entered contact information as a favorite, touch the star icon. To save the contact to the Device Address Book, touch OK. ® ® Xerox WorkCentre 6655/6655i Color Multifunction Printer User Guide... -
Page 188: Editing Or Deleting Favorites In The Device Address Book
To mark any entered contact information as a favorite, touch the star icon. To delete a favorite, to the right of the appropriate field touch the star icon. Touch OK. ® ® Xerox WorkCentre 6655/6655i Color Multifunction Printer User Guide... -
Page 189: Maintenance
Maintenance This chapter includes: • Cleaning the Printer ..............................190 • Billing and Usage Information ..........................205 • Ordering Supplies ................................206 • Moving the Printer ................................. 210 ® ® Xerox WorkCentre 6655/6655i Color Multifunction Printer User Guide... -
Page 190: Cleaning The Printer
Do not touch the electrical contacts or gears. Doing so could damage the printer and cause the print quality to deteriorate. • Ensure any parts removed during cleaning are replaced before you plug in the printer. ® ® Xerox WorkCentre 6655/6655i Color Multifunction Printer User Guide... -
Page 191: Cleaning The Exterior
Never use cleaning agents other than water or mild detergent. Cleaning the Scanner Xerox recommends that you clean the scanner about once a month or when vertical lines appear on copies or scans from the automatic document feeder. Vertical lines appear when anything is spilled on the scanner or when debris or dust collect on any of the surfaces. - Page 192 For best results, to remove marks and streaks, use a standard glass cleaner. Wipe the white underside of the document cover until it is clean and dry. Close the document cover. ® ® Xerox WorkCentre 6655/6655i Color Multifunction Printer User Guide...
-
Page 193: Cleaning The Interior
Switch off the printer immediately and wait 40 minutes for the fuser to cool. Try to remove the jam after the printer has cooled. ® ® Xerox WorkCentre 6655/6655i Color Multifunction Printer User Guide... - Page 194 If you get toner in your eyes, wash it out immediately with cool water and consult a doctor. Open the side door. To unlock the waste cartridge, turn the waste cartridge lever 90-degrees counterclockwise. ® ® Xerox WorkCentre 6655/6655i Color Multifunction Printer User Guide...
- Page 195 Notes: • Be careful not to spill toner when handling the waste cartridge. • After removing the waste cartridge, do not touch the area shown in the illustration. ® ® Xerox WorkCentre 6655/6655i Color Multifunction Printer User Guide...
- Page 196 Place the removed waste cartridge on a level surface. CAUTION: To avoid toner spills or malfunction, do not lay the waste cartridge on its side. Remove the cleaning rod from inside the printer. ® ® Xerox WorkCentre 6655/6655i Color Multifunction Printer User Guide...
- Page 197 Insert the cleaning rod into one of the four cleaning holes until it clicks, then pull it out. Repeat this two more times. Repeat the procedure for the holes in the other three slots. Return the cleaning rod to its original location. ® ® Xerox WorkCentre 6655/6655i Color Multifunction Printer User Guide...
- Page 198 If the waste cartridge does not fit into place properly, ensure that the belt is inserted fully. 10. To lock the waste cartridge, turn the waste cartridge lock lever 90-degrees clockwise. 11. Close the side door. ® ® Xerox WorkCentre 6655/6655i Color Multifunction Printer User Guide...
- Page 199 The data in the memory is cleared when the printer is turned off. Push down on the rear door release and pull open the door. Open the side door. ® ® Xerox WorkCentre 6655/6655i Color Multifunction Printer User Guide...
- Page 200 Notes: • Be careful not to spill toner when handling the waste cartridge. • After removing the waste cartridge, do not touch the area shown in the illustration. ® ® Xerox WorkCentre 6655/6655i Color Multifunction Printer User Guide...
- Page 201 CAUTION: To avoid toner spills or malfunction, do not lay the waste cartridge on its side. Turn the control panel so that it is not positioned above the top cover. ® ® Xerox WorkCentre 6655/6655i Color Multifunction Printer User Guide...
- Page 202 Put your fingers through the loops on both sides of the transfer belt unit, then pull it out. 10. Use a dry cotton swab to clean the color toner density sensors. ® ® Xerox WorkCentre 6655/6655i Color Multifunction Printer User Guide...
- Page 203 11. Reinsert the belt unit into the printer. 12. Close the top cover. 13. Reinsert the waste cartridge. Note: If the waste cartridge does not fit into place properly, ensure that the belt is inserted fully. ® ® Xerox WorkCentre 6655/6655i Color Multifunction Printer User Guide...
- Page 204 Maintenance 14. To lock the waste cartridge, turn the waste cartridge lock lever 90-degrees clockwise. 15. Close the side door. 16. Close the rear door. ® ® Xerox WorkCentre 6655/6655i Color Multifunction Printer User Guide...
-
Page 205: Billing And Usage Information
Total Impressions: Total number of color impressions plus black impressions. To view detailed usage information, touch Usage Counters, then select an option. To return to the Services Home menu, press the Services Home button. ® ® Xerox WorkCentre 6655/6655i Color Multifunction Printer User Guide... -
Page 206: Ordering Supplies
Total Satisfaction Guarantee do not cover damage, malfunction, or degradation of performance caused by use of non-Xerox supplies, or the use of Xerox supplies not specified for this printer. The Total Satisfaction Guarantee is available in the United States and Canada. Coverage could vary outside these areas. -
Page 207: Viewing Printer Supply Status
Internet Services: At your computer, open a Web browser, in the address field, type the IP address of the printer, then press Enter or Return. For details, see the System Administrator Guide at www.xerox.com/office/WC6655docs. Note: Select the Status tab. Under Status, click Supplies. -
Page 208: Routine Maintenance Items
Imaging Unit • Transfer Unit Kit • Waste Cartridge • Fuser • Feed Roller Kit Recycling Supplies ® For more information on the Xerox supplies recycling program, go to: www.xerox.com/gwa. ® ® Xerox WorkCentre 6655/6655i Color Multifunction Printer User Guide... -
Page 209: Toner Cartridges
Use a damp cloth to wipe off spilled toner. Never use a vacuum cleaner to remove spills. Electric sparks inside the vacuum cleaner can cause a fire or explosion. If you spill a large volume of toner, contact your local Xerox representative. •... -
Page 210: Moving The Printer
Pulling the cord can damage it, which can lead to fire or electric shock. Remove any paper or other media from the output tray. If the output tray extension is extended, close it. ® ® Xerox WorkCentre 6655/6655i Color Multifunction Printer User Guide... - Page 211 When moving the printer over a long distance, remove the imaging units and toner cartridges to prevent toner from spilling. Repack the printer and its options using the original packing material and boxes or a Xerox Repackaging Kit. For a repacking kit and instructions, go to www.xerox.com/office/WC6655support.
- Page 212 Maintenance After moving the printer: Reinstall any parts you removed. Reconnect the printer to the cables and power cord. Plug in and turn on the printer. ® ® Xerox WorkCentre 6655/6655i Color Multifunction Printer User Guide...
-
Page 213: Troubleshooting
This chapter includes: • General Troubleshooting............................. 214 • Jams ....................................219 • Print-Quality Problems ..............................234 • Copy and Scan Problems ............................. 242 • Fax Problems..................................243 • Getting Help ..................................247 ® ® Xerox WorkCentre 6655/6655i Color Multifunction Printer User Guide... -
Page 214: General Troubleshooting
Use a power source with the specifications listed in the Electrical voltage or frequency that does not match the Specifications on page 260. printer specifications. CAUTION: Plug the three-wire cord with grounding prong directly into a grounded AC outlet. ® ® Xerox WorkCentre 6655/6655i Color Multifunction Printer User Guide... -
Page 215: Printer Resets Or Turns Off Frequently
Turn off the printer, then turn it on again. Print the Error History from the Information Pages of the Printer Setting Utility. If the error persists, contact your Xerox representative. The printer is connected to an uninterruptible Turn off the printer, then connect the power cord to a suitable power supply. -
Page 216: Printing Takes Too Long
The job is complex. Wait. No action needed. Change the print-quality mode in the print driver to Standard. The print-quality mode in the driver is set to Enhanced. ® ® Xerox WorkCentre 6655/6655i Color Multifunction Printer User Guide... -
Page 217: Document Prints From Wrong Tray
Solutions There is an obstruction or debris inside the Turn off the printer and remove the obstruction or debris. If you printer. cannot remove it, contact your Xerox representative. Paper Tray Fails to Close Probable Causes Solutions The paper tray does not close fully. -
Page 218: Condensation Has Formed Inside The Printer
Date and Time Are Incorrect Probable Causes Solutions ® The Date and Time Setup is set to Manual To change the Date and Time to Automatic, enable NTP in Xerox ® (NTP Disabled). CentreWare Internet Services. For details, see the System Administrator Guide at www.xerox.com/office/WC6655docs. -
Page 219: Jams
Switch off the printer immediately and wait 40 minutes for the fuser to cool. Try to remove the jam after the printer has cooled. If the error persists, contact your Xerox representative. CAUTION: Do not attempt to clear any paper jams using tools or instruments. -
Page 220: Clearing Paper Jams
Remove the remaining paper from the duplex automatic document feeder. Open the duplex automatic document feeder top cover. If the paper is jammed in the exit of the duplex automatic document feeder, pull it out as illustrated. ® ® Xerox WorkCentre 6655/6655i Color Multifunction Printer User Guide... - Page 221 To reset the interlock switch and clear the paper jam message, open and close the back door. Reload the document in the duplex automatic document feeder, then adjust the guides against the edges of the paper. ® ® Xerox WorkCentre 6655/6655i Color Multifunction Printer User Guide...
-
Page 222: Clearing Paper Jams From The Bypass Tray
To resolve the error displayed on the control panel you must clear all paper from the paper path. Remove any paper from the bypass tray. Grasp both sides of the bypass tray, then pull it straight out of the printer. Pull out the tray until it stops. ® ® Xerox WorkCentre 6655/6655i Color Multifunction Printer User Guide... - Page 223 To remove the tray, lift the front of it slightly, then pull it out of the printer. Remove the jammed paper. To reset the interlock switch and clear the paper jam message, open and close the back door. ® ® Xerox WorkCentre 6655/6655i Color Multifunction Printer User Guide...
- Page 224 If the control panel prompts you, on the screen, verify the paper size and type. Touch Size, then, for a standard paper size, touch an option. Touch Type, then, for the paper type, touch an option. 10. Touch OK. ® ® Xerox WorkCentre 6655/6655i Color Multifunction Printer User Guide...
-
Page 225: Clearing Paper Jams From The Tray 2 Area
To resolve the error displayed on the control panel you must clear all paper from the paper path. Pull out tray 2 until it stops. To remove the tray, lift the front of it slightly, then pull it out of the printer. ® ® Xerox WorkCentre 6655/6655i Color Multifunction Printer User Guide... - Page 226 Troubleshooting Remove any paper jammed at the front of the printer. To reset the interlock switch and clear the paper jam message, open and close the back door. ® ® Xerox WorkCentre 6655/6655i Color Multifunction Printer User Guide...
- Page 227 If the control panel prompts you, on the screen, verify the paper size and type. Touch Size, then, for a standard paper size, touch an option. Touch Type, then, for the paper type, touch an option. Touch OK. ® ® Xerox WorkCentre 6655/6655i Color Multifunction Printer User Guide...
-
Page 228: Clearing Paper Jams From The Fuser Area
Push down on the rear door release and pull open the door. If paper is jammed in the fuser, raise both green levers to open the fuser. To open the paper guide, raise the green handle. ® ® Xerox WorkCentre 6655/6655i Color Multifunction Printer User Guide... - Page 229 Troubleshooting Remove any jammed paper from the back of the printer. Close the paper guide on the fuser. Lower the levers to their original position. ® ® Xerox WorkCentre 6655/6655i Color Multifunction Printer User Guide...
- Page 230 Troubleshooting Remove any jammed paper from the back of the printer. Close the rear door. ® ® Xerox WorkCentre 6655/6655i Color Multifunction Printer User Guide...
-
Page 231: Minimizing Paper Jams
Troubleshooting Minimizing Paper Jams The printer is designed to function with minimal paper jams using Xerox supported paper. Other paper types can cause jams. If supported paper is jamming frequently in one area, clean that area of the paper path. -
Page 232: Troubleshooting Paper Jams
Remove the paper from the tray, then replace it with new dry paper. Too much static electricity is present. Try a new ream of paper. Use only Xerox approved paper. For details, see Supported Paper Unsupported paper is in the tray. - Page 233 The paper must be loaded in the correct tray. For details, see Supported Paper on page 54. Tray is loaded with mixed paper. Load the tray with only one type and size of paper. ® ® Xerox WorkCentre 6655/6655i Color Multifunction Printer User Guide...
-
Page 234: Print-Quality Problems
The Xerox Warranty, Service Agreement, or Xerox Total Satisfaction Guarantee does not cover damage caused by using unsupported paper or specialty media. The Xerox Total Satisfaction Guarantee is available in the United States and Canada. Coverage could vary outside these areas. -
Page 235: Solving Print-Quality Problems
You can also print a Demo Page to more precisely determine the print-quality problem. For details, see Information Pages on page 25. If the print quality does not improve after carrying out the appropriate action, contact your Xerox representative. Notes: •... - Page 236 The toner cartridges are not Replace the toner cartridges with ® ® Xerox toner cartridges. genuine Xerox toner cartridges. It can take several prints before full quality is restored. The bias transfer roller voltage is Verify that the paper loaded in the tray insufficient for the paper type.
- Page 237 The toner cartridges are not Replace the toner cartridges with ® ® Xerox toner cartridges. genuine Xerox toner cartridges. For details, see Consumables on page 207. There is debris on the transfer Wipe the transfer roller with a clean, roller.
- Page 238 The toner cartridges are not Replace the toner cartridges with • Vertical black or color streaks ® ® Xerox toner cartridges. genuine Xerox toner cartridges. For or multiple colored streaks or details, see Consumables on page 207. lines • Streaks in one color only The imaging unit is defective.
- Page 239 • Remove any paper or debris from through all colors against the bottom of the the paper path. transfer belt unit. • Replace the transfer belt unit. ® • For assistance, go to the Xerox Support website at www.xerox.com/office/WC6655sup port. ® ® Xerox...
- Page 240 To verify paper type at the control panel, press Machine Status, then touch Machine Information > Paper Tray Status. For more information about paper weights, see the Offset image section of this table. ® ® Xerox WorkCentre 6655/6655i Color Multifunction Printer User Guide...
- Page 241 The toner cartridges are not Replace the toner cartridges with ® ® Xerox toner cartridges. genuine Xerox toner cartridges. For details, see Consumables on page 207. The paper is impeded in the • Remove any paper or debris from paper path.
-
Page 242: Copy And Scan Problems
• Copy: To lighten, darken, or adjust contrast, use the Image Quality settings. • Scan: To lighten, darken, or adjust contrast, use the Advanced Settings Tab. If the problem persists, for online support information, go to www.xerox.com/office/WC6655support. ® ® Xerox... -
Page 243: Fax Problems
If you cannot send and receive faxes, make sure that you are connected to an approved analog telephone line. The fax cannot send or receive when connected to a digital phone line. If you cannot send or receive faxes correctly, refer to the following tables. ® ® Xerox WorkCentre 6655/6655i Color Multifunction Printer User Guide... -
Page 244: Problems Sending Faxes
The fax is not installed or is not Verify that the fax is installed and enabled. enabled. Server Fax is enabled. Make sure that Server Fax is disabled. If the problem persists, for online support information, go to www.xerox.com/office/WC6655support. ® ® Xerox WorkCentre 6655/6655i Color Multifunction Printer... -
Page 245: Problems Receiving Faxes
If the problem persists, for online support information, go to www.xerox.com/office/WC6655support. Selecting the Starting Rate Select the highest starting rate unless the destination for the fax you are sending has special requirements. -
Page 246: Xerox ® Workcentre ® 6655/6655I Color Multifunction Printer
Touch Close. Note: If this feature does not appear, log in as a system administrator. For details, see Logging In as the System Administrator at the Control Panel on page 28. ® ® Xerox WorkCentre 6655/6655i Color Multifunction Printer User Guide... -
Page 247: Getting Help
Fault messages warn you about printer conditions that prevent the printer from printing or degrade printing performance. If more than one fault occurs, only one is displayed on the control panel. ® ® Xerox WorkCentre 6655/6655i Color Multifunction Printer User Guide... -
Page 248: Using The Integrated Troubleshooting Tools
Starting a Customer Self-Help Session If your printer displays an error message that you cannot clear, you can connect the printer remotely to a Xerox troubleshooting server. The troubleshooting server analyzes diagnostic information from your printer and provides you with helpful solutions. - Page 249 Touch Print. ® ® Note: Information pages can also be printed from Xerox CentreWare Internet Services. Setting Rights to Access the Configuration Report and Information Pages At the printer control panel, press the Machine Status button, then touch the Tools tab.
- Page 250 TCP/IP and HTTP enabled in the printer. • A network-connected computer with a Web browser that supports JavaScript. ® ® Internet Services or the System Administrator Guide. For details, see the Help in Xerox CentreWare ® ® Xerox WorkCentre 6655/6655i Color Multifunction Printer...
-
Page 251: Online Support Assistant
The Online Support Assistant is a knowledge base that provides instructions and troubleshooting help to solve your printer problems. You can find solutions for print-quality problems, paper jams, software installation issues, and more. To access the Online Support Assistant, go to www.xerox.com/office/WC6655support. More Information Resource... -
Page 253: Specifications
This appendix includes: • Printer Configurations and Options ........................254 • Physical Specifications ..............................256 • Environmental Specifications ............................ 259 • Electrical Specifications ............................... 260 • Performance Specifications ............................261 ® ® Xerox WorkCentre 6655/6655i Color Multifunction Printer User Guide... -
Page 254: Printer Configurations And Options
• WIA: Up to 600 dpi Maximum scan size • Document Glass: 215.9 x 355.6 mm (8.5 x 14 in.) • Duplex Automatic Document Feeder: 215.9 x 355.6 mm (8.5 x 14 in.) ® ® Xerox WorkCentre 6655/6655i Color Multifunction Printer User Guide... -
Page 255: Options And Upgrades
7.0-inch LCD touch screen and keypad navigation Connectivity • Universal Serial Bus (USB 2.0) • USB Flash Drive • Ethernet 10/100/1000Base-TSupport for AirPrint • Wi-Fi Direct ® ® Remote access Xerox CentreWare Internet Services Options and Upgrades • Wireless network adapter • 550-Sheet Feeder Note: You can install a maximum of one optional tray on this printer. -
Page 256: Physical Specifications
55.3 cm (21.8 in.) 55.3 cm (21.8 in.) Height 62.5 cm (24.6 in.) 76.3 cm (30.0 in.) Weight 37.6 kg (82.9 lb.) 43.9 kg (96.8 lb.) Standard Configuration Physical Specifications ® ® Xerox WorkCentre 6655/6655i Color Multifunction Printer User Guide... -
Page 257: Physical Specifications With Optional 550-Sheet Feeder
Specifications Physical Specifications with Optional 550-Sheet Feeder Clearance Requirements ® ® Xerox WorkCentre 6655/6655i Color Multifunction Printer User Guide... -
Page 258: Clearance Requirements With Optional 550-Sheet Feeder
Specifications Clearance Requirements with Optional 550-Sheet Feeder ® ® Xerox WorkCentre 6655/6655i Color Multifunction Printer User Guide... -
Page 259: Environmental Specifications
Under extreme environmental conditions, such as 10°C and 85% relative humidity, defects can occur due to condensation. Elevation For optimum performance, use the printer at elevations below 3100 m (10,170 ft.). ® ® Xerox WorkCentre 6655/6655i Color Multifunction Printer User Guide... -
Page 260: Electrical Specifications
® ENERGY STAR settings are preset on Xerox equipment at the factory to switch to Power Saver modes after 2 minutes from the last copy or print. -
Page 261: Performance Specifications
(8.5 x 11 in.) and 23 ppm for A4 (210 x 297 mm). • Paper size. Letter (8.5 x 11 in.) and A4 (210 x 297 mm) sizes share the fastest print speed. Larger sizes reduce print speeds. ® ® Xerox WorkCentre 6655/6655i Color Multifunction Printer User Guide... -
Page 263: Regulatory Information
Regulatory Information This appendix includes: • Basic Regulations ................................264 • Copy Regulations ................................269 • Fax Regulations ................................272 • Material Safety Data Sheets ............................. 276 ® ® Xerox WorkCentre 6655/6655i Color Multifunction Printer User Guide... -
Page 264: Basic Regulations
• Consult the dealer or an experienced radio/TV technician for help. Changes or modifications to this equipment not approved by Xerox can void the authority of the user to operate this equipment. Note: To ensure compliance with Part 15 of the FCC rules, use shielded interface cables. -
Page 265: European Union
This printer, if used properly in accordance with the instructions, is not dangerous for the consumer or for the environment. To ensure compliance with European Union regulations, use shielded interface cables. A signed copy of the Declaration of Conformity for this printer can be obtained from Xerox. European Union Lot 4 Imaging Equipment Agreement Environmental Information... - Page 266 Regulatory Information Environmental Benefits of Duplex Printing Most Xerox products have duplex printing, also known as 2-sided printing, capability. This enables you to print on both sides of the paper automatically, and therefore helps to reduce the use of valuable resources by reducing your paper consumption.
-
Page 267: Germany
This product is certified to Environmental Choice standard for office machines, meeting all requirements for reduced environmental impact. As part of achieving certification, Xerox Corporation has proven this product meets the Environmental Choice criteria for energy efficiency. Certified copier, printer, multifunctional device, and fax products must also meet criteria such as reduced chemical emissions and demonstrate compatibility with recycled supplies. -
Page 268: Turkey Rohs Regulation
(2) this device must accept any interference received, including interference that may cause undesired operation. Changes or modifications to this device not specifically approved by the Xerox Corporation may void the user's authority to operate this equipment. ®... -
Page 269: Copy Regulations
“fair use” or library reproduction rights provisions of the copyright law. Further information of these provisions may be obtained from the Copyright Office, Library of Congress, Washington, D.C. 20559. Ask for Circular R21. ® ® Xerox WorkCentre 6655/6655i Color Multifunction Printer User Guide... - Page 270 The preceding list is not all inclusive, and no liability is assumed for its completeness or accuracy. In case of doubt, consult your attorney. For more information about these provisions contact the Copyright Office, Library of Congress, Washington, D.C. 20559. Ask for Circular R21. ® ® Xerox WorkCentre 6655/6655i Color Multifunction Printer User Guide...
-
Page 271: Canada
Postage stamps and other negotiable instruments This list is not inclusive and no liability is assumed for either its completeness or accuracy. In case of doubt, contact your legal counsel. ® ® Xerox WorkCentre 6655/6655i Color Multifunction Printer User Guide... -
Page 272: Fax Regulations
US:AAAEQ##TXXXX. The digits represented by ## are the REN without a decimal point (for example, 03 is a REN of 0.3). For earlier products, the REN is separately shown on the label. ® ® Xerox WorkCentre 6655/6655i Color Multifunction Printer User Guide... - Page 273 Ask your local Telephone Company for the modular jack type installed on your line. Connecting this machine to an unauthorized jack can damage telephone company equipment. You, not Xerox, assume all responsibility and/or liability for any damage caused by the connection of this machine to an unauthorized jack.
-
Page 274: Canada
DTMF signaling for more reliable and faster call setup. Modification of this product, connection to external control software, or connection to an external ® control apparatus not authorized by Xerox will invalidate its certification. South Africa This modem must be used in conjunction with an approved surge protection device. -
Page 275: New Zealand
For correct operation, total of the RNs of all devices connected to a single line at any time should not exceed five. ® ® Xerox WorkCentre 6655/6655i Color Multifunction Printer User Guide... -
Page 276: Material Safety Data Sheets
Material Safety Data Sheets For Material Safety Data information regarding your printer, go to: • North America: www.xerox.com/msds • European Union: www.xerox.com/environment_europe For the Customer Support Center phone numbers, go to www.xerox.com/office/worldcontacts. ® ® Xerox WorkCentre 6655/6655i Color Multifunction Printer User Guide... -
Page 277: Recycling And Disposal
Recycling and Disposal This appendix includes: • All Countries ..................................278 • North America ................................. 279 • European Union ................................280 • Other Countries ................................282 ® ® Xerox WorkCentre 6655/6655i Color Multifunction Printer User Guide... -
Page 278: All Countries
Recycling and Disposal All Countries If you are managing the disposal of your Xerox product, please note that the printer may contain lead, mercury, perchlorate, and other materials whose disposal may be regulated due to environmental considerations. The presence of these materials is fully consistent with global regulations applicable at the time that the product was placed on the market. -
Page 279: North America
North America Xerox operates an equipment take-back and reuse/recycle program. Contact your Xerox representative (1-800-ASK-XEROX) to determine if this Xerox product is part of the program. For more information about Xerox environmental programs, visit www.xerox.com/environment, or for recycling and disposal information, contact your local authorities. -
Page 280: European Union
In accordance with European legislation, end of life electrical and electronic equipment subject to disposal must be managed within agreed procedures. Prior to disposal, please contact your local reseller or Xerox representative for end of life take-back information. ®... -
Page 281: Collection And Disposal Of Equipment And Batteries
This wheeled bin symbol may be used in combination with a chemical symbol. This establishes compliance with the requirements set out by the Directive. Battery Removal Batteries should only be replaced by a manufacturer-approved service facility. ® ® Xerox WorkCentre 6655/6655i Color Multifunction Printer User Guide... -
Page 282: Other Countries
Recycling and Disposal Other Countries Please contact your local waste management authority to request disposal guidance. ® ® Xerox WorkCentre 6655/6655i Color Multifunction Printer User Guide...
Need help?
Do you have a question about the WorkCentre 6655i/X and is the answer not in the manual?
Questions and answers