
Related Manuals for Jensen JBS-300


Summary of Contents for Jensen JBS-300
- Page 1 Wall Mountable Bluetooth Music System with CD USER MANUAL JBS-300 PLEASE READ THIS USER MANUAL COMPLETELY BEFORE OPERATING THIS UNIT AND RETAIN THIS BOOKLET FOR FUTURE FEFERENCE LIMITED EDITION COLOR...
-
Page 2: Important Safety Instructions
WARNING TO PREVENT FIRE OR SHOCK HAZARD, DO NOT USE THIS PLUG WITH AN EXTENSION CORD, RECEPTACLE OR OTHER OUTLET UNLESS THE BLADES CAN BE FULLY INSERTED TO PREVENT BLADE EXPOSURE. TO PREVENT FIRE OR SHOCK HAZARD, DO NOT EXPOSE THIS APPLIANCE TO RAIN OR MOISTURE. The Caution Marking is located at the back enclosure of the apparatus. - Page 3 Refer all servicing to qualified service personnel. Servicing is required when the apparatus has been damaged in any way, such as power-supply adaptor or plug is damaged, liquid has been spilled or objects have fallen into the apparatus, the apparatus has been exposed to rain or moisture, does not operate normally, or has been dropped.
- Page 4 CAUTION Follow the advice below for safe operations. ON PROTECTION AGAINST LASER ENERGY EXPOSURE o As the laser beam used in this compact disc player is harmful to the eyes, do not attempt to disassemble the casing. o Stop operation immediately if any liquid or solid object should fall into the cabinet. o Do not touch the lens or poke at it.
-
Page 5: Compliance With Fcc Regulations
COMPLIANCE WITH FCC REGULATIONS FCC ID: 2A38HJBS-300 This device complies with Part 15 of the FCC Rules. Operation is subject to the following two conditions: (1) This device may not cause harmful interference, and (2) This device must accept any interference received, including interference that may cause undesired operation. -
Page 6: Dear Jensen® Customer
The serial number of this product is found on its back cover. You should note the serial number of this unit in the space provided as a permanent record of your purchase to aid in identification in the event of theft of loss. Model Number: JBS-300 Serial Number: ____________________... -
Page 7: Installation Options
INSTALLATION OPTIONS ATTACHING THE STAND (See Illustration Below) A. Turn the unit over as shown below, and align the top portion of the stand with the mounting area located on the bottom of the main unit. Make sure the LOCKING TAB is facing out when inserting the stand. -
Page 8: Main Unit
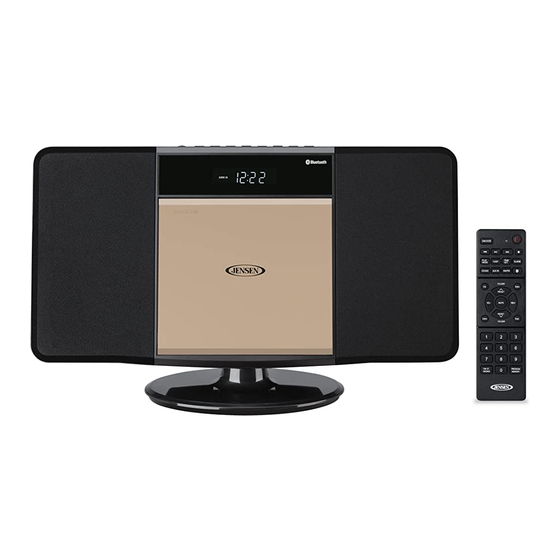
LOCATION OF CONTROLS MAIN UNIT... -
Page 9: Remote Control
REMOTE SENSOR HEADPHONE JACK RIGHT SPEAKER POWER /STANDBY BUTTON CD DOOR FUNCTION BUTTON LCD DISPLAY CD/BLUETOOTH SKIP PREVIOUS / FM TUNE- BUTTON LEFT SPEAKER CD/BLUETOOTH SKIP NEXT / FM TUNE+ BUTTON DETACHABLE STAND CD/BLUETOOTH PLAY/PAUSE BUTTON WALL MOUNTING KEYHOLES CD STOP BUTTON/ BLUETOOTH PAIR BUTTON FM WIRE ANTENNA... -
Page 10: Accessories Included
1. SNOOZE BUTTON POWER /STANDBYBUTTON 15. CD/BLUETOOTH SKIP NEXT 2. CD/BLUETOOTH SKIP PREVIOUS BUTTON BUTTON 16. CD STOP BUTTON 3. PLAY/PAUSE BUTTON 4. CD PLAY MODE BUTTON 17. ALARM BUTTON 5. SLEEP BUTTON 18. TIME SET BUTTON 6. CD/USB FUNCTION BUTTON 19. -
Page 11: Remote Control Battery Installation
NOTE ON NON-MAGNETICALLY SHIELDED SPEAKERS This unit is not magnetically shielded and may cause color distortion on the screen of some TVs or video monitors. To avoid this, you may need to move the unit further away from the TV or monitor if unnatural color shifts or image distortion occurs. -
Page 12: Setting The Alarm Clock
SETTING THE CLOCK The LCD DISPLAY will flash 12:00 when the unit is plugged in for the first time. The unit is now in standby mode. Setting the Time: PROG. button on top of the main unit or the TIME SET In standby mode, press and hold the Button on the remote control. -
Page 13: Radio Operation
6. Press the Button to set the minute and then press the ALARM Button again to confirm, alarm wake up source will appear in display. 7. Press the Button to select wake to CD, USB, Radio (Tu) or Beep (bu) and then press the ALARM Button again to confirm, alarm volume level will be flashing. -
Page 14: Preset Radio Stations
With strong signals, the tuner may stop before it reaches the actual broadcast frequency, so you may need to manually tune for the best reception. PRESET RADIO STATIONS Press the POWER/ STANDBY BUTTON on top of the main unit or on the remote control to turn on the unit. - Page 15 Release the button to continue playing your selection. 10. To stop playing, press the STOP Button. 11. Turn off the JBS-300 when you have finished listening. SKIP AND SEARCH MODE 1. During Play or Pause mode, tap the SKIP NEXT...
-
Page 16: Usb Operation
RANDOM – the tracks in the disc will be played in random sequence. Random icon “RDM” shows in display. For MP3 CD Repeat 1 Repeat Folder Repeat All Random Normal REPEAT FOLDER- Folder tracks will repeat continuously. Repeat Folder icon FOLDER shows in display. -
Page 17: Bluetooth Operation
PAIRING (Linking) a BLUETOOTH ENABLED cell phone OR OTHER BLUETOOTH ENABLED DEVICE to the JBS-300 If the JBS-300 has never been paired with a Bluetooth device before, you need to follow the pairing instructions below to link the JBS-300 with your Bluetooth device. - Page 18 Press the POWER/ STANDBY BUTTON on top of the main unit or on the remote control to turn the unit OFF the unit when you have finished listening. Don't forget to switch off the power of your external device as well. PRESET EQ (REMOTE CONTROL ONLY) This unit provides 4 different EQ modes to enhance your listening experience.
-
Page 19: Care And Maintenance
automatically. If this occurs, unplug the AC cord from power source, wait for 60 seconds, then plug the AC cord to power source again. The unit will be reset, “12:00” flashing in the LCD display, you need to setup the clock and alarm. CARE AND MAINTENANCE Do not subject the unit to excessive force, shock, dust or extreme temperature. -
Page 20: Specifications
CD player will not Unit not in CD function mode. CD Select CD function mode. Insert play is installed incorrectly. CD with label facing to the CD door. If the CD is self-compiled, the Use better quality blank media used may not be compatible media and retest. - Page 21 90 DAY LIMITED WARRANTY AND SERVICE VALID IN THE U.S.A. ONLY EASY BUYS ELECTRONICS INC warrants this unit to be free from defective materials or factory workmanship for a period of 90 days from the date of original customer purchase and provided the product is utilized within the U.S.A.
Need help?
Do you have a question about the JBS-300 and is the answer not in the manual?
Questions and answers