iSystem Infineon TC377TE User Manual
Emulation adapter
Hide thumbs
Also See for Infineon TC377TE:
- User manual (32 pages) ,
- User manua (28 pages) ,
- User manual (28 pages)
Table of Contents
Advertisement
Quick Links
Advertisement
Table of Contents

Subscribe to Our Youtube Channel
Related Manuals for iSystem Infineon TC377TE


Summary of Contents for iSystem Infineon TC377TE
- Page 1 Infineon TC377TE Emulation Adapter V2.6 User Manual September 2022...
- Page 2 This document and all documents accompanying it are copyrighted by iSYSTEM AG and all rights are reserved. Duplication of these documents is allowed for personal use. In all other cases, written consent from iSYSTEM is required. iSYSTEM AG. All rights reserved.
-
Page 3: Table Of Contents
Contents Infineon TC377TE Emulation Adapter Package content ............................5 Adaptation packages content ....................................6 Operation ..............................9 Adaptation setups .......................................... 10 Configuration ............................................. 13 Connectors ............................................16 Power supply package ........................................ 18 Standalone operation ........................................19 Measurement board ........................................20 Mechanical information ........................ -
Page 4: Infineon Tc377Te Emulation Adapter
Furthermore, IOM6 accessories enable the synchronous capture of analog and digital signals in parallel to trace information. Hardware tools coupled with iSYSTEM winIDEA IDE enable reliable recording of program flow and data trace. Integrated measurement and visualization tool Analyzer provides graphical presentation of execution time analysis and much more. -
Page 5: Package Content
Package content Infineon TC377TE Emulation Adapter is delivered with all components required for a standalone operation. Adaptation package for a specific Target board must be ordered separately. Infineon TC377TE Power supply package Emulation Adapter with Infineon Microcontroller Power converter Power adapter... -
Page 6: Adaptation Packages Content
Adaptation packages content Conversion board connects between the TriCore TC377TE Emulation Adapter and the Solder / Connecting part which are soldered on the Target board side. See below the table with ordering codes: Target Conversion board Type Connecting part Extender Solder part Socket cover* board... - Page 7 Fixed Adaptation This adaptation is delivered with a slot screw, which can be optionally used to more firm fix the Conversion board to the Solder part. Conversion board Solder part Flex Adaptation with Wire adapter This part provides a flexible connection of the Emulation Adapter to the Solder part as an alternative to the fixed connection.
- Page 8 BGA Adaptation Conversion board Extender (optional) Solder part Refer to the Adaptation setups chapter for more information how to setup a specific Emulation Adapter adaptation.
-
Page 9: Operation
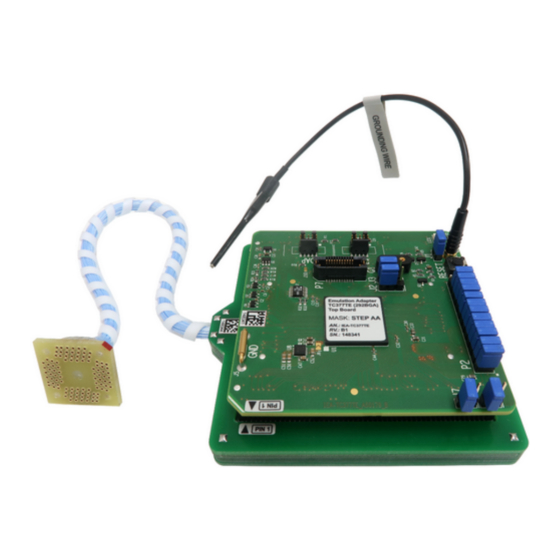
Device overview Emulation Adapter offers the following adaption setups: · Fixed Adaptation · Flex Adaptation · IEA-TC377TE Emulation Adapter Top / Bottom side of the Emulation Adapter How to connect Emulation Adapter (Video Tutorial) How to connect iSYSTEM Hardware (Video Tutorial) -
Page 10: Adaptation Setups
Adaptation setups Fixed Adaptation... - Page 11 Flex Adaptation Connecting part is only required for 0.4 mm pitch variants.
- Page 12 BGA Adaptation...
-
Page 13: Configuration
Configuration J1: Target reset configuration Jumper J1 connects the Emulation Adapter (EA) reset line and the user target board reset line and is populated by default. EA also features a Reset push button (SW1). If having problems establishing the initial debug session with the EA, remove J1 and try again. J2 and J3: Clock source configuration Jumpers J2 and J3 select clock source for the emulation device. - Page 14 Crystal socket Q1 schematics below: J4 & J5: GND connection points In case a good ground connection is required, connection points bridge J4 and pin J5 provide easy access to the EA GND potential. J6 & J7: VFLEX & VAREF VFLEX - If the target’s VFLEX pin isn’t exposed, set the jumper to the position J6 to connect VEXT from the target to power VFLEX.
- Page 15 VAREF - If the target’s VAREF2 pin isn’t exposed, set the jumper to the position J7 to connect VAREF1 from the target to power VARE2 Setting the jumper if VAREF2 is present on the device may brick the emulation or the Target board.
-
Page 16: Connectors
DAP clock Optional 2nd Ground DAPE2 Data pin Not Connected DAPEN/DAP3 Output Ground Not Connected 10-pin DAPE pinout Signal Direction is described from the BlueBox perspective. iSYSTEM BlueBox supporting Infineon DAPE debug and trace interface connects to the P8 connector. - Page 17 Blue color marks the trace signals. Pin 18: TGO (AGBT Trigger out) is connected to the pin TP32.6. Before Revision C1 pin 18 was NC (Not Connected). iSYSTEM BlueBox solution supporting AGBT (Aurora GigaBit Trace) interface connects to the P7 connector.
-
Page 18: Power Supply Package
Power supply package A Power supply package, which is delivered with the Emulation Adapter, is required when: · The Emulation Adapter is used as a standalone device . · The target board doesn’t provide an accurate supply voltage. · The target board doesn’t provide sufficient current for the Emulation Adapter operation. The Power converter can supply either 3.3 V or 5 V. -
Page 19: Standalone Operation
Standalone operation Infineon TC377TE Emulation Adapter is delivered with all components required for a Standalone operation. Power supply Use enclosed Power converter and adapter. Clock source If Target’s crystal circuit microcontroller oscillator (if available) is not an adequate clock source, insert appropriate crystal into the Q1 socket, replace the default 10pF C7 and C8... -
Page 20: Measurement Board
Measurement board With the Measurement board you gain easy access to all MCU pins respectively, because modern targets do not have accessible all the MCU pins / connected signals to connect with a measurement equipment (oscilloscope, logic analyzer). The Measurement board is optional and connects between the Emulation Adapter and the Conversion Board. -
Page 21: Mechanical Information
Mechanical information NQ PACK Solder part solder upper view Solder part solder bottom view Side view of the Solder part Top view of the Conversion board NQPACK Solder pad view Top view of the Emulation Adapter... - Page 22 0.20 21.20 0.18 You must be familiar with the SMT (Surface Mount Technology) soldering to solder the NQPACK to the PCB. On request, iSYSTEM provides this service too. BGA292 Adaptation For ordering the correct amount of Extenders go to the IEA-TC377TE Adaptations chapter.
- Page 23 3. Connect the Emulation Adapter to the Solder part respectively to the Extender when it's being used. 4. Connect iSYSTEM Debug Adapter or Active Probe to the connector on the Emulation Adapter. Gently press the Emulation Adapter with your thumb to the Target board and keep it stable.
- Page 24 Emulation Adapter with Debug Adapter Extender (optional) Solder part Electronic circuit PCB...
-
Page 25: Hq Pack Assembly
HQ Pack Assembly First check that the pin 1 positions on the pad pattern and all of the components are correctly aligned. 1. Solder the NQPACK on the Target after checking for a match with the position of pin 1 on the Target. -
Page 26: Nq Pack Assembly
3. Connect the Emulation Adapter after checking for a match with the position of pin 1 for the YQPACK, and connect the Debug Adapter / Active Probe from the BlueBox to the connector on the Emulation Adapter. For more information on how to connect iSYSTEM hardware refer to isystem.com/connect. -
Page 27: Accessories
Accessories To ease the development process, we recommend using following iSYSTEM hardware tools with the Infineon TC377TE Emulation Adapter. Ordering Code Description IC5700 iC5700 BlueBox On-Chip Analyzer IC5000 iC5000 BlueBox On-Chip Analyzer IC57031 IOM6 Hub (3 x FNet & FBridge) -
Page 28: Schematics
To view the Emulation Adapter schematics, click on the link below. Schematics To view the Emulation Adapter schematics: · Visit isystem.com/user-manuals, find your Emulation Adapter User Manual and go to the Schematics chapter, or · Scan the QR code below. -
Page 29: User Notes
User Notes This page is intentionally left blank. - Page 30 This page is intentionally left blank.
- Page 31 This page is intentionally left blank.
- Page 32 Whilst iSYSTEM reserves the right to make changes to its products and/or the specifications detailed herein, it does not make any representations or commitments to update this document.
Need help?
Do you have a question about the Infineon TC377TE and is the answer not in the manual?
Questions and answers