Table of Contents
Advertisement
Quick Links
OWNER'S GUIDE & INSTALLATION INSTRUCTIONS
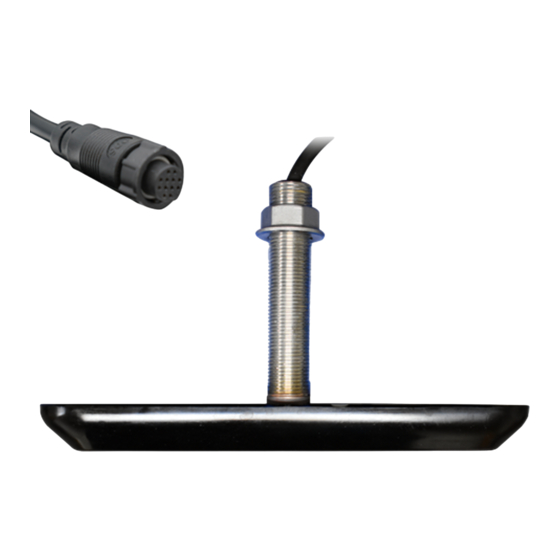
Sidescan Transducer
with Anti-rotation Hardware
Model:
Follow the precautions below for optimal
product performance and to reduce the risk of
property damage, personal injury, and/or death.
WARNING: Installation of the anti-rotation studs/screws
is mandatory! The anti-rotation studs/screws hold the fairing
firmly in place. Failure to install the anti-rotation studs/screws
may result in the fairing rotating while the boat is underway.
The effect may be violent movement and loss of steering.
WARNING: The transducer must be installed parallel to
the keel/centerline to ensure proper boat handling and
water flow under the transducer.
WARNING: Always wear safety glasses, a dust mask,
and ear protection when installing.
WARNING: Immediately check for leaks when the boat is
placed in the water. Do not leave the boat in the water
unchecked for more than three hours. Even a small leak
may allow a considerable amount of water to accumulate.
WARNING: Fairing—The fairing must be screwed to a
block of wood before cutting. It is too thin to cut safely
without additional material. Failure to do so may result in
the fairing moving on the band saw.
WARNING: Fairing—Do not install a fairing that has
been mis-cut. Replace it.
• Cutting the fairing at an angle greater than the
maximum allowed will cut into the transducer and/or
anti-rotation pockets, thus weakening the fairing.
• Do not allow any gap between the fairing and the hull
that is greater than 1.5mm (1/16"). When the boat is
underway, water will enter any gaps and push against
the fairing with considerable force, possibly rotating it.
WARNING: Fiberglass hull—The transducer must be
installed in solid fiberglass, not in coring.
CAUTION: Never install a metal transducer on a vessel
with a positive ground system.
CAUTION: Never pull, carry, or hold the transducer by
the cable as this may sever internal connections.
CAUTION: Never strike the transducer.
SS904
Record the information found on the cable tag for future reference.
Part No:____________________Serial No:________________________
Date_______________Frequency____________________________kHz
►
BOW
CAUTION: Stainless steel transducer in a metal hull—
Stainless steel must be isolated from a metal hull to
prevent electrolytic corrosion. Use the isolation sleeving
supplied.
CAUTION: Transducer Orientation —Be sure to install
the transducer in the correct orientation to the bow. If the
transducer is installed in reverse, the display will not work
properly.
CAUTION: Installation without a Fairing —The
transducer must be installed on a nearly flat hull with less
than 10°of deadrise. Do not install on a V-hull. If the
transducer is installed without a fairing on a hull with a
deadrise greater than 10°, the display will not work
properly.
CAUTION: Transducer Pair —Be sure to install the port
transducer and the starboard transducer in the correct
orientation to the bow. If the transducers are installed in
reverse, the display will not work properly.
CAUTION: Never use solvents. Cleaner, fuel, sealant,
paint, and other products may contain solvents that can
damage plastic parts, especially the transducer's face.
IMPORTANT: Read the instructions completely before
proceeding with the installation. These instructions
supersede any other instructions in your instrument
manual if they differ.
Applications
• Stainless steel is compatible with all hull materials. Recommended
for aluminum hulls to prevent electrolytic corrosion, provided the
stainless steel transducer is isolated from the metal hull.
• Recommended for boats capable of speeds up to 30kn
(35MPH). Optimal speed is 1.5 - 8.5 kn (2 - 10MPH).
• A fairing is strongly recommended if the deadrise angle of the
hull exceeds 10. The fairing can accommodate a deadrise
angle of up to 22°.
• Transducer Pair - On a boat with a steep deadrise angle, a pair of
transducers, one on the port side and one on the starboard side,
can be installed and connected to the echosounder module.
• For stepped hulls, to be installed just ahead of the first step.
Fairing SS904
Advertisement
Table of Contents

Subscribe to Our Youtube Channel
Related Manuals for Airmar SS904


Summary of Contents for Airmar SS904
- Page 1 Part No:____________________Serial No:________________________ Date_______________Frequency____________________________kHz Model: SS904 ► Fairing SS904 Follow the precautions below for optimal CAUTION: Stainless steel transducer in a metal hull— product performance and to reduce the risk of Stainless steel must be isolated from a metal hull to property damage, personal injury, and/or death.
- Page 2 (keel). stepped hull displacement hull slope of hull pressure waves deadrise angle parallel to waterline 150-300mm (Load Waterline Length) (6-12") transducer pair steep deadrise hull with two transducers Figure 1. Best location Copyright © 2010 - 2017 Airmar Technology Corp.
- Page 3 Figure 2. Deadrise angle and fairing thickness Figure 3. Cutting the fairing Copyright © 2010 - 2016 Airmar Technology Corp. Installation: 9. Remove the fairing from the block of wood. 10.Use the remaining section of the fairing with the cutting guide NOTE: If you are installing the transducer with NO fairing, as the backing block.
- Page 4 (2), and washer (2) Figure 4. Bedding and installing with a fairing in a fiberglass or wood hull Copyright © 2022 Airmar Technology Corp. each one in turn. Do not use pliers farther up, as this will damage Bedding the threads.
- Page 5 (2) Figure 6. Bedding and installing WITHOUT a fairing in a fiberglass or wood hull Copyright © 2022 Airmar Technology Corp. • NO fairing—Slide the rubbery washer and hull nut onto the Installing cable.
- Page 6 The core (wood or foam) must be cut and sealed carefully. The CAUTION: Do not remove the connector(s) to ease cable routing. If a cable must be cut and spliced, use Airmar’s splash-proof Junction core must be protected from water seepage, and the hull must be Box No.
- Page 7 Hull Nut SS904 ACC-FAIR-SS904-01 02-149-01 Gemeco Tel: 803-693-0777 Email: sales@gemeco.com Airmar EMEA Europe, Middle East, Africa Tel: +33.(0)2.23.52.06.48 Email: sales@airmar-emea.com 35 Meadowbrook Drive, Milford, New Hampshire 03055-4613, USA • www.airmar.com Copyright © 2012 - 2018 Airmar Technology Corp. All rights reserved.
- Page 8 Template SS904 bolt 11mm IMPORTANT: Some printers and printer or 7/16” settings can alter the size of the template. Verify the template’s size before cutting. Place the transducer on the template to be sure it is the exact size. If necessary, redraw the template.
Need help?
Do you have a question about the SS904 and is the answer not in the manual?
Questions and answers