Table of Contents
Advertisement
Quick Links
Advertisement
Table of Contents
Troubleshooting

Related Manuals for Spectra Logic BlackPearl NAS Solution


Summary of Contents for Spectra Logic BlackPearl NAS Solution
- Page 1 Spectra Logic BlackPearl NAS Solution User Guide SpectraLogic.com...
- Page 2 MERCHANTABILITY OR FITNESS FOR A PARTICULAR PURPOSE, BOTH OF WHICH ARE EXPRESSLY DISCLAIMED. In no event shall Spectra Logic be liable for any loss of profits, loss of business, loss of use or data, interruption of business, or for indirect, special, incidental or consequential damages of any kind, even if Spectra Logic has been advised of the possibility of such damages arising from any defect or error.
- Page 3 Software Product. 3. GENERAL The Software Product is licensed, not sold, to you by Spectra for use only under the terms of this EULA. The Software Product is protected by copyright laws and international copyright treaties, as well as other intellectual property laws and treaties.
- Page 4 Software Product and subject to the terms and conditions of this EULA. C. Spectra retains all right, title, and interest in and to the Software Product, and any rights not granted to you herein are reserved by Spectra. You hereby expressly agree not to extract...
- Page 5 9. INTELLECTUAL PROPERTY RIGHTS A. Spectra shall retain all right, title, and interest in the Software Product and to any modifications or improvements made thereto, and any upgrades, updates or Documentation provided to End User. End User will not obtain any rights in the Software Product, its updates, upgrades, and Documentation, as a result of its responsibilities hereunder.
- Page 6 OF OR INABILITY TO USE THE SOFTWARE PRODUCT OR THE PROVISION OF OR FAILURE TO PROVIDE SUPPORT SERVICES, EVEN IF SPECTRA HAS BEEN ADVISED OF THE POSSIBILITY OF SUCH DAMAGES. IN ANY CASE, SPECTRA'S ENTIRE LIABILITY UNDER ANY PROVISION OF THIS EULA SHALL BE LIMITED TO THE AMOUNT ACTUALLY PAID BY YOU FOR THE SOFTWARE PRODUCT;...
- Page 7 Contacting Spectra Logic To Obtain General Information Spectra Logic Website: spectralogic.com United States Headquarters European Office Spectra Logic Europe Ltd. Spectra Logic Corporation 329 Doncastle Road 6285 Lookout Road Bracknell Boulder, CO 80301 Berks, RG12 8PE United Kingdom Phone:1.800.833.1132 or 1.303.449.6400 International:1.303.449.6400...
-
Page 8: Table Of Contents
Table of Contents About This Guide Intended Audience BlackPearl User Interface Screens Related Information Related Publications Chapter 1 - Product Overview Overview Features Metadata Performance Drives Components Front Bezel Gen2 X Series Gen2 S Series and Gen2 V Series Gen1 S Series, Gen1 P Series, and Gen1 V Series Front View of the 44-Bay Expansion Node Rear View of the 44-Bay Expansion Node 96-Bay Expansion Node... - Page 9 Supported Browsers Command Line Interface Chapter 2 - Initial Configuration Before You Begin Install HBAs Rackmount the Chassis Installing Data Drives Ensure ESD Protection Install a Drive in a Gen2 S Series Chassis Install a Drive in a Gen2 V Series Chassis Install a Drive in a Gen2 X Series Chassis Install a Drive in a Gen1 Chassis Connect Ethernet Cables...
- Page 10 Chapter 3 - Configuring Network Attached Storage Overview of NAS Storage Pools, Volumes, and Shares Storage Pools Volumes and Shares Naming Considerations Create a NAS Storage Pool Create a Volume Create a Share Create a CIFS Share Create an NFS Share Create a Vail S3 Share Configure NAS Services Configure the CIFS Service...
- Page 11 Volume Snapshots Create a Snapshot Create a Snapshot Schedule Delete a Snapshot Schedule Delete Snapshots Restore to a Snapshot Retrieve a Single File from a Snapshot Manage Shares Edit a CIFS Share Edit an NFS Share Delete a Share Manage NAS Replication Manually Start NAS Replication Cancel a NAS Replication In Progress Restoring Files from a NAS Replication Target...
- Page 12 Configure the Active Directory Service Configure the SNMP Service Configure a Vail Sphere Register with a Vail Sphere Edit the Vail Service Deregister from a Vail Sphere Configure and Use Encryption Configure the Encryption Service Change the Encryption Password Unlock the Self-Encrypting Drives Create an Encryption Password USB Key PSID Erase an Encryption Drive Configure Users...
- Page 13 View the Status of Services View the Status of NAS Pools View the Status of NAS Volumes View the Status of NAS Shares View Performance Metrics View Reports Reboot or Shut Down a BlackPearl NAS Solution Using the BlackPearl User Interface Power-Cycle Reset Exit the BlackPearl User Interface Chapter 7 - Using AutoSupport...
- Page 14 Using the Console Using a Separate Computer Network Setup Tips Configuration Connectivity to the Network Troubleshooting Tools Spectra Logic Technical Support Before Contacting Support Determine the Solution Serial Number Opening a Support Ticket January 2022 User Guide-BlackPearl NASSolution - 14 -...
- Page 15 Remote Support Enabling Remote Support Disabling Remote Support Appendix A - IPMI Configuration Appendix B - Network File Interface Overview Requirements Special Considerations for Reading Tapes in a Non-BlackPearl Nearline Gateway Environment Configure a BlackPearl Gateway for Versioning Configure Network File Interface Configure the NFI Service Configure a Volume with NFI Create a Share...
- Page 16 Environmental Specifications Heat Generation Power Requirements Input Power Requirements Power Cord Specifications Interface Specifications System Interface Connectors Expansion Node Interface Connectors Network Interface Cables Universal Serial Bus (USB) Support Appendix D - Regulatory & Safety Standards EU Declaration of Conformity Certifications CE Marking FCC Notice...
- Page 17 Nginx Ruby Ruby on Rails Included Packages Index January 2022 User Guide-BlackPearl NASSolution - 17 -...
-
Page 18: About This Guide
(Network Attached Storage) solution master node, which is referred to as the master node in these instructions. This guide also describes the Spectra 44-bay expansion node, the 96-bay expansion node, and the 107-bay expansion node which are referred to as expansion nodes in these instructions. The expansion nodes are used in conjunction with the master node and cannot be used as a stand- alone product. -
Page 19: Related Information
For additional information about the Spectra BlackPearl NAS Solution, refer to the publications listed in this section. Spectra BlackPearl NAS Solution The following documents related to the Spectra BlackPearl NAS solution are available on the Support Portal website at support.spectralogic.com, and from the Documentation screen in the BlackPearl user interface. - Page 20 Gen1 master node or 44-bay expansion node. • The Spectra 12-, 36- & 45-Drive Chassis Power Supply Replacement Guide provides instructions for replacing a failed power supply in a Gen1 master node or 44-bay expansion node.
-
Page 21: Chapter 1 - Product Overview
Chapter 1 - Product Overview This chapter provides an overview of the Spectra Logic BlackPearl NAS Solution features and components. Overview Features Components Front Bezel Gen2 X Series Gen2 S Series and Gen2 V Series Gen1 S Series, Gen1 P Series, and Gen1 V Series... -
Page 22: Overview
BlackPearl NAS solution. It also lets you monitor the hardware and view system messages. Command Line Interface The BlackPearl NAS solution can be configured, monitored, and maintained using a command line interface. The command line interface is documented in the Spectra BlackPearl NAS Solution Command Line Interface Guide. Easy Network-Based Administration The BlackPearl NAS solution can be configured over an Ethernet network using a standard web browser. -
Page 23: Metadata Performance Drives
Chapter 1 - Product Overview Features Redundant Hardware The solution features N+1 redundant power supplies and data drives that are hot-swappable for uninterrupted operation. Any data drives not configured in a storage pool act as global spares. A spare becomes active if a drive in a storage pool fails. File Sharing Connectivity for Major Operating Systems The Network File System (NFS) and Common Internet File System (CIFS) protocols provide ®... - Page 24 Chapter 1 - Product Overview Features Optional Hardware Features HotPair Two BlackPearl NAS master nodes or a Gen2 X Series master node with two server modules can be connected to multiple expansion nodes in a failover configuration. One master node acts as the primary controller, and the other acts as the secondary.
-
Page 25: Components
Chapter 1 - Product Overview Components 10GBase-T Ethernet Connectivity For Gen2 S and V Series chassis, two onboard 10 gigabit copper ports (10GBase-T) provide Ethernet connectivity for the solution with one dedicated port used to access the BlackPearl user interface. 25 Gigabit Ethernet For Gen2 S and V Series chassis, an optional dual port, 25 Gigabit Ethernet (25 GigE) network interface card can be installed to provide high-speed data connections between hosts and the... -
Page 26: Front Bezel
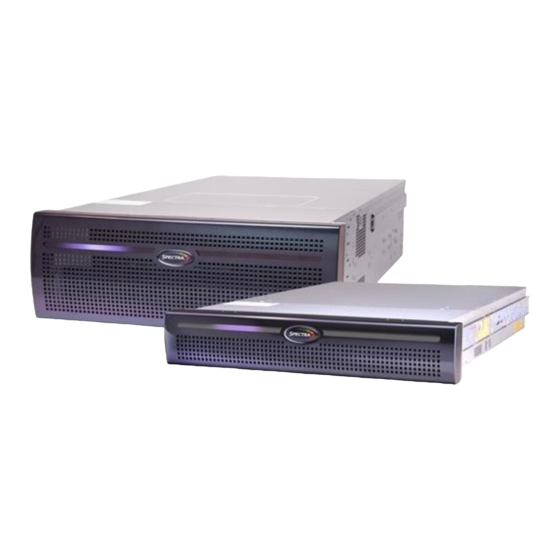
Chapter 1 - Product Overview Components Front Bezel All BlackPearl chassis include a front bezel. For the 96-bay expansion node (see 96-Bay Expansion Node on page 45) and the 107-bay expansion node, the bezel is permanently attached. For all other chassis, the bezel is attached with magnets. Figure 1 A 4U BlackPearl chassis with front bezel and visual status beacon. -
Page 27: Gen2 X Series
Chapter 1 - Product Overview Components Gen2 X Series Front View Figure 2 show the components on the front of the Gen2 X Series BlackPearl NAS solutions with the front bezel removed. Figure 2 The front view of the Gen2 X Series BlackPearl NAS solution (front bezel removed). Component Description System status... - Page 28 Chapter 1 - Product Overview Components Component Description Empty drive sleds Empty drive sleds are installed in the unused drive bays to prevent contaminants from entering the enclosure and to maintain proper air flow. Ensure each empty drive sled has a 'drive blank' installed in the sled for proper airflow and cooling.
- Page 29 Chapter 1 - Product Overview Components Rear View Figure 3 show the major components on the rear of the Gen2 X Series BlackPearl NAS chassis. Figure 3 The rear view of the Gen2 X Series BlackPearl NAS solution. Component Description Power modules The Gen2 X Series BlackPearl NAS solution includes two power modules.
- Page 30 To power on the chassis, insert a blunt pointed object (such as a paper clip) into the recessed opening to momentarily press the Power button. If directed by Spectra Logic Technical Support, use the server Power and Reset buttons to turn off power to the server module, or reset the server module CPU.
-
Page 31: Gen2 S Series And Gen2 V Series
Chapter 1 - Product Overview Components Gen2 S Series and Gen2 V Series Front View Figure 4 shows the components on the front of the Gen2 S Series BlackPearl NAS solution with the front bezel removed. Figure 5 shows the components on the front of the Gen2 V Series BlackPearl NAS solution with the front bezel removed. - Page 32 Use the user interface, not the power button, to power down the chassis. Reset button Only use the chassis reset button under direction of Spectra Logic Technical Support. System status The status LEDs indicate power status, disk and network activity, as well as LEDs hardware faults.
- Page 33 Chapter 1 - Product Overview Components Rear View Figure 6 shows the major components on the rear of the Gen2 S BlackPearl NAS solution. Figure 7 shows the major components on the rear of the Gen2 V Series BlackPearl NAS solution. Figure 6 The rear view of the Gen2 S Series BlackPearl NAS 4U solution. Figure 7 The rear view of the Gen2 V Series BlackPearl NAS 2U solution.
- Page 34 Chapter 1 - Product Overview Components Component Description Rear panel fans Two rear panel fans and four internal fans provide the cooling for the Gen2 S (Gen2 S Series series chassis. The rear panel fans are hot-swappable. The Gen2 V series has only) three internal fans.
- Page 35 Monitor connector If necessary, you can connect a monitor to the VGA connector on the chassis for troubleshooting purposes. Only connect a monitor for initial configuration of the BlackPearl management port, or as directed by Spectra Logic Technical Support. Serial port The serial port is only used in a HotPair configuration.
- Page 36 BlackPearl chassis. The S Series chassis also has one USB 3.1 Gen2 Port (not shown). If necessary, you can use these ports to connect a USB drive, or USB keyboard to the chassis for troubleshooting purposes as directed by Spectra Logic Technical Support.
-
Page 37: Gen1 S Series, Gen1 P Series, And Gen1 V Series
Chapter 1 - Product Overview Components Gen1 S Series, Gen1 P Series, and Gen1 V Series Front View Figure 9 shows the components on the front of the Gen1 S Series or Gen1 P Series BlackPearl NAS solution. All information is the same for the Gen1 S Series and Gen1 P Series unless specified. - Page 38 Chapter 1 - Product Overview Components Component Description Visual Status The drive sled in the upper left corner of the front of the chassis provides Beacon control control for the Visual Status Beacon. A disk drive cannot be installed in this sled position.
- Page 39 Chapter 1 - Product Overview Components Rear View Figure 11 shows the major components on the rear of the Gen1 S or Gen1 P Series BlackPearl NAS master node. All information is the same for the Gen1 S Series and Gen1 P Series unless specified.
- Page 40 Chapter 1 - Product Overview Components Component Description Power supplies The standard BlackPearl NAS solution configuration includes two power supplies to provide N+1 redundancy and fail-over protection. • Each power supply has its own AC power connector. • Each power supply has a single LED that lights to indicate when the power is on and functioning normally.
- Page 41 BlackPearl management port and cannot be used for data transfer. Notes: • The 10GBase-T ports auto-negotiate down to 1000Base-T. • Spectra Logic recommends using 40 GigE ports or the 10 GigE ports for data transfer to ensure maximum performance. Monitor connector If necessary, you can connect a monitor to the SVGA connector on the BlackPearl NAS master node for troubleshooting purposes.
- Page 42 Note: Unless your BlackPearl NAS solution includes a 40 GigE card or a 10GBase-T card, Spectra Logic recommends using the 10 GigE ports for data transfer to ensure maximum performance. Expansion slots...
-
Page 43: Front View Of The 44-Bay Expansion Node
Chapter 1 - Product Overview Components Front View of the 44-Bay Expansion Node Figure 14 shows the major components on the front of the 44-bay expansion node. Figure 14 The front view of the 44-bay expansion node (front bezel removed). Component Description Visual Status If the expansion node uses an active bezel, the drive sled in the upper left Beacon control... -
Page 44: Rear View Of The 44-Bay Expansion Node
Chapter 1 - Product Overview Components Rear View of the 44-Bay Expansion Node Figure 15 shows the major components on the rear of the 44-bay expansion node. Figure 15 The rear view of the 44-bay expansion node. Component Description Power supplies The 44-bay expansion node includes two power supplies to provide N+1 redundancy and fail-over protection. -
Page 45: 96-Bay Expansion Node
Chapter 1 - Product Overview Components 96-Bay Expansion Node Front View Figure 16 shows the major components on the front of the 96-bay expansion node. There are no components or status indicators on the front of the 96-bay expansion node. Figure 16 The front view of the 96-bay expansion node (front bezel removed). January 2022 User Guide-BlackPearl NAS Solution - 45 -... - Page 46 Chapter 1 - Product Overview Components Rear View Figure 17 shows the major components on the rear of the 96-bay expansion node. Figure 17 The rear view of the 96-bay expansion node. Component Description Fans Five hot-swappable fans provide the cooling for the 96-bay expansion node. Power supplies The 96-bay expansion node includes two power supplies to provide N+1 redundancy and fail-over protection.
-
Page 47: 107-Bay Expansion Node
Chapter 1 - Product Overview Components 107-Bay Expansion Node Front View Figure 18 shows the major components on the front of the 107-bay expansion node. There are no components or status indicators visible on the front of the 107-bay expansion node with the front bezel is attached. - Page 48 Chapter 1 - Product Overview Components Rear View Figure 19 shows the major components on the rear of the 107-bay expansion node. Figure 19 The rear view of the 107-bay expansion node. Component Description SAS and Ethernet The rear panel of the 107-bay expansion node has one or two expander connectors panels which include one Ethernet port and four SAS ports used to connect a 107-bay expansion node to a BlackPearl NAS master node.
-
Page 49: Software
Chapter 1 - Product Overview Software OFTWARE The software installed on the BlackPearl NAS boot drives includes the following: • Operating system • Logical volume manager and file system • NFS and CIFS servers Operating System The operating system, running on the integrated application server, provides the foundation for all software and applications running on the system. -
Page 50: Menus
Chapter 1 - Product Overview User Interface Menus The menu bar appears along the top edge of each screen. Use the menu bar drop-down menus to navigate through the interface. Figure 20 The Dashboard screen of the BlackPearl NAS user interface. The following table provides an overview of the screens available under each menu. - Page 51 Chapter 1 - Product Overview User Interface Menu Available Options Configuration The Configuration menu provides access to controls for configuring all aspects of solution operation. • NAS • Pools—Displays information about any currently configured NAS pools and lets you define new NAS pools, and edit or delete existing NAS pools. •...
- Page 52 • Documentation—Displays links to BlackPearl NAS documentation. • Contact Information—Displays contact information for Spectra Logic Technical Support, as well as the part and serial numbers for the solution. • Tools > Data Integrity Verification—Provides a tool for data integrity verification of storage pools.
-
Page 53: Status Icons
Chapter 1 - Product Overview User Interface The information in the following table can be found on the Status bar, located at the bottom of all screens. Status Bar Available Options Hardware Provides an at-a-glance status of the overall health of the BlackPearl NAS solution. -
Page 54: Supported Browsers
NTERFACE The command line interface provides text-based configuration, management, and monitoring of the Spectra BlackPearl NAS Solution. Use the command line interface to perform many of the tasks that are available through the BlackPearl user interface, such as configuring storage pools, volumes, and shares;... -
Page 55: Chapter 2 - Initial Configuration
Chapter 2 - Initial Configuration This chapter describes the initial setup of the Spectra BlackPearl NAS Solution, necessary for operation in your environment. Before You Begin Install HBAs Rackmount the Chassis Installing Data Drives Ensure ESD Protection Install a Drive in a Gen2 S Series Chassis... -
Page 56: Before You Begin
Chapter 2 - Initial Configuration Before You Begin EFORE EGIN If your BlackPearl NAS solution was installed by Spectra Logic Professional Services or in accordance with the Spectra BlackPearl NAS Solution Site Preparation Guide and the Spectra BlackPearl NAS Quick Start Guide... -
Page 57: Installing Data Drives
Chapter 2 - Initial Configuration Installing Data Drives NSTALLING RIVES Use the following instructions to add new drives to a BlackPearl chassis. Ensure ESD Protection The working environment for the chassis must be free of conditions that could cause electrostatic discharge (ESD). To protect the chassis from ESD, follow these procedures when installing, repairing, or testing the chassis: •... - Page 58 Chapter 2 - Initial Configuration Installing Data Drives 3. Simultaneously press the top cover release buttons (1) on both sides of the chassis. Figure 21 Remove the front top cover. 4. Slide the front top cover toward the front of the chassis (2) and lift the cover upward to remove it.
-
Page 59: Install A Drive In A Gen2 V Series Chassis
Chapter 2 - Initial Configuration Installing Data Drives 7. Match the dimples on the drive sled with the dimples on the drive and insert the drive into the drive sled. Figure 23 Match the dimples on the drive Figure 24 The drive installed in the drive sled to the dimples on the drive. -
Page 60: Install A Drive In A Gen2 X Series Chassis
Chapter 2 - Initial Configuration Installing Data Drives 4. Insert a drive into the chassis (3). If necessary, push the plunger (4) inward to seat the drive. Make sure that the drive is aligned and locked into the tray. 5. Repeat Step 4 until all drives are installed or the tray is full. - Page 61 Chapter 2 - Initial Configuration Installing Data Drives 4. Grab the carrier frame below the release handle and pull the drive sled completely out of the drive bay. When hot-swapping a drive or drive sled, the replacement must be completed within five (5) minutes to maintain proper system airflow and cooling.
-
Page 62: Install A Drive In A Gen1 Chassis
Chapter 2 - Initial Configuration Installing Data Drives Install a Drive in a Gen1 Chassis The drives used in the Gen1 BlackPearl NAS solution are mounted on drive sleds that ensure proper data and electrical connection with the backplane inside the BlackPearl NAS solution. Remove the Front Bezel If you are installing a new drive in the front of the solution, you need to remove the front bezel prior to installing the drive. - Page 63 Chapter 2 - Initial Configuration Installing Data Drives 3. Grasp the handle and slide the sled completely out of the chassis. If the sled does not slide easily by pulling on the handle, grasp the sides of the sled and pull the sled out of the enclosure.
-
Page 64: Connect Ethernet Cables
Activation keys enable features on the BlackPearl NAS solution. They are tied to the serial number of the solution for which they are issued, and cannot be used on another solution. Renewals of expired activation keys are obtained by contacting Spectra Logic Technical Support (see Contacting Spectra Logic on page 7). -
Page 65: Power On The Solution
Chapter 2 - Initial Configuration Power On the Solution 3. Wait while the BlackPearl NAS solution performs its power-on sequence. Do not remove the USB device until after the solution power cycles and the IMPORTANT BlackPearl user interface displays a message that it is safe to remove the USB device. - Page 66 Chapter 2 - Initial Configuration Power On the Solution • To power on a 44-bay expansion node, remove the front bezel and then gently press the power button on the front panel. Wait approximately four minutes while the expansion node initializes before powering on the BlackPearl master node. Figure 32 Press the power button.
-
Page 67: Configure The Blackpearl Management Port
Chapter 2 - Initial Configuration Configure the BlackPearl Management Port ONFIGURE THE LACK EARL ANAGEMENT The default IP address for the BlackPearl management port is set to 10.0.0.2, with a netmask of 255.255.255.0. If you do not want to change the default management port IP address, skip Log Into the BlackPearl User Interface on page 69. - Page 68 Chapter 2 - Initial Configuration Configure the BlackPearl Management Port 1. Connect a monitor and USB keyboard or KVM switch to the rear of the BlackPearl NAS solution. Note: The Gen2 X Series chassis has a mini DisplayPort connection for the monitor. The other chassis have a VGA connection.
-
Page 69: Log Into The Blackpearl User Interface
Note: There is no limit to the number of users who can log in to the user interface. Spectra Logic recommends only one person use the interface at a time to avoid conflicting operations. 1. Using a standard web browser, enter the IP address for the BlackPearl management port... - Page 70 Find the serial number on the sticker positioned on the top of the chassis, on the right-hand side, toward the front. The fields are case sensitive. Figure 35 The BlackPearl serial number sticker. Notes: • Spectra Logic recommends that you change the default password for the primary administrator (see Edit a User).
-
Page 71: Configure The Data Connection
• You can only use the BlackPearl management port to access the BlackPearl user interface. You cannot use this port for data transfer. • For a BlackPearl HotPair configuration, see the Spectra BlackPearl HotPair Installation & Configuration Guide for information on configuring data connections. - Page 72 Chapter 2 - Initial Configuration Configure the Data Connection Use the following instructions to configure an aggregate port data connection. 1. From the menu bar, select Configuration > Network, or select the Network pane from the Dashboard screen. The Network screen displays with information about the network connections of the solution.
- Page 73 Chapter 2 - Initial Configuration Configure the Data Connection 3. Select the Data Port(s) you want to configure into an aggregate data interface. Only one type of port can be used in an aggregation. For example, you cannot use both 10 GigE and 40 GigE ports in the same link aggregation.
-
Page 74: Configure A Single Port Data Connection
Chapter 2 - Initial Configuration Configure the Data Connection Configure a Single Port Data Connection Use the following instructions to configure a single port data connection. 1. From the menu bar, select Configuration > Network, or select the Network pane from the Dashboard screen. -
Page 75: Configure A Static Route
Chapter 2 - Initial Configuration Configure the Data Connection 4. To configure a static IP address, click the + button and enter the following information: • IP Address—Enter a valid IPv4 or IPv6 address. Note: You cannot enter an IPv4 address if you selected DHCP in Step 3. •... -
Page 76: Create A User
Chapter 2 - Initial Configuration Create a User For example, if one data connection is on the 10.2.2.x network and another connection is on the 10.2.4.x network, when the 10.2.3.x network is connected externally to the 10.2.4.x network, a static route must be configured on the BlackPearl NAS solution to route communication with the 10.2.3.x network through the data connection on the 10.2.4.x network. -
Page 77: Description Of User Types
This account is useful if you need create a snapshot, but do not have access to an administrator account. The default username and password are both monitor using all lowercase letters. Notes: • Spectra Logic recommends that you change the initial password for the default monitor account. See Edit a User. -
Page 78: Create A User
Chapter 2 - Initial Configuration Create a User Create a User 1. From the menu bar, select Configuration > Users. The Users screen displays. Figure 42 The Users screen. 2. Select Action > New from the menu bar. The New User dialog box displays. Figure 43 The New User dialog box. -
Page 79: Next Steps
Chapter 2 - Initial Configuration Next Steps 6. If desired, enter a value for the Session Timeout in minutes. This value cannot exceed 999 minutes. 7. Select one or more User Access permissions. See Description of User Types on page 77 information on each level of user access permission. -
Page 80: Chapter 3 - Configuring Network Attached Storage
Chapter 3 - Configuring Network Attached Storage This chapter describes using the BlackPearl user interface to configure Network Attached Storage storage pools, volumes, and shares on a BlackPearl NAS solution. Overview of NAS Storage Pools, Volumes, and Shares Storage Pools Volumes and Shares Naming Considerations Create a NAS Storage Pool... -
Page 81: Storage Pools
When creating a new NAS pool, keep the following in mind: • Each storage pool requires a minimum of one drive. Spectra Logic recommends using eight drives or more in a storage pool to reduce the impact of the overhead. Overhead is the space on the storage pool used to store parity data, and not used for data storage. - Page 82 Chapter 3 - Configuring Network Attached Storage Create a NAS Storage Pool Use the following steps to create a new NAS storage pool. 1. From the menu bar, select Configuration > NAS > Pools, or click the Pools pane on the Dashboard.
- Page 83 Chapter 3 - Configuring Network Attached Storage Create a NAS Storage Pool 2. Select Action > New. A dialog box opens to show the default configuration options for the new pool. Note: The Storage Pool Preview pane does not display until you have selected the disks you want to use in the storage pool Figure 45 The New Pool dialog box.
- Page 84 Notes: • The combined storage pool and volume name must be 78 characters or fewer. To avoid problems sharing volumes, Spectra Logic recommends a pool name of 32 characters or fewer. • Each pool name must be unique. This field is case sensitive. Only the following special characters are allowed: hyphen (-), underscore (_), colon (:), and period(.).
- Page 85 Chapter 3 - Configuring Network Attached Storage Create a NAS Storage Pool For this option..Do the following... Select Protection Use the radio buttons to select the protection level for the pool. Only one Level option can be selected. Use the Storage Pool Preview information to compare the fault tolerance and required overhead for each configuration.
-
Page 86: Create A Volume
Chapter 3 - Configuring Network Attached Storage Create a Volume REATE A OLUME Before you begin using a disk pool to store data, you must create one or more volumes to organize how the information is stored on the pool. After you create a volume, you can share the volume using NFS or CIFS, but not both. - Page 87 Chapter 3 - Configuring Network Attached Storage Create a Volume 2. Select Action > New. The New Volume dialog box displays. Figure 47 The New Volume dialog box. 3. Configure the volume as required for your environment. For this option..Do the following... Name Enter a name for the new volume.
- Page 88 Chapter 3 - Configuring Network Attached Storage Create a Volume For this option..Do the following... Pool Select the disk pool on which to create the volume. If there are multiple disk pools configured on the solution, use the drop-down menu to select the Pool where you want to create the volume.
-
Page 89: Create A Share
Configure the Data Connection on page 71. Create a CIFS Share Spectra Logic recommends using Active Directory to control access to CIFS shares on the BlackPearl NAS solutions. To do this, continue with Join an Active Directory Domain, below. However, if your Windows operating system environment does not use Active Directory, you can enable local administrator status on the solution to allow a specified user to access the CIFS shares in a Windows workgroup environment. - Page 90 Chapter 3 - Configuring Network Attached Storage Create a Share Join an Active Directory Domain If your Windows environment uses Active Directory, you must join an Active Directory domain before creating a CIFS share. See Configure the Active Directory Service on page 143 for more information.
- Page 91 Chapter 3 - Configuring Network Attached Storage Create a Share 2. Double-click the row for the user for which you want to enable local administrator status, or select the user, and then select Action > Edit. The Edit User dialog box displays. Figure 49 The Edit User dialog box.
- Page 92 Chapter 3 - Configuring Network Attached Storage Create a Share 2. Select Action > New. The New CIFS Share dialog box displays to show the options for creating a new share. Figure 51 The New CIFS Share dialog box. 3. Use the drop-down menu to select the Volume you want to share. Note: Creating a CIFS share on a case-sensitive volume reduces performance.
- Page 93 Chapter 3 - Configuring Network Attached Storage Create a Share 1. Mount the new CIFS share to your Microsoft Windows operating system host. 2. Using Windows Explorer, right-click on the CIFS share, and select Properties. The General tab of the Properties window displays. Note: You cannot use the Computer Management panel to set permissions on CIFS shares.
-
Page 94: Create An Nfs Share
Chapter 3 - Configuring Network Attached Storage Create a Share 4. Add, or remove users, or modify permissions for users as needed for your storage environment. 5. Click OK. Note: Starting with BlackPearl 5.4, if you remove the "Everyone" group permission in Windows, you must log out of Windows, and then log in again for the change to take effect. -
Page 95: Create A Vail S3 Share
Chapter 3 - Configuring Network Attached Storage Create a Share 4. The network address displayed for Volume Mount Point is the address of the share you are currently configuring. Note: Before mounting an NFS share, make sure the client supports the NFSv3 protocol and properly handles file locking. -
Page 96: Configure Nas Services
Chapter 3 - Configuring Network Attached Storage Configure NAS Services 2. Select Action > New. The New Vail S3 Share dialog box displays. Figure 56 The New Vail S3 Share dialog box. 3. Enter the desired Name of the Vail S3 share. 4. - Page 97 Chapter 3 - Configuring Network Attached Storage Configure NAS Services Add Advanced Parameter Advanced parameters are used to adjust/set global or share specific Samba parameters. Improperly configuring advanced parameters can expose security vulnerabilities CAUTION and other serious issues. Advanced parameters should not be configured without a full understanding of the consequences.
-
Page 98: Configure The Nfi Service
Chapter 3 - Configuring Network Attached Storage Configure NAS Services Configure the NFI Service The NFI service (Network File Interface) automatically transfers files from the NAS volumes on the solution to BlackPearl managed object storage on a BlackPearl gateway. IMPORTANT Network File Interface on page 224 for instructions for configuring NFI. -
Page 99: Configure Nas Replication
Chapter 3 - Configuring Network Attached Storage Configure NAS Services Configure NAS Replication If the BlackPearl NAS solution is on a network with Verde arrays, other BlackPearl NAS solutions, or BlackPearl gateways with NAS enabled, you can select to replicate data from the NAS volumes on the solution to one or multiple NAS replication targets. - Page 100 Chapter 3 - Configuring Network Attached Storage Configure NAS Services 2. Double-click the Replication service, or select the service, and then select Action > Show Details. The Replication service details screen displays. Figure 60 The Replication service details screen. 3. Select Action > Create. The Add Replication Target dialog box displays. Figure 61 The Add Replication Target dialog box.
- Page 101 Chapter 3 - Configuring Network Attached Storage Configure NAS Services Configure the Target System If you have not already done so, use the instructions below to create a disk pool and volume to be the target for the replication. 1. Log into the BlackPearl on the target system as described in Log Into the BlackPearl User Interface on page 69.
- Page 102 The maximum setting for the minute field is 59. Note: Spectra Logic recommends offsetting the minutes after the hour for starting replications so that there are not a large number of jobs starting at exactly the same time.
- Page 103 Chapter 3 - Configuring Network Attached Storage Configure NAS Services Create a Daily Schedule 1. Select Daily as the interval for the replication schedule. The dialog box changes to display options for the daily interval setting. Figure 63 The Configure Replication dialog box showing the daily interval options.
- Page 104 Chapter 3 - Configuring Network Attached Storage Configure NAS Services Create a Weekly Schedule 1. Select Weekly as the interval for the replication schedule. The dialog box changes to display options for the weekly interval setting. Figure 64 The Configure Replication dialog box showing the weekly interval options.
-
Page 105: Chapter 4 - Managing Network Attached Storage
Chapter 4 - Managing Network Attached Storage This chapter describes using the BlackPearl user interface to manage storage pools, volumes, and shares on the solution after configuring NAS. For initial NAS configuration steps, see Configuring Network Attached Storage on page 80. Manage Storage Pools Edit a Storage Pool Expand a Storage Pool... -
Page 106: Manage Storage Pools
Chapter 4 - Managing Network Attached Storage Manage Storage Pools Cancel a NAS Replication In Progress Restoring Files from a NAS Replication Target Disable NAS Replication for a Volume Edit the NAS Replication Service Delete the NAS Replication Service Configuration ANAGE TORAGE OOLS... -
Page 107: Expand A Storage Pool
Chapter 4 - Managing Network Attached Storage Manage Storage Pools 4. If desired, enable or disable Power Saving Mode for the storage pool. Enabling this feature configures the standby timer to 60 minutes. When there is no I/O to the storage pool for 60 minutes, the drives in the pool spin down and use minimal power. - Page 108 Spectra Logic recommends that you avoid mixing drive types in a pool. 4. Use the slider to increase the number of drives to use in the storage pool. As you make changes, the graphics beneath the slider update to show the impact your changes have on the storage pool.
-
Page 109: Delete A Storage Pool
Chapter 4 - Managing Network Attached Storage Manage Volumes Delete a Storage Pool If you want to create a new storage pool and existing storage pools use all of the available drives, you must delete an existing storage pool to make drives available for the new storage pool. -
Page 110: Move A Volume
Chapter 4 - Managing Network Attached Storage Manage Volumes Move a Volume If desired, you can move a volume from one storage pool to another. There must be sufficient space for the volume on the destination storage pool. Access to CIFS shares is lost when moving the share while simultaneously IMPORTANT transferring data to or from the share. -
Page 111: Edit A Volume
Chapter 4 - Managing Network Attached Storage Manage Volumes Edit a Volume After creating a volume, you can edit it to change the volume configuration. Use the following steps to edit a volume. 1. From the menu bar, select Configuration > NAS > Volumes, or click the Volumes pane on the Dashboard. - Page 112 Chapter 4 - Managing Network Attached Storage Manage Volumes 3. Change the configuration of the volume as required for your environment. For this option..Do the following... Name Enter a new name for the volume. Volume names are limited to 62 characters or fewer.
-
Page 113: Delete A Volume
Chapter 4 - Managing Network Attached Storage Manage Volumes For this option..Do the following... NFI Volume Policy If desired, edit the NFI Volume policy configurations. See Configure Network File Interface on page 228. 4. Click Save. Delete a Volume Use the following steps to delete a volume. 1. -
Page 114: Volume Snapshots
Chapter 4 - Managing Network Attached Storage Volume Snapshots OLUME NAPSHOTS Volume Snapshots are images of a volume’s configuration and data makeup as they were when the snapshot was generated. Restoring to a previously created snapshot allows you to go “back in time” and restore the volume to the state it was in when the snapshot was created. - Page 115 Chapter 4 - Managing Network Attached Storage Volume Snapshots 2. Double-click the volume you want to use to create a snapshot, or select the volume, and then select Action > Show Details. The details screen for that volume displays. Figure 71 The Volume details screen. 3.
-
Page 116: Create A Snapshot Schedule
Chapter 4 - Managing Network Attached Storage Volume Snapshots Create a Snapshot Schedule Snapshot schedules can be configured at intervals based on hours, number of days, or days of the week. Decide which interval to use for the schedule and follow the appropriate instructions. - Page 117 48, where the NAS volume creates a snapshot every two days. The maximum setting for the minute field is 59. Note: Spectra Logic recommends offsetting the minutes after the hour for starting snapshots so that there are not a large number of jobs starting at exactly the same time.
- Page 118 Chapter 4 - Managing Network Attached Storage Volume Snapshots 6. Enter a number for Every _ days. This value specifies the interval, in days, between generating snapshots. The value entered is enumerated from the first day of the month. The schedule resets at the beginning of each month. For example, if this value is set to 2, the NAS volume creates a snapshot every two days, starting with the 1st of the month, at the time specified in Step 5.
-
Page 119: Delete A Snapshot Schedule
Chapter 4 - Managing Network Attached Storage Volume Snapshots Delete a Snapshot Schedule If desired, you can delete a previously created snapshot schedule. Note: Deleting a snapshot schedule does not delete the snapshots previously created by the snapshot schedule. To delete snapshots, see Delete Snapshots on page 119. - Page 120 Chapter 4 - Managing Network Attached Storage Volume Snapshots 2. Double-click the volume you for which you want to delete snapshot, or select the volume, and then select Action > Show Details. The details screen for that volume displays. Figure 77 The Volume details screen showing a snapshot. 3.
-
Page 121: Restore To A Snapshot
Chapter 4 - Managing Network Attached Storage Volume Snapshots Restore to a Snapshot Use the following instructions to restore a volume to its previous state using a previously generated snapshot. Note: If you only want to restore a single file in the snapshot, see Retrieve a Single File from a Snapshot on page 122. -
Page 122: Retrieve A Single File From A Snapshot
Chapter 4 - Managing Network Attached Storage Manage Shares 4. A dialog box displays, asking you to confirm the rollback. Select Rollback to restore the volume to its state when the snapshot was created. Figure 80 Confirm the volume snapshot rollback. Retrieve a Single File from a Snapshot If you only need to restore a single file, you do not need to restore an entire snapshot. -
Page 123: Edit A Cifs Share
Chapter 4 - Managing Network Attached Storage Manage Shares Edit a CIFS Share After creating a CIFS share, you can edit it to change the configuration. 1. From the menu bar, select Configuration > Shares > CIFS. The CIFS Shares screen displays. -
Page 124: Delete A Share
Chapter 4 - Managing Network Attached Storage Manage Shares 2. Select the share you want to edit, and then select Action > Edit. The NFS Share Edit screen displays. Figure 82 The Edit NFS Share dialog box. 3. Make the desired changes (see Create a Share on page 89 for more information), and click Save. -
Page 125: Manage Nas Replication
Chapter 4 - Managing Network Attached Storage Manage NAS Replication 3. A dialog box displays asking you to confirm the deletion. Click Delete to remove the share. Note: Clicking Delete does not delete the volume. It only removes the volume from the list of shares and makes it inaccessible to remote hosts. -
Page 126: Cancel A Nas Replication In Progress
Chapter 4 - Managing Network Attached Storage Manage NAS Replication 3. Select Action > Replicate Now. A confirmation window displays. Figure 84 The Replicate Now confirmation window. 4. Click Replicate Now to begin a manual NAS replication. Cancel a NAS Replication In Progress If desired, you can cancel any NAS replications currently in progress. -
Page 127: Restoring Files From A Nas Replication Target
3. If desired, write protect the replicated volume before you copy files from the volume. Note: Spectra Logic highly recommends that you write-protect the volume after sharing a. From the menu bar, select Configuration > NAS > Volumes. The Volumes screen displays. -
Page 128: Disable Nas Replication For A Volume
Chapter 4 - Managing Network Attached Storage Manage NAS Replication Disable NAS Replication for a Volume Use the instructions in this section to prevent any further replication from a volume currently configured to use NAS replication. 1. On the source system’s BlackPearl user interface, select Configuration > NAS > Volumes. The Volumes screen displays. - Page 129 Chapter 4 - Managing Network Attached Storage Manage NAS Replication 2. Double-click the Replication service, or select the service, and then select Action > Show Details. The Replication service details screen displays. Figure 87 The Replication service details screen. 3. Select the replication target in the Replication service details screen, and select Action > Edit.
-
Page 130: Delete The Nas Replication Service Configuration
Chapter 4 - Managing Network Attached Storage Manage NAS Replication Delete the NAS Replication Service Configuration 1. On the source solution’s BlackPearl user interface, select Configuration > Services to display the Services screen (see Figure 101 on page 143). 2. Double-click the Replication service, or select the service, and then select Action > Show Details. -
Page 131: Chapter 5 - Additional Configuration Options
Chapter 5 - Additional Configuration Options This chapter describes using the BlackPearl user interface to configure additional options for the Spectra BlackPearl NAS Solution. Configure Network Connections and Settings Configure Ethernet Ports Configure DNS Settings Configure SMTP Settings Configure Date and Time... -
Page 132: Configure Network Connections And Settings
Use the Network screen to edit the system name, configure Ethernet ports and DNS settings, and to enter SMTP and NTP information. Note: If configuring a HotPair system, see the Spectra BlackPearl HotPair Installation & Configuration Guide for instructions on configuring network connections. Figure 90 The Network screen. -
Page 133: Configure Ethernet Ports
Chapter 5 - Additional Configuration Options Configure Network Connections and Settings Configure Ethernet Ports This section describes using the BlackPearl user interface to configure the IP addressing for the Ethernet ports in the BlackPearl NAS solution. The solution may contain a variety of included and optional Ethernet network interface connections. - Page 134 Chapter 5 - Additional Configuration Options Configure Network Connections and Settings 2. In the Network Interfaces pane, double-click the Management row, or select the Management row and then select Action > Edit. The Edit Management dialog box displays. Figure 91 The Edit Management dialog box. 3.
- Page 135 Chapter 5 - Additional Configuration Options Configure Network Connections and Settings 6. If applicable, enter the IPv6Default Gateway. Notes: • The gateway entered for the last configured IPv6 connection sets the default gateway for the BlackPearl NAS solution. • The IPv6 Gateway does not need to be configured when the BlackPearl NAS solution is connected to a SLACC network.
- Page 136 Chapter 5 - Additional Configuration Options Configure Network Connections and Settings 3. Select or clear the Data Port(s) you want to configure into an aggregate data interface. Only one type of port can be used in an aggregation. For example, you cannot use both 10 GigE and 40 GigE ports in the same link aggregation.
- Page 137 Chapter 5 - Additional Configuration Options Configure Network Connections and Settings 2. Select the row of the data connection you want to edit and select Action > Edit. The Edit Data Connection dialog box displays. Figure 93 The Edit Data # dialog box. 3.
- Page 138 Chapter 5 - Additional Configuration Options Configure Network Connections and Settings 8. Click Save. Edit a Static Route 1. From the menu bar, select Configuration > Network, or select the Network pane from the Dashboard screen. The Network screen displays (see Figure 39 on page 74).
-
Page 139: Configure Dns Settings
Chapter 5 - Additional Configuration Options Configure Network Connections and Settings Configure DNS Settings The DNS settings on the BlackPearl NAS solution are used to allow domain name lookup on the solution. Use the following instructions to enter DNS information on the solution. 1. -
Page 140: Configure Smtp Settings
Chapter 5 - Additional Configuration Options Configure Network Connections and Settings Configure SMTP Settings Use the Email settings to associate the BlackPearl NAS solution with a mail server. The solution uses this SMTP server to send emails whenever ASLs or certain types of messages are generated. -
Page 141: Configure Date And Time
Chapter 5 - Additional Configuration Options Configure Network Connections and Settings 7. Click Save. Configure Date and Time The date and time can be set manually or using NTP (Network Time Protocol). The NTP settings are used to accurately control the current time on the BlackPearl NAS solution. Note: If you plan to join an Active Directory domain, you must configure the BlackPearl NAS solution to use NTP. -
Page 142: Edit The System Name
• Invalid - BlackPearlSolution.domain.com • If your solution is using firmware BlackPearl 3.2.2, or earlier, there are no character restrictions on system names. However, Spectra Logic recommends limiting system names to letters, numbers, and hyphens to maintain compatibility with the RFC 1123 standard. -
Page 143: Configure Networking Services
Chapter 5 - Additional Configuration Options Configure Networking Services ONFIGURE ETWORKING ERVICES Use the following instructions to configure networking services on the BlackPearl NAS solution. For instructions on configuring NAS services, see Configure NAS Services on page 96. To display the services screen, from the menu bar, select Configuration > Services. Figure 101 The Services screen. - Page 144 Chapter 5 - Additional Configuration Options Configure Networking Services 3. On the Active Directory service details screen, select Action > Join Domain. The Join Domain dialog box displays. Figure 102 The Join Domain dialog box. 4. The Hostname identifies the BlackPearl NAS solution in the Active Directory domain. Note: The hostname is unavailable and cannot be changed in the Join Domain dialog box.
- Page 145 Chapter 5 - Additional Configuration Options Configure Networking Services Edit Domain If desired, you can edit your Active Directory configuration to enable or disable support for trusted domains. 1. From the menu bar, select Configuration > Services. The Services screen displays (see Figure 101 on page 143).
- Page 146 Chapter 5 - Additional Configuration Options Configure Networking Services 3. Select Action > Add Advanced Parameter. The Add Advanced Parameter dialog box displays. Figure 104 The Add Advanced Parameter dialog box. 4. Enter the desired Parameter and Value. 5. Click Create. Edit Advanced Parameter Improperly configuring advanced parameters can expose security vulnerabilities CAUTION...
- Page 147 Chapter 5 - Additional Configuration Options Configure Networking Services 3. Select the advanced parameter which you want to edit, then select Action > Edit Advanced Parameter. The Edit Advanced Parameter dialog box displays. Figure 105 The Edit Advanced Parameter dialog box. 4.
-
Page 148: Configure The Snmp Service
Chapter 5 - Additional Configuration Options Configure Networking Services Configure the SNMP Service 1. From the menu bar, select Configuration > Services to display the Services screen (see Figure 101 on page 143). 2. Double-click the SNMP service, or select the SNMP service and select Action > Show Details. - Page 149 Chapter 5 - Additional Configuration Options Configure Networking Services b. Enter the host IP address in the Host field. c. If desired, select the Notifications check box to indicate that the SNMP client should receive outgoing notifications. d. Enter the port number to be used for SNMP communication in the Port field. e.
-
Page 150: Configure A Vail Sphere
Register with a Vail Sphere The Vail service configures a BlackPearl NAS solution for use with a Spectra Vail sphere. The Vail service only displays in the Services menu after an activation key is entered. Use the instructions in this section to register a Vail sphere with a BlackPearl NAS solution. -
Page 151: Edit The Vail Service
S3 service details screen to determine the ports currently in use by the S3 service. • For new BlackPearl NAS solutions, Spectra Logic recommends using the 80/443 pair of ports. 6. Click Get Locations. The Register Vail Service dialog box refreshes to display the Location drop-down menu. -
Page 152: Deregister From A Vail Sphere
Chapter 5 - Additional Configuration Options Configure and Use Encryption 3. Select Action > Edit. The Edit Vail Service dialog box displays. Figure 111 The Edit Vail Service dialog box. 4. Use the Ports drop-down menu to select the desired ports. 5. -
Page 153: Configure The Encryption Service
Chapter 5 - Additional Configuration Options Configure and Use Encryption Configure the Encryption Service Use the encryption service to set the level of encryption and create a password to unlock the drives following a solution power cycle. You can select to store the password on the solution, so that the drives are unlocked automatically, or to save the password to a USB key that is used when needed to unlock the drives, and is otherwise stored in a safe location. -
Page 154: Change The Encryption Password
Chapter 5 - Additional Configuration Options Configure and Use Encryption 4. Use the Encryption Mode drop-down menu to set the encryption mode. Parameter Description No Encryption This setting is included in the drop-down menu as the default so that you do not accidentally select an undesired mode of encryption. -
Page 155: Unlock The Self-Encrypting Drives
Chapter 5 - Additional Configuration Options Configure and Use Encryption 3. Select Action > Change Password. The Change Password dialog box displays. Figure 114 The Change Password dialog box. 4. Enter the (current) Old Password. 5. Enter the desired New Password, and then Confirm the new password. 6. -
Page 156: Create An Encryption Password Usb Key
Chapter 5 - Additional Configuration Options Configure and Use Encryption 3. Select Action > Unlock Drives. The Enter Password dialog box displays. Figure 115 The Enter Password dialog box. 4. Enter the encryption Password. 5. Enter the User Password of the user currently logged in to the BlackPearl user interface. 6. -
Page 157: Psid Erase An Encryption Drive
Chapter 5 - Additional Configuration Options Configure and Use Encryption 3. Select Action > Create USB Key. The Create USB Key confirmation window displays. Figure 116 The Create USB Key confirmation window. 4. Enter the User Password of the user currently logged into the BlackPearl user interface. 5. - Page 158 Chapter 5 - Additional Configuration Options Configure and Use Encryption 4. Power down the solution as described in Reboot or Shut Down a BlackPearl NAS Solution page 180. 5. Locate the drive(s) in the chassis using the slot number and verify the serial number(s) you recorded in Step 3.
-
Page 159: Configure Users
Chapter 5 - Additional Configuration Options Configure Users ONFIGURE SERS Use the instructions in this section to create a new user, edit existing users, change passwords, and configure the session timeout setting. Description of User Types Description of User Types on page 77 for information about each user type. -
Page 160: Delete A User
Chapter 5 - Additional Configuration Options Configure Certificates 5. If you are changing the password, enter the Current Password, the desired New Password, then Confirm New Password. Note: The new password does not take effect until after you log out of the BlackPearl (see Exit the BlackPearl User Interface on page 182). - Page 161 Chapter 5 - Additional Configuration Options Configure Certificates Use the instructions in this section to install an SSL certificate. 1. From the menu bar, select Configuration > Certificates. The Certificates screen displays. Figure 119 The Certificates screen. 2. Select either the Management or Data row, depending on for which port you want to install a new SSL certificate.
-
Page 162: Manually Enter Activation Keys
Chapter 5 - Additional Configuration Options Manually Enter Activation Keys ANUALLY NTER CTIVATION If this is an initial installation and your BlackPearl documentation kit included a USB device, Automatically Import Activation Keys on page 64 for instructions for importing activation keys. Use the following instructions to manually enter activation keys. - Page 163 Chapter 5 - Additional Configuration Options Manually Enter Activation Keys 3. Select Action > New. The Enter Activation Key dialog box displays. Figure 122 The Enter Activation Key dialog box. 4. Enter the key, exactly as provided, in the Activation Key field and click Create to save the key on the solution.
-
Page 164: Chapter 6 - Operating The Blackpearl Nas Solution
Chapter 6 - Operating the BlackPearl NAS Solution This chapter describes procedures for day-to-day monitoring and operation of the Spectra BlackPearl NAS Solution. Monitor the BlackPearl NAS Solution Front Bezel Visual Status Beacon Configuring the Visual Status Beacon Color System Status LEDs... -
Page 165: Monitor The Blackpearl Nas Solution
Chapter 6 - Operating the BlackPearl NAS Solution Monitor the BlackPearl NAS Solution NAS S ONITOR THE LACK EARL OLUTION The Visual Status Beacon on the front bezel, and the BlackPearl user interface, combine to provide a number of tools for monitoring the health and performance of the BlackPearl NAS solution and its components. -
Page 166: Front Bezel Visual Status Beacon
Chapter 6 - Operating the BlackPearl NAS Solution Monitor the BlackPearl NAS Solution Front Bezel Visual Status Beacon The Visual Status Beacon light bar in the front bezel provides an at-a-glance status of the solution to which it is mounted. The light bar changes color to indicate the status of the solution. -
Page 167: Configuring The Visual Status Beacon Color
Optionally, you can enter an HTML color code in the entry field. Note: Spectra Logic recommends against using yellow or red, so that you can more easily determine if the solution is in a warning or error state. 5. Click Choose to set the color of the Visual Status Beacon. - Page 168 Chapter 6 - Operating the BlackPearl NAS Solution Monitor the BlackPearl NAS Solution Gen2 X Series Chassis The table below lists each system status LED, in order from left to right, and its function. Figure 124 The top left section of the front of the Gen2 X chassis (front bezel removed) showing system status LEDs.
- Page 169 Chapter 6 - Operating the BlackPearl NAS Solution Monitor the BlackPearl NAS Solution Gen2 S Series and Gen2 V Series Chassis The table below lists each system status LED, in order from left to right, and its function. Figure 125 The top right section of the front Figure 126 The top left section of the front of the of the Gen2 S Series chassis, with the front Gen2 V Series chassis, with the front bezel...
- Page 170 BlackPearl user interface to determine which fan failed. • If the LED is solid red, it indicates an overheat condition. Check the BlackPearl user interface to view the status of the solution. If the problem persists, contact Spectra Logic Technical Support. See Contacting Spectra Logic on page 7.
-
Page 171: Check System Messages
Chapter 6 - Operating the BlackPearl NAS Solution Monitor the BlackPearl NAS Solution Check System Messages Check the system messages regularly. These messages provide important information about the BlackPearl NAS solution and its operation. Reviewing the messages is the first step in troubleshooting. -
Page 172: View The Status Of Hardware Components
Figure 129 The Messages screen. Pay extra attention to any messages flagged with the Warning or Error icon (see Status Icons on page 53), and follow any recommended steps. Contact Spectra Logic Technical Support if you need assistance (see Contacting Spectra Logic on page 7). - Page 173 Chapter 6 - Operating the BlackPearl NAS Solution Monitor the BlackPearl NAS Solution Use the following instructions to check the status of hardware components. 1. From the menu bar, select Status > Hardware or click the Hardware pane on the Dashboard, or click the Hardware link on the status bar.
-
Page 174: View The Status Of Services
Chapter 6 - Operating the BlackPearl NAS Solution Monitor the BlackPearl NAS Solution Clicking... Shows the... Turn Beacon On Click Turn Beacon On to cause the Visual Status Beacon light on a BlackPearl (Below chassis NAS solution to flash blue. This is useful when you have multiple solutions graphic) and need to locate a specific one, for example to replace a component. -
Page 175: View The Status Of Nas Pools
Chapter 6 - Operating the BlackPearl NAS Solution Monitor the BlackPearl NAS Solution View the Status of NAS Pools The Pools screen provides status information about all NAS storage pools that are configured on the solution. 1. From the menu bar, select Status > NAS > Pools to display the Pools screen. 2. - Page 176 Chapter 6 - Operating the BlackPearl NAS Solution Monitor the BlackPearl NAS Solution 3. To view additional information about a NAS pool, select the pool and then select Action > Show Details. The pool name details screen displays. Figure 133 A NAS Pool details screen. The pool name details screen displays the following information: This row...
-
Page 177: View The Status Of Nas Volumes
Chapter 6 - Operating the BlackPearl NAS Solution Monitor the BlackPearl NAS Solution This row... Shows... Used The amount of used storage space in the pool. Overhead The amount of disk space used for overhead, such as parity data. Drives The size, RPM, type, and number of drives assigned to the pool. -
Page 178: View Performance Metrics
Chapter 6 - Operating the BlackPearl NAS Solution Monitor the BlackPearl NAS Solution 2. The status of each share is indicated by the status icons on the left side of the screen. Figure 135 The CIFS Shares screen. View Performance Metrics The Performance screen displays performance metrics for the BlackPearl NAS storage pools, individual data drives, network traffic, and CPUs. - Page 179 Chapter 6 - Operating the BlackPearl NAS Solution Monitor the BlackPearl NAS Solution 2. Select Pools, Disk Drives, CPU, or Network to display performance information about the selected component. Note: If you select Pools, Disk Drives, or Network, use the Pool, DiskDrive, or Interface drop-down menu to select a specific pool, disk drive, or network connection to monitor.
-
Page 180: View Reports
Chapter 6 - Operating the BlackPearl NAS Solution Reboot or Shut Down a BlackPearl NAS Solution View Reports The Reports screen allows you to generate reports on all aspects of the BlackPearl NAS solution, including component status, and configuration. Reports can be saved in either JSON or XML format. -
Page 181: Using The Blackpearl User Interface
3. A confirmation screen appears. Confirm the selection to perform the reboot or shutdown. Power-Cycle Reset Under some circumstances, Spectra Logic Technical Support may direct you to perform a power-cycle reset of a BlackPearl NAS solution to recover from an error. To power-cycle reset... -
Page 182: Exit The Blackpearl User Interface
Chapter 6 - Operating the BlackPearl NAS Solution Exit the BlackPearl User Interface XIT THE LACK EARL NTERFACE To exit the BlackPearl user interface, close the browser or click Logout on the right side of the menu bar. This ends the session. If the active session is idle for more than the set session timeout, the current user is automatically logged out. -
Page 183: Chapter 7 - Using Autosupport
It is also used to generate AutoSupport Log (ASL) sets for use by Spectra Logic Technical Support. You can configure the solution to email ASL sets when critical events occur, or on a monthly basis. You can also choose to have mail recipients receive ASL sets. -
Page 184: Enter Contact Information
NTER ONTACT NFORMATION Contact information helps Spectra Logic in contacting the administrator of the BlackPearl NAS solution during troubleshooting. Entering the contact information is typically a one- time-only process. 1. From the menu bar, select Support > Contact Information to display the Contact Information screen. -
Page 185: Configure Mail Recipients
Chapter 7 - Using AutoSupport Configure Mail Recipients ONFIGURE ECIPIENTS You can configure AutoSupport to email system messages and log sets, as they are generated, to selected recipients. All log sets and messages are sent to a previously configured mail recipient. -
Page 186: Edit A Mail Recipient
Chapter 7 - Using AutoSupport Configure Mail Recipients 3. Enter the following information for the mail recipient: Field Description Name The name of the recipient. Email Address The email address of the recipient. Be sure to use the full address using the standard email format, including the @ symbol. -
Page 187: Send A Test Email
Chapter 7 - Using AutoSupport Configure Mail Recipients 2. From the list of mail recipients, double-click the name of the recipient whose information you want to edit, or select the name and then select Action > Edit. The Edit Mail Recipient dialog box displays. -
Page 188: Delete A Mail Recipient
Spectra Logic Technical Support. • Statistic Log Sets contain performance data about the solution and are used by Spectra Logic Technical Support for in-depth troubleshooting. Statistic log sets are too large to be mailed directly from the solution and must be downloaded. -
Page 189: Configure A Log Set Schedule
Chapter 7 - Using AutoSupport Log Sets Use the Logs screen to generate, email, or download log sets, as well as to configure a log set schedule. Figure 146 The Logs screen. Configure a Log Set Schedule Use the instructions in this section to configure a log set schedule. 1. -
Page 190: Manually Generate Log Sets
Although the BlackPearl NAS solution auto generates log sets whenever errors occur, you may want to create log sets manually for troubleshooting purposes, or at the request of Spectra Logic Technical Support. Use the following instructions to manually generate a log set. -
Page 191: Download A Log Set
Chapter 7 - Using AutoSupport Log Sets 3. Select the mail recipients you want to receive the log set, and click Email. Download a Log Set Use the instructions in this section to download a log set. 1. From the menu bar, select Support > Logs. The Logs screen displays (see page 188). -
Page 192: Chapter 8 - Maintaining The Blackpearl Nas Solution
Chapter 8 - Maintaining the BlackPearl NAS Solution This chapter describes the maintenance procedures for the Spectra BlackPearl NAS Solution. Data Integrity Verification Cancel Data Integrity Verification Initiate RSC Backup Access the Technical Support Portal Create an Account Log Into the Portal... -
Page 193: Cancel Data Integrity Verification
BlackPearl NAS solution on a storage pool present in the solution. This backup occurs automatically each time you create a storage pool, or once every seven days. If you make major changes to your BlackPearl NAS solution, Spectra Logic recommends that you backup the configuration manually. -
Page 194: Access The Technical Support Portal
BlackPearl software, or to open a support ticket. Note: If you own multiple Spectra Logic products, the serial numbers for all products are associated with your account. If you do not see the serial numbers for all of your... - Page 195 Chapter 8 - Maintaining the BlackPearl NAS Solution Access the Technical Support Portal 2. On the home page, click create an account. Figure 150 The Spectra Logic Technical Support portal home page. January 2022 User Guide-BlackPearl NAS Solution - 195 -...
-
Page 196: Log Into The Portal
Access the Technical Support Portal 3. Enter your registration information. Your account is automatically associated with the serial numbers of all Spectra Logic products owned by your site. • If you have an invitation, follow the link and enter the invitation code. -
Page 197: Configure Automated Software Upload
5. Optionally, select the Email Notifications Only check box to only receive an email when an updated software package is available instead of automatically download the file. 6. Select either Spectra Logic or Use Proxy as the Upload From location. Spectra Logic recommends using the Spectra Logic package server. -
Page 198: Update The Software
Some problems with the BlackPearl NAS solution may be fixed by updating the solution’s software. Spectra Logic provides complete support for the most current release of software and one revision back. Customers using previously released software packages are asked to update to the current release as soon as possible. -
Page 199: Check The Currently Released Software Version
Technical Support portal. 2. Select Downloads > Product Software. 3. On the Product Software page, locate the the BlackPearl NAS solution in the Spectra Product column. The currently released BlackPearl software version is listed in the Current Version column. -
Page 200: Download And Stage The Updated Software
Chapter 8 - Maintaining the BlackPearl NAS Solution Update the Software Download and Stage the Updated Software Use the instructions in this section to download and stage the updated software for the the BlackPearl NAS solution. 1. Log into your account on the Technical Support portal at support.spectralogic.com. -
Page 201: Install The Update
Chapter 8 - Maintaining the BlackPearl NAS Solution Update the Software 5. From the BlackPearl menu bar, select Support > Software to display the Software screen. Click Choose File. Using your web browser, browse to the location of the update file and select the file to upload. -
Page 202: Replace A Failed Component
Chapter 8 - Maintaining the BlackPearl NAS Solution Replace a Failed Component 3. Click Update. A progress bar shows the progress of the update. Figure 158 The Software Update screen showing the progress of an update. 4. When the update is complete, the BlackPearl NAS solution automatically reboots to begin using the latest software. - Page 203 4. After you locate the unit in your data center, click Turn Beacon Off to stop the lights from flashing. 5. For specific part replacement procedures, refer to one of the following guides, which can be found after logging into the Spectra Logic support portal at support.spectralogic.com. • The Spectra 12- & 36-Drive Chassis HBA Installation Guide provides instructions for installing an HBA in a Gen1 master node.
- Page 204 Spectra 96-Bay Chassis Fan Replacement Guide provides instructions for replacing a failed fan in the 96-bay expansion node. • The Spectra 96-Bay Chassis Power Supply Replacement Guide provides instructions for replacing a failed power supply in the 96-bay expansion node. • The...
-
Page 205: Chapter 9 - Troubleshooting And Support
Chapter 9 - Troubleshooting and Support Use the information in this appendix to troubleshoot problems on the Spectra BlackPearl NAS Solution as they arise, before contacting Spectra Logic Technical Support. Resolve a BlackPearl Management Port IP Address Conflict Using the Console... -
Page 206: Using The Console
• Consult your browser documentation for instructions on how to resolve the security certificate warning. • The absence of the certificate does not affect functionality. 6. Enter the login username and password. The default username is Administrator and password is spectra. January 2022 User Guide-BlackPearl NAS Solution - 206 -... - Page 207 Chapter 9 - Troubleshooting and Support Resolve a BlackPearl Management Port IP Address Conflict 7. From the menu bar, select Configuration > Network, or click the Network pane from the Dashboard screen. The Network screen displays. 8. In the Network Interfaces pane, double-click the Management row, or select the Management row and then select Action >...
-
Page 208: Network Setup Tips
Chapter 9 - Troubleshooting and Support Network Setup Tips 14. Click Save. Note: When you change the IP address of the BlackPearl management port, you lose your connection to the user interface when you save your changes. To re-establish the connection, enter the new IP address in your browser and log in again. - Page 209 Chapter 9 - Troubleshooting and Support Network Setup Tips • For the 40 GigE optical card: (Gen1 only): • Single 40 GigE logical connection using one of the 40 GigE physical ports —OR— • Single 80 GigE logical connection using two 40 GigE physical ports (link aggregation) •...
- Page 210 Chapter 9 - Troubleshooting and Support Network Setup Tips Link Aggregation Notes Switches use different methods of routing traffic from hosts to NAS servers. There are also many different network configurations to move data from hosts to NAS servers. For example, some Cisco switches route traffic based on the MAC address and the IP address.
- Page 211 Chapter 9 - Troubleshooting and Support Network Setup Tips For example, if only a single host is connected to the BlackPearl NAS solution through a link aggregated connection, the measured performance is lower than the potential maximum transfer rate because only one physical port of the two port link aggregation is being utilized by the switch.
-
Page 212: Troubleshooting
Chapter 9 - Troubleshooting and Support Network Setup Tips Troubleshooting Port Link LED Does Not Light • Check the port configuration on the network switch. The BlackPearl NAS solution only supports auto-negotiation. Make sure the switch is configured to match speeds on both ends of the connection. -
Page 213: Spectra Logic Technical Support
PECTRA OGIC ECHNICAL UPPORT Spectra Logic Technical Support provides a worldwide service and maintenance structure. Before Contacting Support If you have a problem with your BlackPearl NAS solution, use the information in this section to attempt to resolve the problem. -
Page 214: Determine The Solution Serial Number
2. The solution serial number is listed in the Product Information pane. Figure 163 The solution serial number. Opening a Support Ticket You can open a support ticket using the Spectra Logic Technical Support portal or telephone. 1. Make notes about the problem, including what happened just before the problem occurred. - Page 215 Chapter 9 - Troubleshooting and Support Spectra Logic Technical Support ii. Select Incidents & Inventory > Open or View Incidents, or on the Home page, click Open a Support Incident. Figure 164 Select Incidents & Inventory > Open or View Incidents to open a support incident.
- Page 216 Chapter 9 - Troubleshooting and Support Spectra Logic Technical Support iii. On the Open or View Incidents page, you are given an opportunity to search for existing support content that may help you solve your problem immediately. If the search does not provide an answer, click Open a New Incident.
-
Page 217: Remote Support
When you are finished, click Create Incident. Figure 166 The Create Incident page. • If it is within the hours of coverage provided by your support contract, contact Spectra Logic Technical Support by telephone. See Contacting Spectra Logic on page 7. -
Page 218: Enabling Remote Support
Chapter 9 - Troubleshooting and Support Remote Support Enabling Remote Support 1. Enter the Remote Support activation key as described in Configure Network Connections and Settings on page 132. Note: The Remote Support activation key is only valid for 24 hours. When the key expires, remote access is automatically disabled. -
Page 219: Disabling Remote Support
Chapter 9 - Troubleshooting and Support Remote Support 5. Click Save. After Spectra Logic Technical Support informs you that they no longer require root access to the solution, you should disable Remote Support to prevent any potential unauthorized access. See... - Page 220 Chapter 9 - Troubleshooting and Support Remote Support 2. Double-click the Administrator account, or select the Administrator account, and then select Action > Edit. The Edit User dialog box displays. Figure 168 The Edit User dialog box. 3. Clear the Enable Remote Support check box. 4.
-
Page 221: Appendix A - Ipmi Configuration
DO NOT make any changes in the BIOS other than changing the IPMI settings CAUTION as described below. Changing any other setting is not supported by Spectra Logic and may cause adverse solution performance. 1. If the BlackPearl NAS solution is currently powered on, shut down the solution as... - Page 222 Appendix A - IPMI Configuration 6. Using the keyboard, navigate to the IPMI tab and then select BMC Network Configuration. The current settings of the BMC configuration display. Figure 170 The BMC Configuration screen. 7. Using the keyboard, select Update IPMI LAN Configuration. A confirmation window displays.
- Page 223 Appendix A - IPMI Configuration 8. If desired, select IPMI LAN Selection. Change the configured setting as needed. • Dedicated - Always uses the dedicated IPMI port for IPMI traffic. • Shared - Always uses the LAN1 port for IPMI traffic. •...
-
Page 224: Appendix B - Network File Interface
NAS solution or deleted. When a user needs access to data deleted from the BlackPearl NAS solution, they can use the Spectra Eon Browser or an API client to retrieve the files from the BlackPearl gateway. EQUIREMENTS The Network File Interface service has the following requirements: •... -
Page 225: Special Considerations For Reading Tapes In A Non-Blackpearl Nearline Gateway
1024 characters. If you are using a graphical language, such as Japanese, the limit is 512 characters. • Spectra Logic does not recommend the following characters in LTFS file names or BlackPearl object names for reasons of cross-platform compatibility: control characters such as carriage return (CR) and line feed (LF), double quotation mark (“), asterisk (*), question mark (?), less than sign (<), greater than sign (>), backslash... -
Page 226: Configure A Blackpearl Gateway For Versioning
Appendix B - Network File Interface Configure a BlackPearl Gateway for Versioning If you plan to eject tapes, Spectra Logic recommends the following storage domain and data policy settings: • Set the Write Optimization setting to Capacity when configuring a storage domain so that data is written to as few tapes as possible. - Page 227 2. From the menu bar, select Action > New Bucket. The New Bucket dialog box displays. a. Configure the bucket as desired. See the Spectra BlackPearl Nearline Gateway User Guide for instructions. b. Using the Data Policy drop down menu, select the data policy you created in Step 6 on page 227.
-
Page 228: Configure Network File Interface
2. From the menu bar, select Action > New. The New User dialog box displays. a. Configure the user as desired. See the Spectra BlackPearl Nearline Gateway User Guide instructions. b. Using the Default Data Policy drop down menu, select the data policy you created in Step 6 on page 227. - Page 229 4. Enter the IP address or the DNS name of the data port of the target BlackPearl gateway to which you want to connect in the BlackPearl System entry field. If you do not know the IP address or DNS name of the BlackPearl gateway, consult the Spectra BlackPearl Nearline Gateway User Guide for instructions.
-
Page 230: Configure A Volume With Nfi
S3 Access ID and S3 Secret Key fields. If you have not created a user in the BlackPearl user interface, or do not know the security credentials for that user, consult the Spectra BlackPearl Nearline Gateway User Guide for instructions. - Page 231 Appendix B - Network File Interface Configure Network File Interface 2. Double-click the volume you want to edit, or select the volume and then select Action > Edit. The Edit volume name dialog box displays —OR— Select Action > New. The New Volume dialog box displays. Figure 176 The New Volume dialog box.
- Page 232 Appendix B - Network File Interface Configure Network File Interface 3. Configure the volume as required for your environment. For this option..Do the following... Enter a name for the new volume. Volume names are limited to 62 characters or fewer. Notes: •...
- Page 233 Appendix B - Network File Interface Configure Network File Interface For this option..Do the following... If desired, select this option to configure the volume to treat all names as case insensitive, which can improve performance, especially in situations where directories contain a large number of files. Notes: Case Insensitive •...
- Page 234 Appendix B - Network File Interface Configure Network File Interface 7. Enter the name of the Bucket to use to store the data on the BlackPearl gateway. If the bucket does not exist, it is automatically created. Notes: • The bucket name cannot contain a colon (:), forward slash (/), or space. •...
- Page 235 48, where the NAS volume transfers data every two days. The maximum setting for the minute field is 59. Note: Spectra Logic recommends offsetting the minutes after the hour for starting NFI transfers so that there are not a large number of jobs starting at exactly the same time.
- Page 236 Appendix B - Network File Interface Configure Network File Interface Create a Daily Schedule 1. In the New Volume dialog box, select Daily as the interval for the policy schedule. The dialog box changes to display options for the daily interval setting. Figure 178 The New Volume dialog box showing the daily interval options.
-
Page 237: Create A Share
Appendix B - Network File Interface Configure Network File Interface Create a Weekly Schedule 1. In the New Volume dialog box, select Weekly as the interval for the policy schedule. The dialog box changes to display options for the weekly interval setting. Figure 179 The New Volume dialog box showing the weekly interval options. -
Page 238: Manage Nfi Replication
Appendix B - Network File Interface Manage NFI Replication NFI R ANAGE EPLICATION Edit the NFI Service If desired, you can change the configuration of the previously configured NFI service. 1. From the menu bar, select Configuration > Services to display the Services screen. 2. -
Page 239: Manually Starting An Nfi Replication
Appendix B - Network File Interface Manage NFI Replication 3. Select Action > Delete. A confirmation window displays. 4. Confirm the deletion of the NFI service configuration. Manually Starting an NFI Replication If desired, you can manually initiate an NFI replication to the target gateway. 1. -
Page 240: Edit The Nfi Volume Policy
NAS solution, or the BlackPearl NAS solution fails, you can retrieve files from the BlackPearl gateway using the Spectra Eon Browser, Spectra Deep Storage Browser, or a DS3 client. If you only need to retrieve a small number of files, Spectra Logic recommends using the Eon Browser. -
Page 241: Appendix C - Specifications
Appendix C - Specifications This appendix provides detailed specifications for the BlackPearl NAS solution, the 44-bay expansion node, 96-bay expansion node, and the 107-bay expansion node. The specifications listed here pertain to the currently shipping BlackPearl chassis. Data Storage Specifications System Specification Size and Weight Environmental Specifications... - Page 242 Appendix C - Specifications Data Storage Specifications BlackPearl Gen2 X Series Drive Purpose Drive Type Write Performance, • 1.6 TB SSD Gen4 Metadata Performance, • 6.4 TB SSD Gen4 or NAS BlackPearl Gen2 S Series and Gen2 V Series Drive Purpose Drive Type Write Performance, •...
- Page 243 Appendix C - Specifications Data Storage Specifications 44-Bay Expansion Node Drive Purpose Specification • 4, 8, 12, or 16 TB Spinning-Disk SAS • 12 or 16 TB Spinning-Disk SATA • 12 TB Spinning-Disk Self-Encrypting Drives 96-Bay Expansion Node Drive Purpose Specification 8, 12, or 16 TB Spinning-Disk SATA 107-Bay Expansion Node...
-
Page 244: System Specification
Appendix C - Specifications System Specification YSTEM PECIFICATION The following tables provide an overview of the devices in the BlackPearl NAS solutions. Gen2 X Series BlackPearl Solution Parameter Specifications One 64-core CPU System disk drives Two 480 GB NVMe Memory 256 GB (8 x 32 GB DIMMs) Interface connections •... - Page 245 Appendix C - Specifications System Specification Gen2 S Series BlackPearl Solution Parameter Specifications One 32-core CPU System disk drives Two 480 GB M.2 SSD Memory 128 GB (8 x 16 GB DIMMs) Interface connections • Two integrated 10GBase-T Ethernet ports •...
- Page 246 Appendix C - Specifications System Specification Gen1 S Series BlackPearl 4U Solution Parameter Specifications Two multi-core processors System disk drives Two 500 GB SATA disk drives Memory 64 GB (8 x 8 GB DIMMs) 128 GB (16 x 8 GB DIMMs or 8 x 16 GB DIMMs) Interface connections •...
-
Page 247: Size And Weight
Appendix C - Specifications Size and Weight IZE AND EIGHT The following tables provide the size and weight of each chassis. Specifications are provided for each unit in both an operational environment, and in the shipping container. Gen2 X Series BlackPearl NAS Solution Parameter Gen2 X Series BlackPearl Shipping Container... - Page 248 Appendix C - Specifications Size and Weight Gen2 S Series BlackPearl NAS Solution Parameter Gen2 V Series BlackPearl Shipping Container NAS Solution Dimensions • Height (2U) 7 in. (17.8 cm) 15.9 in. (40.4 cm) • Width 19 in. (48.3 cm) 23.7 in.
- Page 249 Appendix C - Specifications Size and Weight Gen1 S Series 4U BlackPearl NAS Solution and 44-Bay Expansion Node Parameter Gen1 S Series 4U BlackPearl NAS Shipping Container Solution and 44-Bay Expansion Node Dimensions • Height (4U) 7 in. (17.8 cm) 17.5 in.
- Page 250 Appendix C - Specifications Size and Weight 107-Bay Expansion Node Parameter 107-bay Expansion Node Shipping Container Dimensions • Height (4U) 7 in. (17.8 cm) 18.4 in. (46.7 cm) • Width 17 in. (43.2 cm) 24.3 in. (61.7 cm) • Depth 41 in.
-
Page 251: Environmental Specifications
Appendix C - Specifications Environmental Specifications NVIRONMENTAL PECIFICATIONS The tables below show the temperature, humidity, and altitude requirements for each chassis. Gen2 X Series BlackPearl NAS Solution Parameter Operating Storing and Shipping Transit Conditions Environment (Non-Operating) Storage Environment Environment Humidity 20% to 80% 10% to 90% 10% to 90%... - Page 252 Appendix C - Specifications Environmental Specifications Gen1 S Series and Gen1 V Series BlackPearl NAS Solutions, and 44-Bay Expansion Nodes Parameter Operating Environment Storing and Shipping (Non-Operating) Environment Humidity 8% to 90% 5% to 95% (non-condensing) (non-condensing) Temperature 50° F to 95° F –40°...
-
Page 253: Heat Generation
Appendix C - Specifications Environmental Specifications 107-Bay Expansion Node Parameter Operating Environment Storing and Shipping (Non-Operating) Environment Humidity 20% to 80% 10% to 90% (non-condensing) (non-condensing) Temperature 32° F to 95° F –4° F to 140° F (0° C to 35° C) (–20°... -
Page 254: Power Requirements
Appendix C - Specifications Power Requirements OWER EQUIREMENTS The BlackPearl NAS solutions, 44-bay, 96-bay, and 107-bay expansion nodes, have the following power requirements. Failure to meet the cabling and power specifications could damage your CAUTION BlackPearl NAS solution, result in data loss, or both. Input Power Requirements The following tables provide the input power requirements for each solution or expansion node. - Page 255 Appendix C - Specifications Power Requirements Gen1 V Series 2U BlackPearl NAS Solution Parameter Requirements Input Voltage 100–240 VAC, 11–4.5 A, 920 watts maximum Input Frequency 50–60 Hz Gen1 S Series 4U BlackPearl NAS Solution Parameter Requirements Input Voltage 100–140 VAC, 12–8 A, 1000 watts maximum 180–240 VAC, 8–6 A, 1280 watts maximum Input Frequency 50–60 Hz...
-
Page 256: Power Cord Specifications
Cables provided by Spectra Logic are between 6 ft (1.8m) to 6.5 ft (2m) in length. If you need to use a longer cord, make sure it conforms to the specifications listed below. - Page 257 Appendix C - Specifications Power Requirements North American 120 Volt-AC Power Cord The criteria for a 120-volt power cord for use in the United States and Canada are as follows: Parameter Specification Power cordage Three-conductor, 14 AWG Power input Gen1 S, P and V Series, Gen2 X and V Series, and connectors 44-Bay Expansion Node: •...
-
Page 258: Interface Specifications
Appendix C - Specifications Interface Specifications International 220 Volt-AC Power Cord The criteria for an international 220-volt AC power cord are as follows: Parameter Specification Power cordage Flexible, HAR (harmonized) type H05VV-F, three conductor, cord with minimum conductor size of 1.7 square millimeters (0.0026350 square inches). -
Page 259: System Interface Connectors
Appendix C - Specifications Interface Specifications System Interface Connectors Gen2 X Series BlackPearl NAS Solution Interface Type Number of Ports and Connector Type Ethernet • 1 Gig E One RJ-45 socket • 100 GigE Two QSFP28 sockets. SAS (12 Gbps) Four SFF-8644 sockets per 12 Gbps SAS card provide connections to four 96-bay expansion nodes, or four 107-bay disk expansion nodes, using one (Optional) -
Page 260: Expansion Node Interface Connectors
Appendix C - Specifications Interface Specifications Interface Type Number of Ports and Connector Type Ethernet (40 GigE) Two QSFP+ optical modules with a duplex LC connector per optional 40 GigE NIC. SAS (6 Gbps) Four SFF-8644 sockets per optional 6 Gbps SAS card provide connections to two 44-bay expansion nodes, using two ports for each expansion node. -
Page 261: Universal Serial Bus (Usb) Support
107-bay expansion node. Universal Serial Bus (USB) Support Spectra Logic supports using the USB ports on the solution for the following: • USB mass storage devices (for example, flash drives) • Keyboards & pointer devices (for example, a computer mouse) •... -
Page 262: Appendix D - Regulatory & Safety Standards
Appendix D - Regulatory & Safety Standards The Spectra BlackPearl NAS Solution complies with the safety and regulatory agency standards listed below when installed by a Spectra Logic certified engineer or third-party provider. EU D ECLARATION OF ONFORMITY Spectra Logic Corporation... - Page 263 Appendix D - Regulatory & Safety Standards EU Declaration of Conformity Directive Compliance EN 61000-4-3 1995 + A1:1998 + A2:2001, ENV 50204: 1995, Radiated RF Immunity EN 61000-4-4 1995 + A1:2001, Electrical Fast Transient/Burst EN 61000-4-5 1995 + A1:2001 + A2:2001, Surge Immunity EN 61000-4-6 1996 + A1:2001 + A2:2001, Conducted RF Immunity EN 61000-4-8...
- Page 264 Appendix D - Regulatory & Safety Standards EU Declaration of Conformity January 2022 User Guide-BlackPearl NAS Solution - 264 -...
- Page 265 Appendix D - Regulatory & Safety Standards EU Declaration of Conformity January 2022 User Guide-BlackPearl NAS Solution - 265 -...
-
Page 266: Certifications
Appendix D - Regulatory & Safety Standards CE Marking Certifications Country Certification Covers Australia 826-9, 847-12, 847JBOD-14, SP-5, JBOD 108 Canada 826-9, 847-12, 847JBOD-14, SP-5, JBOD 108 826-9, 847-12, 847JBOD-14, SP-5, JBOD 108 Mexico 826-9, 847-12, 847JBOD-14, SP-5, JBOD 108 UL, FCC 826-9, 847-12, 847JBOD-14, SP-5, JBOD 108 Japan... -
Page 267: Fcc Notice
MISSIONS ARNING AFETY TANDARDS AND OMPLIANCE The Spectra BlackPearl NAS solution complies with the following domestic and international product safety standards. • EN 60950-1 Second Edition • UL 60950-1 Second Edition • CSA-C22.2 No. 60950-1-03 • Low Voltage Directive (EU: CE Mark) -
Page 268: Waste Of Electronic And Electrical Equipment (Weee) Directive
The RoHS marking indicates that this product is in compliance with European Council Directive 2011/65/2008, on the restriction of the use of certain hazardous substances in electrical and electronic equipment. ECYCLING YSTEM For information on recycling your Spectra solution, check the Spectra Logic website at: spectralogic.com/environment. ONFLICT INERALS OLICY... - Page 269 Appendix D - Regulatory & Safety Standards Conflict Minerals Policy Affected suppliers to Spectra Logic will be required to commit to being or becoming “conflict-free” (which means that such supplier does not source conflict minerals) and sourcing, where possible, only from conflict-free smelters. Each affected supplier to Spectra...
-
Page 270: Appendix E - Open Source Code Acknowledgments & Package List
BlackPearl NAS solution. If you have any questions or want to receive a copy of the free/open source software to which you are entitled under the applicable free/open source license(s) (such as the Common Development and Distribution License (CCDL)), contact Spectra Logic Technical Support (see Contacting Spectra Logic on page 7). -
Page 271: Java
Appendix E - Open Source Code Acknowledgments & Package List Java THIS SOFTWARE IS PROVIDED BY THE FREEBSD PROJECT ``AS IS'' AND ANY EXPRESS OR IMPLIED WARRANTIES, INCLUDING, BUT NOT LIMITED TO, THE IMPLIED WARRANTIES OF MERCHANTABILITY AND FITNESS FOR A PARTICULAR PURPOSE ARE DISCLAIMED. - Page 272 Appendix E - Open Source Code Acknowledgments & Package List Java 1. DEFINITIONS. "Software" means the software identified above in binary form that you selected for download, install or use (in the version You selected for download, install or use) from Oracle or its authorized licensees, any other machine readable materials (including, but not limited to, libraries, source files, header files, and data files), any updates or error corrections provided by Oracle, and any user manuals, programming guides and other...
- Page 273 Appendix E - Open Source Code Acknowledgments & Package List Java 3. RESTRICTIONS. Software is copyrighted. Title to Software and all associated intellectual property rights is retained by Oracle and/or its licensors. Unless enforcement is prohibited by applicable law, you may not modify, decompile, or reverse engineer Software. You acknowledge that the Software is developed for general use in a variety of information management applications;...
- Page 274 Appendix E - Open Source Code Acknowledgments & Package List Java 7. EXPORT REGULATIONS. You agree that U.S. export control laws and other applicable export and import laws govern your use of the Software, including technical data; additional information can be found on Oracle's Global Trade Compliance web site (http://www.oracle.com/products/export).
- Page 275 Appendix E - Open Source Code Acknowledgments & Package List Java These Supplemental License Terms add to or modify the terms of the Binary Code License Agreement. Capitalized terms not defined in these Supplemental Terms shall have the same meanings ascribed to them in the Binary Code License Agreement. These Supplemental Terms shall supersede any inconsistent or conflicting terms in the Binary Code License Agreement, or in any license contained within the Software.
- Page 276 Appendix E - Open Source Code Acknowledgments & Package List Java D. LICENSE TO DISTRIBUTE REDISTRIBUTABLES. Subject to the terms and conditions of this Agreement and restrictions and exceptions set forth in the README File, including but not limited to the Java Technology Restrictions and Limitations on Redistribution of these Supplemental Terms, Oracle grants you a non-exclusive, non-transferable, limited license without fees to reproduce and distribute those files specifically identified as redistributable in the README File ("Redistributables") provided that: (i) you distribute the Redistributables...
- Page 277 Appendix E - Open Source Code Acknowledgments & Package List Java E. DISTRIBUTION BY PUBLISHERS. This section pertains to your distribution of the JavaTM SE Development Kit Software (“JDK”) with your printed book or magazine (as those terms are commonly used in the industry) relating to Java technology ("Publication"). Subject to and conditioned upon your compliance with the restrictions and obligations contained in the Agreement, Oracle hereby grants to you a non-exclusive, nontransferable limited right to reproduce complete and unmodified copies of the JDK on electronic media (the "Media") for...
-
Page 278: Samba
Appendix E - Open Source Code Acknowledgments & Package List Samba H. COMMERCIAL FEATURES NOTICE. For purpose of complying with Supplemental Term Section C.(v)(b) and D.(v)(b), your license agreement shall include the following notice, where the notice is displayed in a manner that anyone using the Software will see the notice: Use of the Commercial Features for any commercial or production purpose requires a separate license from Oracle. - Page 279 Appendix E - Open Source Code Acknowledgments & Package List Nginx For more details and for the full text for each of these licenses, read the LICENSES and COPYING files included with the source packaging of this software. On Debian GNU/Linux systems, the complete text of the GNU General Public License can be found in `/usr/share/common-licenses/GPL'.
- Page 280 Appendix E - Open Source Code Acknowledgments & Package List Ruby 1. You may make and give away verbatim copies of the source form of the software without restriction, provided that you duplicate all of the original copyright notices and associated disclaimers.
- Page 281 Appendix E - Open Source Code Acknowledgments & Package List Ruby on Rails UBY ON AILS Permission is hereby granted, free of charge, to any person obtaining a copy of this software and associated documentation files (the “Software”), to deal in the Software without restriction, including without limitation the rights to use, copy, modify, merge, publish, distribute, sublicense, and/or sell copies of the Software, and to permit persons to whom the Software is furnished to do so, subject to the following conditions:...
- Page 282 Appendix E - Open Source Code Acknowledgments & Package List Included Packages boost-libs-1.72.0_3 brotli-1.0.9,1 c-ares-1.17.1 ca_root_nss-3.62 cdbcmd-0.0.1774343,1 compat10x-amd64-10.4.1004000.20181014 compat11x-amd64-11.2.1102000.20181014 cscope-15.9 ctags-5.8 curl-7.75.0 cyrus-sasl-2.1.27_1 dbus-1.12.20_3 dbus-glib-0.110 dejavu-2.37_1 dfu-util-0.10 dmidecode-3.3 ds3-3.2.0.1701306 e2fsprogs-libuuid-1.46.2 expat-2.2.10 fieldmod-2.0.0.2867631 fio-3.26 fontconfig-2.13.93,1 freetype2-2.10.4 fsx-1.0.2867631_1 fusefs-libs-2.9.9_2 gamin-0.1.10_10 gdb-10.1_1 gdbm-1.19 gettext-runtime-0.21 glib-2.66.7_1,1 gmp-6.2.1...
- Page 283 Appendix E - Open Source Code Acknowledgments & Package List Included Packages gnome_subr-1.0 gnupg-2.2.27 gnutls-3.6.15 icu-70.1,1 indexinfo-0.3.1 iozone-3.491 iperf-2.1.0.r2 iperf3-3.9 ipmitool-1.8.18_3 jansson-2.13.1 java-zoneinfo-2021.a javavmwrapper-2.7.7 ksh93-93.u_1,2 kyua-0.13_6,3 libarchive-3.5.1,1 libassuan-2.5.4 libdaemon-0.14_1 libedit-3.1.20191231,1 libevent-2.1.12 libffi-3.3_1 libfontenc-1.1.4 libgcrypt-1.9.2_1 libgpg-error-1.41 libiconv-1.16 libinotify-20180201_2 libksba-1.5.0 liblz4-1.9.3,1 libnghttp2-1.43.0 libsmi-0.4.8_1 libsunacl-1.0.1 libtasn1-4.16.0_1...
- Page 284 Appendix E - Open Source Code Acknowledgments & Package List Included Packages libunistring-0.9.10_1 libunwind-20201110 libuv-1.41.0 libxml2-2.9.10_3 libxslt-1.1.34_1 libyaml-0.2.5 llvm11-11.0.1 lnav-0.9.0 logrotate-3.13.0_1 lua52-5.2.4 lutok-0.4_7 mbuffer-20200929 mhash-0.9.9.9_5 mkfontscale-1.2.1 monit-5.27.2 mpfr-4.1.0 mtx-1.3.12_1 ncurses-6.2.20210313 net-snmp-5.9_3,1 netperf-2.7.1.p20170921_1 nettle-3.6 nginx-1.20.1_2,2 node14-14.16.0 npth-1.6 openjdk8-8.282.08.1 openldap-sasl-client-2.4.57 p4-2016.1.1492381_3 pcre-8.44 pdksh-5.2.14p2_6 perl5-5.32.1_1 pgbadger-11.5...
- Page 285 Appendix E - Open Source Code Acknowledgments & Package List Included Packages pinentry-1.1.1 pinentry-curses-1.1.1 pkg-1.16.3 png-1.6.37_1 popt-1.18_1 postgresql13-client-13.2 postgresql13-contrib-13.2 postgresql13-server-13.2 python37-3.7.10 readline-8.1.0 redis-6.0.12 rrdtool-1.7.2_4 ruby-2.6.6_2,1 ruby26-gems-3.0.8 rubygem-actioncable5-5.1.7 rubygem-actionmailer5-5.1.7 rubygem-actionpack5-5.1.7 rubygem-actionview5-5.1.7 rubygem-activejob5-5.1.7 rubygem-activemodel-serializers-xml-1.0.2 rubygem-activemodel4-4.2.11.3 rubygem-activemodel5-5.1.7 rubygem-activerecord-import-1.0.8 rubygem-activerecord4-4.2.11.3 rubygem-activerecord5-5.1.7 rubygem-activeresource-5.1.1 rubygem-activesupport4-4.2.11.3 rubygem-activesupport5-5.1.7_1 rubygem-addressable-2.7.0 rubygem-arel6-6.0.4 rubygem-arel8-8.0.0,1...
- Page 286 Appendix E - Open Source Code Acknowledgments & Package List Included Packages rubygem-aws-eventstream-1.1.0 rubygem-aws-partitions-1.429.0 rubygem-aws-sdk-3.0.1 rubygem-aws-sdk-accessanalyzer-1.16.0 rubygem-aws-sdk-acm-1.39.0 rubygem-aws-sdk-acmpca-1.33.0 rubygem-aws-sdk-alexaforbusiness-1.44.0 rubygem-aws-sdk-amplify-1.28.0 rubygem-aws-sdk-amplifybackend-1.2.0 rubygem-aws-sdk-apigateway-1.59.0 rubygem-aws-sdk-apigatewaymanagementapi-1.20.0 rubygem-aws-sdk-apigatewayv2-1.31.0 rubygem-aws-sdk-appconfig-1.13.0 rubygem-aws-sdk-appflow-1.7.0 rubygem-aws-sdk-appintegrationsservice-1.1.0 rubygem-aws-sdk-applicationautoscaling-1.50.0 rubygem-aws-sdk-applicationdiscoveryservice-1.34.0 rubygem-aws-sdk-applicationinsights-1.17.0 rubygem-aws-sdk-appmesh-1.34.0 rubygem-aws-sdk-appregistry-1.4.0 rubygem-aws-sdk-appstream-1.50.0 rubygem-aws-sdk-appsync-1.39.0 rubygem-aws-sdk-athena-1.35.0 rubygem-aws-sdk-auditmanager-1.3.0 rubygem-aws-sdk-augmentedairuntime-1.11.0 rubygem-aws-sdk-autoscaling-1.55.0 rubygem-aws-sdk-autoscalingplans-1.30.0 rubygem-aws-sdk-backup-1.27.0 rubygem-aws-sdk-batch-1.44.0 rubygem-aws-sdk-braket-1.6.0 rubygem-aws-sdk-budgets-1.37.0...
- Page 287 Appendix E - Open Source Code Acknowledgments & Package List Included Packages rubygem-aws-sdk-chime-1.41.0 rubygem-aws-sdk-cloud9-1.30.0 rubygem-aws-sdk-clouddirectory-1.30.0 rubygem-aws-sdk-cloudformation-1.48.0 rubygem-aws-sdk-cloudfront-1.48.0 rubygem-aws-sdk-cloudhsm-1.28.0 rubygem-aws-sdk-cloudhsmv2-1.32.0 rubygem-aws-sdk-cloudsearch-1.28.0 rubygem-aws-sdk-cloudsearchdomain-1.23.0 rubygem-aws-sdk-cloudtrail-1.33.0 rubygem-aws-sdk-cloudwatch-1.49.0 rubygem-aws-sdk-cloudwatchevents-1.41.0 rubygem-aws-sdk-cloudwatchlogs-1.39.0 rubygem-aws-sdk-codeartifact-1.7.0 rubygem-aws-sdk-codebuild-1.69.0 rubygem-aws-sdk-codecommit-1.41.0 rubygem-aws-sdk-codedeploy-1.38.0 rubygem-aws-sdk-codeguruprofiler-1.13.0 rubygem-aws-sdk-codegurureviewer-1.15.0 rubygem-aws-sdk-codepipeline-1.41.0 rubygem-aws-sdk-codestar-1.28.0 Official rubygem-aws-sdk-codestarconnections-1.13.0 rubygem-aws-sdk-codestarnotifications-1.9.0 rubygem-aws-sdk-cognitoidentity-1.30.0 rubygem-aws-sdk-cognitoidentityprovider-1.49.0 rubygem-aws-sdk-cognitosync-1.25.0 rubygem-aws-sdk-comprehend-1.43.0 rubygem-aws-sdk-comprehendmedical-1.24.0 rubygem-aws-sdk-computeoptimizer-1.14.0 rubygem-aws-sdk-configservice-1.58.0...
- Page 288 Appendix E - Open Source Code Acknowledgments & Package List Included Packages rubygem-aws-sdk-connectcontactlens-1.1.0 rubygem-aws-sdk-connectparticipant-1.10.0 rubygem-aws-sdk-core-3.112.0 rubygem-aws-sdk-costandusagereportservice-1.29.0 rubygem-aws-sdk-costexplorer-1.58.0 rubygem-aws-sdk-customerprofiles-1.3.0 rubygem-aws-sdk-databasemigrationservice-1.51.0 rubygem-aws-sdk-dataexchange-1.12.0 rubygem-aws-sdk-datapipeline-1.25.0 rubygem-aws-sdk-datasync-1.29.0 rubygem-aws-sdk-dax-1.28.0 rubygem-aws-sdk-detective-1.14.0 rubygem-aws-sdk-devicefarm-1.40.0 rubygem-aws-sdk-devopsguru-1.4.0 rubygem-aws-sdk-directconnect-1.38.0 rubygem-aws-sdk-directoryservice-1.38.0 rubygem-aws-sdk-dlm-1.39.0 rubygem-aws-sdk-docdb-1.28.0 rubygem-aws-sdk-dynamodb-1.59.0 rubygem-aws-sdk-dynamodbstreams-1.28.0 rubygem-aws-sdk-ebs-1.12.0 rubygem-aws-sdk-ec2-1.225.0 rubygem-aws-sdk-ec2instanceconnect-1.12.0 rubygem-aws-sdk-ecr-1.41.0 rubygem-aws-sdk-ecrpublic-1.2.0 rubygem-aws-sdk-ecs-1.74.0 rubygem-aws-sdk-efs-1.37.0 rubygem-aws-sdk-eks-1.49.0 rubygem-aws-sdk-elasticache-1.53.0 rubygem-aws-sdk-elasticbeanstalk-1.41.0 rubygem-aws-sdk-elasticinference-1.11.0...
- Page 289 Appendix E - Open Source Code Acknowledgments & Package List Included Packages rubygem-aws-sdk-elasticloadbalancing-1.30.0 rubygem-aws-sdk-elasticloadbalancingv2-1.60.0 rubygem-aws-sdk-elasticsearchservice-1.49.0 rubygem-aws-sdk-elastictranscoder-1.28.0 rubygem-aws-sdk-emr-1.42.0 rubygem-aws-sdk-emrcontainers-1.2.0 rubygem-aws-sdk-eventbridge-1.19.0 rubygem-aws-sdk-firehose-1.36.0 Official rubygem-aws-sdk-fms-1.34.0 rubygem-aws-sdk-forecastqueryservice-1.11.0 rubygem-aws-sdk-forecastservice-1.15.0 rubygem-aws-sdk-frauddetector-1.16.0 rubygem-aws-sdk-fsx-1.34.0 rubygem-aws-sdk-gamelift-1.41.0 rubygem-aws-sdk-glacier-1.36.0 rubygem-aws-sdk-globalaccelerator-1.29.0 rubygem-aws-sdk-glue-1.84.0 rubygem-aws-sdk-gluedatabrew-1.5.0 rubygem-aws-sdk-greengrass-1.38.0 rubygem-aws-sdk-greengrassv2-1.2.0 rubygem-aws-sdk-groundstation-1.16.0 rubygem-aws-sdk-guardduty-1.44.0 rubygem-aws-sdk-health-1.33.0 rubygem-aws-sdk-healthlake-1.2.0 rubygem-aws-sdk-honeycode-1.5.0 rubygem-aws-sdk-iam-1.48.0 rubygem-aws-sdk-identitystore-1.4.0 rubygem-aws-sdk-imagebuilder-1.19.0 rubygem-aws-sdk-importexport-1.25.0 rubygem-aws-sdk-inspector-1.33.0...
- Page 290 Appendix E - Open Source Code Acknowledgments & Package List Included Packages rubygem-aws-sdk-iot1clickdevicesservice-1.27.0 rubygem-aws-sdk-iot1clickprojects-1.27.0 rubygem-aws-sdk-iotanalytics-1.37.0 rubygem-aws-sdk-iotdataplane-1.27.0 rubygem-aws-sdk-iotdeviceadvisor-1.1.0 rubygem-aws-sdk-iotevents-1.22.0 rubygem-aws-sdk-ioteventsdata-1.14.0 rubygem-aws-sdk-iotfleethub-1.1.0 rubygem-aws-sdk-iotjobsdataplane-1.26.0 rubygem-aws-sdk-iotsecuretunneling-1.10.0 rubygem-aws-sdk-iotsitewise-1.19.0 rubygem-aws-sdk-iotthingsgraph-1.13.0 rubygem-aws-sdk-iotwireless-1.2.0 rubygem-aws-sdk-ivs-1.7.0 rubygem-aws-sdk-kafka-1.34.0 rubygem-aws-sdk-kendra-1.21.0 rubygem-aws-sdk-kinesis-1.31.0 rubygem-aws-sdk-kinesisanalytics-1.30.0 rubygem-aws-sdk-kinesisanalyticsv2-1.25.0 rubygem-aws-sdk-kinesisvideo-1.31.0 rubygem-aws-sdk-kinesisvideoarchivedmedia-1.31.0 rubygem-aws-sdk-kinesisvideomedia-1.27.0 rubygem-aws-sdk-kinesisvideosignalingchannels-1.9.0 rubygem-aws-sdk-kms-1.42.0 rubygem-aws-sdk-lakeformation-1.12.0 rubygem-aws-sdk-lambda-1.59.0 rubygem-aws-sdk-lambdapreview-1.25.0 rubygem-aws-sdk-lex-1.34.0 rubygem-aws-sdk-lexmodelbuildingservice-1.43.0 rubygem-aws-sdk-lexmodelsv2-1.1.0 rubygem-aws-sdk-lexruntimev2-1.1.0...
- Page 291 Appendix E - Open Source Code Acknowledgments & Package List Included Packages rubygem-aws-sdk-licensemanager-1.24.0 rubygem-aws-sdk-lightsail-1.45.0 rubygem-aws-sdk-locationservice-1.1.0 rubygem-aws-sdk-lookoutforvision-1.2.0 rubygem-aws-sdk-machinelearning-1.26.0 rubygem-aws-sdk-macie-1.27.0 rubygem-aws-sdk-macie2-1.23.0 rubygem-aws-sdk-managedblockchain-1.20.0 rubygem-aws-sdk-marketplacecatalog-1.10.0 rubygem-aws-sdk-marketplacecommerceanalytics-1.31.0 rubygem-aws-sdk-marketplaceentitlementservice-1.25.0 rubygem-aws-sdk-marketplacemetering-1.33.0 rubygem-aws-sdk-mediaconnect-1.29.0 rubygem-aws-sdk-mediaconvert-1.63.0 rubygem-aws-sdk-medialive-1.64.0 rubygem-aws-sdk-mediapackage-1.37.0 rubygem-aws-sdk-mediapackagevod-1.21.0 rubygem-aws-sdk-mediastore-1.31.0 rubygem-aws-sdk-mediastoredata-1.28.0 rubygem-aws-sdk-mediatailor-1.35.0 rubygem-aws-sdk-migrationhub-1.30.0 rubygem-aws-sdk-migrationhubconfig-1.10.0 rubygem-aws-sdk-mobile-1.25.0 rubygem-aws-sdk-mq-1.35.0 rubygem-aws-sdk-mturk-1.28.0 rubygem-aws-sdk-mwaa-1.1.0 rubygem-aws-sdk-neptune-1.33.0 rubygem-aws-sdk-networkfirewall-1.1.0 rubygem-aws-sdk-networkmanager-1.10.0 rubygem-aws-sdk-opsworks-1.31.0 rubygem-aws-sdk-opsworkscm-1.41.0...
- Page 292 Appendix E - Open Source Code Acknowledgments & Package List Included Packages rubygem-aws-sdk-organizations-1.57.0 rubygem-aws-sdk-outposts-1.14.0 Official rubygem-aws-sdk-personalize-1.21.0 Official rubygem-aws-sdk-personalizeevents-1.16.0 rubygem-aws-sdk-personalizeruntime-1.21.0 rubygem-aws-sdk-pi-1.26.0 rubygem-aws-sdk-pinpoint-1.51.0 Official rubygem-aws-sdk-pinpointemail-1.25.0 rubygem-aws-sdk-pinpointsmsvoice-1.22.0 rubygem-aws-sdk-polly-1.39.0 rubygem-aws-sdk-pricing-1.25.0 rubygem-aws-sdk-prometheusservice-1.2.0 rubygem-aws-sdk-qldb-1.12.0 rubygem-aws-sdk-qldbsession-1.12.0 rubygem-aws-sdk-quicksight-1.43.0 rubygem-aws-sdk-ram-1.23.0 rubygem-aws-sdk-rds-1.115.0 rubygem-aws-sdk-rdsdataservice-1.24.0 rubygem-aws-sdk-redshift-1.54.0 rubygem-aws-sdk-redshiftdataapiservice-1.5.0 rubygem-aws-sdk-rekognition-1.48.0 rubygem-aws-sdk-resourcegroups-1.34.0 rubygem-aws-sdk-resourcegroupstaggingapi-1.36.0 rubygem-aws-sdk-resources-3.94.0 rubygem-aws-sdk-robomaker-1.33.0 rubygem-aws-sdk-route53-1.46.0 rubygem-aws-sdk-route53domains-1.29.0 rubygem-aws-sdk-route53resolver-1.23.0...
- Page 293 Appendix E - Open Source Code Acknowledgments & Package List Included Packages rubygem-aws-sdk-sagemaker-1.79.0 rubygem-aws-sdk-sagemakeredgemanager-1.1.0 rubygem-aws-sdk-sagemakerfeaturestoreruntime-1.1.0 rubygem-aws-sdk-sagemakerruntime-1.30.0 rubygem-aws-sdk-savingsplans-1.13.0 rubygem-aws-sdk-schemas-1.11.0 rubygem-aws-sdk-secretsmanager-1.44.0 rubygem-aws-sdk-securityhub-1.40.0 rubygem-aws-sdk-serverlessapplicationrepository-1.33.0 rubygem-aws-sdk-servicecatalog-1.58.0 rubygem-aws-sdk-servicediscovery-1.32.0 rubygem-aws-sdk-servicequotas-1.13.0 rubygem-aws-sdk-ses-1.37.0 rubygem-aws-sdk-sesv2-1.16.0 rubygem-aws-sdk-shield-1.34.0 rubygem-aws-sdk-signer-1.28.0 rubygem-aws-sdk-simpledb-1.25.0 rubygem-aws-sdk-sms-1.28.0 rubygem-aws-sdk-snowball-1.36.0 rubygem-aws-sdk-sns-1.38.0 rubygem-aws-sdk-sqs-1.36.0 rubygem-aws-sdk-ssm-1.104.0 rubygem-aws-sdk-ssoadmin-1.6.0 rubygem-aws-sdk-ssooidc-1.9.0 rubygem-aws-sdk-states-1.38.0 rubygem-aws-sdk-storagegateway-1.53.0 rubygem-aws-sdk-support-1.29.0 rubygem-aws-sdk-swf-1.26.0 rubygem-aws-sdk-synthetics-1.11.0 rubygem-aws-sdk-textract-1.23.0 rubygem-aws-sdk-timestreamquery-1.3.0...
- Page 294 Appendix E - Open Source Code Acknowledgments & Package List Included Packages rubygem-aws-sdk-timestreamwrite-1.3.0 rubygem-aws-sdk-transcribeservice-1.51.0 rubygem-aws-sdk-transcribestreamingservice-1.26.0 rubygem-aws-sdk-transfer-1.31.0 rubygem-aws-sdk-translate-1.30.0 rubygem-aws-sdk-waf-1.37.0 rubygem-aws-sdk-wafregional-1.38.0 rubygem-aws-sdk-wafv2-1.16.0 rubygem-aws-sdk-wellarchitected-1.2.0 rubygem-aws-sdk-workdocs-1.29.0 rubygem-aws-sdk-worklink-1.22.0 rubygem-aws-sdk-workmail-1.35.0 rubygem-aws-sdk-workmailmessageflow-1.11.0 rubygem-aws-sdk-workspaces-1.50.0 rubygem-aws-sdk-xray-1.36.0 rubygem-aws-sigv2-1.0.1 rubygem-aws-sigv4-1.2.2 rubygem-bindata-2.4.8 rubygem-bindex-0.8.1 rubygem-bluestorm_cli-3.0.0.2267317 rubygem-builder-3.2.4 rubygem-bundler-2.2.11,1 rubygem-byebug-11.1.3 rubygem-capybara-3.35.3 rubygem-childprocess3-3.0.0 rubygem-coffee-rails-rails5-4.2.2 rubygem-coffee-script-2.4.1 rubygem-coffee-script-source-1.12.2 rubygem-colorize-0.8.1 rubygem-concurrent-ruby-1.1.8y rubygem-cookiejar-0.3.3...
- Page 295 Appendix E - Open Source Code Acknowledgments & Package List Included Packages rubygem-crass-1.0.4 rubygem-cucumber-5.3.0_1 rubygem-cucumber-core-8.0.1_2 rubygem-cucumber-create-meta2-2.0.4 rubygem-cucumber-cucumber-expressions10-10.3.0 rubygem-cucumber-gherkin15-15.0.2_1 rubygem-cucumber-html-formatter9-9.0.0 rubygem-cucumber-messages13-13.2.1 rubygem-cucumber-tag-expressions-2.0.4 rubygem-cucumber-wire-4.0.1_2 rubygem-daemons-1.3.1 rubygem-devdctl-0.1.0.2776037 rubygem-devstat_stat-0.0.1.1280468 rubygem-diff-lcs-1.4.4 rubygem-digest-crc-0.4.1 rubygem-docile-1.3.5 rubygem-ds3-0.0.1.1358398 rubygem-ds3apitest-0.1.0.1759726_6 rubygem-ejs-1.1.1 rubygem-em-http-request-1.1.5 rubygem-em-socksify-0.3.2 rubygem-erubi-1.10.0 rubygem-etc-1.2.0 rubygem-eventmachine-1.2.7 rubygem-execjs-2.7.0 rubygem-faraday-1.3.0 rubygem-faraday-net_http-1.0.1 rubygem-faraday_middleware-1.0.0 rubygem-faye-1.2.4 rubygem-faye-websocket-0.10.7 rubygem-ffi-1.14.2...
- Page 296 Appendix E - Open Source Code Acknowledgments & Package List Included Packages rubygem-ffi-locale-1.0.1_2 rubygem-ffi-ncurses-0.4.0_3 rubygem-fio_rb-1.1.0.1686791 rubygem-freebsd_cam-1.0.7.2423180 rubygem-freebsd_mps-1.1.1.1325934 rubygem-freebsd_ses-1.3.2.1325934 rubygem-globalid-rails5-0.4.2 rubygem-http_parser.rb-0.6.0 rubygem-i18n-1.8.9,2 rubygem-i18n-js-3.0.11 rubygem-inifile-3.0.0 rubygem-io-console-0.5.9 rubygem-ipaddress-0.8.3_4 rubygem-irb-1.3.4 rubygem-jbuilder-rails5-2.11.2 rubygem-jmespath-1.4.0 rubygem-jquery-rails-rails5-4.4.0 rubygem-json-2.3.1 rubygem-json_pure-2.3.1 rubygem-jwt-2.2.2 rubygem-key_verify-1.0.1.1750298 rubygem-libifconfig-0.1.0.2867631_1 rubygem-libxml-ruby-3.1.0 rubygem-live_record-0.2.1.1686790 rubygem-liveresource-2.1.2.1638704 rubygem-loofah-2.9.0 rubygem-lsiexp-1.2.4.2856460 rubygem-mail-2.7.1,2 rubygem-method_source-1.0.0 rubygem-middleware-0.1.0 rubygem-mini_mime-1.0.2...
- Page 297 Appendix E - Open Source Code Acknowledgments & Package List Included Packages rubygem-minitest-5.14.1 rubygem-mocha-1.11.2 rubygem-multi_json-1.15.0 rubygem-multi_test-0.1.2_1 rubygem-multipart-post-2.1.1 rubygem-net-ping-2.0.8 rubygem-net-scp-1.2.1 rubygem-net-ssh-6.0.2,2 rubygem-nio4r-2.5.5 rubygem-nokogiri-1.11.1 rubygem-open4-1.3.4 rubygem-os-1.1.1 rubygem-pam-1.5.2.2267479 rubygem-passenger-nginx-6.0.8 rubygem-pg-1.2.3 rubygem-pkg-config-1.4.5 rubygem-pmbus-1.1.2.1718448 rubygem-power_assert-1.2.0 rubygem-pqueue-2.1.0 rubygem-pretty-xml-0.2.2 rubygem-protobuf-cucumber-3.10.8 rubygem-public_suffix-4.0.6_6 rubygem-puma-5.1.1 rubygem-racc-1.5.2 rubygem-rack-2.2.3,3 rubygem-rack-test-1.1.0 rubygem-rack16-1.6.13 rubygem-rails-dom-testing-rails5-2.0.3_1 rubygem-rails-html-sanitizer-1.3.0 rubygem-rails5-5.1.7_2 rubygem-railties5-5.1.7...
- Page 298 Appendix E - Open Source Code Acknowledgments & Package List Included Packages rubygem-rake-13.0.3 rubygem-rb-fsevent-0.10.3 rubygem-rb-inotify-0.10.1 rubygem-rb-kqueue-0.2.5_1 rubygem-rbcurse-1.5.3 rubygem-rbcurse-core-0.0.14_1 rubygem-rbcurse-extras-0.0.0 rubygem-rdoc-6.3.0 rubygem-redis-4.2.5 rubygem-redis-actionpack-rails5-5.2.0 rubygem-redis-activesupport-rails5-5.2.0 rubygem-redis-rack-2.1.3 rubygem-redis-rails-rails5-5.0.2 rubygem-redis-store-1.9.0 rubygem-regexp_parser-1.8.2 rubygem-reline-0.2.4 rubygem-rice-2.2.0 rubygem-rrd-ffi-0.2.14_3 rubygem-rspec-expectations-3.10.1 rubygem-rspec-support-3.10.2 rubygem-ruby-termios-1.0.2 rubygem-ruby2_keywords-0.0.4 rubygem-rubyzip-2.3.0 rubygem-sass-3.7.4 rubygem-sass-listen-4.0.0 rubygem-sass-rails-rails5-6.0.0 rubygem-sassc-2.4.0 rubygem-sassc-rails-rails5-2.1.2_1 rubygem-selenium-webdriver-3.142.7_1 rubygem-serialport-1.3.1_2 rubygem-simplecov-0.19.0...
- Page 299 Appendix E - Open Source Code Acknowledgments & Package List Included Packages rubygem-simplecov-html-0.12.2 rubygem-smart_data-0.0.2.2714935 rubygem-snmp-1.2.0 rubygem-spectra_acl-1.2.1.1759726_1 rubygem-spectra_cli-1.0.2.2867631 rubygem-spectra_platform-1.3.1.2866038 rubygem-spectra_support-5.0.0.2275716 rubygem-spectra_view-2.3.0.2869767_9 rubygem-spectra_workers-5.0.0.2867631 rubygem-spring-2.1.1 rubygem-sprockets-rails-rails5-3.2.2 rubygem-sprockets3-3.7.2 rubygem-sqlite3-1.4.2 rubygem-staf4ruby-0.1.3.1325934,1 rubygem-sys-uname-1.2.2 rubygem-tape_backend-0.1.1759726 rubygem-test-unit-3.3.6 rubygem-thin-1.7.2 rubygem-thor-1.1.0 rubygem-thread_safe-0.3.6 rubygem-tilt-2.0.9 rubygem-turbolinks-5.2.1 rubygem-turbolinks-source-5.2.0 rubygem-tzinfo1-1.2.9 rubygem-uglifier-4.1.20 rubygem-uuidtools-2.1.5 rubygem-web-console3-rails5-3.7.0 rubygem-websocket-driver-0.7.3 rubygem-websocket-extensions-0.1.5 rubygem-xpath-3.2.0 rubygem-yard-0.9.26...
- Page 300 Appendix E - Open Source Code Acknowledgments & Package List Included Packages rubygem-zfs-0.0.12.2864176 samba413-4.13.7_1 sedutil-1.12.2267418 sg3_utils-1.45_1 smartmontools-7.2_1 smp_utils-0.98_1s source-highlight-3.1.9_1 spectra_ltfs-2.5.0.0.2867631 sqlite3-3.34.1,1 staf-3.4.26_1 stress-1.0.4_1 stress-ng-0.12.05 t5seeprom-0.0.1366684_1 talloc-2.3.1 tdb-1.4.3,1 tevent-0.10.2_1 tidy-html5-5.7.28 tmux-3.1c tomcat-native-1.2.24_1 tomcat85-8.5.64 verde_hotpair-2.1.2867631 vim-8.2.2569 zip-3.0_1 zsh-5.8 January 2022 User Guide-BlackPearl NAS Solution - 300 -...
- Page 301 SMTP 140 current version 198 snapshots 114 exit 182 user 159 log in 69 Conflict Mineral Policy 268 menus 50 contact information, enter 184 overview 49 contacting Spectra Logic 7 status icons 53 supported browsers 50, 54 - 301 -...
- Page 302 Technical Support 213 corporate headquarters, Spectra Logic 7 icons component OK 53 error condition 53 information 53 dashboard 50 unknown state 53 data drive warning 53 install new 63 information icon 53 remove 62 data integrity verification disk pools 192...
- Page 303 122 restore snapshot 121 scheduled snapshots 116 snapshot restore 121 performance metrics 178 snapshots 114 phone numbers, Spectra Logic offices 7 network pools, see NAS storage pools, nearline cables 260 disk pools, or online disk pools 81 configure 132...
- Page 304 7 power cords 256 serial number size and weight 247 where to find 214 system 244 services Spectra Logic CIFS 96 contacting 7 configuring 96, 143, 150 status lights 167 NAS replication 99 storage pools, see NAS storage pools,...
- Page 305 53 updates download 200 USB, support 261 user configure 159 edit 159 types 159 Visual Status Beacon, lights 166 volumes options 233 volumes, see NAS volumes 81 warning icon 53 website Spectra Logic 7 WEEE Directive 268 - 305 -...
Need help?
Do you have a question about the Logic BlackPearl NAS Solution and is the answer not in the manual?
Questions and answers