Advertisement
Quick Links
Advertisement

Related Manuals for Kogan KAWLMFM55MA


Summary of Contents for Kogan KAWLMFM55MA
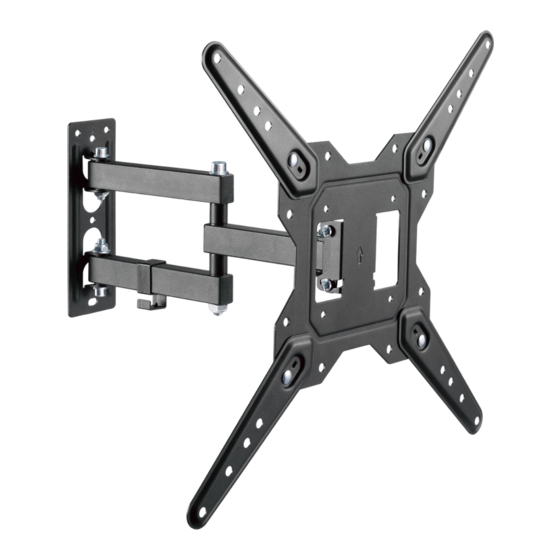
- Page 1 KOGAN TILT EXTENDABLE FULL MOTION WALL MOUNT (SUITABLE FOR 23” – 55” TVS) KAWLMFM55MA...
-
Page 3: Safety And Warnings
SAFETY & WARNINGS Read the entire instruction manual before you start installation and assembly. If you have any questions regarding any of the instructions or warnings, contact your local distributor for assistance. CAUTION: Use with products heavier than the rated weights indicated may result in instability causing possible injury. - Page 4 COMPONENTS A Bracket / wall plate B VESA mount extension arms (x1) (x4) C Extension arm bolt D Extension arm nut E Spanner (x4) (x4) (x1) M-A Screw M-B Screw M-C Spacer (x4) M6 x 14 (x4) M8 x 20 (x4) W-B Wall anchors W-A Screw W-C Washer...
- Page 5 INSTALLING MOUNT TO WALL Step 1 Extend the bracket / wall mount (A) out to full length. Step 2 Using a Phillips head screwdriver (not supplied), unscrew and remove the 3mm screws attaching the arm of the mount to the bracket. Keep these screws nearby for later use.
- Page 6 Step 3 Using a pencil, spirit level, mark the desired position for the mount on your wall, using the wall mount to serve as a stencil for the hole positions. If mounting on dry wall or plaster- board, use a stud finder first to check positions of wall studs and ensure the position is free from electrical wiring.
- Page 7 Step 4 Drywall / plaster: Position the wall mount in line with the pilot holes and secure to the wall using washers (W-C) and ST6.3 screws (W-A). Do not use the wall anchors. Masonry / concrete: Insert wall anchors (W-B) into the drilled holes. Position the wall mount in line with the holes and secure to the wall using washers (W-C) and ST6.3 screws (W-A).
- Page 8 INSTALLING BRACKET TO TV VESA: 100x100; 100x200; 200x100; 200x200 Align the bracket with your TV’s VESA holes and secure using supplied screws (M-A or M-B, depending on required length). Check if spacers (M-C) are required to ensure correct length of screw, as per the below image.
- Page 9 VESA: 300x200; 300x300; 400x200; 400x300; 400x400 For larger VESA configurations, attach the extension arms (B) to the bracket using the bolt and nut set (C, D), tightening with the included spanner (E). Align the bracket with your TV’s VESA holes and secure using supplied screws (M-A or M-B, depending on required length).
- Page 10 With the extension arms successfully fitted, align the bracket with your TV’s VESA holes and secure using supplied screws (M-A or M-B, depending on required length). Check if spacers (M-C) are required to ensure correct length of screw, as per the below image.
- Page 11 SECURING TV TO MOUNT With the top two screws (from Step 2) loosely in place, hook the TV with bracket installed onto the wall mount arm. Two people should carry the TV to prevent damage. Once in place, attach the lower two screws, then tighten all four. Do not overtighten.
- Page 12 To set the TV to a vertical angle, loosen the lower two screws and move the bracket into desired position before retightening. Do not overtighten. Horizontal angles can be freely positioned without adjusting screws.
- Page 13 Add the TV’s cables to the cable management clip.
- Page 14 NOTES...
- Page 16 Need more information? We hope that this user guide has given you the assistance needed for a simple set-up. For the most up-to-date guide for your product, as well as any additional assistance you may require, head online to help.kogan.com...
Need help?
Do you have a question about the KAWLMFM55MA and is the answer not in the manual?
Questions and answers