Sena SRL-Mesh - Custom Communication System for SHOEI Helmets Quick Start Guide
- Quick start manual (26 pages) ,
- User manual (64 pages)
Advertisement
- 1 Product Details
- 2 Installation
- 3 Icon Legend
- 4 Basic Operations
- 5 Checking the Battery Level
- 6 Phone Pairing
- 7 Using the Phone
- 8 Siri and Google Assistant
- 9 Music Control
- 10 Mesh Intercom
- 11 Open Mesh
- 12 Group Mesh
- 13 Enable/Disable Mic (Default: Enable)
- 14 Reset Mesh
- 15 Bluetooth Intercom
- 16 Last-Come, First-Served
- 17 Two-way Intercom
- 18 FM Radio
- 19 Configuration Menu
- 20 Troubleshooting
- 21 Quick Reference
- 22 Downloadable Sena Software
- 23 Videos
- 24 Documents / Resources
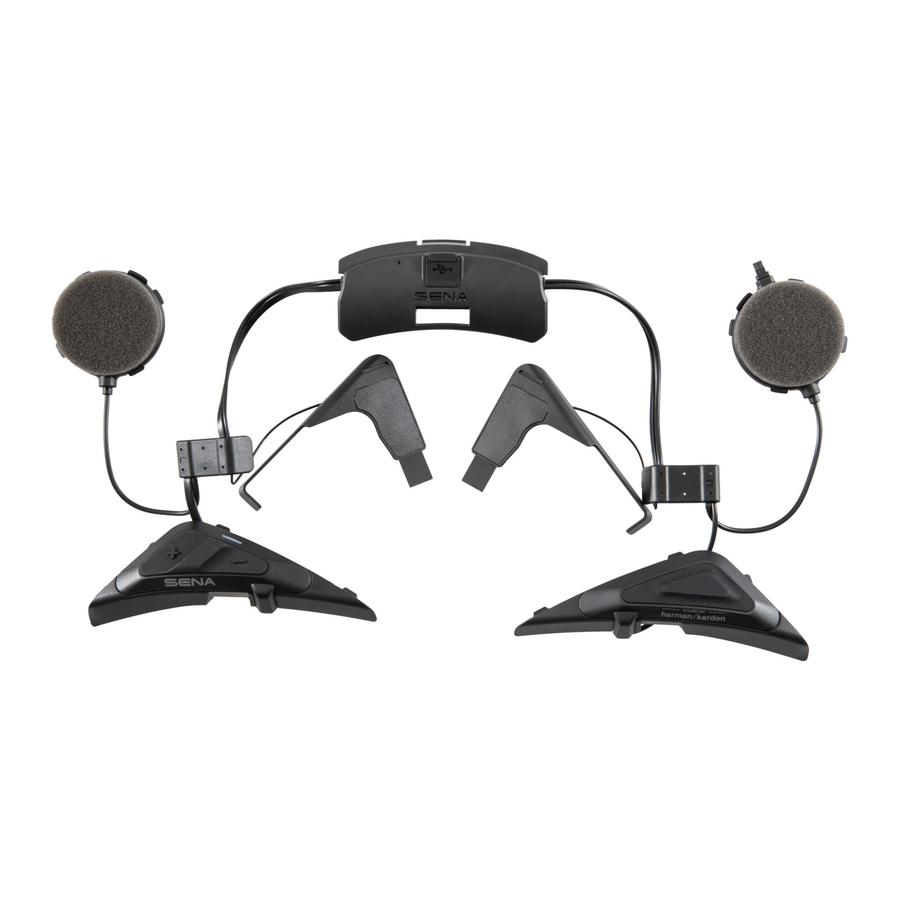
Product Details

- Bluetooth Module

- Charging LED
- Pinhole Fault Reset Button
- DC Power Charging & Firmware Upgrade Port
- Antenna
- Speaker
- Button Module (L)
")
- (+) Button
- Status LED
- (-) Button
- Center Button
- Antenna
- Button Module (R)
")
- Microphone Connector
- Speaker

")
")
Installation
The following SHOEI helmets are compatible with the SRL-Mesh.
- GT-Air II, J-Cruise II, Neotec II*
* Neotec II's manufactured on and after March 8, 2019. - For more information about installation, refer to the User's Guide.
Flip Up Helmet Installation


Full Face Helmet Installation


Icon Legend

Tap button the specified number of times

Press and Hold button for the specified amount of time

Audible prompt
Basic Operations
Powering On

Powering Off

Volume Up

Volume Down

Checking the Battery Level
| Powering On |  |  | = |  |
 | = |  | ||
 | = |  |
Phone Pairing

![]()


![]()

- Select SRL-Mesh in the list of Bluetooth devices detected.


- For more information on phone pairing, refer to the User's Guide.
Using the Phone
Answer a Call

End a Call

Reject a Call

Siri and Google Assistant
Activate the Siri or Google Assistant Installed on Your Phone

or

Music Control
Play/Pause

Track Forward

Track Backward

Mesh Intercom™
Open Mesh™: communication within the same channel.
Group Mesh™: communication within the same private group.
- For more information on Mesh Intercom, refer to the User's Guide.
Mesh Intercom On

![]()

Mesh Intercom Off

![]()

Note: When Mesh Intercom is on, the SRL-Mesh will automatically connect to nearby SRL-Mesh users and the headset will be in Open Mesh (default: channel 1) initially.
Open Mesh
Channel Setting (Default: channel 1) in Open Mesh
- Enter into the Channel Setting.

![]()

- Navigate between channels.
(1 → 2 → ••• → 8 → 9 → Exit → 1 → •••)

or

![]()

- Save the channel.

![]()


Note: You can use the SENA MOTORCYCLES App to change the channel.
Group Mesh
Group Mesh is a closed group intercom function that allows users to join, leave, or rejoin a group intercom conversation without pairing each headset.
Creating a Group Mesh
Creating a Group Mesh requires two or more Open Mesh users.
Open Mesh


Group Mesh

- Users (You, B, and C) enter into Mesh Grouping to create a Group Mesh.

![]()

- When Mesh Grouping is completed, the users (You, B and C) will hear a voice prompt on their headsets as Open Mesh switches to Group Mesh.


Joining an Existing Group Mesh
One of the current usersin an Existing Group Mesh can allow new users (one or more) in Open Mesh to join the Existing Group Mesh.

Existing Group Mesh

- One (You) of the current users in the Existing Group Mesh and new users (D and F) in Open Mesh enter into Mesh Grouping to join the Existing Group Mesh.

![]()

- When Mesh Grouping is completed, the new users (D and F) will hear a voice prompt on their headsets as Open Mesh switches to Group Mesh.


Enable/Disable Mic (Default: Enable)
Users can enable/disable the microphone when communicating in a Mesh Intercom.

![]()

Reset Mesh
If the headset in an Open Mesh or Group Mesh resets the Mesh, it will automatically return to Open Mesh (default: channel 1).

![]()

Bluetooth Intercom
Up to three other people can be paired with the headset for Bluetooth intercom conversations.

Intercom Pairing
There are two ways to pair the headset.
Using the Smart Intercom Pairing (SIP)
SIP allows you to quickly pair with your friends for intercom communication by scanning the QR code on the SENA MOTORCYCLES App without remembering the button operation.
- Pair the mobile phone with the headset.
- Open the SENA MOTORCYCLES App and tap
![]() (Smart Intercom Pairing Menu).
(Smart Intercom Pairing Menu). - Scan the QR code displayed on your friend (B)'s mobile phone.
- Your friend (B) can display the QR code on the mobile phone by tapping
![]() > QR code (
> QR code ( ![]() ) on the SENA MOTORCYCLES App.
) on the SENA MOTORCYCLES App.

- Your friend (B) can display the QR code on the mobile phone by tapping
- Tap Save and check that your friend (B) is paired with you (A) correctly.
- Tap Scan (
![]() ) and repeat steps 3-4 to pair with Intercom Friends (C) and (D).
) and repeat steps 3-4 to pair with Intercom Friends (C) and (D).

Note: The Smart Intercom Pairing (SIP) is not compatible with Sena products that use Bluetooth 3.0 or below.
Using the Button

- Users (You, B) enter into Intercom Pairing.

![]()

- The two headsets (A and B) will be automatically paired.
![]()

- Repeat the steps above to pair with other headsets (C and D).


Last-Come, First-Served
If the headset has multiple paired headsets for intercom conversations, the last paired headset is set as the First Intercom Friend.
Intercom Pairing Order

![]()
Last-Come, First-Served

Two-way Intercom
Start/End Conversation with the First Intercom Friend D

Start/End Conversation with the Second Intercom Friend C

Start/End Conversation with the Third Intercom Friend B

FM Radio
FM Radio On/Off

Start/Stop Scanning

Seek Forward

Seek Backward

Navigating Preset Stations

Note: You can also save the current station from the SENA MOTORCYCLES App.
Configuration Menu
Accessing the Configuration Menu

![]()

Navigating Between Menu Options

or

Execute Menu Options

Troubleshooting
Fault Reset

Note:
- Fault Reset will not restore the headset to factory default settings.
- The charging LED is not the Pinhole Fault Reset Button. Do not press it.


Factory Reset


Quick Reference
| TYPE | OPERATION | BUTTON COMMANDS | ||
 Basic Operations | Power on / Power off |   | ||
| Volume up / Volume down |  | |||
 Mobile Phone | Answer phone call |  | ||
| End phone call |  | |||
| Reject phone call | | |||
 Siri and Google Assistant | Activate the Siri or Google Assistant |  | ||
 Mesh Intercom™ | Mesh Intercom on/off |  | ||
| Channel setting |  | |||
| Mesh Grouping |  | |||
| Reset Mesh |  | |||
| Enable/Disable Mic |  | |||
 Intercom | Intercom pairing |  | ||
| Start/End intercom | | |||
 Music | Play/Pause music |  | ||
| Track forward |  | |||
| Track backward |  | |||
 FM Radio | FM radio on/off | | ||
| Select preset | | |||
| Seek forward/backward |  | |||
| Scan up FM band/ stop scanning | | |||
Downloadable Sena Software
Download the SENA MOTORCYCLES App at Google Play Store or App Store.
 SENA MOTORCYCLES
- Device configuration setting
Download the following items at sena.com.
 Firmware
 Sena Device Manager
- Firmware upgrade
- Device configuration setting
 Quick Start Guide, User's Guide
Follow us on Facebook, YouTube, Twitter and Instagram to check the latest information and helpful tips.
![]()
![]()
![]()
![]()
SENA Technologies, Inc.
Customer Support: sena.com
1.0.0_EN_April2022

VideosSena SRL Mesh - Install Video
Documents / Resources
References

Download manual
Here you can download full pdf version of manual, it may contain additional safety instructions, warranty information, FCC rules, etc.
Download Sena SRL-Mesh - Custom Communication System for SHOEI Helmets Quick Start Guide
Advertisement


Need help?
Do you have a question about the SRL-Mesh and is the answer not in the manual?
Questions and answers