VeriFone T650p Quick Start Manual
Hide thumbs
Also See for T650p:
- User manual (100 pages) ,
- Installation manual (40 pages) ,
- Quick reference manual (13 pages)
Advertisement
Advertisement
Table of Contents

Related Manuals for VeriFone T650p


Summary of Contents for VeriFone T650p
- Page 1 T650p Quick Start Guide...
-
Page 3: Getting Started
Getting started Set up base Your new Verifone T650p terminal comes with either a charging only base for mobile / Wi-Fi terminals OR a full feature base with Ethernet connectivity. T650p Charging Only Base (for Wi-Fi and mobile terminals) T650p Full Feature Base... -
Page 4: Connect To The Internet
Via your internet router Plug one end of the Ethernet cable provided into the port labelled with the icon on your T650p Full Feature base. Plug the other end of the Ethernet cable into a free LAN port on your router. -
Page 5: Process A Transaction
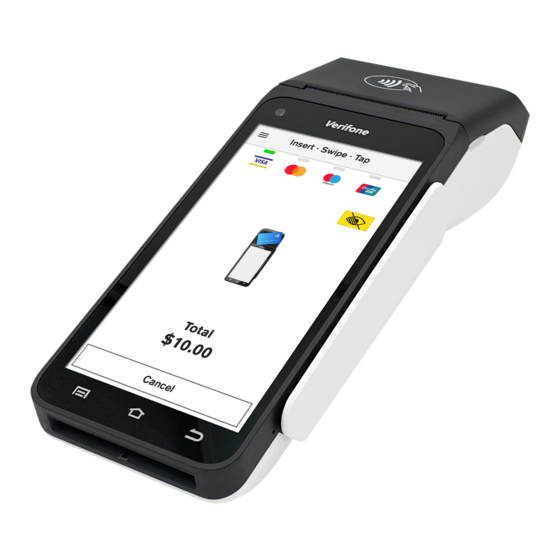
Process a transaction 11.30 AM Enter the purchase Your customer taps, inserts, or amount and tap Purchase. swipes their card or mobile wallet TIP: You can tap on the icon to add and enters their PIN if prompted a reference to the transaction Terminal will display Customer selects how they would like Approved or Declined... - Page 6 Navigation keys Headphone jack Power / Accessibility Paper roll cover mode button Card insert Volume buttons Wake the T650p To save power, your T650p goes into sleep mode when you are not using it. To wake the T650p Press Power button...
- Page 7 Icons on the T650p The Notification bar at the top of the screen displays status icons on the right side and notification alerts on the left. Swipe down from the Notification bar to see notification cards and the Quick Settings panel.
-
Page 8: Changing The Paper Roll
Order more paper rolls online at eftpos.co.nz/t650p-paper Close the printer door, pressing down gently until it clicks shut... - Page 9 Charging the T650p Using a Base • Make sure the power supply is connected to the T650p base and plugged in (see page 1) • Place the T650p on the base • Look for this icon to make sure your T650p is charging Using the USB Adapter •...
-
Page 10: Need Help
NEED HELP? Get step-by-step instructions for using your new terminal at support.eftpos.co.nz/android-user-guide... - Page 11 NOTES:...
- Page 12 If you have any questions we are here to help. Call us on 0800 EFTPOS, or visit support.eftpos.co.nz 0800 E FTPOS 0800 338 767 www.eftpos.co.nz EFTPOS New Zealand Limited is a Verifone Company...
Need help?
Do you have a question about the T650p and is the answer not in the manual?
Questions and answers