Table of Contents
Advertisement
Quick Links
- 1 Getting Started
- 2 Setting up the Printer on a Windows Operating System
- 3 Setting up the Printer on a Macintosh Operating System or Without a Computer
- 4 Setting up the Printer for Wireless Printing
- 5 Wireless Networking
- 6 Understanding the Parts of the Printer
- 7 Changing Print Cartridges
- Download this manual
See also:
User Manual
3500-4500 Series All-In-One
Getting Started
March 2007
www.lexmark.com
Lexmark and Lexmark with diamond design are trademarks of Lexmark International, Inc., registered in the United States and/or other countries.
All other trademarks are the property of their respective owners.
© 2007 Lexmark International, Inc.
All rights reserved.
740 West New Circle Road
Lexington, Kentucky 40550
Advertisement
Table of Contents
Troubleshooting

Related Manuals for Lexmark X3550


Summary of Contents for Lexmark X3550
-
Page 1: Getting Started
Getting Started March 2007 www.lexmark.com Lexmark and Lexmark with diamond design are trademarks of Lexmark International, Inc., registered in the United States and/or other countries. All other trademarks are the property of their respective owners. © 2007 Lexmark International, Inc. -
Page 2: Safety Information
Refer service or repairs, other than those described in the user documentation, to a professional service person. This product is designed, tested, and approved to meet strict global safety standards with the use of specific Lexmark components. The safety features of some parts may not always be obvious. -
Page 3: Table Of Contents
Using the Settings menu ... 33 Saving settings ... 35 Learning about the software...37 Using the printer software...37 Using the Lexmark Imaging Studio...37 Using the Solution Center...38 Using Printing Preferences...40 Opening Printing Preferences ... 40 Using the Save Settings menu ... 40 Using the I Want To menu... - Page 4 Removing a used print cartridge... 43 Installing print cartridges... 43 Ordering print cartridges...45 Ordering paper and other supplies...45 Troubleshooting...47 Setup troubleshooting...47 Incorrect language appears on the display... 47 Power button is not lit ... 47 Software does not install ... 48 Page does not print ...
-
Page 5: Finding Information About The Printer
Solutions booklet, see the User's Guide instead. Where to find You can find this document in the printer box or on the Lexmark Web site at www.lexmark.com. Where to find You can find this document in the printer box or on the... - Page 6 An icon of the User's Guide appears on your desktop, and the User's Guide appears on the screen. You can also find this document on the Lexmark Web site at www.lexmark.com. Where to find While in any Lexmark software program, click Help,...
-
Page 7: Customer Support
Where to find (rest of world) Telephone numbers and support hours vary by country or region. Visit our Web site at www.lexmark.com. Select a country or region, and then select the Customer Support link. Note: For additional information about contacting Lexmark, see the printed warranty that shipped with your printer. - Page 8 Record the following information (located on the store receipt and the back of the printer), and have it ready when you contact us so that we may serve you faster: • Machine Type number • Serial number • Date purchased •...
-
Page 9: Setting Up The Printer
Setting up the printer If you are going to use your printer for wireless printing, these are the things you need to know: Make sure your wireless network is set up and working properly, and that your computer is connected to your wireless network. -
Page 10: Installing Another Language Control Panel
Follow the instructions on the computer screen to set up the printer. Your security software may notify you that Lexmark software is trying to communicate with your computer system. Always allow these programs to communicate. This is necessary for the printer to work properly. -
Page 11: Setting Up The Printer On A Macintosh Operating System Or Without A Computer
Align the clips on the control panel with the holes on the printer, and then press down. Setting up the printer on a Macintosh operating system or without a computer The following instructions are for setting up the printer without a computer or on a Macintosh operating system. Unpack the printer. - Page 12 Raise the control panel. Raise the paper support, and then extend the paper exit tray. Extend the paper guides.
- Page 13 Load paper. Connect the power cord. Make sure the power is on. Set the language, if needed. Using the control panel of the printer, press display, and then press to save the setting. Set the country, if needed. repeatedly until the language you want appears on the...
- Page 14 Using the control panel of the printer, press and then press to save the setting. Raise the scanner unit. Press down on the cartridge carrier levers to raise the cartridge carrier lids. Remove the tape from the print cartridges. repeatedly until the country you want appears on the display,...
-
Page 15: Setting Up The Printer For Wireless Printing
Insert the cartridges, and then close the cartridge carrier lids. Close the scanner unit. Press to align the cartridges. Discard or recycle the alignment page that prints. If you are setting up the printer without a computer, you are finished. You can now use the printer. If you are setting up the printer on a Macintosh computer: •... - Page 16 You may need to enter the password for your wireless network security. • Your connection to the Internet will be restored when you reconnect to your original network. Insert the CD for Macintosh. From the Finder desktop, double-click the Lexmark 3500-4500 Series Installer icon. Double-click the Install icon.
-
Page 17: Setting Up The Printer Using A Usb Cable
If your printer does not have an internal wireless print server already installed, you can purchase one separately at www.lexmark.com. Use the following instructions to install the internal wireless print server: Turn off your printer, and then unplug the power cord from the wall outlet. - Page 18 9. • If you purchased the optional internal wireless print server separately and have already installed the printer: Click Start Programs or All Programs Click Wireless Setup. Follow the prompts on the computer screen. Lexmark 3500-4500 Series.
-
Page 19: Configuring The Optional Internal Wireless Print Server
The printer should appear as a highlighted printer in the installation. If multiple printers appear in the list, make sure you select the printer with the correct IP address/MAC address. If you need help finding the IP or MAC address, see “Finding your MAC address” on page 64. Lexmark 3500-4500 Series. -
Page 20: Wireless Networking
The printers in the following diagrams represent Lexmark printers with Lexmark internal print servers built in or installed in them so that they can communicate over a network. Lexmark internal print servers are devices made by Lexmark to enable Lexmark printers to be connected to wired or wireless networks. - Page 21 Scenario 3: Ethernet-connected devices with Internet • A computer, a laptop, and a printer are connected by Ethernet cables to a hub, router, or switch. • The network is connected to the Internet through a DSL or a cable modem. Scenario 4: Computer, laptop, and printer connected wirelessly without Internet •...
-
Page 22: Mac Address
SSID SSID (Service Set identifier) is a setting on a wireless device that allows devices to join the same wireless network. It is sometimes called the network name. The SSID permits devices to communicate with each other. Signal strength Wireless devices have built-in antennas that transmit and receive radio signals. The signal strength listed on the printer network setup page indicates how strongly a transmitted signal is being received. -
Page 23: Types Of Wireless Networks
For additional information, refer to the “Wireless troubleshooting” section of the “Troubleshooting” chapter. Types of wireless networks Networks can operate in one of two modes: infrastructure or ad hoc. Lexmark recommends setting up a network in infrastructure mode using the installation CD that came with the printer. - Page 24 Unique IP address for each device Mode set to Infrastructure mode Same SSID Yes, including the wireless access point (wireless router) Same channel Yes, including the wireless access point (wireless router) Infrastructure mode is the recommended setup method because it has: •...
-
Page 25: Learning About The Printer
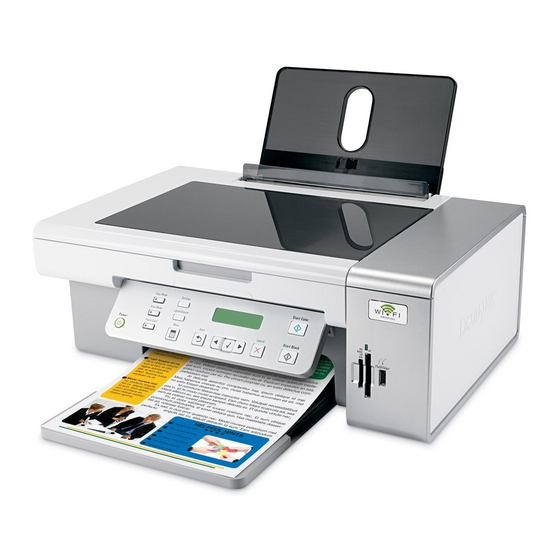
Learning about the printer Understanding the parts of the printer Use the Paper support Load paper. Wi-Fi indicator Check wireless status: • Off indicates that the printer is not turned on or that no wireless option is installed. • Orange –... -
Page 26: Using The Control Panel Buttons And Menus
Use the Scanner unit Print cartridge carrier Lexmark N2050 (internal wireless print server) Connect the printer to a wireless network. USB port Power supply with port Using the control panel buttons and menus Using the control panel The display shows: •... - Page 27 Press • Turn the printer on. • Turn the printer off. – Press and then release the button quickly to enter Power Saver mode. – Press and hold the button for two seconds to turn the printer off. • Stop the print, copy, or scan process. Copy Mode Access the copy default screen and make copies.
- Page 28 Press To • Return to the previous screen. • Delete a letter or number. • Decrease a number. • Delete a letter or number. • Scroll through menus, submenus, or settings on the display. • Select a menu or submenu item that appears on the display. •...
-
Page 29: Using The Copy Menu
Press Start Color Start a color copy, scan, or photo print job, depending on which mode is selected. Start Black Start a black-and-white copy, scan, or photo print job, depending on which mode is selected. Using the Copy menu To access and navigate the Copy menu: From the control panel, press Copy Mode. -
Page 30: Using The Scan Menu
Use this Copies* Resize* Lighter / Darker* Quality* Paper Setup Repeat Image* Collate N-Up* Original Size* Original Type* * Temporary setting. For information on saving temporary and other settings, see “Saving settings” on page 35. Using the Scan menu To access and navigate the Scan menu: From the control panel, press Scan Mode. -
Page 31: Using The Photo Card Menu
Use this Quality* Adjust the quality of a scan. Original Size* Specify the size of the original document. * Temporary setting. For information on saving temporary and other settings, see “Saving settings” on page 35. Using the Photo Card menu If necessary, press Photo Card, or insert a memory card or a flash drive into the printer. -
Page 32: Using The Pictbridge Menu
Saving Paper Size, Paper Type, and Photo Size settings From the control panel, press Settings. Press repeatedly until Paper Setup appears. Press Press repeatedly until Paper Size appears. Press Press repeatedly until the size you want appears. Press Press to go to the Paper Type submenu. Press Press repeatedly until the setting type you want appears. -
Page 33: Using The Settings Menu
The message, PictBridge camera detected. Press display. Press repeatedly until the menu item you want appears. Press Press repeatedly until the submenu item you want or the setting you want appears. Press Note: Pressing selects a setting. An * appears next to the selected setting. To go into additional submenus and settings, repeat step 4 and step 5 as needed. - Page 34 Press Press repeatedly until the submenu item you want or the setting you want appears. Press Note: When you choose a value selection, an * appears next to the selected setting. To go into additional submenus and settings, repeat step 4 and step 5 as needed. If necessary, press repeatedly to return to the previous menus and make other selections.
-
Page 35: Saving Settings
Saving settings In a setting menu, an * appears next to the default setting. To change the setting: Press repeatedly until the setting you want appears. Press • To save most settings. An * appears next to the saved setting. •... - Page 36 Press Press repeatedly until Set Defaults appears. Press Press repeatedly until Use Current appears. Press...
-
Page 37: Learning About The Software
The Solution Center Printing Preferences The Toolbar Using the Lexmark Imaging Studio To open the Lexmark Imaging Studio Welcome screen, use one of these methods: Method 1 From the desktop, double-click the Lexmark Imaging Studio icon. Click the Lexmark Imaging Studio icon for the task you want to complete. -
Page 38: Using The Solution Center
Click View/Print Photo Library Transfer Photos Photo Greeting Cards Photo Packages Slideshow Poster From the bottom left corner of the Welcome screen, Click Setup and diagnose printer • • • • Setup and manage faxes Set printer fax settings for: •... - Page 39 To open the Solution Center, use one of these methods: Method 1 From the desktop, double-click the Lexmark Imaging Studio icon. Click Setup and diagnose printer. The Solution Center appears with the Maintenance tab open. The Solution Center consists of six tabs:...
-
Page 40: Using Printing Preferences
From here Advanced Note: For more information, click Help in the lower right corner of the screen. Using Printing Preferences Opening Printing Preferences Printing Preferences is the software that controls the printing function when the printer is connected to a computer. You can change the settings in Printing Preferences based on the type of project you want to create. -
Page 41: Using The Printing Preferences Tabs
• Select Page Setup options. • Select Options to customize the toolbar appearance or select a different setting for printing photos. • Access links to the Lexmark Web site. • Access Help for additional information. • Uninstall the Toolbar. -
Page 42: Resetting Printer Software Settings To Defaults
Windows 2000 or Windows XP users only: Click Start Settings Printers or Printers and Faxes. Right-click the Lexmark 3500-4500 Series icon. Click Printing Preferences. Click the Save Settings menu. From the Restore section, select Factory Settings (Defaults). Note: Factory default settings cannot be deleted. -
Page 43: Maintaining The Printer
Maintaining the printer Changing print cartridges Removing a used print cartridge Make sure the printer is on. Lift the scanner unit. The print cartridge carrier moves and stops at the loading position, unless the printer is busy. Press down on the cartridge carrier lever to raise the cartridge carrier lid. Remove the used print cartridge. - Page 44 Press down on the cartridge carrier levers to raise the cartridge carrier lids. Insert the black cartridge or the photo cartridge in the left carrier. Insert the color cartridge in the right carrier. Close the lids. Close the scanner unit, making sure to keep your hands out from underneath the scanner unit. The control panel display will prompt you to load paper and press Note: The scanner unit must be closed to start a new scan, print, copy, or fax job.
-
Page 45: Ordering Print Cartridges
Item Color cartridge Black cartridge Photo cartridge Ordering paper and other supplies To order supplies or to locate a dealer near you, visit our Web site at www.lexmark.com. Notes: • For best results, use only Lexmark print cartridges. • For best results when printing photos or other high-quality images, use Lexmark photo papers. - Page 46 Lexmark PerfectFinish Photo Paper Note: Availability may vary by country or region. For information on how to purchase Lexmark Premium Photo Paper, Lexmark Photo Paper, or Lexmark PerfectFinish Photo Paper in your country or region, go to www.lexmark.com. Paper size •...
-
Page 47: Troubleshooting
Troubleshooting For more troubleshooting information on a Macintosh operating system, see the Mac Help. Setup troubleshooting • “Incorrect language appears on the display” on page 47 • “Power button is not lit” on page 47 • “Software does not install” on page 48 •... -
Page 48: Software Does Not Install
Disconnect and reconnect the power cord Disconnect the power cord from the wall outlet, and then from the printer. Plug the cord all the way into the power supply on the printer. Plug the cord into an electrical outlet that other electrical devices have been using. If the light is not on, press Software does not install... -
Page 49: Page Does Not Print
Uninstall and reinstall software Uninstall the printer software, and then reinstall it. For more information, see “Uninstalling and reinstalling the software” on page 66. Page does not print These are possible solutions. Try one or more of the following: Check messages If an error message is displayed, see “Error messages”... -
Page 50: Cannot Print From Digital Camera Using Pictbridge
Reconnect power supply Press to turn the printer off. Disconnect the power cord from the wall outlet. Gently remove the power supply from the printer. Reconnect the power supply to the printer. Plug the power cord into the wall outlet. Press to turn the printer on. -
Page 51: Wi-Fi Indicator Is Not Lit
Write down the SSID, security type, and the security keys if they are shown. Note: Make sure you copy them down exactly, including any capital letters. Click Start Programs or All Programs Programs or All Programs Accessories All Programs Accessories Lexmark 3500-4500 Series. Command Prompt Command Prompt... -
Page 52: Check Your Security Keys
Write down the SSID. Reconfigure the printer's settings. See “Run the wireless setup again” on page 62. Insert the CD for Macintosh. From the Finder desktop, double-click the Lexmark 3500-4500 Series Installer icon. Double-click the Install icon. Click Continue. Follow the instructions on the computer screen. -
Page 53: Wi-Fi Indicator Light Is Orange
You can find the signal strength of the network on the network setup page. For information on how to print a setup page, see “Printing a network setup page” on page 50. USB symbol. Lexmark 3500-4500 Series. Lexmark 3500-4500 Series. -
Page 54: Wi-Fi Indicator Light Is Blinking Orange During Installation
Check MAC address If your network uses MAC address filtering, provide the MAC address for the printer to your network. If you need help finding the MAC address, see “Finding your MAC address” on page 64. Wi-Fi indicator light is blinking orange during installation When the Wi-Fi indicator light is blinking orange, it indicates that the printer has been set up for wireless networking but cannot connect to the network for which it has been configured. - Page 55 Press Enter. • The “Default Gateway” entry is typically the wireless access point (wireless router). • The IP address appears as four sets of numbers separated by periods, such as 192.168.0.100. Your IP address might also start with the numbers 10 or 169. This is determined by your operating system or wireless network software.
-
Page 56: Windows Users Only
Note: The application is referred to as Rendezvous in Macintosh OS X version 10.3, but is now called Bonjour by Apple Inc. Double-click your printer model. Note: If your printer is not shown, manually type the IP address of the printer in the browser address field. For example: http://10.168.0.101 Click Configuration. Click Wireless. Lexmark 3500-4500 Series. -
Page 57: Wireless Network Printer Does Not Print
Turn off and restart the computer. Check printer ports Make sure the correct printer port is selected. Windows users only Click Start Control Panel Right-click Lexmark XXXX where XXXX is the model series number of your printer. Lexmark 3500-4500 Series. Printers. -
Page 58: Reinstall Software
Click Properties Ports. Verify that XXXX_Series_nnnnnn_P1 is selected, where XXXX is the model series number of your printer and nnnnnn is the last six numbers of the MAC address of your printer. Note: The MAC address is located at the back of the printer beside the serial number. If USB is selected instead: Select the port name from step 4. -
Page 59: Reboot The Computer
The Start icon looks like Type ping followed by a space and the IP address of the wireless access point (wireless router). For example: ping 192.168.0.100 Press Enter. Lexmark 3500-4500 Series. Programs or All Programs Accessories All Programs Accessories Programs or All Programs... - Page 60 If the wireless access point (wireless router) responds, you will see several lines appear that start with “Reply from”. Turn off and restart the printer. If the wireless access point (wireless router) does not respond, it will take several seconds and then you will see “Request timed out.”...
- Page 61 Ping the printer to make sure it is on the network Windows users only Click: • In Windows XP: Start Programs or All Programs • In Windows Vista: The Start icon The Start icon looks like Type ping followed by the IP address of the printer. For example, ping 192.168.0.25 Press Enter.
- Page 62 Select the type of security you use to protect your wireless network. Note: If you do not know this information, see the documentation that came with the wireless network, or contact the person who set up your wireless network. Click Submit. Lexmark 3500-4500 Series.
-
Page 63: Photos Do Not Transfer From A Memory Card Across A Wireless Network
Follow the prompts on the screen. For more information, see the “Working with photos” chapter in the User's Guide. Macintosh users only From the Finder desktop, double-click the Lexmark 3500-4500 Series folder. Double-click the Network Card Reader icon. Select your wireless printer, and then click Connect. -
Page 64: Changing Wireless Settings After Installation
In order to complete the network configuration of your printer, you may need the media access control (MAC) address of the printer or print server. The MAC address is a series of letters and numbers located on the back of your printer. Lexmark 3500-4500 Series. -
Page 65: Resetting To Factory Default Settings
If you purchased the internal wireless print server separately, the MAC address appears on an adhesive label that came with the wireless print server. Attach the adhesive label to your printer so you will be able to find the MAC address when you need it. -
Page 66: Uninstalling And Reinstalling The Software
Follow the instructions on the computer screen to remove the printer software. Restart the computer before reinstalling the printer software. Insert the CD for Macintosh. From the Finder desktop, double-click the Lexmark 3500-4500 Series Installer icon. Double-click the Install icon. Follow the instructions on the computer screen to reinstall the software. - Page 67 If the software still does not install correctly, visit our Web site at www.lexmark.com to check for the latest software. In all countries or regions except the United States, select your country or region. Click the links for drivers or downloads.
-
Page 68: Advanced Wireless Setup
Note: If your printer is not shown, manually type the printer IP address in the browser address field. For example: http://10.168.0.101 Note: If you do not know the IP address of the printer, print the network setup page to find it. Click Configuration. Click Wireless. Lexmark 3500-4500 Series. -
Page 69: Creating An Ad Hoc Wireless Network
Your connection to the Internet will be restored when you reconnect to your original network. Creating an ad hoc wireless network Lexmark recommends that you set up your wireless network using a wireless access point (wireless router). A network set up this way is called an infrastructure network and has: •... - Page 70 Note: You may be prompted to connect the printer to the computer again using the installation cable as part of the setup process. Follow the prompts on the computer screen. Store your network name and security code in a safe place for future reference. Lexmark 3500-4500 Series.
- Page 71 Note: The MAC address appears on an adhesive label located on the back of your printer. Insert the CD for Macintosh to run the wireless setup. From the Finder desktop, double-click the Lexmark 3500-4500 Series Installer icon. Double-click the Install icon.
-
Page 72: Notices
A variable amount of ink will remain in the cartridge when replacement is required. After this single use, the license to use the print cartridge terminates, and the used cartridge must be returned only to Lexmark for remanufacturing, refilling or recycling. -
Page 73: Networking Glossary
Networking glossary ad hoc mode ad hoc network AutoIP address BSS (Basic Service Set) channel DHCP (Dynamic Host Configuration Protocol) DHCP IP address DHCP server infrastructure mode installation cable internal wireless print server IP (Internet Protocol) address ipconfig MAC (Media Access Control) address MAC filtering network adapter/card network hub... - Page 74 UAA (Universally Administered Address) USB cable USB port WEP (Wired Equivalent Privacy) wireless access point wireless router Wi-Fi WPA (Wi-Fi Protected Access) WPA2 An address assigned to a network printer or print server by the manufacturer. To find the UAA, print a network setup page and look for the UAA listing. A lightweight, flexible cable that lets the printer communicate with the computer at much higher speeds than parallel cables A small, rectangular port on the back of the computer that connects the peripheral...
Need help?
Do you have a question about the X3550 and is the answer not in the manual?
Questions and answers