
Related Manuals for Smiths Medical LEVEL 1 HOTLINE HL-90-40


Summary of Contents for Smiths Medical LEVEL 1 HOTLINE HL-90-40
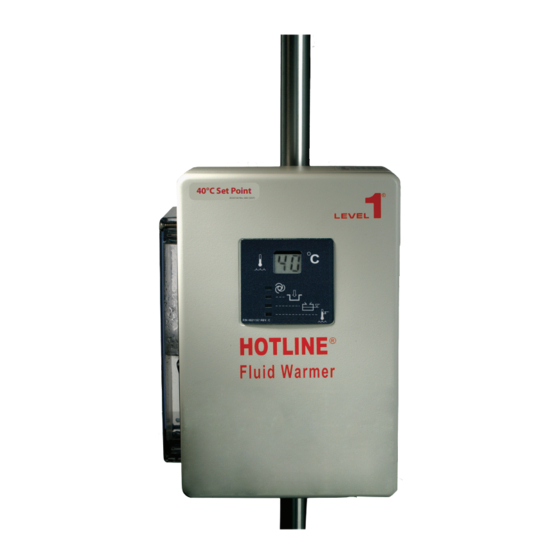
- Page 1 ® OPERATOR’S MANUAL ® HOTLINE Blood and Fluid Warmer < HL-90-40 40°C Set Point 4524104 Rev. 000 (3/07)
- Page 2 Page intentionally blank...
- Page 3 ® ® HOTLINE Blood and Fluid Warmer < HL-90-40 OPERATOR’S MANUAL PN 4534010EN Rev. 004...
- Page 4 Smiths Medical and Level 1 design marks and Level 1 and HOTLINE are trademarks of Smiths Medical. The symbol ® indicates the trademark is registered in the U.S. Patent and Trademark office and certain other countries.
-
Page 5: Table Of Contents
C o n t e n t s Contents 1 About this Manual Indications for Use Conventions Used in this Manual 2 Description Components ® HOTLINE Fluid Warming Set 3 Important Safety Information Additional WARNINGS and CAUTIONS for Accessories 4 Assembly Instructions ... - Page 6 C o n t e n t s Ground Bond Test 10 Maintenance Maintenance Performed with Every Use Clean the Exterior General Inspection Disinfect the Reservoir and Change the Recirculating Solution Disinfect the Reservoir Add Recirculating Solution Maintenance Performed Every 30 Days Disinfect the Reservoir and Change Recirculating Solution for Distilled Water and 35% Isopropyl Alcohol Solution Lubricate O-Ring Seals...
-
Page 7: About This Manual
S E C T I O N 1 • A b o u t t h i s M a n u a l SECTION About this Manual This operator’s manual describes the assembly, use, and maintenance of the HOTLINE Blood and Fluid Warmer. -
Page 8: Description
S E C T I O N 2 • D e s c r i p t i o n SECTION Description The HOTLINE Warmer delivers blood and intravenous fluid at normothermic temperatures by surrounding the sterile intravenous line with a layer of warmed recirculating solution. - Page 9 S E C T I O N 2 • D e s c r i p t i o n Right Side View Socket with the reflux plug removed Clamp for I.V. pole Drain tube in tube holder Reflux plug Power cord Rear View Fill-port plug...
-
Page 10: Hotline ® Fluid Warming Set
S E C T I O N 2 • D e s c r i p t i o n ® HOTLINE Fluid Warming Set HOTLINE Fluid Warming Sets (L-70, L-70NI, L-80) are individually packed, single-use disposables with a Sterile Fluid Path. The priming volume is 20 ml for the L-70 and L-70NI, and 21 ml for the L-80. -
Page 11: Important Safety Information
® • The HOTLINE Warmer is for use only with Smiths Medical supplied or approved parts, accessories, and Disposable Sets. The device may not function as intended with the use of unapproved parts, accessories, or Disposable Sets. - Page 12 S E C T I O N 3 • I m p o r t a n t S a f e t y I n f o r m a t i o n Continued from previous page WARNINGS WARNINGS •...
- Page 13 Warmer if equipment or Disposable Set malfunction is evident. • No user-serviceable parts. All service must be performed by Smiths Medical or competent personnel. • No modification of this equipment is allowed. CAUTIONS Malfunction, failure, or damage to the device may occur if these cautions are not followed.
-
Page 14: Additional Warnings And Cautions For Accessories
S E C T I O N 3 • I m p o r t a n t S a f e t y I n f o r m a t i o n Continued from previous page CAUTIONS •... -
Page 15: Step 1 - Unpack The Hotline
3 Examine the HOTLINE Warmer for damage. If any components appear damaged, do not use the HOTLINE Warmer. Contact Smiths Medical for a replacement. Note: After unpacking the HOTLINE Warmer, recycle packaging material according to hospital policy for recyclable materials. -
Page 16: Step 3 - Disinfect The Reservoir
S E C T I O N 4 • A s s e m b l y I n s t r u c t i o n s 1 Slide the clamp ( a ) on the HOTLINE Warmer over the I.V. -
Page 17: Step 4 - Fill The Reservoir With Recirculating Solution
S E C T I O N 4 • A s s e m b l y I n s t r u c t i o n s Step 4 - Fill the Reservoir With Recirculating Solution WARNINGS WARNINGS ... -
Page 18: Operation
S E C T I O N 5 • P r i n c i p l e o f O p e r a t i o n SECTION Principle of Operation HOTLINE Warmer delivers blood and intravenous fluid at normothermic temperatures under routine, gravity flow rates. -
Page 19: Controls And Displays
S E C T I O N 6 • O p e r a t i o n SECTION Operation This section describes the controls and displays that monitor and control the HOTLINE Warmer, and the modes of operation. Controls and Displays •... -
Page 20: Power And Alarm Test Panel
S E C T I O N 6 • O p e r a t i o n Power and Alarm Test Panel 1.4 LITERS The Power and Alarm Test Panel is located on the left side of the HOTLINE Warmer next to the reservoir. -
Page 21: Modes Of Operation
S E C T I O N 6 • O p e r a t i o n Modes of Operation The HOTLINE Warmer operation is defined in the following modes: • OFF Mode • ON/Operating Mode • Check Disposables Mode •... -
Page 22: Add Recirculating Solution Mode
S E C T I O N 6 • O p e r a t i o n To clear this mode, check that the Twin-Tube Connector on the HOTLINE Fluid Warming Set is firmly inserted in the socket. Add Recirculating Solution Mode The Add Recirculating Solution mode indicates that the solution level in the reservoir is below its minimum level. -
Page 23: Warmer
S E C T I O N 7 • O p e r a t i n g I n s t r u c t i o n s SECTION Operating Instructions The Operating Instructions are grouped into five segments. Read through each segment BEFORE performing a procedure. - Page 24 S E C T I O N 7 • O p e r a t i n g I n s t r u c t i o n s Continued form previous page WARNINGS WARNINGS • Do not use HOTLINE Fluid Warming Set, L-10, PC-8, and YC-8 if the caps are not securely in place, else flow path may not be sterile and may cause death or serious injury.
-
Page 25: Step 3 - Connect The Intravenous Administration Set
S E C T I O N 7 • O p e r a t i n g I n s t r u c t i o n s Step 3 - Connect the Intravenous Administration Set WARNINGS WARNINGS ®... -
Page 26: Step 5 - After Use
S E C T I O N 7 • O p e r a t i n g I n s t r u c t i o n s Continued from previous page WARNINGS WARNINGS • Not for use with pressure devices generating over 300 mmHg. Pressure greater than 300 mmHg may compromise the integrity ®... - Page 27 S E C T I O N 8 • T r o u b l e s h o o t i n g SECTION Troubleshooting Only competent personnel should perform any routine maintenance and repairs to the HOTLINE Warmer.
- Page 28 - question. receiving or 2 Plug the HOTLINE Warmer into a separate electrical transmitting circuit. • If the problem continues, notify Smiths Medical or your local Smiths Medical distributor. ® HOTLINE Blood and Fluid Warmer | Operator’s Manual...
-
Page 29: Testing
Warmer should be tested by hospital biomedical personnel prior to placing it in service. All testing and maintenance should be performed by competent personnel. If competent personnel are not available, contact Smiths Medical or your local Smiths Medical distributor. If the HOTLINE Warmer and any installed accessories do not pass any of ... -
Page 30: Over Temperature Alarm Test
S E C T I O N 9 • T e s t i n g Over Temperature Alarm Test The HOTLINE Warmer should be running at an operating temperature of approximately 39°C to 40°C. 1 Press and hold the Over Temperature Alarm Test button ( a ). 2 Observe the following: •... -
Page 31: Check Disposables Test
S E C T I O N 9 • T e s t i n g Check Disposables Test An interlock switch/sensor, located in the socket on the right side of the HOTLINE Warmer, senses a properly installed HOTLINE Fluid ... - Page 32 4 Remove the black label from the auxiliary outlet on the back of the HOTLINE and plug in the TEMP CHECK power cord. Note: The auxiliary outlet is for use only with Smiths Medical accessories. 5 Turn ON the HOTLINE Warmer.
-
Page 33: Periodic Electrical Testing
S E C T I O N 9 • T e s t i n g Periodic Electrical Testing Electrical Safety Tests must be performed by qualified personnel authorized by the institution to perform such testing. The Safety Tests must be performed and documented at least once per year, or according to institutional policy. -
Page 34: Maintenance Performed With Every Use
Do not clean if there is a defect. Contact Smiths Medical or your local Smiths Medical distributor. 3 Immerse a soft cloth or sponge as an applicator into the cleaning solution consisting of mild liquid detergent soap and warm tap water mixture. - Page 35 S E C T I O N 1 0 • M a i n t e n a n c e control panels. Use a soft brush to clean the power cord if necessary. 4 Rinse a separate soft cloth or sponge in room temperature running potable water.
-
Page 36: General Inspection
S E C T I O N 1 0 • M a i n t e n a n c e General Inspection • Check the condition of the HOTLINE Warmer with a visual inspection before using. Remove from service any HOTLINE Warmer that shows physical damage. -
Page 37: Add Recirculating Solution
S E C T I O N 1 0 • M a i n t e n a n c e 6 Remove the fill-port plug ( c ), fill the reservoir with the hydrogen peroxide solution, and replace the fill-port plug. 7 Remove the reflux plug from the socket if required, and insert a ... -
Page 38: Lubricate O-Ring Seals
2 Apply silicone lubricant along the O-Rings inside the socket ( a ) located on the right side of the HOTLINE Warmer. Silicone lubricant is available from Smiths Medical, (Silicone lubricant P/N 80-04-002). Maintenance Performed Every 12 Months Disinfect the Reservoir and Change Recirculating Solution for 0.3% Hydrogen Peroxide Solution... -
Page 39: Maintenance Log
S E C T I O N 1 0 • M a i n t e n a n c e Maintenance Log All maintenance and testing should be done by competent personnel. Regularly scheduled maintenance ensures proper functioning of the equipment. - Page 40 • L i m i t e d W a r r a n t y SECTION Limited Warranty Smiths Medical ASD, Inc. (the “Manufacturer”) warrants to the Original ® Purchaser that the HOTLINE Blood and Fluid Warmer (the ®...
- Page 41 S E C T I O N 1 1 • L i m i t e d W a r r a n t y packaged and returned to the Manufacturer, postage prepaid. Any loss or damage during shipment is at the risk of the sender. ®...
-
Page 42: Service
Smiths Medical or competent personnel. Death or serious injury may occur if this warning is not followed. All service must be performed by Smiths Medical or competent personnel. Service by any other person or organization voids the warranty and transfers liability for malfunctions of the device to the servicing organization. -
Page 43: Disposal Information
Observe national and local codes or requirements for disposal of contaminated materials and for recycling of solid waste materials that may impact the environment. Service Contacts Contact your Smiths Medical Technical Service Department or Smiths Medical distributor at: USA/Canada Smiths Medical ASD, Inc. -
Page 44: System Specifications
S E C T I O N 1 3 • S p e c i f i c a t i o n s a n d A c c e s s o r i e s SECTION Specifications and Accessories System Specifications Standard Compliance Guidelines... -
Page 45: Electromagnetic Compliance
S E C T I O N 1 3 • S p e c i f i c a t i o n s a n d A c c e s s o r i e s Electrical Type Protection Against Electrical Class 1 Equipment, Type BF Shock... -
Page 46: Electromagnetic Environmental Recommendations
S E C T I O N 1 3 • S p e c i f i c a t i o n s a n d A c c e s s o r i e s Electromagnetic Environmental Recommendations Recommended separation distances between portable and mobile RF communications ®... - Page 47 S E C T I O N 1 4 • S y m b o l s SECTION Symbols Symbols Definitions Power switch in the ON position Power switch in the OFF position. ON/Operation Reservoir Temperature Display Add Recirculating Solution Check Disposables Over Temperature Maximum Reservoir Level...
- Page 48 S E C T I O N 1 4 • S y m b o l s Symbols Definitions Protected Against Dripping Water < Catalog Number > Serial Number Part Number Batch Code Authorized Representative in the European Community Manufacturer Date of Manufacture Quantity Protective Earth [Ground]...
- Page 49 S E C T I O N 1 4 • S y m b o l s Symbols Definitions Not made with natural rubber latex € Caution: This product contains natural rubber latex which may cause allergic reactions. Caution: Federal (U.S.A.) law restricts this device to sale by or on the order of a physician.
- Page 50 I n d e x Numerics 0.3% Hydrogen peroxide solution Description maintenance schedule 30 components 2 preparation 11 HOTLINE Fluid Warming Sets 4 35% Isopropyl alcohol solution HOTLINE Warmer 2 maintenance schedule 30 Disinfect the reservoir 10 preparation 11 Display Panel 2 description 13 Disposal information 37 biohazardous materials 20...
- Page 51 I n d e x Intravenous administration set Principle of operation 12 connect 19 Isopropyl alcohol solution 11 Recirculating solution change 30 L-10 Gas Vent maintenance schedule 11 warnings and cautions 8 preparation 11 LCD 13 protocols 11 LEDs 13 Reflux plug 3 Light-emitting diodes (LEDs) 13 Replace...
- Page 52 I n d e x no power 21 Over Temperature alarm 21 recirculating solution leaks 22 USA service contact 37 Using the HOTLINE Warmer 19 Warnings 5 L-10 Gas Vent 8 Warranty 34 ® HOTLINE Blood and Fluid Warmer | Operator’s Manual...
- Page 53 Page intentionally blank...
- Page 54 ® Manufacturer: Smiths Medical ASD, Inc. 160 Weymouth Street Rockland, MA 02370, USA Tel: 1 800 258 5361...
Need help?
Do you have a question about the LEVEL 1 HOTLINE HL-90-40 and is the answer not in the manual?
Questions and answers