Table of Contents
Advertisement
Quick Links
Advertisement
Table of Contents
Troubleshooting

Related Manuals for Smiths Medical Level 1 NORMOFLO H-1129


Summary of Contents for Smiths Medical Level 1 NORMOFLO H-1129
- Page 1 OPERATOR’S MANUAL ® ® Level 1 NORMOFLO H-1129 Irrigation Fluid Warmer < H-1129 115V Manufacturer: Smiths Medical ASD, Inc. 160 Weymouth Street Rockland, MA 02370, USA USA/Canada: 1-800-258-5361 International: +1-781-878-8011 www.smiths-medical.com Made in USA...
- Page 2 ® ® Level 1 NORMOFLO H-1129 Irrigation Fluid Warmer < H-1129 115V OPERATOR’S MANUAL P/N 4533800-EN Rev. 004...
- Page 3 Smiths Medical ASD Inc. (“Smiths Medical”) assumes no responsibility with regard to the performance or use of these products. Level 1, NORMOFLO, and Level 1 and Smiths Medical design marks are trademarks of the Smiths Medical ®...
-
Page 4: Table Of Contents
C o n t e n t s Contents About this Manual Conventions Used in this Manual Description Gas Vent Temperature Control Automatically Operating Pole Indications for Use Important Safety Information Out of the Box-Assembly Step 1 - Verify Components of the Fluid Warmer Step 2 - Assemble Fluid Warmer to Base Step 3 - Install the Pressure Chambers Step 4 - Attach the Fluid Bag Hanger... - Page 5 C o n t e n t s Over Temperature Alarm Mode Pressurized Mode Unpressurized Mode Pressure Regulation Mode Operating Instructions 9.1 Set Up for Use 9.2 Use of the Fluid Warmer 9.3 After Use 10 Troubleshooting General Troubleshooting Guide Slow Flow Rate Troubleshooting 11 Testing Add Recirculating Solution Alarm...
-
Page 6: About This Manual
S E C T I O N 1 • A b o u t t h i s M a n u a l SECTION About this Manual This Operator's Manual describes the set-up, use, and maintenance of the ® ®... -
Page 7: Description
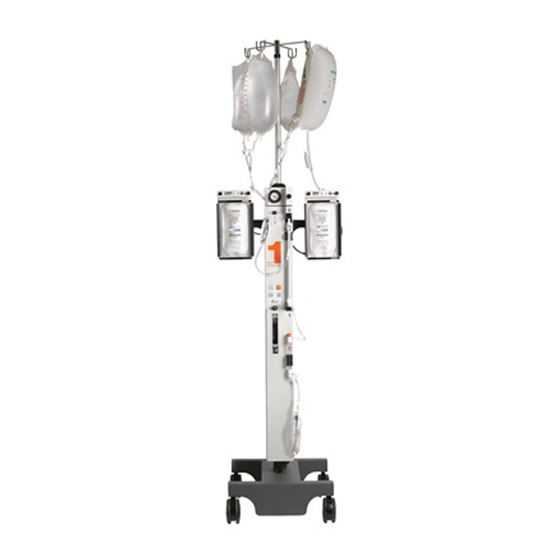
S E C T I O N 2 • D e s c r i p t i o n SECTION Description ® ® The Level 1 NORMOFLO H-1129 Irrigation Fluid Warmer has been designed for safe, rapid, in-line warming of irrigating fluids as they are administered to patients. -
Page 8: Indications For Use
S E C T I O N 3 • I n d i c a t i o n s f o r U s e SECTION Indications for Use ® ® The Level 1 NORMOFLO H-1129 Irrigation Fluid Warmer (Fluid Warmer) is designed for use by trained medical personnel for in-line warming of irrigating fluids. -
Page 9: Important Safety Information
S E C T I O N 4 • I m p o r t a n t S a f e t y I n f o r m a t i o n SECTION Important Safety Information This section covers information for prescribers and guidelines for safe use ®... - Page 10 Continued from previous page WARNINGS WARNINGS • The Fluid Warmer is for use only with Smiths Medical supplied or approved parts, accessories, and Irrigation Disposable Sets. The device may not function as intended with the use of unapproved parts, accessories, or Disposable Sets.
- Page 11 S E C T I O N 4 • I m p o r t a n t S a f e t y I n f o r m a t i o n CAUTIONS Physical injury to the patient, user, and/or an adverse effect on the device or its performance may occur if these cautions are not followed: •...
-
Page 12: Out Of The Box-Assembly
B o x - A s s e m b l y SECTION Out of the Box-Assembly This device must be assembled and tested by authorized Smiths Medical personnel, an authorized distributor of Smiths Medical, or a qualified person authorized by the institution prior to placing the device into service. -
Page 13: Step 1 - Verify Components Of The Fluid Warmer
Check the contents of all packaging to verify that the following components are present. If any parts are missing or damaged, do not use the Fluid Warmer. Do not substitute parts not supplied by Smiths Medical. Contact Smiths Medical for replacement parts. -
Page 14: Step 2 - Assemble Fluid Warmer To Base
S E C T I O N • O u t t h e B o x - A s s e m b l y Step 2 - Assemble Fluid Warmer to Base 1 Insert two locking casters ( e ) into the base as shown, and then insert the two non-locking casters. -
Page 15: Step 3 - Install The Pressure Chambers
S E C T I O N • O u t t h e B o x - A s s e m b l y Step 3 - Install the Pressure Chambers 1 Remove the four HI-2 Bracket screws located just under the Pressure Gauge Box on the back of the Fluid Warmer and slide the HI-2 Bracket through the slot between the Fluid Warmer and the Power Pole. -
Page 16: Step 5 - To Set Up The 3-Liter (3L) Pressure Accessory
S E C T I O N • O u t t h e B o x - A s s e m b l y Step 5 - To Set Up the 3-Liter (3L) Pressure Accessory 1 Disconnect the black pneumatic tubing from each In-Line Pneumatic Fitting ( b ). -
Page 17: Step 7 - Preparation For Use
S E C T I O N • O u t t h e B o x - A s s e m b l y Step 7 - Preparation for Use 1 Remove the fill-port plug ( a ) on the front of the warming unit and fill the reservoir to the maximum level with 1.4 liters of one of the following solutions: •... -
Page 18: Principle Of Operation
S E C T I O N 6 • P r i n c i p l e o f O p e r a t i o n SECTION Principle of Operation The schematic illustration on the following page depicts the ®... - Page 19 S E C T I O N 6 • P r i n c i p l e o f O p e r a t i o n H-1129 H-1129 NORMOFLOW® Irrigating Fluid Warmer Pressure Gauge Pressure Chambers Irrigating Fluid Bag Heat Exchanger Pressure...
-
Page 20: Controls And Displays
S E C T I O N 7 • C o n t r o l s a n d D i s p l a y s SECTION Controls and Displays ® ® Five locations on the Level 1 NORMOFLO H-1129 Irrigation Fluid Warmer govern how the device is controlled and where function indicators... -
Page 21: Fluid Warmer Power And Alarm Test Panel
S E C T I O N 7 • C o n t r o l s a n d D i s p l a y s Fluid Warmer Power and Alarm Test Panel The Power and Alarm Test Panel is located on the front of the Fluid Warmer directly above the reservoir fill-cap. -
Page 22: Fluid Warmer Display Panel
S E C T I O N 7 • C o n t r o l s a n d D i s p l a y s Fluid Warmer Display Panel The Fluid Warmer Display Panel provides continuous information about the operation of the Fluid Warmer. -
Page 23: Reservoir Level Display
S E C T I O N 7 • C o n t r o l s a n d D i s p l a y s Reservoir Level Display The Reservoir Level Display has a clear window for viewing the amount of recirculating solution present in the reservoir. -
Page 24: Pressure Gauge Box
S E C T I O N 7 • C o n t r o l s a n d D i s p l a y s Pressure Gauge Box 1 Pressure Dial Gauge When pressure is activated, the Pressure Dial Gauge displays the selected pressure as you adjust the Pressure Regulator Knob (b). -
Page 25: Operation
S E C T I O N 8 • O p e r a t i o n SECTION Operation ® ® The Level 1 NORMOFLO H-1129 Irrigation Fluid Warmer (Fluid Warmer) functions are monitored and controlled by four interfaces/control panels located on the Fluid Warmer. - Page 26 S E C T I O N 8 • O p e r a t i o n Operation ® ® Level 1 NORMOFLO H-1129 Irrigation Fluid Warmer Indicator/ Alarm Signal Function Interface Description Visible Audible Beep None None Fluid Warmer LEDs display None Power...
-
Page 27: Off Mode
S E C T I O N 8 • O p e r a t i o n Modes of Operation WARNING • If any visual indicator does not illuminate or the audible signal does not sound, do not use the Fluid Warmer. Remove the device from service immediately. -
Page 28: Alarm Test Mode
S E C T I O N 8 • O p e r a t i o n Alarm Test Mode The Alarm Test mode is used to test the visual and audible indicators of the Fluid Warmer. To enter Alarm Test Mode, press and hold the Alarm Test button ( d ) on the Fluid Warmer's Control Panel. -
Page 29: Check Disposables Mode
S E C T I O N 8 • O p e r a t i o n Check Disposables Mode The Check Disposables mode of the Fluid Warmer indicates a missing or improperly installed Disposable Set. Mode characteristics • The Check Disposables yellow LED ( a ) on the Fluid Warmer's Display Panel illuminates. -
Page 30: Over Temperature Alarm Mode
S E C T I O N 8 • O p e r a t i o n Over Temperature Alarm Mode The Over Temperature Alarm mode is entered when the temperature of the recirculating solution reservoir is at or above 43.9°C (± 0.1 WARNING •... -
Page 31: Unpressurized Mode
S E C T I O N 8 • O p e r a t i o n Mode Characteristics • The Fluid Warmer must be ON for the Pressure Chamber to work. • Pressure is applied to the fluid bag in the Pressure Chamber according to the amount specified by the Pressure Regulator Knob (d). -
Page 32: Operating Instructions
BEFORE performing a procedure. WARNINGS WARNINGS • The Fluid Warmer is for use only with Smiths Medical supplied or approved parts, accessories, and Irrigation Disposable Sets. The device may not function as intended with the use of unapproved parts, accessories, or Disposable Sets, resulting in death or serious injury to the patient. -
Page 33: 9.1 Set Up For Use
S E C T I O N 9 • O p e r a t i n g I n s t r u c t i o n s CAUTIONS Physical injury to the patient, user, and/or an adverse effect on the device or its performance may occur if these cautions are not followed: •... - Page 34 S E C T I O N 9 • O p e r a t i n g I n s t r u c t i o n s A–Install the Irrigation Warming Set The installation sequence for the Disposable Set corresponds to the numbered Blocks marked 1-2-3 on the Fluid Warmer.
- Page 35 S E C T I O N 9 • O p e r a t i n g I n s t r u c t i o n s 3 Align the Gas Vent ( f ) to the #3 Block, and press it into place. 4 Press the green Power ON button, located on the Power and Alarm Test Panel, to turn ON the Fluid Warmer.
- Page 36 S E C T I O N 9 • O p e r a t i n g I n s t r u c t i o n s 10 Remove orange caps from the Gas Vent ( f ) and from the Patient Line ( g ).
-
Page 37: 9.2 Use Of The Fluid Warmer
S E C T I O N 9 • O p e r a t i n g I n s t r u c t i o n s 9.2 Use of the Fluid Warmer Use of the Fluid Warmer requires that the steps in “9.1 Set Up for Use” on page 28 have been completed. - Page 38 S E C T I O N 9 • O p e r a t i n g I n s t r u c t i o n s 6 Turn the valve handle on the Adapter Assembly to the ON position (c).
-
Page 39: 9.3 After Use
S E C T I O N 9 • O p e r a t i n g I n s t r u c t i o n s D–Change the Fluid Bag 1 Close the clamp under empty bag. 2 Push the Pressure Chamber Toggle Switch to the minus (-) unpressurized position to release pressure in the pressure chambers. -
Page 40: Troubleshooting
If the Fluid Warmer continues to alarm, Alarm activates discontinue use of the medical device and remove from service. Contact Smiths Medical or an authorized representative for service. Hot Cabinet Check the air inlet on the bottom of the unit. Remove any blockage or dust to insure adequate air flow. -
Page 41: Slow Flow Rate Troubleshooting
S E C T I O N 1 0 • T r o u b l e s h o o t i n g Problem Check the following Pressure • Pressure Chamber Toggle Switch(es) should be in the Chambers not plus (+) pressurized position. -
Page 42: Testing
This unit should be tested by hospital biomedical personnel prior to placing it in service. All testing and maintenance should be performed by qualified personnel authorized by the institution to perform such testing. If qualified personnel are not available, contact Smiths Medical. If the ® ®... -
Page 43: Over Temperature Test
S E C T I O N 1 1 • T e s t i n g 3 Gas Vent Interlock - Pull the top of the Gas Vent Assembly from the #3 Block. The Check Disposables indicator illuminates and the audible alarm beeps. -
Page 44: Performance Testing
• In 3 to 10 minutes the display should read 41°C. The Temper- ature Set Point is 41.7°C (+/- 0.3°C). Note: If the Fluid Warmer does not pass the Cold Start Test, it should be removed from use and returned to Smiths Medical or an authorized representative for service. Calibration Test One approved way to confirm proper calibration of the recirculating ®... - Page 45 ® Note: The Level 1 DSTA-40 TEMP CHECK is available for purchase from Smiths Medical. Proper calibration of recirculating solution temperature Confirm proper calibration of recirculating solution temperature by performing the following steps: 1 Unplug the power cord for the base assembly from the auxiliary outlet on the bottom of the Fluid Warmer.
-
Page 46: Periodic Electrical Testing
ON condition; for this reason the leakage current test should be performed on units which have room temperature recirculating solution in the reservoir. Units not meeting this standard should be returned to Smiths Medical or an authorized representative for service. Ground Continuity The Fluid Warmer must be tested in accordance with EN 60601-1. -
Page 47: Maintenance
S E C T I O N 1 2 • M a i n t e n a n c e SECTION Maintenance Only qualified personnel authorized by the institution should perform any ® ® routine maintenance and repairs to the Level 1 NORMOFLO H-1129 Irrigation Fluid Warmer (Fluid Warmer). -
Page 48: Maintenance Performed Every 12 Months
S E C T I O N 1 2 • M a i n t e n a n c e peroxide solution and 1,260 ml of sterile water). The reservoir holds 1.4 liters. Maintenance Performed Every 12 Months Disinfect the Reservoir 1 Place a container under the drain valve of the Fluid Warmer. - Page 49 S E C T I O N 1 2 • M a i n t e n a n c e Change O-Rings Change the O-Rings in the #1 Block and #2 Block. 1 Remove each O-Ring from its socket by pulling it out with a pair of needle-nose pliers or by prying it out with a small screwdriver.
-
Page 50: Maintenance And Calibration Log
S E C T I O N 1 2 • M a i n t e n a n c e Maintenance and Calibration Log All maintenance and testing should be done by qualified personnel authorized by the institution to perform such maintenance. Regularly scheduled maintenance ensures proper functioning of the equipment. -
Page 51: Limited Warranty
S E C T I O N 1 3 • L i m i t e d W a r r a n t y SECTION Limited Warranty Smiths Medical ASD, Inc. (the “Manufacturer”) warrants to the Original ® ® Purchaser that the Level 1 NORMOFLO... - Page 52 S E C T I O N 1 3 • L i m i t e d W a r r a n t y ® C. Conditions of Warranty: The warranty is void if the Level 1 ® NORMOFLO H-1129 Irrigation Fluid Warmer has been 1) repaired by someone other than the Manufacturer or its authorized agent;...
-
Page 53: Service
• No user-serviceable parts. All service must be performed by Smiths Medical or an authorized representative. All service must be performed by Smiths Medical, or an authorized service representative. Service by any other person or organization voids the warranty and transfers liability for malfunctions of the device to the servicing organization. -
Page 54: Disposal Information
Service Contacts Contact your Smiths Medical, Technical Service Department or Smiths Medical, distributor at: Smiths Medical ASD, Inc. 160 Weymouth Street... -
Page 55: Specifications
S E C T I O N 1 5 • S p e c i f i c a t i o n s SECTION Specifications System Specifications Standard Compliance Guidelines Product Safety EN 60601-1, UL 2601-1 EN 60601-1-2, FCC 47 CFR Part 15, Class B Enclosure Protection IEC 60529 IP Code: IPX1... -
Page 56: Electromagnetic Environmental Recommendations
S E C T I O N 1 5 • S p e c i f i c a t i o n s Electromagnetic Environmental Recommendations Recommended separation distances between portable and mobile RF communications equipment and ® ® the Level 1 NORMOFLO H-1129 Irrigation Fluid Warmer... -
Page 57: Symbols
S E C T I O N 1 6 • S y m b o l s SECTION Symbols Symbols Definitions Type BF Equipment Protected Against Dripping Water < Catalog Number > Serial Number Part Number Batch Code Manufacturer Date of Manufacture Quantity Protective Earth [Ground] Alternating Current... - Page 58 S E C T I O N 1 6 • S y m b o l s Symbols Definitions Sterilized using ethylene oxide Sterile Fluid Path, Ethylene oxide gas sterilized Caution: Federal (U.S.A.) law restricts this device to sale by or on the order of a physician. Device is class type 1 equipment Protective earth terminal Consult instructions for use.
- Page 59 S E C T I O N 1 6 • S y m b o l s Symbols Definitions Automatic Operation Recirculating Solution Temperature Over Temperature Test (Recirculating Solution Over Temperature) Add Recirculating Solution Check Disposables, Check Tubing Maximum Reservoir Level Minimum Reservoir Level Device has been tested by National Technical Systems, a nationally recognized technical...
- Page 60 I n d e x Index Description Fluid Warmer 2 Numerics Dial Gauge 19 Disinfecting recirculating solution 1-Liter (1L) Pressure Chambers Pressure During assembly 11 Chambers Reservoir 43 3-Liter (3L) Pressure Cuff Accessory Disposable Hand Piece Setting up 11 Attach 31 Using 32 Disposable Sets Installing 29...
- Page 61 I n d e x Priming 30 Pressure Used with 1129 Fluid Warmer 51 Activating and adjusting 32 Deflating 3L Pressure Cuff 33 Turning off 34 Pressure Chambers Control Panel 18 Maintenance and Calibration 45 Depressurizing 34 Lubricating O-Ring seals 42 Dial Gauge 19 Installing 10 Pressure Gauge 18...
- Page 62 I n d e x TEMPCHECK calibration test 40 Temperature Display 17 Test Fluid Warmer Alarms 38 Testing Add Recirculating Solution Alarm 37 Calibration 40 Check Disposables Alarm 37 Electrical 41 Fluid Warmer Alarms 38 Ground continuity 41 Maintenance requirements 44 Over Temperature test 38 Performance 39 Thermal specifications 50...
Need help?
Do you have a question about the Level 1 NORMOFLO H-1129 and is the answer not in the manual?
Questions and answers