Clarson public III Operating And Installation Instructions
Hide thumbs
Also See for public III:
- Operating and installation instructions (2 pages) ,
- Operating and installation instructions (4 pages) ,
- Service and installation instructions (24 pages)

Related Manuals for Clarson public III


Summary of Contents for Clarson public III
- Page 1 III Bedienings-en montagehandleiding Operating and Installation Instructions Instructions de Service et de Montage...
-
Page 2: Table Of Contents
Index Index Sommaire Eigenschappen/ Features / Caractéristiques ..........3 Aansluiting microfoon/luidspreker unit ............4 Connecting the microphone loudspeaker unit..........4 Brancher le pupitre micro/haut-parleur ............4 Standaard werkingsmode................5 Standard operating mode................5 Mode opératoire standard ................5 Push-to-talk werkingsmode ................6 Push to talk mode .................. -
Page 3: Eigenschappen/ Features / Caractéristiques
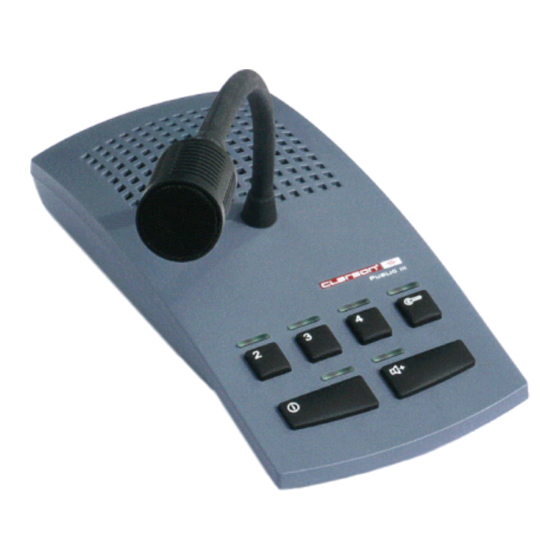
Eigenschappen/ Features / Caractéristiques Open duplextechnologie Tijdelijke volumetoename Mute-functie aan bedieningszijde (Push-to-talk) Afzonderlijk instelbare microfoongevoeligheid aan bedienings-en klantzijde Onderhoudsvriendelijk d.m.v. connectoren RJ45 Verhoogde storingsbeveiliging door gebalanceerde audio in-en uitgangen Laag verbruik wanneer systeem afgezet is (< 0,2 W) Afzonderlijke inductie versterker voor bedienings-en klantzijde* Inductie versterker aan bedieningszijde kan ook voor de klantzijde gebruikt worden* Tot 2 bedieningsposten* Tot 4 klantposten*... -
Page 4: Aansluiting Microfoon/Luidspreker Unit
Aansluiting microfoon/luidspreker unit Connecting the microphone loudspeaker unit Brancher le pupitre micro/haut-parleur Sluit de microfoon/luidspreker unit aan met de Centrale Eenheid bij connector 1 (noodzakelijke aansluiting). Connector 2 met de Centrale Eenheid aansluiten. Deze aansluiting is alleen noodzakelijk, wanneer aan de microfoon/luidspreker unit een headset/handset aangesloten wordt. -
Page 5: Standaard Werkingsmode
STANDAARD werkingsmode STANDARD Operating Mode Mode Opératoire STANDARD Op-en afzetten Volumetoename Switching ON/Off Volume increase Mise en marche/arrêt Augmenter le volume Opzetten: De toets “ ingedrukt Druk op toets !, de LED houden. bovenaan de toets licht op. De LED bovenaan de toets Afzetten: licht op. -
Page 6: Push-To-Talk Werkingsmode
PUSH TO TALK - werkingsmode PUSH TO TALK Mode Mode Opératoire APPUYER POUR PARLER Het systeem op-en afzetten Spreken Volumetoename Switching the system ON/OFF Speak Volume increase Mise en marche/arrêt Parler Augmenter le volume Opzetten: Toets ingedrukt houden. Toets “ ingedrukt houden. Druk op toets !, de LED De LED bovenaan de De LED bovenaan de toets... -
Page 7: Boost Werkingsmode
BOOST - werkingsmode BOOST MODE Mode BOOSTER Het systeem op-en afzetten Horen / Spreken Switching the system ON/OFF Listen / Speak Mise en marche/arrêt Ecouter / Parler In deze mode is het volume aan de Opzetten: bedieningszijde verhoogd met 10dB en Toets ! indrukken. -
Page 8: Standaard Werkingsmode Wijzigen (Standaard-Push To Talk-Boost)
Verandering van werkingsmode Changing the Operating Mode Changer le Mode Opératoire Standaard - mode Push to talk - mode Boost - mode Standard Operating Mode Push to talk Mode Boost Mode Mode Opératoire Standard Mode Appuyer pour parler Mode Booster Het systeem functioneert Systeem afzetten. -
Page 9: Posten Klantzijde Selecteren / Deuropening Functie
OPTIES / OPTIONS Posten klantzijde selecteren / Deuropening functie Selecting a Public Side Position / Door Lock Release Sélectionner une Position Côté Public/Commande de Gâche Posten klantzijde 2 / 3 / 4 Deuropening functie Public Side Positions 2 / 3 / 4 Door Lock Release Positions Côté... -
Page 10: Activatie Interface Headset/Handset
OPTIES/ OPTIONS Activatie interface HEADSET/HANDSET Activating the HEADSET/HANDSET Interface Activer l´interface MICRO-CASQUE/COMBINE Bedieningszijde Klantzijde Service Side Public Side Côté Service Côté Public Systeem afzetten. Systeem afzetten. Toets “ zo lang ingedrukt hou- Toets “ zo lang ingedrukt den totdat de LED bovenaan de houden totdat de LED bovenaan toets één keer oplicht. -
Page 11: Interface Headset/Handset Geactiveerd
OPTIES / OPTIONS Interface HEADSET/HANDSET geactiveerd HEADSET/HANDSET Interface activated Interface MICRO-CASQUE/COMBINE activée Bedieningszijde Klantzijde Bedienings-en klantzijde Service Side Public Side Service + Public Side Côté Public Côté Service + Public Côté Service De microfoon en luidspre- De microfoon en luidspreker De microfoon en luidspreker ker aan de bedieningszijde aan de klantzijde zijn niet... -
Page 12: Montage-Instructies
Montagehandleiding Montagetips: . Elke opening tussen de bedienings-en klantzijde zal de performantie van het systeem beïnvloeden. Hoe meer het loket gesloten blijft, des te meer zal het interfoniesysteem goed functioneren. . Plaats de luidspreker zo dicht mogelijk bij het oor van de luisteraar. Plaats de microfoon zo dicht mogelijk bij de mond van de spreker en zo ver mogelijk van de luidspreker. - Page 13 1. Montage van 1.1 Contactdoos/dozen RJ45 installeren (1 contactdoos voor elke de Centrale post klantzijde). Eenheid 1.2 Schroef de Centrale Eenheid vast met vier vijzen onder de tafel of tegen de muur. 2. Aansluiting 2.1 Installeer alle microfoons en luidsprekers en sluit deze aan aan de van de contactdoos RJ45 (fig 1).
-
Page 14: Afstellingen
FIG 2 3. Afstellingen De potentiometers bevinden zich aan de achterzijde van de Centrale Eenheid. Deze zijn vooraf ingesteld in de fabriek en moeten onder normale omstandigheden niet aangepast worden. Gebruik de potentiometers niet vooraleer het systeem geïnstalleerd en in werking is gesteld. -
Page 16: Installation Instructions
Installation Instructions Planning Advice Any aperture in the window between public and service side will affect the performance of the system. The more enclosed the counter, the better the system will perform. . The loudspeaker should be placed as near to the listener´s ear as possible. The microphone should be as near to the speaker´s mouth as possible, but as far from the loudspeaker as circumstances allow. - Page 17 1. Installation 1.1 Install the RJ45 socket/s (1 socket for each public side position) of the central unit 1.2 Screw the central unit provisionally on the wall or under the desk (4 screws). 2. Installation 2.1 Install the microphones and loudspeakers and connect them to the RJ45 socket (pict.
-
Page 18: Adjustment
pict. 2 3. Adjustment The potentiometers are located at the rear of the central unit. They have been pre-set at the factory and do not need to be adjusted under normal conditions. Do not turn potentiometers before the system has been installed and is in working order. If potentiometers need to be set, use a 2.5 mm (not smaller than 2 mm) flat blade screwdriver. -
Page 20: Instructions De Montage
Instructions de montage Indications pour l´intégration . Chaque ouverture du guichet entre le côté service et le côté public peut influencer l´efficacité acoustique. Plus la séparation physique est complète, meilleure sera la performance de l´interphonie. . Placer le haut-parleur aussi près que possible de l´oreille de celui qui écoute et le microphone aussi près que possible de la bouche de celui qui parle et aussi éloigné... - Page 21 1. Montage 1.1 Installer la/les prise/s RJ45 (1 prise par position public) l´unité centrale 1.2 Visser l´unité centrale avec 4 vis sous la table ou contre le mur 2. Branchement 2.1 Installer tous les microphones et haut-parleurs et les brancher à...
-
Page 22: Réglage
fig. 2 3. Réglage Les potentiomètres se trouvent à l´arrière de l´unité centrale. Le volume sonore a été réglé en usine. Dans un premier temps, mettre l´appareil en service en maintenant les pré-réglages usine. Après avoir vérifié les fonctions de l´appareil, vous pouvez être amené... - Page 24 Notizen / Memo / Notes Clarson Apparatebau GmbH Zeppelinstraße 4 D-78083 Dauchingen Tel. +49 (0)7720 / 9956 - 0 Fax +49 (0)7720 / 9956 - 22 E-mail: clarson@clarson.de, http://www.clarson.de Technische Änderungen vorbehalten. Technical modifications reserved. Sous réserve de modifications techniques.
Need help?
Do you have a question about the public III and is the answer not in the manual?
Questions and answers