Advertisement
Quick Links
Day One+
ACX7024
IN THIS GUIDE
Step 1: Begin | 1
Step 2: Up and Running | 6
Step 3: Keep Going | 10
Step 1: Begin
IN THIS SECTION
Meet the ACX7024 | 2
Install the ACX7024 | 2
Power On | 4
In this guide, we provide a simple, three-step path, to quickly get you up and running with your new Juniper Networks®
ACX7024 Cloud Metro Router. We've simplified and shortened the installation and configuration steps to make it easy
for you to install a DC-powered ACX7024 in a rack, power it up, and configure basic settings.
Advertisement

Related Manuals for Juniper Day One+ ACX7024


Summary of Contents for Juniper Day One+ ACX7024
- Page 1 Power On | 4 In this guide, we provide a simple, three-step path, to quickly get you up and running with your new Juniper Networks® ACX7024 Cloud Metro Router. We’ve simplified and shortened the installation and configuration steps to make it easy...
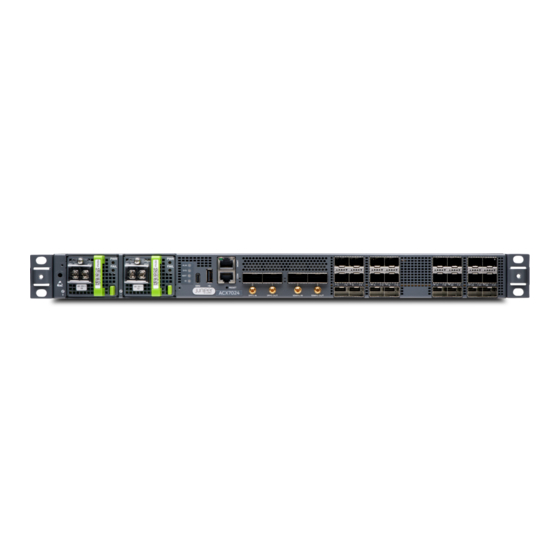
- Page 2 Meet the ACX7024 The ACX7024 Cloud Metro Router is a high-performance access router that addresses the growing demands of metro applications. With a compact 1-U form factor, temperature-hardened design, and advanced timing features, the ACX7024 is well suited to support Ethernet business services, residential access, and 5G mobile deployments. The ACX7024 provides 1GbE to 100GbE port flexibility and a switching capacity of 360 Gbps.
- Page 3 • A management host such as a laptop or desktop PC • A serial-to-USB adapter (if your laptop or desktop PC doesn’t have a serial port) • A grounding cable: 6 AWG, 90°C stranded copper wire • A 12 AWG and 75°C temperature-rated or 14 AWG and 90°C temperature-rated stranded copper wire to connect the DC source to the router.
- Page 4 Power On Now that you’ve installed your ACX7024 in the rack, let's connect it to power. The ACX7024 supports DC power supplies that are pre-installed at the factory. CAUTION: The connection between each power source and power supply module must include a circuit breaker.
- Page 5 Dress the grounding cable and verify that it doesn't touch or block access to router components, or drape where people could trip over it. Ensure that the power supplies are fully inserted in the chassis. Verify that the DC power cables are correctly labeled before making connections to the power supply module. In a typical power distribution scheme where the return is connected to chassis ground at the battery plant, you can use a multimeter to verify the resistance of the –48V and RTN DC cables to chassis ground: •...
-
Page 6: Step 2: Up And Running
NOTE: To connect the DC source to an ACX7024 router, use a 12 AWG and 75°C temperature-rated or 14 AWG and 90°C temperature-rated stranded copper wire. To connect the DC power source to an ACX7024 in a data center or a central office, use a 14 AWG DC wire. a. -
Page 7: Plug And Play
Now that the ACX7024 is powered on, let’s do some initial configuration to get it up and running on the network. It’s simple to configure and manage the ACX7024 using the CLI. Plug and Play The ACX7024 router ships with factory-default settings that enable plug-and-play operation. These settings load as soon as you power on the router. - Page 8 NOTE: If your laptop or desktop PC doesn't have a serial port, use a serial-to-USB adapter (not provided). At the Junos OS Evolved login prompt, type root to log in. You don't need to enter a password. If the software boots before you connect your laptop or desktop PC to the console port, you might need to press the Enter key for the prompt to appear.
- Page 9 Commit the configuration, and wait for the ZTP process to stop. [edit] root@re0# commit A message appears on the console, confirming that the ZTP process has stopped. [edit] root@# [ 511.430877] ztp.py[13237]: 2021-03-04 05:28:00 INFO: ZTP:(et-0/2/7) DHCP request timed out [ 511.432804] ztp.py[13237]: 2021-03-04 05:28:00 INFO: ZTP: checkZTPAbort: Upgrade detected pending abort [ 511.433586] ztp.py[13237]: 2021-03-04 05:28:00 INFO: ZTP: notifier loop user requested ZTP abort [ 511.485370] ztp.py[13237]: 2021-03-04 05:28:00 INFO: ZTP: exiting...
- Page 10 14. Enable Telnet service, if required. [edit] root@re0# set system services telnet NOTE: When Telnet is enabled, you cannot log in to the ACX7024 using root credentials. Root login is allowed only for SSH access. 15. Enable SSH service. [edit] root@re0# set system services ssh 16.
-
Page 11: What's Next
General Information If you want to Then See all documentation available for the ACX7024 See the ACX7024 Documentation in the Juniper Networks TechLibrary Stay up-to-date about new and changed features, and known Junos OS Evolved Release Notes and resolved issues... - Page 12 Juniper Learning Portal Juniper Juniper Networks, the Juniper Networks logo, Juniper, and Junos are registered trademarks of Juniper Networks, Inc. in the United States and other countries. All other trademarks, service marks, registered marks, or registered service marks are the property of their respective owners.
Need help?
Do you have a question about the Day One+ ACX7024 and is the answer not in the manual?
Questions and answers