
Related Manuals for Kraus Bolden KFF1610BB


Summary of Contents for Kraus Bolden KFF1610BB
- Page 1 INSTALLATION GUIDE Single Handle Filtration Kitchen Faucet KFF-1610 www.kraususa.com I Toll Free: 1.800.775.0703 I © 2019 Kraus USA Inc. I REV. AUG 09, 2021...
- Page 2 Congratulations on the purchase of your new Please keep the box and packaging materials until your product is completely installed. If you have any questions, require technical assistance, or have any problems with your product: DO NOT RETURN TO STORE Please contact our Customer Service Team 1-800-775-0703 / customerservice@kraususa.com Have the model number available, and retain a copy of your receipt...
-
Page 3: Prior To Installation
Prior to Installation: • Make sure you have all necessary parts by checking the diagram and parts list. If any part is missing or damaged, please contact Kraus Customer Service at 800-775- 0703 for a replacement • Turn o the hot and cold water lines at the angle stops and turn on the old faucet to release any built-up pressure •... - Page 4 Diagram and Parts List A. Spray Head G. Weight B. Faucet Body H. Weight Clip C. Rubber Washer I. Quick Connector D. Metal Washer J. 3/8” to 1/4” Filter Adapter E. Mounting Nut K. 2.5mm Hex Wrench F. Screws...
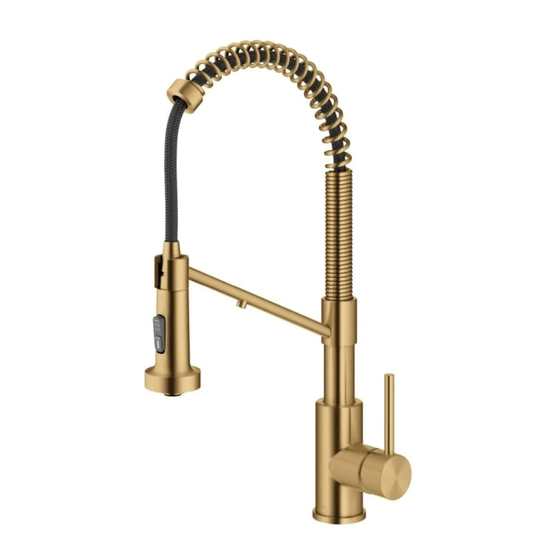
- Page 5 Faucet Dimension 10 3/4" [273.5mm] 4 1/4" 8 5/8" [108.6mm] [220.0mm] 5 1/4" [132.9mm] 2 1/8" [54.0mm] 3/8”-compression 3/8”-filter tube Installer Tip:...
- Page 6 Step 1: Installing the faucet Shut o water supply. Place faucet (B) through the hole in countertop. Secure the faucet (B) to the countertop using the rubber washer (C), metal washer (D) and mounting nut (E) provided. Tighten screws (F). (2N.m Max) Step 2: Securing the faucet assembly...
- Page 7 Step 3: Securing the faucet assembly Install the weight clip (H) at the point of the hose marking "weight here". Insert the weight (G) onto the weight clip (H) by sliding it down onto the weight clip (H). Step 4: Connect waterlines to main valve Attach waterlines to angle stops and tighten until snug.
- Page 8 Step 5: Flushing and checking for leaks Unfiltered Water Function Pull the hose assembly out of the spout and remove the spray head (A) by unscrewing it from the hose in a counterclockwise direction. Be sure to hold the end of the hose down into the sink and turn the faucet to the warm position Cold where it mixes hot and cold water.
-
Page 9: Replacement Parts
Replacement Parts Replacement Parts List Finish / Color Part # CH, SFS, MB,BB 1. Sprayer Head KP27216 SFACB* 2. Washer KP27208 3. Inverter KP27245 GRCH, GRSFS, 4. Sprayer Hose KP27247 BLBB,BLSFS BLMB,BLSFACB* CH, SFS, MB, BB 5. Spring Assembly KP27220 SFACB* 6. -
Page 10: Troubleshooting
Troubleshooting If you have followed the instructions carefully and your faucet still does not work properly, take the following coorective steps: P R O B L E M C A U S E A C T I O N Leakage under the Bonnet nut (7) has Remove the index (11). - Page 11 Any product reported to the authorized dealer or to Kraus as being defective within the warranty period will be repaired or replaced with a product of equal value at the option of Kraus. This warranty extends to the original owner or end-user, and is not transferable to a subsequent owner.
- Page 12 Rico shipping charges may apply). International shipping fees are not included. Commercial Warranty Kraus extends the above warranty for a period of one (1) year to purchasers of products for industrial, commercial, and business use. All incidental or consequential damages are specifically excluded. No additional warranties, express or implied, are given, including but not limited to any implied warranty of merchantability or fitness for a particular purpose.
- Page 13 IMPORTANT Register Your Kraus Product Activate Your Warranty Access Premium Customer Support Get Product Information REGISTER TODAY http://www.kraususa.com/registration www.kraususa.com...
Need help?
Do you have a question about the Bolden KFF1610BB and is the answer not in the manual?
Questions and answers