Advertisement
Table of Contents
Advertisement
Table of Contents

Related Manuals for ML Accessories AX CCT


Summary of Contents for ML Accessories AX CCT
- Page 1 INSTALLATION & MAINTENANCE MANUAL AXxxxCCT...
-
Page 2: General Instructions
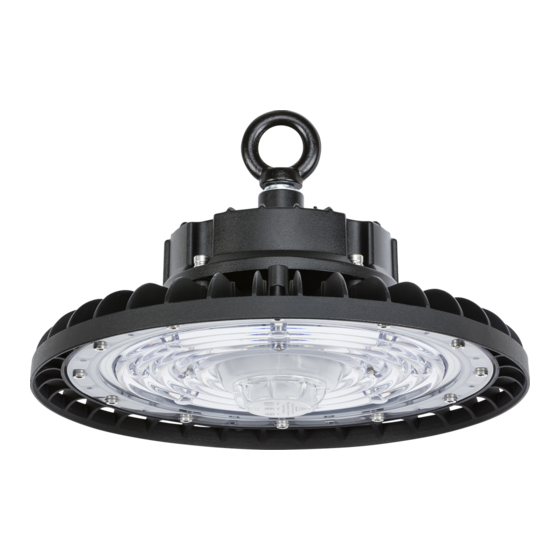
GENERAL INSTRUCTIONS These instructions should be read carefully and retained after installation by the end user for future reference and maintenance. These instructions should be used to aid installation of the following products: AX100CCT / AX150CCT / AX200CCT / AX100R / AX150R / AX200R / AX100L60 / AX150L60 / AX200L60 / AXSMOD / AXDMOD / AXREMC / AXBRAC SAFETY •... -
Page 3: Installation
INSTALLATION Note – Microwave sensors may not be suitable for all installations, for example enclosed spaces, as they are able to detect movement through non-metallic surfaces like plasterboard and thin doors. SUSPENSION MOUNTING • To suspend the fitting, screw the mounting hoop into the top of the luminaire and secure with the screw provided SURFACE MOUNTING •... - Page 4 Provide power to the required point of installation Connect the luminaire to the mains supply ensuring the correct polarity is observed: Live (brown), Earth (green/yellow), Neutral (blue) The luminaire can be connected to a 0-10V dimmer or DALI control gear (not supplied) (see Fig. 1) Fig.
- Page 5 Additional accessories (sold separately) AXxxxL60 LENS • To replace the 120° lens supplied with the optional 60° lens AXxxxL60: remove all the screws that attach the lens to the luminaire, remove the lens, then attach the 60° lens and replace the screws AXxxxR REFLECTOR •...
- Page 6 Fig. 3 Fig. 3 Note: To change the settings on the optional AXSMOD microwave sensor module, the AXREMC remote Note: To change the settings on the optional AXSMOD microwave sensor module, the controller is required. The maximum mounting height with the sensor fitted is 15 metres. Use of the optional AXDMOD module enables the luminaire to become DALI compatible.
- Page 7 Fig. 3 Note: To change the settings on the optional AXSMOD microwave sensor module, the AXREMC remote AXREMC REMOTE CONTROL PROGRAMMER controller is required. The maximum mounting height with the sensor fitted is 15 metres. • Insert 2 x AA batteries (not included) Use of the optional AXDMOD module enables the luminaire to become DALI compatible.
- Page 8 Press to switch between permanent on and permanent off. To quit this Press to switch between permanent on and permanent off. To quit this Reset to default settings: Brightness 100%, Sensitivity 100%, Hold time 5m, Confirm the selected parameters or save/confirm the selected mode mode press “AUTO”...
- Page 9 WARNING This product must be disconnected from the circuit if subjected This product must be disconnected from the circuit if subjected WARNING testing. Irreparable damage will occur if this instruction is not fo testing. Irreparable damage will occur if this instruction is not fo This product must be disconnected from the circuit if subjected to any high voltage or insulation resistance testing.
-
Page 10: Warranty
ML Accessories does not accept responsibility for any installation costs associated with the replacement product. Your statutory rights are not affected. ML Accessories reserve the right to alter product specification without prior notice.
Need help?
Do you have a question about the AX CCT and is the answer not in the manual?
Questions and answers