
Related Manuals for BANDELIN SONOREX DIGIPLUS DL 102 H


Summary of Contents for BANDELIN SONOREX DIGIPLUS DL 102 H
- Page 1 Dokument: 1586-006 Sprache: en Version: 2022-08 Instructions for use SONOREX DIGIPLUS High-performance ultrasonic baths Valid for: DL 102 H DL 156 BH DL 255 H DL 510 H DL 512 H DL 514 BH DL 1028 H 1586-006 en/2022-08...
- Page 2 © 2022 1 2 GmbH & Co. KG, Heinrichstr. 3–4, 12207 Berlin, Germany Phone: +49 30 76880-0, Fax: +49 30 7734699, info@bandelin.com Certified in accordance with ISO 9001 and ISO 13485 2/46 1586-006 en/2022-08...
-
Page 3: Table Of Contents
Table of contents Table of contents About this operating manual ........Safety . - Page 4 Table of contents Sonication time ..........17 Pour in sonication fluid .
-
Page 5: About This Operating Manual
• If you pass this ultrasound bath on to others, please enclose these instructions for use. • Contact your specialist dealer or BANDELIN if any of your ques- tions are not answered in these instructions for use. Information on service can be found in chapter 6.4 Repair. -
Page 6: Safety
Safety 2 Safety Use of the ultrasound bath The following applications are possible with the ultrasound bath: • Ultrasonic cleaning of objects of various shapes, types and sizes, • Homogenising, emulsifying, • Rapid degassing of liquids, • Sonochemical applications, e.g. for radical production or improved material transport, •... -
Page 7: Danger Of Electric Shock
Safety Danger of electric shock The ultrasound bath is an electrical device. Failure to follow safety rules can result in a life-threatening electric shock. • Protect the ultrasound bath from moisture and wetness. Keep the surface and controls clean and dry. •... -
Page 8: Hazards Due To High Temperature
Safety Hazards due to high temperature The ultrasound bath, the sonication fluid and the sonication objects can become hot during operation. Contact with these products may cause burns. The temperature can be set at up to 80 °C. Ultrasound energy warms up the sonication fluid even without additional heating. -
Page 9: Danger Due To Preparations Used
Safety • Do not touch the sonication fluid during operation. • Never sonicate living beings. Danger due to preparations used Preparations used in the ultrasound bath may be toxic or corrosive. They can irritate the eyes, skin and mucous membranes. Vapours and aerosols can also be dangerous. -
Page 10: Erosion Of The Oscillating Tank
Safety Erosion of the oscillating tank The surface of the oscillating tank is subject to erosion. How quickly this erosion takes place depends on the use of the ultrasound bath. The erosion leads to leakage in the oscillating tank. Bath liquid can thus penetrate into the interior of the ultrasound bath. -
Page 11: Disturbance Of Wireless Communication
Safety 2.11 Disturbance of wireless communication The ultrasound bath may interfere with other wireless communica- tion ultrasound baths in the immediate vicinity, such as: • mobile phones, • WLAN devices, • Bluetooth devices. If interference occurs with the operation of a wireless device, move it further away from the ultrasound bath. -
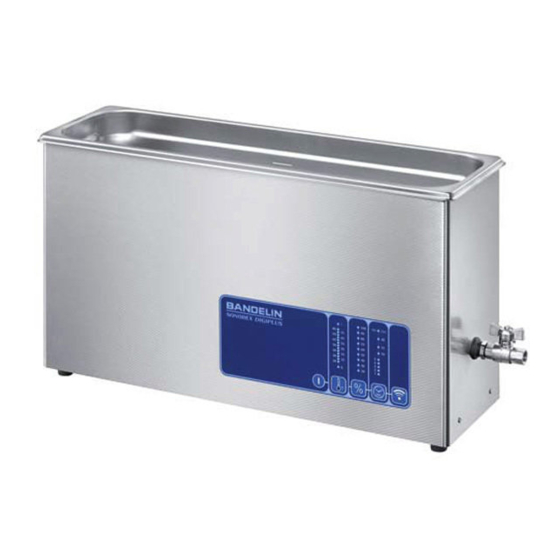
Page 12: Design And Function
Design and function 3 Design and function Structure Fig. 1 Overview of the device Handles (depending on model) Oscillating tank Control panel Filling level mark Drain with ball valve (depending on model) Housing Device feet 12/46 1586-006 en/2022-08... -
Page 13: Control Panel
Design and function Control panel Fig. 2 Operating elements On/off button for switching the device on and off Button for setting the heating temperature with temperature scale Button for setting the power with percentage scale Button for setting the sonication time with time scale Start/stop button for ultrasound Function The ultrasound bath uses cavitation triggered by low-frequency... -
Page 14: Preparation For Operation
Preparation for operation 4 Preparation for operation Installation site requirements The installation location of the ultrasound bath must meet the fol- lowing conditions: • The installation surface must be horizontal, firm and dry. • The load-bearing capacity must be sufficient for the ultrasound bath with the sonication fluid. -
Page 15: Performing A Function Test
Preparation for operation Performing a function test Requirement • The device has adapted to the climatic conditions at the setup location for at least 2 hours. Procedure 1. Insert the mains plug for the device into an earthed mains socket. 2. -
Page 16: Operation
The ultrasound agent used must foster cavitation and be biode- gradable, easy to dispose of, material-compatible and long-lasting. BANDELIN recommends ultrasound agents from the TICKOPUR, TICKOMED and STAMMOPUR product ranges from DR. H. STAMM GmbH. -
Page 17: Sonication Time
Operation • Telephone advice: +49 30 76880-280 • Internet: www.dr-stamm.de Observe the information on dosing provided by the ultrasound agent manufacturer. Please refer to the dosing table for the required quantities of ultrasound agent and water. See chapter 9 Dosing table. You can calculate the quantities yourself in the same way as the following example: 10 l ready to use solution, 2.5%:... -
Page 18: Pour In Sonication Fluid
Operation Pour in sonication fluid CAUTION Risk of scalding – Do not pour hot water into the ultrasonic oscillating tank. – Maximum filling temperature: 50 °C. NOTICE Damage due to condensation in the ultrasonic bath At high humidity, condensation forms inside the device if you fill it with cold water. - Page 19 Operation Fig. 3 Fill oscillating tank On/off button for switching the device on and off Filling level mark Drain with ball valve (depending on model) Requirements • The ball valve must be closed in ultrasonic baths with a drain. • The device must be switched off. Procedure 1.
-
Page 20: Switching Sonication On And Off
Operation Switching sonication on and off Requirements • The ultrasonic oscillating tank has been filled. • The mains plug has been connected to an earthed mains socket. Procedure 1. If available, place the lid on the device. 2. Press the on/off button to switch on the device. 3. - Page 21 Operation be reduced. At higher working temperatures, the effect of the ultra- sound decreases again. Ultrasound also heats the sonication liquid. During continuous operation, the working temperature of the sonication liquid can rise above the set value – particularly if the ultrasonic oscillating tank is covered.
-
Page 22: Setting The Power
Operation the heating is on. Above the set target temperature, the LED flashes slowly and the heating is off. – The yellow LED will light up steadily as soon as the target tem- perature and the actual temperature are the same. –... -
Page 23: Degassing The Sonication Fluid - Degas
Operation Procedure Hold down the button for setting the heating temperature and press the on/off button to switch on the ultrasonic bath. » As soon as the heating is switched on, the ultrasound is acti- vated once per minute regardless of the temperature. Information –... -
Page 24: Adding Goods To Be Treated
Operation 5.10 Adding goods to be treated To achieve good results, observe the following information when inserting goods to be treated: • Each time before sonication, check whether the sonication fluid is contaminated. If there is visible contamination, replace the sonication fluid. -
Page 25: Empty The Oscillating Tank
Operation Switch off the ultrasound before removing the sonication objects. Do not remove sonication objects by hand. Carefully remove e.g. the insert basket with the sonication objects and place it on a level surface. Rinse sonication objects with clean water. Do not leave sonication objects in the sonication fluid for too long. -
Page 26: Enabling And Blocking Continuous Operation
Operation 7. If necessary, disinfect the ultrasound bath with a suitable sur- face disinfectant. 5.13 Enabling and blocking continuous operation The function can be blocked to prevent accidental activation of con- tinuous operation. Requirement • The mains plug is disconnected. Procedure Press and hold down the button for setting the sonication time. -
Page 27: Troubleshooting A Malfunction
Operation 5.14 Troubleshooting a malfunction Error Possible causes Troubleshooting Insufficient ultra- • Sonication fluid contains • Degas the sonication fluid. sound effect, loud gases. See chapter 5.9 Degassing noises the sonication fluid – • There are too many sonica- DEGAS. tion objects in the oscillat- •... -
Page 28: Maintenance
Maintenance 6 Maintenance Cleaning and maintaining the ultrasound bath Cleaning the housing • Wipe the housing with a damp cloth. Wipe dry with a soft cloth. • Do not use abrasive cleaning agents, only care products without scouring additives. • If necessary, disinfect the housing with a suitable surface disin- fectant. - Page 29 Maintenance Checking indicator lamps Requirement • Device is switched off. Procedure 1. Hold down the start/stop button and press the on/off button. » All LEDs light up briefly one after the other. Then all LEDs light up at the same time. 2.
-
Page 30: Performing The Foil Test
Maintenance Performing the foil test Before the first use and at regular intervals, e.g. every 3 months, a foil test should be conducted. This serves to ensure the consistent effect of the ultrasound. The frequency with which these tests are carried out is your responsibility. - Page 31 To document the test results, you can download a documentation template here: https:/ /bandelin.com/folientest/ Here you will also find an application video. Foils can also be archived if done in a suitable manner (scanning, photos, etc.). This allows foils to be compared at any time.
- Page 32 9. Rinse the oscillating tank thoroughly to remove any detached foil particles. Suitable foil test frames can be ordered from BANDELIN electronic GmbH & Co. KG. The foil test frames are designed for a wide range of tank dimensions. Aluminium foil is also required to conduct the test, but it is not included in the scope of delivery.
-
Page 33: Repair
Fill out the form and attach it to the outside of the packing so that it is clearly visible. Acceptance will be refused without a completed form. Send the device to the following address: BANDELIN electronic GmbH & Co. KG Heinrichstr. 3-4 12207 Berlin Germany +49 30 76880-13 service@bandelin.com... -
Page 34: Disposal
Disposal 7 Disposal WARNING Health risk due to contaminated ultrasonic bath – Decontaminate the ultrasonic bath before disposal if it has come into contact with hazardous substances. – Also decontaminate accessories before disposal. Dispose of the ultrasonic bath properly as elec- tronic waste if it can no longer be used. -
Page 35: Device Information
Device information 8 Device information Technical data Electrical data Operating voltage 230 V~ (± 10%) 50/60 Hz Operating voltage (optional) 115 V~ (± 10%) 50/60 Hz Protection class Degree of protection IP 33 Ultrasonic frequency 35 kHz Type Ultrasonic peak Heating out- Power con- Power con-... -
Page 36: Ambient Conditions
Device information Dimensions and weights Type Internal dimen- Operating Connection Weight sions of oscil- volume for ball valve lating tank (drain) (L × W × H) [mm] [kg] DL 102 H 240 × 140 × 100 G ¼ DL 156 BH 500 ×... -
Page 37: Ce Conformity
Dosing table CE conformity The device satisfies the CE-marking criteria of the European Union: – 2014/35/EU – Low Voltage Directive – 2014/30/EU – EMC Guideline – 2011/65/EU RoHS Directive A declaration of conformity can be requested from the manufac- turer by providing the serial number. 9 Dosing table Type Work... -
Page 38: Accessories
Accessories 10 Accessories Insert basket K ..., made of stainless steel, sieve cloth. Protects objects to be treated and prevents damage to the tank bot- tom. Optimum ultrasound transmission. Utensil holder GH ..., made of stainless steel, mesh size 12 x 12 mm. For larger components. - Page 39 Accessories Insert bas- Utensil Lid D ... Insert bas- Basket Lid D ... T Insert tub Type holder holder DL 102 H K 3 C GH 1 D 100 – – D 3 T KW 3 DL 156 BH K 6 BL –...
- Page 40 Accessories Inset baskets KD …, PD …, Sieve cloth. Suitable for inset beakers, for cleaning small parts. KD 0: Stainless steel, interior Ø 75 mm; PD 04: Plastic, interior Ø 60 mm. Inset beakers SD … (glass), EB … (stainless steel), KB …, PD … (plastic). For indirect cleaning of small parts, suitable for positioning lid and beaker holder diameter 87 mm.
- Page 41 Accessories Inset basket Insert beaker Position- Impres- Insert Injection Cassette ing lid/ sion tray basket nozzle holder beaker holder holder Type holder DL 102 H KD 0, PD 04 SD 06, SD 09, DE 100 LT 102 PK 2 C ED 9 –...
- Page 42 Accessories Spring clamps EK …, made of stainless steel, for laboratory flasks. Prevent them from buoying upwards. For screwing into inset baskets and utensil holders. EK 10 – 10 ml, max. Ø 31 mm EK 25 – 25 ml, max. Ø 42 mm EK 50 –...
- Page 43 Accessories Holding clamps for Handle adjust- Test tube Sieve holder Silicone knob Fixation Type laboratory flasks ment holder clamps DL 102 H EK 10, EK 25, EK 50, GV 3 RG 2 – SM 3 – EK 100, EK 250 DL 156 BH EK 10, EK 25, EK 50, GV 3...
- Page 44 Accessories 44/46 1586-006 en/2022-08...
- Page 45 45/46 1586-006 en/2022-08...
- Page 46 1 2 GmbH & Co. KG Heinrichstr. 3–4 12207 Berlin Germany Phone: +49 30 76880-0 Fax: +49 30 7734699 info@bandelin.com www.bandelin.com 1586-006 en/2022-08...
Need help?
Do you have a question about the SONOREX DIGIPLUS DL 102 H and is the answer not in the manual?
Questions and answers