
Related Manuals for PROGRESSIVE DESK Corner Ryzer FLT-05


Summary of Contents for PROGRESSIVE DESK Corner Ryzer FLT-05
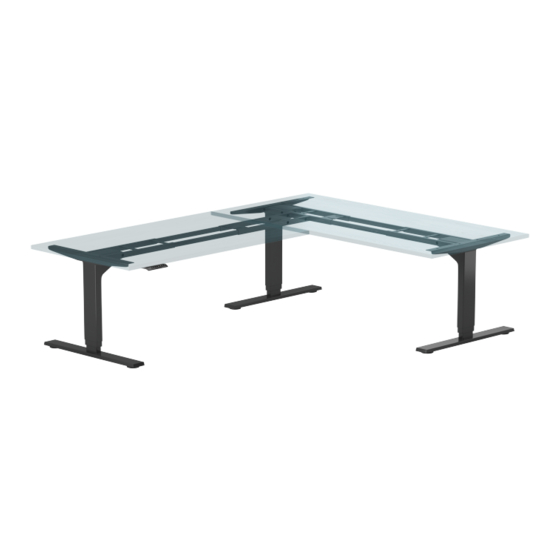
- Page 1 Corner Ryzer (FLT-05) Table Lift and Table Top User Manual Scan for video assembly! V 3.02...
-
Page 2: Table Of Contents
Table of Contents Caution Specifications Components Assembly Table Top Installation Dimensional Drawing Reset Procedure Operations Troubleshooting Have any queries? Our expert engineers are here to help! sales@progressivedesk.com 1-800-828-9414 progressivedesk.com P a g e | 2... -
Page 3: Caution
Caution Have any queries? Our expert engineers are here to help! sales@progressivedesk.com 1-800-828-9414 progressivedesk.com P a g e | 3... -
Page 4: Specifications
Specifications Specification Description Input Voltage 120 VAC, 60 Hz Force 330 lbs (110 lbs per Leg) Speed 1.57"/sec Install Size Retracted 23.6" Install Size Extended 49.1" Foot Length 23.6" Duty Cycle 10% (2 Minutes On, 18 Minutes Off) Collision Detection Frame Material Stell Remote Functions... -
Page 5: Components
Components P a g e | 5... -
Page 6: Assembly
Assembly On the protected surface of your floor, lay your table top facing down. Orient it according to Step 1. The table lift assembly process can be done directly on the table top surface as if you were building the table lift upside down. Note: Some table tops are reversible. - Page 7 Assembly STEP 6 P a g e | 7...
- Page 8 Assembly For Progressive Desk 30" wide table tops, use Holes 4 to 7. For Progressive Desk DT-90 Corner table top, use holes 3 to 6. P a g e | 8...
- Page 9 Wood Screws (12) on the marked locations. Install only 1/4 of screw's length and then remove the screws. Optional: An electric drill with a drill bit may be used to create pilot holes instead of the wood screws. Place Progressive Desk DT-90 corner table top in accordance to the suggested dimensions in the diagram for best fitment.
- Page 10 Table Top Installation P a g e | 10...
- Page 11 Table Top Installation P a g e | 11...
-
Page 12: Dimensional Drawing
Dimensional Drawing 23.6" P a g e | 12... -
Page 13: Reset Procedure
Operations P a g e | 13... - Page 14 Operations P a g e | 14...
- Page 15 Operations P a g e | 15...
-
Page 16: Troubleshooting
Troubleshooting Have any queries? Our expert engineers are here to help! sales@progressivedesk.com 1-800-828-9414 progressivedesk.com P a g e | 16...
Need help?
Do you have a question about the Corner Ryzer FLT-05 and is the answer not in the manual?
Questions and answers