LXE VX3X User Manual
Lxe vx3x: user guide
Hide thumbs
Also See for VX3X:
- Reference manual (316 pages) ,
- User manual (33 pages) ,
- Installation instructions manual (6 pages)

Related Manuals for LXE VX3X


Summary of Contents for LXE VX3X
- Page 1 VX3X User’s Guide Copyright © September 2008 by LXE Inc. All Rights Reserved E-EQ-VX3XOGWW-D...
- Page 2 Summit Data Communications, Inc. Summit Data Communications, the Summit logo, and “The Pinnacle of Performance” are trademarks of Summit Data Communications, Inc. All rights reserved. The Bluetooth® word mark and logos are owned by the Bluetooth SIG, Inc. and any use of such marks by LXE, Inc. is under license.
-
Page 3: Revision Notice
Appendix B Regulatory Notices and Safety Information Note: A complete revision history is included in Appendix B, “Regulatory Notices and Safety Information”. Revision Notice VX3X User’s Guide Explanation Update approvals for 802.11 a/b/g radio. Remove Summit Declaration of Compliance for consistency. -
Page 5: Table Of Contents
VX3X V EHICLE OUNT Introduction ... 1 Identifying the VX3X Computer ...2 Document Conventions ...3 Environmental Specifications...3 Quick Start... 4 Troubleshooting...5 Components ... 6 Microsoft Windows CE Control Panel... 8 The Half-Screen Display ... 8 AppLock and the VX3X... 9 Single Application AppLock ...9... - Page 6 Procedure ...25 Step 1 – Mount Vehicle RAM Clamp Mount ...25 Mounting Dimensions... 26 Step 2 – Attach RAM Mount Ball to the VX3X ...27 Step 3 – Attach VX3X Assembly to RAM Mount...28 Completed Assembly...28 Strain Relief Cable Clamps ... 29 Install Stylus Tether and Sleeve (Optional) ...
- Page 7 Distance from Label ...49 Successful Scan ...49 Unsuccessful Scan...49 Bluetooth Scanners ...50 Voice Data ...50 Bluetooth Devices... 51 PPENDIX The VX3X Keypad... 53 Key Map 101-Key Equivalencies...53 IBM 3270 Keypad Overlay ...58 IBM 5250 Keypad Overlay ...58 PPENDIX EGULATORY Approvals ... 60 Revision History...
- Page 8 Figure 14 Strain Relief Cable Clamps ...29 Figure 14 Slide Clamp Over Cable ...29 Figure 16 Connect Serial Scanner Cable ...31 Figure 17 VX3X with Generic Barcode Scanner Attached ...32 Figure 18 Generic Barcode Scanner ...32 Figure 19 Connect Serial Cable to COM3 ...33 Figure 20 Connect USB-C Cable...34...
-
Page 9: The Vx3X Vehicle Mount Computer
The keys on the keypad are constructed of a phosphorescent material that can easily be seen in dimly lighted areas. The VX3X provides the power and functionality of a desktop computer in a vehicle mounted unit, with a wide range of options: •... -
Page 10: Identifying The Vx3X Computer
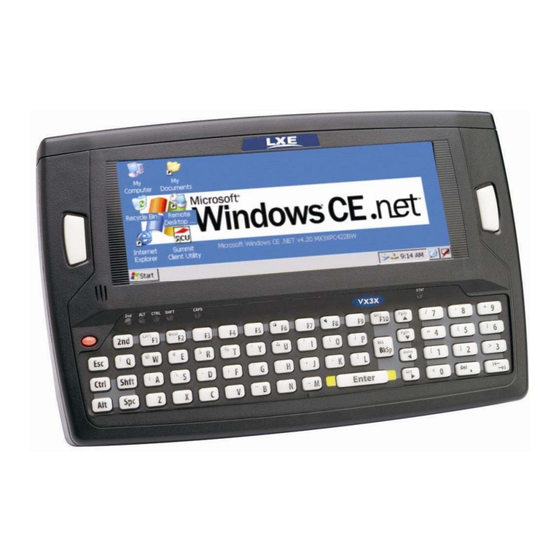
Identifying the VX3X Computer VX3X The VX3X is identified by the “VX3X” logo located above the keypad. The VX3X is covered in this document and the VX3X Reference Guide. VX3Plus The VX3Plus is identified by the “VX3Plus” logo located at the bottom right of the keypad. -
Page 11: Document Conventions
-22°F to 158°F (-30°C to 70°C) [non-condensing] 5% to 95% non-condensing at 104°F (40°C) Based on MIL Std 810D 8 kV air, 4kV contact 75G, 5ms duration, 100 shock impacts 32.8 feet (10 meters) Direct line of sight only. VX3X User’s Guide... -
Page 12: Quick Start
Use this guide as you would any other source book -- reading portions to learn about the VX3X, and then referring to it when you need more information about a particular subject. This guide takes you through installation and operation of the LXE VX3X. -
Page 13: Troubleshooting
AppLock is installed and running on the mobile device. AppLock restricts User access to running programs. Changes or modifications require Administrator access. Refer to AppLock in the VX3X Reference Guide for setup and processing information. Tap File | Exit to close the RFTerm application. -
Page 14: Components
Components Left Port Strain Relief Clamps Right Port The following combinations are offered for the VX3X Endcap Left Port COM3 (RS-232) COM3 (RS-232) USB-Host (USB-H) USB-Host (USB-H) Endcap Display Programmable Key Beeper On/Off Button VX3X User’s Guide RS-232 Figure 1 VX3X Components, Top View... -
Page 15: Figure 3 Vx3X Components, Back View
Components Note: The RAM ball shown above is shipped unattached. The installer must assemble the RAM ball to the back of the VX3X. See “Installation” later in this manual for details. E-EQ-VX3XOGWW-D Figure 3 VX3X Components, Back View RAM Ball... -
Page 16: Microsoft Windows Ce Control Panel
Microsoft Windows CE user guides or the on-line Help application for these standard configuration options. The Half-Screen Display The VX3X has a half screen transmissive LCD color display capable of supporting VGA graphics mode. The resolution is 640 x 240 pixels. VX3X User’s Guide... -
Page 17: Applock And The Vx3X
AppLock. Multi Application AppLock A checkmark indicates applications currently active or available for Launching by the user. When Keyboard is selected, the VX3X default input method (Input Panel, Transcriber, or custom input method) is activated. Note: If “Keyboard”... -
Page 18: Using The Keypad
The previous application continues to run in the background. End-user key presses affect the application in focus only. See the VX3X Reference Guide for AppLock setup instruction. VX3X User’s Guide AppLock and the VX3X... -
Page 19: The Qwerty Keyboard
The QWERTY Keyboard The QWERTY Keyboard The VX3X has a QWERTY keyboard, available with a standard ANSI overlay, an IBM 3270 overlay or an IBM 5250 overlay. These keyboards have 101 keyboard functions, including a numeric keypad. Please refer to Appendix A, “Key Maps”, for keypress combinations. -
Page 20: Key Functions
Shft VX3X User’s Guide Function For information on programming these keys, please refer to the “VX3X Reference Guide”. By default, these keys function as Enter keys, except for IBM 5250 configurations where the left button is configured as “Field Exit”. -
Page 21: Caps Key And Capslock Mode
CAPS OR Shift – result is an uppercase letter. • CAPS AND Shift keypress – result is a lowercase letter. For information on preserving Caps configuration after a reboot, please see refer to the “VX3X Reference Guide”. Keypad Shortcuts Use keyboard shortcuts instead of the stylus: •... -
Page 22: Led Functions
Amber when on and unlit when off. Status Indicator. STAT • Amber when device is booting up. • Blinking Green when display Suspend state begins. VX3X User’s Guide SHFT CAPS Break Figure 8 LED Functions keypress. The QWERTY Keyboard STAT... -
Page 23: General Windows Ce Keyboard Shortcuts
The QWERTY Keyboard General Windows CE Keyboard Shortcuts Use the keyboard shortcuts in the chart below to navigate with the VX3X keyboard. These are standard keyboard shortcuts for Windows CE applications. Press these keys … CTRL + C CTRL + X... -
Page 24: Input Panel (Virtual Keyboard)
When the virtual keyboard is displayed, the physical keyboard is still active. Therefore it is possible to input data from both keyboards. Enabling the Input Panel The Input Panel is disabled by default. Please see the “VX3X Reference Guide” for details on enabling the Input Panel VX3X User’s Guide... -
Page 25: Power Supply
Power Supply Power Supply Vehicle power input for the VX3X is 12V to 80V DC and is accepted without the need to perform any manual adjustments within the VX3X. See the section titled “Installation”, sub-section titled “Vehicle 12-80V DC Direct Connection”. -
Page 26: Getting Help
LXE Manuals CD or logon information for the ServicePass web pages. You can also get help from LXE by calling the telephone numbers listed on the LXE Manuals CD, in the file titled “Contacting LXE”. This information is also available on the LXE website. - Page 27 Manuals and Accessories Power Supplies Power Supply, External, AC, W/US Power Cord VX3X Power Supply, External, AC, No Power Cord VX3X Adapter Cable for AC Power Supply to VX3X Antenna Mount Kits Remote Mount Antenna Assembly Kit, 8 Ft Cable...
- Page 28 Bluetooth Scanner and Accessories LXE Bluetooth module with laser ring scanner, battery, two hand/wrist straps (large and small) LXE Bluetooth module with 1D/2D imager ring scanner, battery, two hand/wrist straps (large and small) Li-Ion Spare Battery for LXE Bluetooth Ring Scanner...
- Page 29 Replacement Microphone Foam, Wind Screen, 10 pack Replacement Microphone Foam, Wind Screen, 50 pack Replacement Headset Foam, Ear Cover, 10 pack Replacement Headset Foam, Ear Cover, 50 pack E-EQ-VX3XOGWW-D 9000A076CBLHEADSET1 HX1A501SINGHEADSET HX1A502DUALHEADSET HX1A503BTHHEADSET HX1A504HSBLOCKFOAM HX1A505DUALYOKE HX1A506SINGLEYOKE HX1A508WINDSREEN10 HX1A509WINDSREEN50 HX1A510FOAMEAR10 HX1A511FOAMEAR VX3X User’s Guide...
- Page 30 Manuals and Accessories VX3X User’s Guide E-EQ-VX3XOGWW-D...
-
Page 31: Installation
Equipment Needed: Phillips No. 1 screwdriver and a Torque wrench capable of measuring to 50 inch pounds (5.64±.56 N/m). Note: Torquing tool is not supplied by LXE. Tools needed to attach the RAM Clamp Mount to the vehicle are not supplied by LXE. The VX3X is designed to use a RAM mount system. -
Page 32: Ram Mount System
10-32 lock nuts VX3X User’s Guide RAM Mount System The RAM mounting assembly consists of the following parts: VX3X RAM ball (included with VX3X) RAM arm, size C RAM clamp mount RAM Clamp Mount includes: Upper Clamp Piece with Ball... -
Page 33: Procedure
Align the bolts with the holes in the lower clamp piece. Place the nylon locking nuts (D) on the bolts and tighten the bolts. E-EQ-VX3XOGWW-D Figure 10 RAM Clamp Mount Figure 11 Assembled RAM Clamp Mount Components VX3X User’s Guide... -
Page 34: Mounting Dimensions
Mounting Dimensions Figure 12 RAM Clamp Mount - Mounting Dimensions (Not To Scale) VX3X User’s Guide RAM Mount System 2.56” (65.02 mm) 1.84” (46.74 mm) Varies depending on bolt length E-EQ-VX3XOGWW-D... -
Page 35: Step 2 - Attach Ram Mount Ball To The Vx3X
Place the VX3X face down on a stable surface. Position the RAM ball bracket on the rear of the VX3X, aligning the studs on the back of the VX3X with the holes on the RAM ball mount bracket. Attach with three 10-32 lock nuts. -
Page 36: Step 3 - Attach Vx3X Assembly To Ram Mount
Slip the RAM arm over the ball on the vehicle RAM clamp mount. Insert the ball of the RAM mount bracket into the RAM arm. Adjust the VX3X to the desired position and tighten the knob on the RAM arm using the supplied RAM wrench. -
Page 37: Strain Relief Cable Clamps
Strain Relief Cable Clamps Equipment Required: Phillips screwdriver (not supplied by LXE) There are two strain relief cable clamps secured to the VX3X endcap. Use the strain relief clamps to secure audio, power, and I/O cables attached to the VX3X. -
Page 38: Install Stylus Tether And Sleeve (Optional)
Stylus Clip so that the ends don’t interfere with placing the stylus in the Stylus Clip. Place the stylus in the Stylus Clip when not in use. An extra or replacement stylus can be ordered from LXE. See the section titled “Accessories” for the stylus part number. -
Page 39: Connect Serial Barcode Scanner
Pin 9 of COM1 or COM3 (when present) may be configured to provide +5V or RI. To change Pin 9 of the port, please refer to the “VX3X Reference Guide”. Caution – Do Not Use the USB-C or USB-H Labeled Port for Tethered Scanners. -
Page 40: Figure 17 Vx3X With Generic Barcode Scanner Attached
When you have finished using the scanner, remove it from the VX3X and store the scanner in a closed container or bag. Figure 19 VX3X with Generic Barcode Scanner Attached VX3X User’s Guide 1. Good Scan LED (or equivalent) 2. Trigger 3. -
Page 41: Connect Serial Printer Or Pc
Caution – Do Not Use the USB-C or USB-H Labeled Port for PC serial cables or printers. The printer or PC cable requires a nine-pin D-shell female connector for the VX3X. The printer or PC cable is attached to the connector labeled “RS-232”. -
Page 42: Usb-C Port
The USB-C connector accepts an adapter cable which provides a USB client port. Cable requires a nine-pin D-shell female connector for the VX3X. Power off the VX3X before connecting the cable to the VX3X. Seat the connector firmly over the pins and turn the thumbscrews in a clockwise direction. -
Page 43: Usb-H Port
D-shell female connector for the VX3X. USB Host Type B Power off the VX3X before connecting the cable to the VX3X. Seat the connector firmly over the pins and turn the thumbscrews in a clockwise direction. Do not overtighten. -
Page 44: Connect External Headset
An adapter cable (LXE Part No. 9000A076CBLHEADSET1) can be attached to the audio port. The adapter cable has a 2.5mm plug on one end to attach to the VX3X and a quick disconnect connector on the other end to connect to a variety of LXE voice recognition headsets. -
Page 45: Other Headsets
Connect the quick connect end of the adapter cable to the LXE headset. Align the pins and push the connectors together until they click and are locked in place. If the adapter cable is removed from the VX3X, replace the plug to ensure the VX3X is environmentally sealed. -
Page 46: Connect Antenna
Connect Antenna If the VX3X has the optional remote mount external antenna, please refer to the “Vehicle Remote Mount Antenna Installation Sheet”, available on the LXE Manuals CD or ServicePass website, for details. If the VX3X has an internal antenna (no antenna connector on the endcap), the antenna was connected when the VX3X was manufactured. -
Page 47: External Power Supply, Optional
External Power Supply, Optional External Power Supply, Optional The LXE-approved AC Power Supply and Adapter Cable are only intended for use in a 25ºC (77ºF) maximum ambient temperature environment. In North America, this unit is intended for use with a UL Listed ITE power supply with output rated 12 –... -
Page 48: Vehicle 12-80Vdc Power Connection
“Vehicle Connection Wiring Color Codes” for additional wire color-coding specifics. VX3X User’s Guide For proper and safe installation, the input power cable must be connected to a fused circuit on the vehicle. This fused circuit requires a 2 Amp maximum time delay (slow blow) high interrupting rating fuse. -
Page 49: Figure 29 Vehicle Connection Wiring Color Codes
Vehicle 12-80VDC Power Connection How To: Connect Vehicle 12-80VDC Connection The VX3X must be turned off and the power cable must be UNPLUGGED from the VX3X. While observing the fuse requirements specified above, connect the power cable as close as possible to the actual battery terminals of the vehicle. When available, always connect to unswitched terminals in vehicle fuse panel, after providing proper fusing. - Page 50 Vehicle 12-80VDC Power Connection VX3X User’s Guide E-EQ-VX3XOGWW-D...
-
Page 51: Operation
“VX3X Reference Guide” for configuration details. The VX3X can be placed in Suspend Mode. To enter suspend mode, tap the power button and release or select Start | Suspend. To exit suspend tap the screen, press any key or tap the power button. -
Page 52: Display And Touchscreen
Always use the point of the stylus for tapping or making strokes on the display. Never use an actual pen, pencil or sharp object to write on the touch screen. An extra or replacement stylus may be ordered from LXE. See the “Accessories” section for the stylus part number. -
Page 53: Cleaning The Display
<Enter> or click the Calibration button. Touchscreen Protective Film LXE offers a replaceable touchscreen protective film to protect the touchscreen when the VX3X is used in an abrasive environment. Installation and removal instructions can be found earlier in this guide. -
Page 54: Adjust Speaker Volume
Microsoft Windows CE Event Sounds The VX3X includes a customized sound scheme. The customized WAV files are preferable to the standard Microsoft Windows CE sounds when using the internal speaker. VX3X User’s Guide... -
Page 55: Laser Barcode Scanner Warnings
Do not pour, spray, or spill any liquid on the scanner. The Barcode Scanner contains the circuitry, scanning motor and laser. Handle with appropriate care. Enter Data You can enter data into the VX3X through several different methods: • The tethered scanner connected to the COM1 serial port provides barcode data entry •... -
Page 56: Keyboard Entry
The keyboard is used to manually input data that is not collected otherwise. Almost any function that a full sized computer keyboard can provide is duplicated on the VX3X keyboard but it may take a few more keystrokes to accomplish a keyed task. -
Page 57: Tethered Scanner Entry
Tethered Scanner Entry The following section is directed toward a generic tethered scanner connected to the COM1 serial port on the VX3X. Aiming the Barcode Scanner Aim the scanner away from you, direct it at the barcode and press the trigger to scan. -
Page 58: Bluetooth Scanners
Only LXE Bluetooth scanners and LXE Bluetooth printers are supported by LXE. See Accessories. Voice Data Data is entered into the VX3X by speaking into the headset’s microphone when prompted. Please contact your System Administrator if assistance is needed with the voice software. VX3X User’s Guide... -
Page 59: Bluetooth Devices
When an active paired device, not the VX3X, enters Suspend Mode, is turned Off or leaves the VX3X Bluetooth scan range, the Bluetooth connection between the linked device and the VX3X is lost. There may be audible or visual signals as paired devices disconnect from the VX3X. - Page 60 Bluetooth Devices VX3X User’s Guide E-EQ-VX3XOGWW-D...
-
Page 61: Appendixa Key Maps
CAPS Ctrl Shft The key map table that follows lists the commands used for the VX3X. Note that since the VX3X uses a Microsoft Windows CE operating system, no DOS Terminal Emulation keypress sequences are provided. Key Map 101-Key Equivalencies Note: This key mapping is used on VX3X computers that are NOT running LXE’s RFTerm. - Page 62 Page Down ScrollLock Left Scan key default value is Scan, however this key has no affect on an external scanner attached to the VX3X. Right Scan key default value is Enter. VX3X User’s Guide Press These Keys and Then Shift...
- Page 63 The VX3X Keypad To get this key E-EQ-VX3XOGWW-D Press These Keys and Then Shift Ctrl CapsLock Press this key VX3X User’s Guide...
- Page 64 To get this key < > VX3X User’s Guide Press These Keys and Then Shift Ctrl CapsLock The VX3X Keypad Press this key E-EQ-VX3XOGWW-D...
- Page 65 The VX3X Keypad To get this key : (colon) ; (semicolon) _ (underscore) , (comma) ‘ (apostrophe) ~ (tilde) “ & E-EQ-VX3XOGWW-D Press These Keys and Then Shift Ctrl CapsLock Press this key VX3X User’s Guide...
-
Page 66: Ibm 3270 Keypad Overlay
The 60-key keypad is available with an IBM 3270 overlay designed to allow the user to enter terminal emulator commands when running LXE’s RFTerm™ program. When running this program please refer to the following reference guide for equivalent keys and keypress sequences: •... -
Page 67: Appendixb Regulatory Notices And Safety Information
Warning: Changes or modifications to this device not expressly approved by LXE, Inc., could void the user’s authority to operate this equipment. -
Page 68: Approvals
A label on the exterior of the device should resemble one of the labels shown below (the label contains the LXE part number of the installed radio card). The labels shown below and affixed to the device, identify where the device may be used and where its use is restricted. Use of a device is prohibited in countries not listed below or otherwise identified by the label. -
Page 69: Lithium Battery Safety Statement
Pila de litio adentro. Peligro de explosión si la pila se reemplaza incorrectamente. Reemplace solamente con el mismo tipo o equivalente recomendado por el fabricante. (ES) Oppassen: Bevat Lithium-batterij. Incorrrecte plaatsing van batterij kan leiden tot explosiegevaar. Alleen vervangen door hetzelfde of door fabrikant aanbevolen gelijkwaardig type. (NL) E-EQ-VX3XOGWW-D VX3X User’s Guide... - Page 70 Lithium Battery Safety Statement (GR) (JP) Dikkat: (TR) Legend: Chinese Danish Dutch English Finnish French German Greek VX3X User’s Guide (KR) (CN) Italian Japanese Korean Norwegian Portuguese Spanish Swedish Turkish Regulatory Notices E-EQ-VX3XOGWW-D...
- Page 71 Regulatory Notices A/C Power Supply Safety Statement – VX3X Output Rated 12 – 80 VDC, Minimum 15W. The LXE-approved AC Power Adapter is only intended for use in a 25ºC (77ºF) maximum ambient temperature environment. Optional A/C Power Supply: Outside North America, this unit is intended for use with an IEC certified ITE power supply with output rated as stated at the top of this page.
-
Page 72: Vehicle Power Supply Connection Safety Statement
Danish – DK; English – US; Finnish – FI; French- - FR; German – DE; Greek – GR; Italian – IT; Norwegian – NO; Portuguese – PT; Spanish – ES; Swedish – SE; Turkish – TR. Updated 02/10/2004 VX3X User’s Guide Regulatory Notices E-EQ-VX3XOGWW-D... -
Page 73: Revision History
Revision B: November 2007 Section Entire Manual Overview Components Accessories Connect Serial Barcode Scanner Strain Relief Cable Clamps AppLock and the VX3X Connect Serial Printer or PC USB-C Port USB-H Port Connect External Headset Connect Antenna. Vehicle 12-80VDC Power Connection Appendix B –... - Page 74 Revision C: May 2008 Section Accessories Identifying the VX3X Computer Revision D: September 2008 Section Appendix B Regulatory Notices and Safety Information VX3X User’s Guide Explanation Revised accessories listing. Added new section. Explanation Update approvals for 802.11 a/b/g radio. Remove Summit Declaration of Compliance for consistency.
-
Page 75: Index
How To Aim the Scan Beam...49 Connect 12-80VDC Vehicle Power...41 Connect Barcode Scanner ...31 Connect External Speakers ...36 Connect Serial Printer ...33, 34, 35 Install Vehicle Mounting Brackets ...23 Keyboard data entry...48 Input Cable, Max Temp rating ...41 VX3X User’s Guide... - Page 76 PC...33, 34, 35 Operating Temperature...3 Overcurrent protection...39 Pen Stylus ...44, 48 Polarity ...41 Power Button ...43 Printer ...33, 34, 35 VX3X User’s Guide Procedure Mounting Brackets...25 Protective Film ...30 Quick Start Instructions...4 Scanner Nine-pin D-shell female connector ...31 Scanner data entry ...48...
- Page 77 External Power Supply ...39 View Display ...44 Voice data...50 Volume adjust audio volume ...46 VX3Plus Reference Guide ...2 E-EQ-VX3XOGWW-D VX3X Reference Guide ...2 Warning Laser light ...47 Windows CE Control Panel ...8 Help Screens ...8 Windows CE online Help...8 Wiring Color Codes...41...
- Page 78 Index VX3X User’s Guide E-EQ-VX3XOGWW-D...
Need help?
Do you have a question about the VX3X and is the answer not in the manual?
Questions and answers