
Related Manuals for LawnMaster BV1210E 1201


Summary of Contents for LawnMaster BV1210E 1201
- Page 1 Operator's Manual EN p. 2 VARIABLE SPEED - 12 AMP ELECTRIC BLOWER / VACUUM BV1210E 1201 CAUTION: To reduce the risk of injury, the user must read and understand the operator's manual before using this product.
-
Page 2: Table Of Contents
13-16 OPERATION 17-19 CARE AND MAINTENANCE TROUBLESHOOTING ® LAWNMASTER WARRANTY ILLUSTRATED PARTS LIST 23-24 INTRODUCTION This tool has many features for making its use more pleasant and enjoyable. Safety, performance, and dependability have been given top priority in the design of this product making it easy to maintain and... -
Page 3: Important Safety Instructions
IMPORTANT SAFETY INSTRUCTIONS IMPORTANT ! READ AND UNDERSTAND ALL INSTRUCTIONS. Failure to follow all instructions listed below may result in electric shock, fire, and/or serious personal injury. WARNING READ THESE INSTRUCTIONS BEFORE USING THIS BLOWER / VACUUM TO REDUCE THE RISK OF FIRE, ELECTRIC SHOCK OR INJURY: ■... - Page 4 IMPORTANT SAFETY INSTRUCTIONS hearing protection when operating this product. ■ Protect your lungs. Always wear a face or dust mask if the operation is dusty. Following this rule will reduce the risk of serious personal injury. ■ Use extra care when cleaning on stairs. ■...
- Page 5 IMPORTANT SAFETY INSTRUCTIONS ■ Do not operate in poor lighting. ■ Do not put any object into openings. Do not use with any opening blocked; keep openings free of dust, lint, hair, and anything that may reduce air flow. ■ Check the work area before each use. Remove all objects such as rocks, broken glass, nails, wire, or string which can be thrown or become entangled in the machine.
-
Page 6: Specific Safety Rules
SPECIFIC SAFETY RULES ■ Make sure your extension cord is in good condition. When using an extension cord, be sure to use one heavy enough to carry the current your product will draw. A wire gauge size (A.W.G.) of at least 14 is recommended for an extension cord 50 feet or less in length. -
Page 7: Symbols
SYMBOLS Some of the following symbols may be used on this product. Please study them and learn their meaning. Proper interpretation of these symbols will allow you to operate the product better and safer. SYMBOL NAME DESIGNATION/EXPLANATION Volts Voltage Amperes Current Hertz Frequency (cycles per second) - Page 8 SYMBOLS The following signal words and meanings are intended to explain the levels of risk associated with this product. SYMBOL SIGNAL MEANING Indicates an imminently hazardous situation, which, if not DANGER avoided, will result in death or serious injury. Indicates a potentially hazardous situation, which, if not WARNING avoided, could result in death or serious injury.
-
Page 9: Know Your Electric Blower
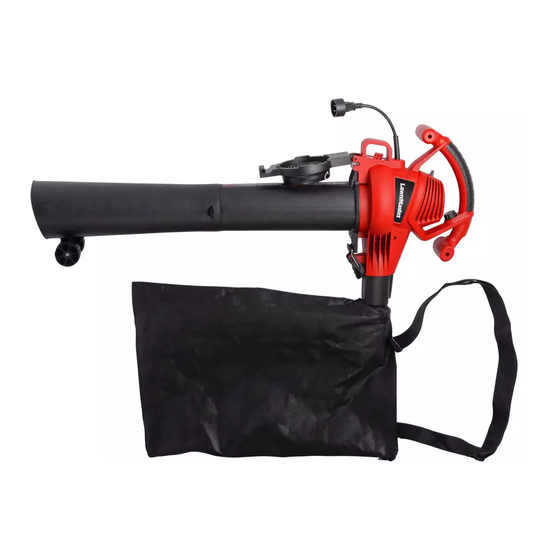
KNOW YOUR ELECTRIC BLOWER A - Handle B - On/Off Switch C - Power Cord D - Cord Retainer E - Mulch/Vacuum Gate F - Blower Tube Release Button G - Blower Tube H - Concentrator Nozzle I - Vacuum Tubes (Upper/Lower) J - Collection Bag With Connector Neck K - Gate Latching Lock L - Airstream Regulator... -
Page 10: Features
FEATURES PRODUCT SPECIFICATIONS Voltage...........................120V~ 60Hz Current............................12 AMP Air Speed (Max)..........................240 MPH Air Volume (Max).........................380 CFM Mulch Ratio............................16:1 Weight..........................9.0LBS(4.1 KG ) Collection Bag Volume.......................14 Gallon(54L) KNOW YOUR BLOWER / VACUUM The safe use of this product requires an understanding of the information on the product and in this Operator’s Manual as well as a knowledge of the project you are attempting. -
Page 11: Electrical Information
ELECTRICAL INFORMATION DOUBLE INSULATION Double insulation is a concept in safety in electric power tools, which eliminates the need for the usual threewire grounded power cord. All exposed metal parts are isolated from the internal metal motor components with protecting insulation. Double insulated tools do not need to be grounded. WARNING The double insulated system is intended to protect the user from shock resulting from a break in the tool’s internal insulation. - Page 12 ELECTRICAL INFORMATION Minimum Gauge for Extension Cords (AWG) (when using 120V only) Ampere Rating Total Length of Cord in Feet (meters) More Than Not More Than 25' (7.6 m) 50' (15.2 m) 100' (30.4 m) 150' (45.7 m) Not recommended Make sure your extension cord is properly wired and in good electrical condition.
-
Page 13: Assembly
ASSEMBLY UNPACKING This product requires assembly. ■ Carefully remove the product and any accessories from the box. Make sure that all items listed in the packing list are included. WARNING Do not use this product if any parts on the Packing List are already assembled to your product when you unpack it. - Page 14 ASSEMBLY ASSEMBLING THE BLOWER TUBE See Figure 2. ■ Slide blower tube forward until the tab on the blower housing clicks into the slots on the tube. ■ Insert the concentrator nozzle onto the blower tube to lock. (Concentrator nozzle is used to increase air flow in tight areas: flower beds, under decks, etc.).
- Page 15 ASSEMBLY Open Shut Fig. 3 Fig. 4 A - Vacuum tube aligning tab B - Vacuum tube locking tab Latching gate lock Fig.5 Fig. 6...
- Page 16 ASSEMBLY Fig. 7 Fig. 8 Fig. 9...
-
Page 17: Operation
OPERATION WARNING Do not allow familiarity with products to make you careless. Remember that a careless fraction of a second is sufficient to inflict serious injury. WARNING Always wear eye protection with side shields marked to comply with ANSI Z87.1, along with hearing protection. - Page 18 OPERATION A - Power Switch B - ON A - Cord Retainer C - OFF B - Loop D - Airstream Regulator C - Plug E - Low Speed D - Extension Cord Fig. 10 Fig.11 F - High Speed OPERATING THE BLOWER/VAC See Figure 12.
- Page 19 OPERATION Fig.12 Fig.13 EMPTYING OF COLLECTION BAG See Figure 13. ■ Switch off the tool and disconnect the plug. ■ Wait until the impeller fan comes to a standstill before removing the collection bag from the tool. ■ Open the zipper of the collection bag and empty it completely. (Fig.13)
-
Page 20: Care And Maintenance
CARE AND MAINTENANCE WARNING When servicing, use only identical replacement parts. Use of any other parts may create a hazard or cause product damage. WARNING Always wear eye protection with side shields marked to comply with ANSI Z87.1, along with hearing protection. -
Page 21: Troubleshooting
TROUBLESHOOTING PROBLEM POSSIBLE CAUSE SOLUTION 1. Check cord to make sure it is plugged into an 1. Unit is unplugged. electrical outlet. 2. Power/speed switch is in 2. Slide switch to high or low. the OFF position. 3. Call customer service for assistance at (866) 3. -
Page 22: Lawnmaster ® Warranty
LAWNMASTER WARRANTY We take pride in producing a high quality, durable product. This Lawnmaster® product carries a limited two (2) year warranty against defects in workmanship and materials from date of purchase under normal household use. If product is to be used for commercial, industrial or rental use, a 30 day limited warranty will apply. -
Page 23: Illustrated Parts List
EXPLODED VIEW... - Page 24 PARTS LIST ITEM NO. PART NO. DESCRIPTION Right Motor Housing Rubber Pad Impeller Assembly Motor Assembly Pressing Line Plate On/Off Switch Cable Assembly PCB Board Assembly Variable Speed Switch Left Motor Housing Mulch/Vacuum Port Assembly 131003111 Upper Vacuum Tube 131007106 Lower Vacuum Tube Switch Push Plate Latch Assembly...
Need help?
Do you have a question about the BV1210E 1201 and is the answer not in the manual?
Questions and answers