Table of Contents
Advertisement
Available languages
Available languages
Quick Links
Operators Manual / Manual del usuario
EN p. 2
ES p. 21
BV1211_V2
Read all safety rules and instructions carefully before operating this tool.
Distributed By Cleva North America 601 Regent Park Court Greenville, SC 29607 (866)-384-8432
Lea detenidamente todas las normas de seguridad e instrucciones antes de utilizar esta herramienta.
Distribuido por Cleva North America, Inc. 601 Regent Park Court Greenville, SC, 29607 (866)-384-8432
2-Speed Electric Blower / Vacuum BV1211
Sopladora/aspiradora Eléctrica de 2
Velocidades BV1211
3084514
Advertisement
Chapters
Table of Contents

Related Manuals for LawnMaster BV1211


Summary of Contents for LawnMaster BV1211
- Page 1 Operators Manual / Manual del usuario EN p. 2 2-Speed Electric Blower / Vacuum BV1211 Sopladora/aspiradora Eléctrica de 2 ES p. 21 Velocidades BV1211 BV1211_V2 Read all safety rules and instructions carefully before operating this tool. Distributed By Cleva North America 601 Regent Park Court Greenville, SC 29607 (866)-384-8432 Lea detenidamente todas las normas de seguridad e instrucciones antes de utilizar esta herramienta.
-
Page 2: Table Of Contents
CONTENTS Product Specifications Important Safety Instructions Specific Safety Rules Symbols Electrical Information Know Your Blower / Vac Assembly 10-12 Operation 13-14 Maintenance Troubleshooting Warranty Exploded View Parts List Notes PRODUCT SPECIFICATIONS 12 AMP / 2-SPEED ELECTRIC BLOWER/VAC Voltage 120 V ~ 60Hz Current 12 AMP 225 MPH... -
Page 3: Important Safety Instructions
IMPORTANT SAFETY INSTRUCTIONS READ AND UNDERSTAND ALL INSTRUCTIONS. Failure to follow all WARNING: instructions listed below may result in electric shock, fire, and/or serious personal injury. READ THESE INSTRUCTIONS BEFORE USING THIS BLOWER / VACUUM Do not operate power tools in explosive atmospheres, such as in the presence of flammable liquids, gases, or dust. - Page 4 IMPORTANT SAFETY INSTRUCTIONS Do not use on steps, a ladder, roof top, tree, or other unstable support. Stable footing on a solid surface enables better control of the blower in unexpected situations. Secure long hair so it is above shoulder level to prevent entanglement in any moving parts. ...
-
Page 5: Specific Safety Rules
SPECIFIC SAFETY RULES Make sure your extension cord is in good condition. When using an extension cord, be sure to use one heavy enough to carry the current your product will draw. A wire gauge size (A.W.G.) of at least 14 is recommended for an extension cord 50 feet or less in length. If in doubt, use the next heavier gauge. -
Page 6: Symbols
SYMBOLS The following signal words and meanings are intended to explain the levels of risk associated with this product. SYMBOL SIGNAL MEANING Indicates an imminently hazardous situation, which, if not avoided, will result DANGER: in death or serious injury. Indicates a potentially hazardous situation, which, if not avoided, could result WARNING in death or serious injury. -
Page 7: Electrical Information
SYMBOLS The following signal words and meanings are intended to explain the levels of risk associated with this product. WARNING To avoid serious personal injury, do not attempt to use this product until you read thoroughly and understand completely the operator’s manual. If you do not understand the warnings and instructions in the operator’s manual, do not use this product. - Page 8 ELECTRICAL INFORMATION GFCI Ground Fault Circuit Interrupter (GFCI) protection should be provided on the circuit(s) or outlet(s) to be used for the product. Receptacles are available having built-in GFCI protection and may be used for this measure of safety. GUIDELINES FOR USING EXTENSION CORDS USE THE PROPER EXTENSION CORD.
-
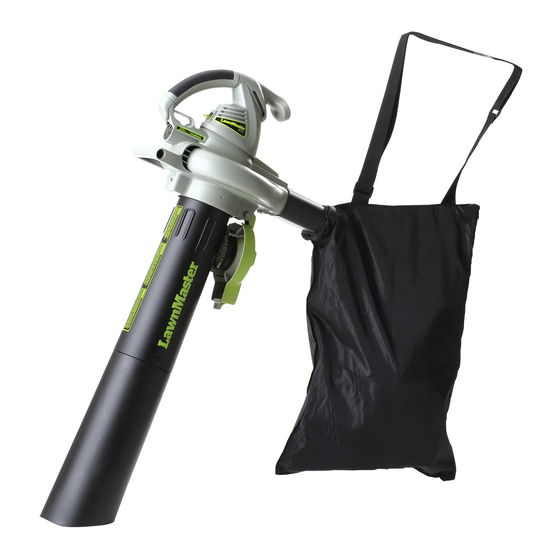
Page 9: Know Your Blower / Vac
KNOW YOUR BLOWER / VAC KNOW YOUR BLOWER / VAC CONCENTRATOR NOZZLE An accessory that can be added onto the end of the blower tube to increase the air speed (mph). MAIN BLOWER TUBE The main blower tube can be easily installed on blower without any additional tools. CORD RETAINER A convenient cord retainer helps keep extension cord connection secure during spacing blower operation. -
Page 10: Assembly
ASSEMBLY UNPACKING This product requires assembly. Carefully remove the product and any accessories from the box. Make sure that all items listed in the packing list are included. WARNING: Do not use this product if any parts on the Packing List are already assembled to your product when you unpack it. - Page 11 ASSEMBLY ASSEMBLING THE BLOWER TUBE See Figure 2. Slide blower tube forward until the lock button clicks into the top of the tube. A - Air Inlet B - Blower Tube Release Button C - Concentrator Nozzle D - Blower Tube Fig.
- Page 12 ASSEMBLY 5. Add collection bag by simply aligning the plastic connector sleeve on the bag to the blowers exhaust. (See Figure. 8) 6. While standing in the operating position adjust the length to fit the operator’s size. Pull the tab to lengthen, pull the strap to shorten.
-
Page 13: Operation
OPERATION WARNING: Do not allow familiarity with products to make you careless. Remember that a careless fraction of a second is sufficient to inflict serious injury. WARNING: Always wear eye protection with side shields marked to comply with ANSI Z87.1, along with hearing protection. - Page 14 OPERATION Attach the outlet end of an extension cord to the plug on the rear of the blower/vacuum. NOTE: Use only an approved outdoor extension cord as described previously in this manual. Route the extension cord through the side of the loop located on the rear of the blower/vacuum housing and place underneath the cord retainer.
-
Page 15: Maintenance
MAINTENANCE WARNING: When servicing, use only identical replacement parts. Use of any other parts may create a hazard or cause product damage. WARNING: Always wear eye protection with side shields marked to comply with ANSI Z87.1, along with hearing protection. Failure to do so could result in objects being thrown into your eyes, resulting in possible serious injury. -
Page 16: Troubleshooting
TROUBLESHOOTING PROBLEM POSSIBLE CAUSE SOLUTION 1. Bag full 1. Empty the bag. 2. Blocked tube 2. Clear the blockage. 3. Blocked impeller 3. Clear the blockage Unit will not blow 4. Dirty bag 4. Clean the bag. or suck debris. 5. -
Page 17: Warranty
WARRANTY We take pride in producing a high quality, durable product. This Lawnmaster product carries a ® limited two (2) year warranty against defects in workmanship and materials from date of purchase under normal household use. Warranty does not apply to defects due to direct or indirect abuse, negligence, misuse, accidents, repairs or alterations and lack of maintenance. -
Page 18: Exploded View
EXPLODED VIEW BV1211 EXPLODED VIEW... -
Page 19: Parts List
PARTS LIST BV1211 PARTS LIST ITEM NO. PART NO. DESCRIPTION 131012101 Motor Housing Right Assy 131012103 Micro-Switch 131012124 Switch Plate 131012125 Switch Push Button Assy 131012105 Inner Cable(Black) 131003105 Inner Cable 131012108 Rubber Pad 131003104 Motor Assy 131012110 Impeller Assy... -
Page 20: Notes
NOTES... -
Page 21: 225 Mph 380 Cfm
CONTENIDO Especificaciones Del Producto Instrucciones de Seguridad Importantes 23-24 Reglas de Seguridad Específicas Símbolos 26-27 Información Eléctrica 28-29 Conozca Su Sopladora / Aspiradora Armado 31-33 Funcionamiento 34-35 Mantenimiento Resolución de Problemas Garantía Vista en Detalle Lista de Piezas Notas ESPECIFICACIONES DEL PRODUCTO SOPLADORA/ASPIRADORA ELÉCTRICA DE 2 VELOCIDAD Y 12 AMP Current 120 V ~ 60Hz... -
Page 22: Instrucciones De Seguridad Importantes
INSTRUCCIONES DE SEGURIDAD IMPORTANTES ADVERTENCIA: LEA Y ASEGÚRESE DE COMPRENDER TODAS LAS INSTRUCCIONES. El incumplimiento de las instrucciones detalladas debajo puede derivar en descargas eléctricas, incendios o lesiones graves: LEA ESTAS INSTRUCCIONES ANTES DE USAR LA SOPLADORA / ASPIRADORA No utilice herramientas eléctricas en atmósferas explosivas como, por ejemplo, en presencia de líquidos inflamables, gases o polvo. - Page 23 INSTRUCCIONES DE SEGURIDAD IMPORTANTES No fuerce la herramienta. Utilice la herramienta correcta para su necesidad. La herramienta correcta hará el trabajo de mejor manera y con mayor seguridad si la utiliza de la manera para la que está diseñada. ...
-
Page 24: Reglas De Seguridad Específicas
INSTRUCCIONES DE SEGURIDAD IMPORTANTES En un aparato con aislación doble, se incluyen dos sistemas de aislación en vez de una conexión a tierra. No se incluyen conexiones a tierra en un aparato con aislación doble, por lo que tampoco debiera agregarse una conexión a tierra a dicho aparato. -
Page 25: Símbolos
SÍMBOLOS Las siguientes palabras y significados están diseñados para explicar los niveles de riesgo asociados a este producto. SÍMBOLO SEÑAL SIGNIFICADO Indica una situación peligrosa inminente, la cual, de no evitarse, PELIGRO: causará una muerte o lesiones severas. Indica una situación peligrosa potencial, la cual, de no evitarse, ADVERTENCIA: podría causar una muerte o lesiones severas. - Page 26 SÍMBOLOS Las siguientes palabras y significados están diseñados para explicar los niveles de riesgo asociados a este producto. ADVERTENCIA To avoid serious personal injury, do not attempt to use this product until you read thoroughly and understand completely the operator’s manual. If you do not understand the warnings and instructions in the operator’s manual, do not use this product.
-
Page 27: Información Eléctrica
INFORMACIÓN ELÉCTRICA DOBLE AISLANTE El aislamiento doble en las herramientas eléctricas elimina la necesidad del cable tradicional de tres patas con conexión a tierra. Todas las piezas metálicas expuestas están aisladas de los componentes internos metálicos del motor mediante una aislación protectora. Las herramientas con doble aislación no necesitan conexión a tierra. - Page 28 INFORMACIÓN ELÉCTRICA Calibre mínimo para alargadores (AWG) (solo al utilizar 120 V) Amperaje Largo total del cable en pies (metros) Más de No más de 25' (7,6 m) 50' (15 m) 100' (30,4 m) 150' (45,7 m) No se recomienda Asegúrese de que su alargador esté...
-
Page 29: Conozca Su Sopladora / Aspiradora
CONOZCA SU SOPLADORA / ASPIRADORA CONOZCA SU SOPLADORA / ASPIRADORA INTERRUPTOR DE 2 VELOCIDADES BOTÓN DE BLOQUEO CONTENEDOR DEL CABLE TUBO DE LA SOPLADORA BOQUILLA CONCENTRADORA PUERTA DE ACCESO DE ASPIRADORA TUBOS DE LA ASPIRADORA BOLSA RECOLECTORA Fig. 1 DE ASPIRADORA... -
Page 30: Armado
ARMADO DESEMBALAJE Este producto requiere armado. Con cuidado, extraiga el producto y sus accesorios de la caja. Asegúrese de que todos los elementos mencionados en la lista de componentes del empaque estén incluidos. ADVERTENCIA: No utilice este producto si alguna de las piezas mencionadas en la lista de componentes del empaque ya está... - Page 31 ARMADO INSTRUCCIONES PARA ARMAR EL TUBO DE LA SOPLADORA Consulte la Figura 2. Deslice el tubo de la sopladora hacia adelante hasta que el botón de bloqueo haga clic en la parte superior del tubo. A. Entrada de aire B. Botón de liberación del tubo de la sopladora C.
- Page 32 ARMADO 4. Con las lengüetas de los tubos de aspirado adecuadamente alineadas, gire el tubo (Ver Figura. 7). 5. Añada la bolsa recolectora alineando la manga conectora de plástico de la bolsa con el escape de la sopladora (Ver Figura. 8). 6.
-
Page 33: Funcionamiento
FUNCIONAMIENTO ADVERTENCIA: No permita que estar acostumbrado a usar un producto genere descuidos en usted. Recuerde que una sola fracción de segundo en que se descuide es suficiente para generar una lesión severa. ADVERTENCIA: Use siempre protección ocular con escudos laterales para cumplir con l normativa ANSI Z87.1, junto con protección auditiva. - Page 34 FUNCIONAMIENTO Inserte el extremo de salida de un cable de extensión en el enchufe de la parte posterior de la sopladora/aspiradora. NOTA: Utilice solo alargadores aprobados para uso en exteriores según se describe anteriormente en este manual. Enrute el cable de extensión por el costado del bucle ubicado en la parte posterior de la carcasa de la sopladora/aspiradora y colóquela debajo del retén del cable.
-
Page 35: Mantenimiento
MANTENIMIENTO ADVERTENCIA: Al realizar mantenimiento, utilice solo piezas de repuesto idénticas. El uso de otras piezas podría generar un peligro o dañar al producto. ADVERTENCIA: Use siempre protección ocular con escudos laterales para cumplir con l normativa ANSI Z87.1, junto con protección auditiva. El no seguir esta instrucción podría causar que objetos salgan disparados hacia sus ojos, causando una posible lesión severa. -
Page 36: Resolución De Problemas
RESOLUCIÓN DE PROBLEMAS PROBLEMA POSIBLE CAUSA SOLUCIÓN 1. Bolsa llena 1. Vacíe la bolsa. 2. Tubo bloqueado 2. Despeje el bloqueo. 3. Impulsor bloqueado 3. Despeje el bloqueo. La unidad no sopla ni aspira. 3. Bolsa sucia 4. Limpie la bolsa. 5. -
Page 37: Garantía
Cobros por transporte: Los cobros por transporte para cualquier unidad o aditamento son r esponsabilidad del comprador. Es responsabilidad del comprador pagar los cobros por transporte de cualquier pieza enviada para remplazarse bajo esta garantía, a menos que LawnMaster haya requerido tal devolución por escrito. -
Page 38: Vista En Detalle
VISTA EN DETALLE BV1211 VISTA EN DETALLE... - Page 39 LISTA DE PIEZAS BV1211 LISTA DE PIEZAS ITEM NO. PART NO. DESCRIPTION Conjunto de piezas de la parte 131012101 derecha de la carcasa del motor 131012103 Microinterruptor 131012124 Placa del interruptor Conjunto de piezas del botón interruptor 131012125 de encendido...
- Page 40 NOTAS...
Need help?
Do you have a question about the BV1211 and is the answer not in the manual?
Questions and answers