Table of Contents
Advertisement
Quick Links
Advertisement
Table of Contents

Related Manuals for Tenmars TM-183N


Summary of Contents for Tenmars TM-183N
- Page 1 TM-183N Temperature/Humidity Meter User’s Manual HB2TM183N000...
-
Page 2: Table Of Contents
Contents Introduction ............1 Accessories ............. 1 Safety Precaution ..........1 Instrument Description ........2 Operation ............3 Temperature Unit Switch: ......3 Data Hold: ............ 3 Maximum/Minimun Read Value Lock(MAX/MIN): ......... 4 Backlight : ............ 5 Temperature/Dew Point/Wet Bulb/Relative Humidity Switch: ......... -
Page 3: Introduction
TM-183N Introduction This meter uses precision capacitive humidity sensor and NTC temperature sensor designs. Accessories Meter Temperature and Humidity probe 9V battery Carrying case User’s Manual Safety Precaution Note! Please refer to this manual. Improper use may damage the meter and its components. -
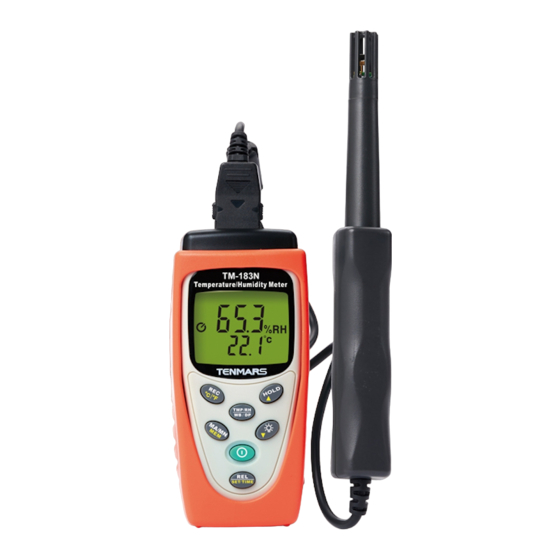
Page 4: Instrument Description
TM-183N Instrument Description 1. Temperature/humidity probe input terminal 2. LCD display 3. On/off button 4. Backlight and setting downwards button 5. HOLD and setting upwards button 6. Relative value/alarm setting/time display switch button 7. Maximum/minimum value and read record button 8. -
Page 5: Operation
TM-183N Operation 1. Connect the temperature/humidity probe onto this meter. 2. Press the button to turn on/off and it will show full display for 0.5 seconds. Then, display the program version for 0.5 seconds, and then enter measuring mode. 3. Please connect the probe before powering on, or else it will display wrong values. -
Page 6: Maximum/Minimun Read Value Lock(Max/Min)
TM-183N 5.3 Maximum/Minimun Read Value Lock(MAX/MIN): Under measurement mode, press the button for less than 1 second to enter MAX/MIN mode and start timing. The main display area displays the currently tested temperature and the secondary display area displays the recording time. -
Page 7: Backlight
TM-183N 5.4 Backlight : Press the button to turn the backlight on or off. The backlight will automatically turn off after 15 seconds. 5.5 Temperature/Dew Point/Wet Bulb/Relative Humidity Switch: Under measurement mode, press the button to switch between dew point measurement → wet bulb measurement →... -
Page 8: Manual Recording
TM-183N 5.7 Manual Recording: Press the button and the text REC will be displayed on the LCD. It will also record the currently displayed data into memory. 5.8 Read Data Recorded in Memory: Press and hold the button and then press the button to enter read recorded data in memory mode. - Page 9 TM-183N Press the button to change the displayed data (temperature → humidity → dew point temperature → wet bulb temperature). Press the button to change the displayed time (hour:minute → month:day → Year) Press the button again and then press to exit read data recorded in memory mode.
-
Page 10: Setting Mode
TM-183N 5.9 Setting mode: Press the button and then press the button to enter the setting mode. Press the button to switch between setting modes. (Remark 1); Press the button to record settings and exit setting mode. Remark 1: You can set eight functions in setting mode 1. - Page 11 TM-183N Enable alarm function setting: Press the button and then press the button to enter setting mode. Press the button or button and Alarm on will be displayed on the LCD. Press the button to record settings and exit setting mode.
- Page 12 TM-183N 5.9.2 High temperature alarm setting Press and hold the button and then press the button to enter settings mode. Then press the button twice to enter high temperature alarm setting. Press the button or button to increase or reduce the high temperature alarm range.
- Page 13 TM-183N 5.9.4 High humidity alarm setting Press and hold the button and then press button to enter setting mode. Then press the button four times to enter high humidity alarm setting. Press the button or button to increase or reduce the high humidity alarm range.
- Page 14 TM-183N The time format of this model is the 24 hour format. Press the button or button to change between date, time and unit. Press the button or button to change the values. Press the button to record the settings and exit setting mode.
- Page 15 TM-183N 5.9.7 Clear memory setting This option is only available when there are data recorded on this unit. Press and hold the button and then press button to enter setting mode. Then press the button seven times to enter automatic shutdown time setting.
-
Page 16: General Specifications
TM-183N General Specifications Read value display: Dual LCD display. The maximum displayed value of the main display area is 1999 and the maximum displayed value of the secondary display area is 9999. Data hold Low battery indication ... -
Page 17: Electrical Specification
TM-183N Electrical Specification Accurate environmental conditions are: 23°C ± 5°C and RH <80% 7.1 Temperature: 量 Range -20.0℃~+60℃ (-4.0℉~+140.0℉) Resolution ±0.8℃ (±1.5℉) Accuracy 7.2 Humidity: 量 Range 1%~99.0%RH Resolution 0.1 %RH ±3.0%(20.0~80.0%RH,@25℃) Accuracy ±5.0%(<20.0%RH>80.0%RH,@25℃) 7.3 Dew point temperature(DEW) 量 Range -63.0℃~+60℃(--81.4℉~+140.0℉) -
Page 18: Maintenance Or Repair
TM-183N The value is calculated from the RH and Temperature. Maintenance or Repair 1. When the symbol is displayed on the LCD, it means that there is insufficient power; please change the battery immediately in order to ensure its accuracy. -
Page 19: Product Disposal
TM-183N 10 Product Disposal Note: This symbol indicates that the meter and its accessories must be separated and processed properly. - Page 21 Solar power meter, Radiation meter, Clamp meter, Multimeter, Phase Rotation test, Digital Insulation teste Our products of high quality are selling well all over the world TENMARS ELECTRONICS CO., LTD. 6F, NO. 586 Ruiguang Rd, Neihu Dist. Taipei City, Taiwan E-mail: service@tenmars.com http://www.tenmars.com...
Need help?
Do you have a question about the TM-183N and is the answer not in the manual?
Questions and answers