Table of Contents
Advertisement
Quick Links
Download this manual
See also:
User Manual
Advertisement
Table of Contents

Subscribe to Our Youtube Channel
Related Manuals for Kramer VM-10XL


Summary of Contents for Kramer VM-10XL
-
Page 1: User Manual
Kramer Electronics, Ltd. USER MANUAL Model: VM-10xl Video Audio Distribution Amplifier... -
Page 2: Table Of Contents
Figure : Increasing the Outputs: arranging a 1:30 Video Audio DA Tables Table : Front Panel VM-10xl Video Audio Distribution Amplifier Features Table : Rear Panel VM-10xl Video Audio Distribution Amplifier Features Table : Technical Specifications of the VM-10xl Video Audio Distribution Amplifier 11 Contents... -
Page 3: Introduction
GROUP 6: Accessories and Rack Adapters; GROUP 7: Scan Converters and Scalers; and GROUP 8: Cables and Connectors 2 Download up-to-date Kramer user manuals from the Internet at this URL: http://www.kramerelectronics.com 3 The complete list of Kramer cables is on our Web site at http://www.kramerelectronics.com Introduction... - Page 4 Getting Started KRAMER: SIMPLE CREATIVE TECHNOLOGY...
-
Page 5: Overview
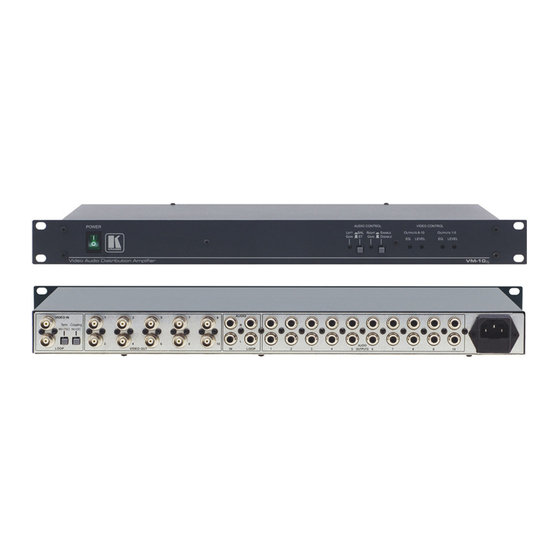
Figure 1 and Table 1 define the VM-10xl Video Audio Distribution Amplifier: 1 For example, you can connect 3 VM-10xl units to make a 1:30 video audio distribution amplifier. See section 6.2 for details 2 Recommended for low signal transmission over long distances or in audio broadcasting studios for high quality signal recreation 3 The video outputs are arranged in two blocks of 5 outputs (outputs 1 to 5, and outputs 6 to 10). -
Page 6: Figure 1: Vm-10Xl Video Audio Distribution Amplifier
Your VM-10xl Video Audio Distribution Amplifier Figure 1: VM-10xl Video Audio Distribution Amplifier KRAMER: SIMPLE CREATIVE TECHNOLOGY... -
Page 7: Table : Front Panel Vm-10Xl Video Audio Distribution Amplifier Features
Your VM-10xl Video Audio Distribution Amplifier Table : Front Panel VM-10xl Video Audio Distribution Amplifier Features Feature POWER Switch BAL/ST Button LEFT GAIN Trimmer Enable/Disable Button RIGHT GAIN Trimmer EQ. Trimmer LEVEL Trimmer LEVEL Trimmer EQ. Trimmer Table : Rear Panel VM-10xl Video Audio Distribution Amplifier Features... -
Page 8: Installing On A Rack
Always mount the machine in the rack before you attach any cables or connect the machine to the power If you are using a Kramer rack adapter to situations where kit (for a machine that is not 19"), see the Rack Adapters user manual for... -
Page 9: Using The Vm-10Xl Video Audio Distribution Amplifier
7. If audio control adjustment is required for left and/or right gain, push in Enable/Disable button, and then adjust 1 Switch OFF the power on each device before connecting it to your VM-10xl. After connecting your VM-10xl, switch on its power and then switch on the power on each device 2 As required. -
Page 10: Figure 2: Connecting A Single Vm-10Xl Video Audio Distribution Amplifier
Using the VM-10xl Video Audio Distribution Amplifier Figure 2: Connecting a single VM-10xl Video Audio Distribution Amplifier KRAMER: SIMPLE CREATIVE TECHNOLOGY... -
Page 11: Increasing The Outputs
VM-10xl unit, push in the Term button to terminate the line to 75 . 1 Switch OFF the power on each device before connecting it to your VM-10xl units. After connecting the VM-10xl units, switch on their power and then switch on the power on each device... -
Page 12: Figure : Increasing The Outputs: Arranging A 1:30 Video Audio Da
Using the VM-10xl Video Audio Distribution Amplifier 6. On each VM-10xl unit: Connect the power cord to the mains electricity Release the BAL/ST buttons to select unbalanced stereo audio operation Adjust the video trimmer controls compensation equalization level, if required... -
Page 13: Technical Specifications
WEIGHT: 2.1kg (4.7lbs.) approx. ACCESSORIES: Power cord 1 Specifications are subject to change without notice Technical Specifications of the VM-10xl Video Audio Distribution Amplifier with termination switch on BNC on BNC connectors AUDIO: 26.5Vpp AUDIO: >100kHz AUDIO: 87dB AUDIO: AC... - Page 14 EXCLUSION OF DAMAGES The liability of Kramer for any effective products is limited to the repair or replacement of the product at our option. Kramer shall not be liable for: 1. Damage to other property caused by defects in this product, damages based upon inconvenience, loss of use of the product, loss of time, commercial loss;...
- Page 15 For the latest information on our products and a list of Kramer distributors, visit our Web site: www.kramerelectronics.com, where updates to this user manual may be found. We welcome your questions, comments and feedback. Safety Warning: Disconnect the unit from the power supply before opening/servicing.
Need help?
Do you have a question about the VM-10XL and is the answer not in the manual?
Questions and answers