Advertisement
Quick Links
VM-10H2 Quick Start Guide
This guide helps you install and use your VM-10H2 for the first time.
Go to
upgrades are available.
Scan for full manual
Step 1: Check what's in the box
VM-10H2 4K@60Hz (4:4:4) HDMI 2.0 1:10 DA
1 Power cord
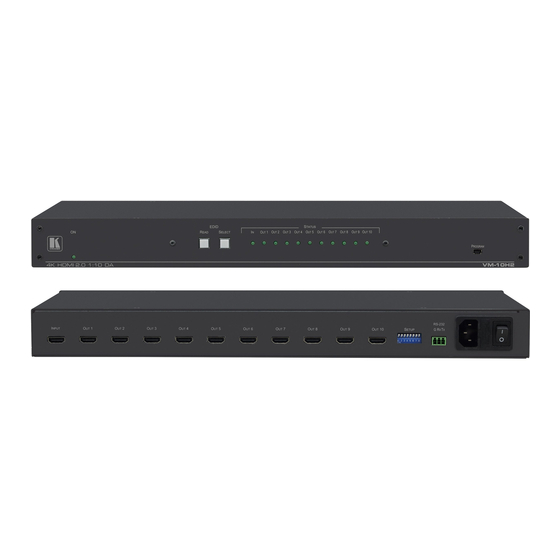
Step 2: Get to know your VM-10H2
#
Feature
1
ON LED
2
EDID READ Button
3
EDID SELECT Button
4
STATUS LEDs
5
PROGRAM Mini-USB Connector
#
Feature
6
INPUT HDMI Connector
7
OUT (1-10) HDMI Connectors
8
SETUP DIP-switches
9
RS-232 3-pin Terminal Block
10
Power socket, Fuse, Switch
VM-10H2 Quick Start (P/N: 2900-300619QS REV 1)
www.kramerav.com/downloads/VM-10H2
Function
Lights green when the unit is powered on
Press to read the selected EDID
Press to enter selection mode and sequentially toggle through outputs Out 1 through 10 to
select the required EDID. The selected output lights green. When no output acceptor is
connected, the default EDID is selected and all LEDs flash slowly
Light green when an HDMI source (IN) or HDMI acceptors (OUT 1 to 10) are connected
Connects to a PC for local firmware upgrade
Function
Connects to an HDMI source (Input)
Connect to up to 10 HDMI acceptors
Set switches to configure various operating parameters (see Step 6)
Connects to an RS-232 control device, or laptop to upgrade firmware via K-Upload and
EDID handling via EDID Designer
Connects power to and switches the unit on and off
to download the latest user manual and check if firmware
4 Rubber feet
1 Quick start guide
P/N:
2900- 300619QS
1 pair of rack "ears"
Rev:
1
Advertisement

Related Manuals for Kramer VM-10H2


Summary of Contents for Kramer VM-10H2
- Page 1 VM-10H2 Quick Start Guide This guide helps you install and use your VM-10H2 for the first time. Go to www.kramerav.com/downloads/VM-10H2 to download the latest user manual and check if firmware upgrades are available. Scan for full manual Step 1: Check what’s in the box VM-10H2 4K@60Hz (4:4:4) HDMI 2.0 1:10 DA...
- Page 2 Step 4: Connect the inputs and outputs Always switch OFF the power on each device before connecting it to your VM-10H2. For best results, we recommend that you always use Kramer high-performance cables to connect AV equipment to the VM-10H2.
Need help?
Do you have a question about the VM-10H2 and is the answer not in the manual?
Questions and answers