
Related Manuals for Airspan AirHarmony-1000


Summary of Contents for Airspan AirHarmony-1000
- Page 1 AirHarmony-1000 Installation Guide Part Number: UGD-D01006 System Release: 14.1 Revision: A4 Published: August 2015...
- Page 2 Information supplied by Airspan Networks Inc. is believed to be accurate and reliable. However, no responsibility is assumed by Airspan Networks Inc. for the use thereof nor for the rights of third parties which may be effected in any way by the use of thereof.
-
Page 3: Table Of Contents
Power Consumption ....................7 Antenna System ..................... 7 Front Mounted Sector Antenna ................7 SelectaBeam Multi-beam Antenna ................. 8 AirHarmony-1000 Antenna Usage Options ............8 About This Document ................10 Purpose ........................ 10 Intended Audience ....................10 Document Conventions ..................10 Document Organization .................. - Page 4 5.1 Pole Mount Assembly ..................26 5.1.1 Installing AirHarmony-1000 Back-to-Back ............ 29 5.2 Wall Mount Assembly ..................30 5.3 Securing AirHarmony-1000 to the Mounting Plate ........32 5.4 Front Mount Antenna Tilt Adjustment ............33 5.5 LED Display ....................34 5.6 Connecting the Ground Cable ...............
- Page 5 B Checklist ................... 53 C Abbreviations ..................54 Figures Figure 1: AirHarmony-1000 with front mounted antenna and AirHarmony-1000 with sun-shield ..9 Figure 2: AirHarmony-1000 assembled with Front Mount antenna and GPS ........14 Figure 3: Workflow ..........................15 Figure 4: AirHarmony-1000 Unit, bottom termination ................22 Figure 5: AirHarmony-1000 Unit, Top, RF ports ...................
- Page 6 Figure 32: AC/DC Converter with DC power connector ............... 39 Figure 33: DC Power connector pre-assembled on converter .............. 39 Figure 34: Power connection - on bottom panel of AirHarmony-1000 ..........40 Figure 35: Power cable assembly ......................40 Figure 36: Power cable attached to AirHarmony-1000 ................. 40 Figure 37: Waterproof connector exploded view ..................
- Page 7 Figure 58: RJ45 crimping ........................49 Figure 59: Crimped cable ........................49 Figure 60: RJ45 assembled ........................49 Figure 61: Attaching front mount antenna assembly to AirHarmony-1000 ........... 50 Figure 62: Connecting RF cable ......................51 Figure 63: Weather-proof the connection ..................... 51 Tables Table 1: AirHarmony-1000 FCC Maximum Output TX Power ..............
-
Page 8: Document Information
AirHarmony Installation Guide Document Information Abstract This document details procedures for installing the Airspan’s AirHarmony 1000 Indoor-Pico Enterprise-Femto eNodeB variant. Revision History Revision Details Date Summary of Changes Initial document Rev 0.1 October 2014 Reformatted and revised the document. -
Page 9: Warnings And Cautions
Failure to do so may void Airspan's product warranty and may expose the end user or the service provider to legal and financial liabilities. Airspan and its resellers or distributors are not liable for injury, damage or violation of regulations associated with the installation of outdoor units or antennas. -
Page 10: Warning Of Hazardous Voltages
Substances Hazardous to Health Regulations 1989 and the Dangerous Substances Regulations 1990). At the end of any Airspan products life cycle, the customer should consult with Airspan to ensure that the product is disposed of in conformance with the relevant regulatory requirements. -
Page 11: Service Information
- AirHarmony-1000 is designed to operate in environmental conditions complying with IP66 and relevant standards. -
Page 12: Declaration Of Conformity
Este equipo cumple con los requisitos esenciales asi como con otras disposiciones de la Directive 1999/5/EC. Greek: ΜΕ ΤΗΝ ΠΑΡΟΥΣΑ Airspan ΔΗΛΩΝΕΙ ΟΤΙ Ο ΕΞΟΠΛΙΣΜΟΣ ΣΥΜΜΟΡΦΩΝΕΤΑΙ ΠΡΟΣ ΤΙΣ ΟΥΣΙΩΔΕΙΣ ΑΠΑΙΤΗΣΕΙΣ ΚΑΙ ΤΙΣ ΛΟΙΠΕΣ ΣΧΕΤΙΚΕΣ ΔΙΑΤΑΞΕΙΣ ΤΗΣ ΟΔΗΓΙΑΣ 1999/5/ΕΚ. Français: Cet appareil est conforme aux exigencies essentialles et aux autres dispositions pertinantes de la Directive 1999/5/EC. -
Page 13: Gps Compliance
EN 61000-4-8: Magnetic Field Immunity Note: A GPS is recommended for synchronizing between LTE sectors. Note: An optional GPS Lightning/Surge protector is available from Airspan when installing the GPS antenna in a remote location for lightning prone deployments. UGD-D01006 Airspan Commercial and Internal Use... -
Page 14: Maximum Output Tx Power
The following antennas are designed specifically for AirHarmony-1000 deployments. Externally mounted antennas are available for use as well (pending), but are specified separately. Note: For a list of compatible external antennas, please contact your nearest Airspan sales representative. Front Mounted Sector Antenna The front mounted sector antenna is a cross polarized fixed antenna which mounts on the front of the unit in place of the sun-shield. -
Page 15: Selectabeam Multi-Beam Antenna
Initially deliveries are of the Front Mount Antenna variant. A typical sector installation will have a cross-polar sector antenna fitted directly to the front of the AirHarmony-1000 main unit. (This is attached instead of the sun-shield in other variants - pending). UGD-D01006... -
Page 16: Figure 1: Airharmony-1000 With Front Mounted Antenna And Airharmony-1000 With Sun-Shield
AirHarmony-1000 Installation Guide Figure 1: AirHarmony-1000 with front mounted antenna and AirHarmony-1000 with sun-shield UGD-D01006 Airspan Commercial and Internal Use... -
Page 17: About This Document
Connect and manage cables Intended Audience This guide is intended for persons who are responsible for installing the AirHarmony-1000 equipment. These persons should have a working knowledge of the equipment. Document Conventions This document uses the following typographic conventions. -
Page 18: Document Organization
Provides workflows for initial install and workflow. Lists the hardware, software, and client requirements for Verifying Prerequisites installation. AirHarmony-1000 Installation Describes how to install AirHarmony-1000. Install the AC/DC converter AC/DC converter installation Connect and Manage Cables Describes how to connect the cables. -
Page 19: Customer Care Help Desk
Customer Care Help Desk Airspan’s Customer Care Help Desk offers prompt and efficient customer support services. To avail Airspan’s Customer Care Help Desk support, you must be a registered user and Note: must have a valid support contract. To register, click here and fill the Registration form. -
Page 20: Introduction
Broadband Wireless Access market. AirHarmony-1000 is a compact, easy to install Micro / Pico-cell, allowing an operator to deploy LTE broadband services using existing Street Furniture (e.g. street lamps, power poles, etc…) -
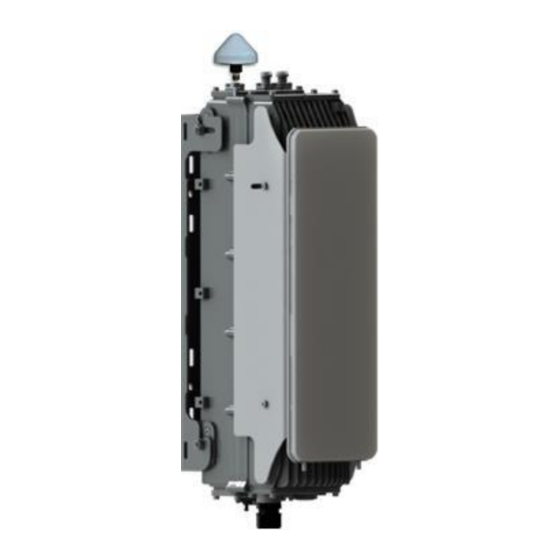
Page 21: Figure 2: Airharmony-1000 Assembled With Front Mount Antenna And Gps
AirHarmony-1000 Installation Guide Figure 2: AirHarmony-1000 assembled with Front Mount antenna and GPS Note: The illustration above displays the GPS connected directly to the top of the unit; there is also a remote GPS antenna option. UGD-D01006 Airspan Commercial and Internal Use... -
Page 22: Getting Started
AirHarmony-1000 Installation Guide 2 Getting Started 2.1 Workflow of Installation The Workflow to install the AirHarmony-1000 is shown in the following diagram: Figure 3: Workflow Caution: Antennas must be connected and attached before AirHarmony-1000 is powered on. UGD-D01006 Airspan Commercial and Internal Use... -
Page 23: Airharmony-1000 Installation Checklist
AirHarmony-1000 Installation Guide 2.2 AirHarmony-1000 Installation Checklist Plan the installation of the AirHarmony-1000 by using the Installation Checklist, which you can find as a removable job aid in Appendix A for this guide. UGD-D01006 Airspan Commercial and Internal Use... -
Page 24: Verifying Prerequisites
Set up requirements for the installation is detailed in the Job Sheet, see Appendix 3.1 Verifying Site Requirements To set up the AirHarmony-1000, an IP connection to a Netspan server is required. 3.2 Verify Installation Requirements 3.2.1 Verify the Tools... - Page 25 (green) Grounding Lug CON-LUG-GND-1 Ring Terminal for 6AWG grounding cable. (M6 x 8mm screw) DC Power cable v1, 10m PWR-10-MF-1 DC Power cable Alternative AC/DC converter kit. Additional lengths will be defined as required. UGD-D01006 Airspan Commercial and Internal Use...
-
Page 26: Power Supply
Operational Voltage Range: -40.5 to -57 VDC Transient Voltage: +150V (ETR283) AC power feed is also available, using an AC/DC power converter offered by Airspan. 3.2.4 Verify Components The following figures display various AirHarmony-1000 components and accessory kits. Note: AirHarmony-1000 variants with front mounted, Sunshield (pending) and Switched Beam (pending) antenna come factory pre-assembled. -
Page 27: Table 10: Airharmony-1000 Components
AirHarmony-1000 Installation Guide Table 10: AirHarmony-1000 Components Parts Images AirHarmony-1000 Unit (with front mounted antenna) in typical packing HAR10-FM-U40-B01D AirHarmony-1000 Unit (with Sunshield) in typical packing box (Pending) HAR10-CN-U40-B01D Universal mounting plate HAR10-U-PMK-1 Pole Clamps X 2 (included in above) - Page 28 8 available lengths) Ground cable with grounding lug (Note that the cable is ordered per meter and the lug is ordered separately. Crimping is done by the user) PVC Insulation tape Self-Amalgamating Tape UGD-D01006 Airspan Commercial and Internal Use...
-
Page 29: Physical Dimensions
AirHarmony-1000 Installation Guide AirHarmony-1000 is shown below from the Ethernet termination and RF port end views respectively. Copper Ethernet connection is currently unsupported. Figure 4: AirHarmony-1000 Unit, bottom termination Figure 5: AirHarmony-1000 Unit, Top, RF ports 3.2.5 Physical Dimensions AirHarmony-1000 is in an all outdoor enclosure. -
Page 30: Environmental
SBA Antenna 3.2.6 Environmental Note: AirHarmony-1000 is not meant to be used in a Marine environment. AirHarmony 1000 meets the following environmental requirements: ETSI EN 300-019-1-4 Operational (non-weather protected equipment) ETSI EN 300-019-1-1 Storage (weather protected, not temperature controlled locations) ... -
Page 31: Before Installation Of Airharmony-1000
1. Remove the protective dust cap from the GPS antenna jack prior to mounting on the AirHarmony-1000. 2. Align the GPS jack with the plug attached to the top panel on the AirHarmony-1000. 3. Attach the GPS antenna to the TNC connector on the unit. -
Page 32: Figure 7: Verify Connection Of Rf Cable
2. Weather-proofing of the connections is mandatory. This is done with a layer of self- amalgamating tape followed by an over layer of PVC tape. Both the self-amalgamating tape and the PVC tape are available from Airspan. 3. Verify the RF connector is completely weather-proof. -
Page 33: Installing Airharmony-1000
AirHarmony-1000 Installation Guide 5 Installing AirHarmony-1000 Install the AirHarmony-1000 eNodeB by pole mount or wall mount. AirHarmony-1000 is mounted on a pole or wall with its pre-installed antenna (front mount or SBA variants (pending)) or in close proximity to its external antenna (connectorized variant). Take care to install the mounting plate the correct way up. -
Page 34: Figure 10: Mounting Plate On Pole
Wrap the band to properly fit on the pole. Press down locking mechanism with band excess fed through the mechanism. Figure 12: Press down locking mechanism Align and position each of the 4 pole clamps. Tighten the clamp bands with large flat screwdriver in place. UGD-D01006 Airspan Commercial and Internal Use... -
Page 35: Figure 13: Tighten Clamp Bands
AirHarmony-1000 Installation Guide Figure 13: Tighten clamp bands Mounting plate is installed and ready for AirHarmony-1000 mounting. Figure 14: Pole mounting – exploded view UGD-D01006 Airspan Commercial and Internal Use... -
Page 36: Installing Airharmony-1000 Back-To-Back
5.1.1 Installing AirHarmony-1000 Back-to-Back In the event you want to deploy two (2) AirHarmony-1000(s) on the same pole – back-to-back, then the installation must be performed so that the clamp bands used to secure the units to the pole do not interfere with the clamp bands of the other unit. -
Page 37: Wall Mount Assembly
The difference in height between the installed units after installation will be 40mm. Note: The Universal Mounting plate for each AirHarmony-1000 must be mounted on the pole prior to assembling the AirHarmony-1000 units. Assemble each unit’s AC/DC Converter as explained in... -
Page 38: Figure 17: Positioning Wall Mounting Plate
Figure 18: Wall mounting plate fastened on wall Note: Wall plugs (x4) and necessary hardware are not supplied by Airspan and are the responsibility of the installer. Recommended minimum 8mm dia. with appropriate wall plugs according to field conditions. -
Page 39: Securing Airharmony-1000 To The Mounting Plate
The following procedure shown with the Front-Mount antenna variant as shown below. To mount AirHarmony-1000 to the mounting plate, perform the following: Loosely fit the flange nuts on the studs protruding from the sides of the unit. Figure 19: Lift unit to top of mounting plate Hook the studs into the top slots of the mounting plate. -
Page 40: Front Mount Antenna Tilt Adjustment
AirHarmony-1000 Installation Guide Figure 21: AirHarmony-1000 unit engaged into the bottom slots Tighten the flange nuts (4 places) to the required degree of down-tilt. Check and tighten all flange nuts. 5.4 Front Mount Antenna Tilt Adjustment On the Front Mount Antenna variant it is possible, after assembly to adjust the front mounted antenna tilt-down. -
Page 41: Led Display
On Continuously Sector OOS 5.6 Connecting the Ground Cable Connect the ground cable after attaching the grounding lug (optionally supplied by Airspan – CBL- GND-1M-1 and CON-LUG-GND-1) to the M6 threaded connection on the bottom of the main body casting. -
Page 42: Figure 24: Attaching Ground Cable To Airharmony-1000
Remove grounding screw and slip the ring terminal end of the ground cable onto the screw prior to re-setting into the threaded hole. Figure 24: Attaching ground cable to AirHarmony-1000 Connect the ground cable to the protection ground bar using suitable crimp lugs. -
Page 43: Installing Ac/Dc Converter
AC/DC power converter with cables on both AC and DC side. The DC side comes pre- connected to the AirHarmony-1000 DC plug and the AC side arrives with 3 bare wires. Waterproof cable joiner to connect the AC side with the AC cable ... -
Page 44: Ac/Dc Converter Wall Mount Assembly
Note: The AC/DC converter can be mounted horizontally if required. 1. Position AC/DC Converter against the wall in close proximity to the AirHarmony-1000 so as to facilitate the proper connection. 2. Mark the wall through the holes on the AC/DC Converter at the required height. -
Page 45: Figure 30: Wall Mount - Exploded View
Figure 30: Wall mount – exploded view Figure 31: Wall mount Note: Wall plugs (x4) and necessary hardware are not supplied by Airspan and are the responsibility of the installer. Recommended minimum 8mm dia. with appropriate wall plugs according to field conditions. -
Page 46: Cable Connections
Figure 32: AC/DC Converter with DC power connector 6.1.1 Power Cable Preparation The Power cable is connected to the AirHarmony-1000 using a Gland connector assembled on the bottom panel of the unit. 1. Remove the connector by unscrewing the body from the AirHarmony-1000, using the Gland wrench. -
Page 47: Figure 34: Power Connection - On Bottom Panel Of Airharmony-1000
AirHarmony-1000 Installation Guide Figure 34: Power connection - on bottom panel of AirHarmony-1000 4. Screw the gland connector plug securely into the body cavity of the unit using the provided Gland wrench. 5. Tighten the tail nut on to the body forcing the seal to compress around the power cable using the (provided) Gland wrench. -
Page 48: Wiring Ac Power Cable On The Ac/Dc Converter
3. Thread the prepared cable end through the gland, washer, sealing ring and body of the connector. Figure 40: Connector on cable 4. Secure the prepared ends of the cable into the head part of the connector. UGD-D01006 Airspan Commercial and Internal Use... -
Page 49: Figure 41: Secure Cable To Connector
Individual connection numbers are marked on each part of the connector. Note: Set screw maximum recommended tightening torque of 0,3 Nm. Figure 43: Numbered connector contacts 7. Assemble the parts of the connector and tighten the gland to provide a waterproof seal. UGD-D01006 Airspan Commercial and Internal Use... -
Page 50: Wiring Ac Power Input Cable
Fasten the 2 parts of the connector together and tighten to make a waterproof seal. Position the pins correctly; the connector is secured to the unit with a locking ring that is screwed into place. Use firm hand pressure only, the connector has a built in sealing ring. UGD-D01006 Airspan Commercial and Internal Use... -
Page 51: Fiber Ethernet (Sfp) Cable Installation
Note: Airspan recommends using the Finisar - FTLF1318P3BTL 1000BASE-LX which has been tested and approved by Airspan. Available from Airspan if required. The Outdoor fiber cable is available in 8 different lengths from 10m to 200m. Airspan recommends to test the fibers prior to installation (using FOA’s standard Note: testing industry standards). -
Page 52: Figure 50: Cable Connector Hook Up To The Board Connector
Check that there no space between the inner housing and mounting flange. Check and remove any debris that might interfere with the connection. 6. Slide the outer shell over the inner housing and turn the outer bayonet shell 1/4 turn clockwise, until it clicks into place. UGD-D01006 Airspan Commercial and Internal Use... -
Page 53: Copper Ethernet Cable Installation
Airspan products. The Ethernet cable is connected using a standard RJ45 connector protected by a harsh environment protective casing. 6.5.1 Hardware Requirements The following are the cable and connectors available from Airspan. Table 14: Hardware Airspan Part Number Description... -
Page 54: Tool Requirements
4. Peal and stick the front seal on the collar of the connector body. 5. Carefully strip the outer sheath insulation back 1- 2 inches using the Jacket strippers. Roll back the foil shield insulation and the drain wire. Do not remove any insulation from the conductors. UGD-D01006 Airspan Commercial and Internal Use... -
Page 55: Figure 54: Ethernet Cable Stripped
11. Push the wires all the way into the RJ45 connector until the front of the wires butt against the front of the connector (inside). Visually inspect to verify that the wires are fully inserted. UGD-D01006 Airspan Commercial and Internal Use... -
Page 56: Figure 58: Rj45 Crimping
16. With an Ethernet cable tester, test to verify the proper connectivity of the cable. 17. Tighten the tail nut on to the body forcing the seal to compress around the cable. Figure 60: RJ45 assembled UGD-D01006 Airspan Commercial and Internal Use... -
Page 57: Additional Installations (Non-Standard)
The AirHarmony-1000 unit can be used either with a sector antenna mounted directly on the front or with a remotely attached antenna. The following describes the installation procedure for the front mounted antenna. -
Page 58: Figure 62: Connecting Rf Cable
AirHarmony-1000 Installation Guide For installation of a remotely mounted antenna follow the antenna manufacturer’s instructions and connect the antenna to the AirHarmony-1000 using the appropriate cables. (Weather-proofed N-type Heliax RF cables (ordered separately). 1. Attach, connect and secure the RF cable between the external antenna and the appropriate RF connection on the top of the unit. -
Page 59: A Job Sheet
AirHarmony-1000 Installation Guide A Job Sheet This job sheet enables the users to keep track of their installation. It covers all the prerequisites required for accomplishing the AirHarmony-1000 installation. Site Requirements Pole or wall for installation identified Position on pole or wall identified... -
Page 60: B Checklist
B Checklist During installation, review and perform all the steps on this checklist (in the given order). This checklist is meant for the person who performs the AirHarmony-1000 installation. It includes the high– level steps involved in the installation process. -
Page 61: C Abbreviations
Resource Block locations in the presence of an interfering signal Internet Protocol Security is a protocol suite for securing Internet IPSec Protocol (IP) communications by authenticating and encrypting each IP packet of a communication session UGD-D01006 Airspan Commercial and Internal Use... - Page 62 Used in LTE for UE transmissions to the eNodeB Stream Control Transmission Protocol is a reliable transport layer SCTP protocol, ensuring in-sequence transport of messages with congestion control like TCP Software Defined Radio WEEE Waste Electrical and Electronic Equipment UGD-D01006 Airspan Commercial and Internal Use...
Need help?
Do you have a question about the AirHarmony-1000 and is the answer not in the manual?
Questions and answers