Advertisement
Quick Links
Advertisement

Subscribe to Our Youtube Channel
Related Manuals for PICO 4


Summary of Contents for PICO 4
- Page 1 用户指南 * User Guide * 包装内含 使用前注意事项 快速引导 产品部件详情说明 操作说明...
- Page 2 包装内含: • 本产品支持在系统设置中进行瞳距调节 , 调节时请务必注意,最小瞳距可能会碰触鼻梁。当您佩戴头盔后,您 可在“设置”►“显示”中进行手动调节,请注意设置使用不合适的瞳距,可能会引起视觉重影或者眼睛疲劳。 VR 头盔 / 手柄 × 2 / 1.5V AA 碱性干电池 × 4 / 眼镜支架 / 遮光鼻托 / 手柄挂绳 × 2 / USB-C 电源适配器 / USB-C • 本产品“护眼模式”经德国 TÜV Rheinland 低蓝光认证,通过软件算法降低三色通道中的蓝光量,来达到保护 to C 2.0 数据线 / 快速指南 / 用户指南 / 安全与质保指南 眼睛的作用,该模式下画面颜色偏黄,您可根据个人喜好在“设置”►““显示”►“色彩调节”►“护眼” 使用前注意事项 中激活或关闭此功能。 • 本产品在开阔的室內环境使用体验最佳,建议至少预留 2×2 米 的空间。使用前请确认身体没有不适且周围环 境安全,特别是佩戴头盔在室内行走移动时,要尽量避免发生意外。 • 不建议 12 岁及以下儿童使用本产品,建议将头盔、手柄和配件置于儿童够不到的位置,13 岁以上青少年须在 成人监护下使用,以免发生意外。 • 本产品无近视调节功能,近视用户请佩戴眼镜使用并尽量避免近视眼镜被头盔的光学镜片磨伤或刮伤。建议在 使用和收纳时注意防护光学镜片, 避免尖锐物体划伤镜片, 擦拭清洁时请使用柔软的眼镜布, 否则可能划伤镜片, 影响视觉效果。 • 长时间使用可能引发轻微的昡晕或者眼疲劳,建议使用 30 分钟后适当休息,可通过眼保健操或观看远处物体缓 解眼疲劳。如果您的身体感到任何不适,请立即停止使用。如果不适持续,请咨询医生。 • 当头盔镜片被阳光或紫外线照射时(尤其在户外、阳台、窗台及汽车内存放时),可能导致屏幕出现永久性黄斑。 请尽量避免该情况发生,此种屏幕损坏不在产品的质保范围内。 * 本产品最终外观及功能以实物为准, 部分地区包装内含物品有所差异, 本说明仅供参考。...
- Page 3 快速引导 六自由度 VR 体验 ❶ 安装电池 本产品可以追踪头盔和手柄前、后、左、右、上、下和旋转的运动状态,您在现实中的肢体运动会实时反映在虚 按箭头方向拔出电池盖侧边的绝缘纸 拟世界中。 由于没有任何线缆的束缚,您在虚拟世界自由探索时请确保游玩区域的安全。 1. 建议准备一个整洁安全的体验空间:至少 2×2 米;保持房间明亮,避免在只有单色的墙或大面积玻璃、镜子类 反射物以及许多移动画面和物体的空间中使用。 2. 撕下 VR 头盔前端摄像头上的保护膜,并佩戴手柄挂绳。 3. 根据开机后的画面提示进行游玩区域的设定。 提示:本产品虚拟的安全区提醒功能,不能完全保证您在设定好的游戏区域中的安全,请时刻注意周围的安全情况。 提示:建议使用 1.5V AA 碱性电池。 按照图示拨动电池盖拨钮打开电池盖更换电池。...
- Page 4 ❷ 手柄开机 ❸ 头盔开机 ❹ 佩戴头盔,调节至清晰舒适的位置 首次开机:拔出绝缘纸,手柄自动开机(蓝灯闪烁) 长按头盔电源键 2 秒(蓝灯常亮) 调节旋钮转动绑带,使后脑垫套在头上,微调绑带长度及佩戴位置至视野清晰 非首次开机:短按手柄 Home 键开机(蓝灯闪烁) 提示:近视用户请佩戴眼镜或镜片插件使用,本产品不具备近视调节功能。...
- Page 5 ❺ 微调顶绑带 ❻ 瞳 距 调 节 微调顶绑带使其受力以减少额头压力 在系统设置:“设置”►“显示”界面中进行瞳距调节,点击“+”或“-”按钮可微调瞳距直至画面清晰 64mm 请勿强行掰动镜筒,以免造成损坏! 请注意设置使用不合适的瞳距,可能会引起视觉重影或者眼睛疲劳。准确的瞳距设置有助于获得清晰的图像并减少 眼睛疲劳。...
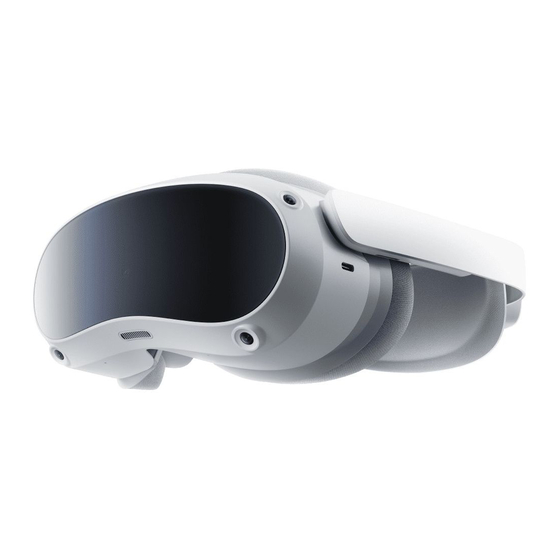
- Page 6 产品部件详情说明 头盔状态指示灯 蓝灯常亮:开机进行中或工作状态 黄灯常亮:充电中,电量低于 98% ① 电源键 ② 状态指示灯 ⑥ 顶部绑带 ⑨ USB-C 接口 ⑫ 眼球追踪摄像头 红灯常亮:充电中,电量低于 20% ③ 贴脸泡棉 ⑩ 左 / 右喇叭 开机:长按 2 秒 此功能仅 Pro 版支持 可拆卸 绿灯常亮:充电完毕,电量大于 98% 或 充满 关机:长按 5 秒 ④ 音量键 ⑦ 绑带旋钮 ⑪ 距离传感器 使用时请勿遮挡 蓝灯闪烁:关机进行中 ⑬ 面部追踪摄像头 复位:长按 10 秒 ⑤...
- Page 7 手柄状态指示灯 ① 摇杆 ③ Home 键 ④ 状态指示灯 ⑧ 电池盒 熄灭:已连接或者关机 ② 菜单键 ⑤ 抓握键 开机 : 短按 打开:拨动拨钮,电池盒弹出 蓝灯常亮:固件升级模式 关机 : 长按 6 秒 ⑥ 截屏键 安装:按压直至自动锁紧 蓝灯闪烁:连接中 ⑨ 追踪光环 退出应用 : 短按 ⑦ 扳机键 红蓝灯交替慢速闪烁:等待配对 屏幕中心校正 : 长按 1 秒 使用时请勿遮挡 注:手柄挂绳可按图示将粗绳穿过细绳并锁紧在手柄尾端...
- Page 8 操作说明 手柄硬件复位 如果手柄出现按 Home 键和任何按键均无反应或者头盔中虚拟手柄卡死不动的问题可拆装电池重新启动手柄。 头控模式 近视用户配戴 未连接手柄的情况下,您可通过转动头部光标及点击头盔音量加减按键进行操作。 本设备不具备近视调节功能,头盔可支持佩戴镜框宽度小于 150mm 的大多数标准眼镜。 切换主控手柄射线 在主控菜单下,短按对应手柄的扳机键可以切换主控手柄的射线。 屏幕中心校正 戴着头盔直视前方,按住手柄 Home 键(或头控模式下头盔上的音量减键)1 秒以上,进行屏幕中心的校正将菜 单拉到当前视野朝向位置。 断开手柄 长按手柄 Home 键直至手柄状态指示灯红灯亮起并伴随振动产生时即可松手, 此时手柄关机并断开与头盔的连接。 您无需刻意进行手柄关机操作,在以下状态下手柄会自动关机省电: • 头盔进入深度休眠时(摘下头盔后一段时间) • 头盔手柄管理界面解绑手柄时 • 头盔关机时 添加新手柄 如需添加新手柄 (头盔最多可同时连接一对手柄, 即左右手柄各一只) , 或解绑手柄后再次连接 , 可进入 “设置” ► “手 柄”,点击“配对”,同时按住手柄 Home 键和扳机键直至手柄状态指示灯红蓝交替闪烁时即可松开,然后根据 头盔画面提示操作。 休眠 / 唤醒 方式一:摘下头盔一段时间后,系统自动休眠;戴上头盔时,系统自动唤醒。 方式二:短按头盔电源键也可以进行休眠或唤醒操作。...
- Page 9 安装眼镜支架 安装遮光鼻托 如您存在眼镜摩擦光学镜片或者压迫鼻梁的问题,请按照图示安装眼镜支架以增加间隔空间。 如您感觉鼻子处漏光影响体验,请按照图示安装遮光鼻托配件。 您可根据佩戴的舒适度选择是否安装。 由于眼睛空间密闭可能加剧起雾及出汗问题,您可根据喜好选择是否安装。 ❶ 摘下贴脸泡棉 ❸ 将贴脸泡棉按照图示安装眼镜支架上 ❶ 摘下贴脸泡棉 ❸ 安装贴脸泡棉 ❷ 将眼镜支架按照图示安装在产品上 ❷ 将遮光鼻托按照图示方式安装在贴脸泡棉上 注:按照图示拆卸眼镜支架...
- Page 10 • 畅 聊 社 区, 与 众 多 PICO 玩 家 一起探索 VR 世界 • 管理设备更便捷 • 参与丰富互动活动 • 更多精彩内容等你来发现 ❷ ❶ 微 信公 众 号: PICO VR 抖音: PICO官 方 旗 舰 店 哔 哩 哔 哩: PICO-VR官 方 微 博: PICO-VR...
- Page 11 • This product has an “Eye Protection Mode”, certified by TÜV Rheinland (Germany), which can protect VR Headset / 2 Controllers / 4 1.5V AA Alkaline Batteries / Glasses Spacer / Nose Pad / 2 Controller Lan- your eyes by reducing blue light in the three color channels using software algorithms. The screen ap- yards / USB-C Power Adapter / USB-C to C 2.0 Data Cable / Quick Guide / User Guide / Safety and Warranty...
- Page 12 ❶ Install Batteries 6 Degrees of Freedom VR Quick Guide The device can track your translational and rotational movements in all directions (up/down, left/right, Pull the tab to remove the insulating paper. forward/backward, pitch, roll, and yaw). Your movements in the real world will be captured and translated to what you see in the virtual world when using the appropriate content.
- Page 13 ❷ Power on the Controller ❸ Power on the VR Headset ❹ Wear Your Headset for a Comfortable Fit and View First Start: The Controller will start automatically Long press the Power button for 2 seconds until Adjust the strap dial to turn the strap so that the back of your head rests on the padding. Fine-tune the after removing the insulating paper.
- Page 14 ❺ Fine-tune the Top Strap ❻ Interpupillary Distance (IPD) Adjustment Fine-tune the head strap to reduce pressure on the forehead. In System Setting, go to “Setting” ► “Display” to adjust IPD, tap “+” or “-” button to slightly adjust IPD until the picture is clear.
-
Page 15: Product Details
Product Details VR Headset Status Indicator Legend ① ⑤ ⑨ ⑫ Blue: Powered on with battery over 20% Power RGB See Through Camera USB-C Interface Eye Tracking Cameras ⑩ Yellow: Charging: Battery is less than 98% Power on: Long press for 2 seconds Left/Right Speaker Pro version only. - Page 16 ① ③ ④ ⑧ Controller Status Indicator Legend Joystick Home Status Indicator Battery Case ⑤ ② Menu Power on: Short press Grip Open: Slide down the toggle and ⑥ Off: Connected or Powered off pop up the battery case. Power off: Long press for 6 seconds Capture ⑦...
- Page 17 Operating Instructions Hardware reset VR Headset reset Headset Control Mode If the visual in the VR Headset freezes, or the VR Headset does not respond after short press the Power If the Controller is not connected, you can interact with the home screen by moving your head to direct button, you can press the Power button of the VR Headset for more than 10 seconds to reboot the VR the crosshairs over your intended selection and clicking the Volume Up/Down button on the VR Headset.
- Page 18 Install Glasses Spacer Install Nose Pad If you have glasses collision with headset lens or pressure on the bridge of nose, please follow the picture If you feel light leaking from your nose, please follow the picture to install Nose Pad to block the light. to install Glasses Spacer to increase the space.
- Page 19 Pinch the metal buckle of the top strap as shown, press it down and pull it out. • Purchase high-quality and trending apps • Join PICO Community and explore the VR world with other PICO players • Manage your device with ease •...
Need help?
Do you have a question about the 4 and is the answer not in the manual?
Questions and answers