PICO Neo 2 User Manual
All-in-one
Hide thumbs
Also See for Neo 2:
- User manual (38 pages) ,
- User manual (56 pages) ,
- Quick start manual (4 pages)

Related Manuals for PICO Neo 2


Summary of Contents for PICO Neo 2
- Page 1 A New Reality Virtual Reality All-In-One Headset 用户指南 USER GUIDE ユーザガイド 사용 설명서 Pico Neo 2_User Guide(无11ad)-四国语言-20191127.indd 1 2019/12/9 上午9:54...
- Page 2 用户指南 USER GUIDE ユーザガイド 사용 설명서 Pico Neo 2_User Guide(无11ad)-四国语言-20191127.indd 2-3 2019/12/9 上午9:54...
- Page 3 包装盒内包括 头盔 x1 用户指南 适用于 Pico Neo 2 系列 手柄 x2 User Guide 电源适配器 x2 用户指南 x1 USB-C 2.0 数据线 x1 2合1 USB-C 手柄挂绳 x2 清洁布 x1 手柄充电线 x1 Pico Neo 2_User Guide(无11ad)-四国语言-20191127.indd 4-5 2019/12/9 上午9:54...
- Page 4 • 建议在使用和收纳时注意防护光学镜片,避免尖锐体划伤镜片,擦拭清洁时请使用 包装内附赠的眼镜布,否则可能刮伤镜片,影响视觉效果。 • 建议勿将声音音量调得过大,否则可能对听觉造成损伤。 • 长时间使用可能引发轻微的眩晕或者眼疲劳,建议使用30分钟后适当休息,可通 过眼保健操或观看远处物体缓解眼疲劳。如果您的身体感到任何不适,请立即停 止使用。 • 本产品可通过头盔按键实现基本操作,如需体验更丰富有趣的内容,请连接手柄 使用。 • 本产品无近视调节功能,近视用户请佩戴眼镜使用。 • 不建议12岁及以下儿童使用本产品,建议将头盔、手柄和配件置于儿童够不到的位 置,12岁以上青少年须在成人监护下使用,以免发生意外。 2米 2米 1. 建议准备一个整洁安全的体验空间:2米 x 2米;保持房间明亮,避免使用只有单色 的墙或大面积玻璃、镜子类反射物以及许多移动画面和物体的空间; 2. 撕下VR头盔前端摄像头上贴有的保护膜,佩戴手柄挂绳; 3. 根据开机后的画面提示进行游玩区域的设定。 * 提示:本产品虚拟的安全区提醒功能不能完全保证您在设定好的游戏区域中的安全,请时刻注意周围 * 本产品最终外观及功能以实物为准,本说明仅供参考。 的安全情况。 Pico Neo 2_User Guide(无11ad)-四国语言-20191127.indd 6-7 2019/12/9 上午9:54...
- Page 5 快速引导 开机 连接手柄 长按头盔电源键2秒(蓝灯常亮) 短按手柄HOME键(蓝灯闪烁) Pico Neo 2_User Guide(无11ad)-四国语言-20191127.indd 8-9 2019/12/9 上午9:54...
- Page 6 佩戴头盔 调节至清晰舒适的位置 调节旋钮并向上转动绑带, 向下转动绑带使后头垫套在头上, 微调绑带长度及佩戴位置至视野清晰。 留出足够的头部空间。 提示:近视用户请佩戴眼镜使用,本产品不具备近视调节功能。 Pico Neo 2_User Guide(无11ad)-四国语言-20191127.indd 10-11 2019/12/9 上午9:54...
- Page 7 黄灯常亮: 充电中,电量低于90% 红灯闪烁: 电量低于20% 音量键 Micro SD 耳机孔 红灯常亮: 充电中,电量低于20% 指示灯熄灭: 休眠或关机 卡插槽 802.11ad 60GHz 天线 眼球追踪 绿灯常亮: 充电完毕,电量大于90%或充满 * 此功能仅 Pico Neo 2 WiGig 支持 * 此功能仅 Pico Neo 2 Eye 支持 Pico Neo 2_User Guide(无11ad)-四国语言-20191127.indd 12-13 2019/12/9 上午9:54...
- Page 8 • 头控模式 • 近视用户配戴 未连接手柄的情况下,您可通过转动头部及点击头盔按键进行操作。 本设备不具备近视调节功能,头盔可支持佩戴镜框宽度小于160毫米的大多数标 准眼镜。 • 头控模式下屏幕中心校正 戴着头盔直视前方,按住 头盔HOME键1秒以上,进行屏幕中心的校正,将界面调 整至当前视野朝向位置。 • 头控模式下添加新手柄 如需添加新手柄(头盔最多同时连接一对手柄,即左右手柄各一只),或解绑手 柄后再次连接,可进入“设置”->“手柄”,点击“添加手柄”,同时按住手柄 HOME键和扳机键直至手柄状态指示灯红蓝交替闪烁时即可松开,然后根据头盔 画面提示操作。 • 头盔音量调节 头盔音量调节键可进行音量的增加或减少操作,长按可连续调节。 • 头盔硬件复位 如果头盔出现短按头盔HOME键或电源键没有反应或头盔的画面卡死等问题,可以 长按头盔电源键10秒以上重新启动头盔。 • 休眠/唤醒 方式一:摘下头盔一段时间后,系统自动休眠;戴上头盔时,系统自动唤醒。 方式二:短按头盔电源键也可以进行休眠或唤醒操作。 Pico Neo 2_User Guide(无11ad)-四国语言-20191127.indd 14-15 2019/12/9 上午9:54...
- Page 9 • 关机:长按 6 秒 • 复位:长按 16 秒以上 • 返回主界面:短按 • 屏幕中心校正:按住 1 秒 状态指示灯 挂绳孔 USB-C充电接口 手柄状态指示灯 蓝灯常亮:已连接 蓝灯闪烁: 连接中 红灯常亮:充电中 红灯闪烁: 电池电量低 绿灯常亮:电量已充满 白灯闪烁: 固件升级中 白灯常亮:固件升级模式 熄灭: 关机 红蓝灯交替慢速 ( 0.5s ) 闪烁: 等待配对 Pico Neo 2_User Guide(无11ad)-四国语言-20191127.indd 16-17 2019/12/9 上午9:54...
- Page 10 • 断开手柄 长按手柄HOME键直至手柄状态指示灯红灯亮起并伴随振动产生时即可松手, 此时手柄关机并断开与头盔的连接。您无需刻意进行手柄关机操作,在以下状 态下手柄会自动关机省电: - 头盔进入深度休眠时 (摘下头盔后一段时间) - 头盔蓝牙关闭时 - 头盔手柄管理界面解绑手柄时 - 头盔关机时 • 添加新手柄 如需添加新手柄(头盔最多可同时连接一对手柄,即左右手柄各一只),或解 • 移动光标 绑手柄后再次连接,可进入“设置”->“手柄”,点击“添加手柄”,同时按 可通过移动和旋转手柄/头盔来指向要浏览的内容, 住手柄HOME键和扳机键直至手柄状态指示灯红蓝交替闪烁时即可松开,然后 并通过手柄扳机键或头盔确认键进行选择。 根据头盔画面提示操作。 • 手柄硬件复位 如果手柄出现按HOME键和任何按键状态指示灯均无反应或头盔中虚拟手柄卡 死不动问题,可按住手柄HOME键16秒以上以重新启动手柄。 • 屏幕中心校正 戴着头盔直视前方,按住手柄HOME键1秒以上,进行屏幕中心的校正将菜单 拉到当前视野朝向位置。 提示:未连接手柄的情况下,您可通过转动头部及点击头盔按键进行操作。 Pico Neo 2_User Guide(无11ad)-四国语言-20191127.indd 18-19 2019/12/9 上午9:54...
- Page 11 • 更换贴脸泡棉请按照图示,将贴脸泡棉沿着边缘卡进头盔缝隙中。 • 部分人群使用VR 头盔时会有严重头晕、呕吐、心悸甚至昏厥等症状,该类人群 在玩普通的电子游戏、观看3D电影等时也出现这样的感觉。任何人出现类似情 • 清洁贴脸泡棉时不可水洗、不可干洗、不可阳光暴晒、不可接触有机溶剂,否 况,建议您在使用VR 头盔前咨询医生。 则可能会导致贴脸舒适性下降,且增加眼镜碰撞光学镜片的几率。 • 不建议12岁及以下儿童使用本产品。建议您将头盔、手柄和配件置于儿童够不 到的位置,12岁以上青少年须在成人监护下使用,以免发生意外。 • 若您的双眼视力差距较大,或近视度数较高,或存在散光、远视等情况,建议 您在使用VR 头盔时,佩戴眼镜矫正视力。 • 部分人群是过敏体质,其皮肤对塑胶类、皮质类、纤维类等材质过敏,长期接 触部位会有红肿、发炎等症状。任何人出现类似情况,请停止使用VR 头盔并 咨询医生。 • 建议您每次佩戴VR 头盔的时间不超过30分钟,若有不适感,建议根据个人习 惯增加休息的频率和时间,每次休息时间不低于10分钟。当出现视觉异常(重 影视线扭曲、眼部不适或疼痛等)、过度出汗、恶心眩晕、心悸、迷失方向、平 衡感丧失等症状时,建议您立即停止使用。本产品提供了身临其境的虚拟内容 体验,某些类型的内容可能会引发您的不适反应。当出现以下症状时应立即停 止使用并及时就医。 • 癫痫发作、失去意识、抽搐、不自主运动、头昏眼花、方向障碍、恶心、头 Pico Neo 2_User Guide(无11ad)-四国语言-20191127.indd 20-21 2019/12/9 上午9:54...
- Page 12 • 请勿在多灰、潮湿、肮脏或靠近磁场的地方使用设备,以免引起设备内部电 环境保护 路故障。 • 请勿将本设备及其附件作为普通的生活垃圾处理。 • 请勿在雷雨天气使用本设备。雷雨天气可能导致设备故障或电击危险。 • 请遵守本设备及其附件处理的本地法令,并支持回收行动。 • 建议您在温度0° C~35° C范围内使用本设备,并在温度-20° C~+45° C 范围内 存放设备及其配件,当环境温度过高或过低时,可能会引起设备故障。 听力保护 • 请勿将设备放置在阳光或紫外线直射的地方,如汽车仪表盘、消毒柜或窗台 • 为了防止可能的听力损伤,请勿长时间使用高音量。 处。建议您避免设备及其配件雨淋或受潮,否则可能导致火灾或触电危险。 • 当您使用耳机收听音乐、玩游戏或观影时,建议您使用所需的最小音量,以免 • 请勿将设备靠近热源或裸露的火源,如电暖器、微波炉、烤箱、热水器、炉 损伤听力。长时间接触高音量可能会导致永久性听力损伤。 火、蜡烛或其他可能产生高温的地方。 易燃易爆区域 • 设备在运行一段时间后,设备温度会升高。如果设备温度过高,请勿长时间接 Pico Neo 2_User Guide(无11ad)-四国语言-20191127.indd 22-23 2019/12/9 上午9:54...
- Page 13 充电器安全 • 建议您使用产品包装附赠的或符合产品铭牌标注输入值的充电设备,否则可能 引发意外。 • 设备充电时,电源插座应安装在设备附近并应易于触及。 • 当充电完毕或者不充电时,建议您断开充电器与设备的连接并从电源插座上拔 掉充电器。 • 请勿摔落或碰撞充电器。 • 若充电器插头或电源线已损坏,请勿继续使用,以免发生触电或火灾。 • 请勿用湿手触碰电源线,或用拉电源线缆的方式拔出充电器。 • 请勿用湿手触摸设备或充电器,以免发生设备短路、故障或触电。 • 充电器被雨淋、液体浸湿或严重受潮时,请停止使用。 电池安全 • 本产品头盔和手柄均包含锂离子聚合物或锂离子电池。请勿将金属物导体与电 池两极对接、或接触电池的端点,以免导致电池短路,以及因电池过热而引起 的烧伤等身体伤害。 • 请勿将电池暴露在高温处或发热设备的周围,如日照、取暖器、微波炉、烤箱 或热水器等。电池过热可能引起爆炸。请勿拆解或改装电池、插入异物、或浸 入水或其它液体中,以免引起电池漏液、过热、起火或爆炸。 * 请勿自行拆卸、更换、维修设备,否则会失去保修资格。如您需要维修服务,请与客服联系或到 • 如果电池漏液,请勿使皮肤或眼睛接触到漏出的液体。若接触到皮肤或眼睛 Pico授权的服务商处进行维修。 Pico Neo 2_User Guide(无11ad)-四国语言-20191127.indd 24-25 2019/12/9 上午9:54...
- Page 14 有毒有害物质声明 产品保修条例 在三包有效期内,您可以依照本规定享受修理、换货、退货的权力,以上应凭发票 或相关有效购物凭证办理。 • 自购买日起7日内出现的质量问题,消费者可以选择按发票价格一次性退还货款 或者更换同型号产品; • 自购买日起15日内出现的质量问题,消费者可以选择更换同型号产品; • 自购买日起12个月内出现的质量问题,消费者可以选择免费进行修理; • 主机之外的附属类配件质保期3个月。 重要提示 以下情况不属于三包范围: - 未按本产品说明书的要求使用、维护、保管而造成损坏的; - 除本产品以外的赠品和包装盒; - 未经授权服务者的拆机、改动、维修造成的损坏; - 火灾、水灾、雷击等不可抗力造成的损坏; - 已超过三包有效期。 * 请勿自行拆卸、更换、维修设备,否则会失去保修资格。如您需要维修服务,请与客服联系或到 Pico授权的服务商处进行维修。 Pico Neo 2_User Guide(无11ad)-四国语言-20191127.indd 26-27 2019/12/9 上午9:54...
- Page 15 法律法规 版权所有 ©小鸟看看科技有限公司2015-2020。保留一切权利。 本资料仅供参考,不构成任何形式的承诺。产品(包括但不限于颜色、大小、屏幕 显示等)请以实物为准。 用户软件许可协议 • 在使用本产品前,务请仔细阅读软件许可协议,当您开始使用本产品即表示同 意接受本许可协议的约束。 • 如您不同意本协议的条款,请勿使用本产品及软件,并将本产品交还原处以取 得退款。协议内容请访问: https://www.pico-interactive.com/cn/terms/ user_terms.html USER GUIDE 隐私保护 For Pico Neo 2 Series • 为了解我们如何保护您的个人信息,请访问: https://www.pico-interactive. com/cn/terms/privacy.html阅读我们的隐私政策。 官方论坛 官方微信 请至官网查看更多Pico产品信息、售后服务政策和授权服务商信息,请关注Pico 微信公众号或登录官方网站。 www.pico-interactive.com Pico服务热线 产品型号 400-6087-666 Model: A7B10/A7C10/A7D10 Pico Neo 2_User Guide(无11ad)-四国语言-20191127.indd 28-29...
- Page 16 • Protect optical lenses during use and storage to prevent damage. User Guide AC Adapter x2 User Guide x1 USB-C 2.0 Data Two-in-one Controller Lens Cleaning Cable x1 USB-C Controller Lanyard x2 Cloth x1 Charging Cable x1 Pico Neo 2_User Guide(无11ad)-四国语言-20191127.indd 30-31 2019/12/9 上午9:54...
- Page 17 3. Set up your environment by following instructions on the VR Headset screen. Note: This product can not guarantee your safety with guardian system, you will need always pay attention to the surrounding safety. Pico Neo 2_User Guide(无11ad)-四国语言-20191127.indd 32-33 2019/12/9 上午9:54...
- Page 18 Turn the strap dial counter clockwise to loosen the VR Headset. The status indicator will flash blue once powered on. Rotate the strap up to ensure the enough space for head. *Note: Nearsighted users can use this product with prescription glasses. Pico Neo 2_User Guide(无11ad)-四国语言-20191127.indd 34-35 2019/12/9 上午9:54...
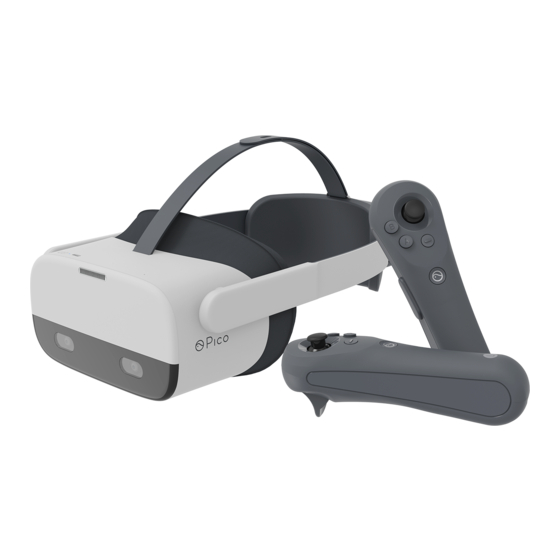
- Page 19 Pico Neo 2 VR Headset Details 3.5mm Power Jack Face Cushion 2nd Mic Removable Top Strap Removable and three steps adjustable USB-C Interface Back Head-pad USB 3.0 data transmission USB 3.0 OTG device extension Status Indicator POWER Button • Power on: long press for 2 seconds •...
- Page 20 Press the POWER button for manual sleeping or waking up. Main VOLUME Micro SD Audio Button Card Slot Jack Built in 80.11ad 60GHz Antenna Built in Eye Tracking *For Pico Neo 2 WiGig only *For Pico Neo 2 Eye only Pico Neo 2_User Guide(无11ad)-四国语言-20191127.indd 38-39 2019/12/9 上午9:54...
- Page 21 Blue: Connected to VR Headset Blue flashing: Searching for connection Red: Charging Red flashing: Low battery White: Firmware update White flashing: Firmware update in Red and blue flashing alternately: progress Pairing in progress Off: Powered off Pico Neo 2_User Guide(无11ad)-四国语言-20191127.indd 40-41 2019/12/9 上午9:54...
- Page 22 TRIGGER button of the Controller or the CONFIRM button of the VR Headset. Lanyard Hole USB-C * Note: You can operate by turning your head and clicking the buttons on the VR Headset if the Con- troller is not connected. Pico Neo 2_User Guide(无11ad)-四国语言-20191127.indd 42-43 2019/12/9 上午9:54...
-
Page 23: Product Care
Controller for more than 16 seconds to restart the Controller. * Note: For multiple users, use medical surface wipes to sanitize facial interface between uses. For recommended products, please contact Pico support. Do not dry clean, machine wash, or exposure to the sun. -
Page 24: Safety Warnings
• Do not use the equipment in dusty, humid, dirty or near strong magnetic fields, • This product is not meant for extended use over 30 minutes at a time with rest so as not to cause internal circuit failure of this product. Pico Neo 2_User Guide(无11ad)-四国语言-20191127.indd 46-47 2019/12/9 上午9:54... - Page 25 • If the charging adapter or cable is damaged, discontinue using to prevent the is located. For approved accessories, please contact Pico Customer Service risk of electric shock or fire.
-
Page 26: Eu Regulatory Conformance
“CCCC” stands for the nation. “YY” stands for Baseband Version. human injury. The battery can only be replaced by Pico or Pico authorized ser- “Z.ZZ” stands for the Software Version. “YY” stands for the update year. -
Page 27: Fcc Statement
EEE waste, please contact your local authorities, retailer or • Consult the dealer or an experienced radio/ TV technician for help. household waste disposal service or visit the website www.pico-interactive.com. This device complies with part 15 of the FCC rules. Operation is subject to the fol-... -
Page 28: Product Warranty Terms
- The product has exceeded the valid period of the warranty. Laws and Regulations Copyright © 2015-2020 Pico Technology Co., Ltd. All Rights Reserved. This information is for reference only and does not constitute any form of commit- ment. Products (including but not limited to color, size, screen display, etc.) shall be subject to physical objects. - Page 29 セット内容 使用説明書 HMD本体 x1 For Pico Neo 2 Series コントローラー x2 User Guide ACアダプター x2 使用説明書 (本書) x1 USB Type-C データケ コントローラー充 コントローラー用 クリーニングクロス ーブル x1 電用ケーブル (USB ストラップ x2 (レンズ用) x1 Type-C) x1 Pico Neo 2_User Guide(无11ad)-四国语言-20191127.indd 56-57 2019/12/9 上午9:54...
- Page 30 す。 HMD本体のレンズと眼鏡のレンズがぶつかったり、 擦れないようご注意の上ご使用 ください。 ( 詳細は42ページに記載しております) • HMDの長時間のご使用はめまいや眼精疲労の原因となる可能性がございます。 30 分 ごとにHMD本体を外し、 遠く を見る等の休憩を取りながらご使用ください。 ご使用者様 の体調に異常が見られた場合は直ちにご使用を中止してください。 • HMD本体のレンズに太陽光または他の光源が差し込まないようにご注意くださ い。スクリーン焼けの原因となる可能性がございます。太陽光または他の光源に よるスクリーンの破損については保証対象外となります。予めご了承ください。 • HMDのご使用時、保管時はレンズに傷がつかないようご注意ください。 1. 周囲に障害物のない、安全な室内環境下でご使用ください。(2m×2m以上のス ペースが必要です) 2. HMD本体と左右のコントローラーをそれぞれ充電してください。 3. 付属のストラップをコントローラーに使用し、手首にストラップを通した状態で コントローラーをしっかりと握ってください。 4. HMD本体に表示される推奨環境でご使用ください。 * ヒント:本制品の仮想的な安全区域の注意喚起机能はあなたがこのゲーム区域の中の安全を保証することが できなくて、 あなたは常に周囲の安全情況に注意する必要があります。 Pico Neo 2_User Guide(无11ad)-四国语言-20191127.indd 58-59 2019/12/9 上午9:54...
- Page 31 クイックガイド HMD本体を起動してください コントローラーを起動してください 本体の電源ボタンを2秒以上長押ししてください。 ホームボタンを長押しするとインジケーターラン インジケーターランプが青色に点灯し、 HMD本体が起動します。 プが青色に点滅し、コントローラーが起動します。 Pico Neo 2_User Guide(无11ad)-四国语言-20191127.indd 60-61 2019/12/9 上午9:54...
- Page 32 HMD本体を装着してください HMD本体の装着位置を調整してください ストラップ後頭部にあるストラップ調整ダイヤルを反時計回りに回してストラップ ストラッ プの位置を水平に戻し、 後頭部のストラッ プ調整ダイヤルを時計回りにお締めくだ を緩め、ストラップを上に引き上げながらご使用者様の顔面に装着してください。 さい。 HMD本体をご使用者様の快適な位置に調整ください。 *Note: Nearsighted users can use this product with prescription glasses. Pico Neo 2_User Guide(无11ad)-四国语言-20191127.indd 62-63 2019/12/9 上午9:54...
- Page 33 Pico Neo 2 VR Headset Details 近接センサー ご使用者様の装着をセンサーが感知し、 スピーカー (左) スピーカー (右) 自動でスリープから起動、 HMDを顔から外すと自動でスリープモードとなります。 3.5mm充電ポート フェイスパッド マイ ク ヘッドバンド バックパッド USB Type-Cポート インジケーター ランプ 電源ボタン 電源ON : 電源OFF時に • 2秒以上長押し 電源OFF:電源ON時に5 • 秒以上長押し HMD本体のリセッ • ト : 10秒以上長押し スリープモード (再度押...
- Page 34 奨しております。 ) 装着時、 ご使用者様の視界から画面中央の位置にずれが生じた場合は、 HMD側面の ホームボタンを1秒以上長押しするとご使用者様の正面に画面中央が再度セットされ ます。 • • 音量調整方法 HMD本体下部にある音量ボタンで、 音量の調節が可能です。 • • リセット方法 映像が固まってしまった場合や、 ホームボタン、 決定ボタンを押しても画面が反応しな い際は電源ボタンを10秒以上長押しすることでHMD本体をリセットいただけます。 • • スリープモード ①近接センサー使用: ご使用者様の顔面からHMD本体を外すと、 自動でスリープモードに切り替わります。 ま た、 起動の際はご使用者様の装着を感知し、 自動起動します。 ②電源ボタン使用: 電源ボタンを1度押すとスリープモードになります。 スリープモード時に再度電源ボタン を押すと起動します。 Pico Neo 2_User Guide(无11ad)-四国语言-20191127.indd 66-67 2019/12/9 上午9:54...
- Page 35 Controller Status Indicator Legend 青: HMD本体に接続中 青 (点滅) : HMD本体と接続を検索中 ストラッ プホール USB Type-Cポート (充電ポート) 赤: 充電中 赤 (点滅) : バッテリー残量わずか 白: ファームウェアアッ プデート 白 (点滅) : ファームウェアアッ プデート中 赤青点滅時: ペアリング中 消灯 : 電源OFF Pico Neo 2_User Guide(无11ad)-四国语言-20191127.indd 68-69 2019/12/9 上午9:54...
- Page 36 • • 別のコントローラーを接続する方法 HMD本体に新品のコントローラーを接続する際 、 (HMD本体に接続可能なコントロ ーラーは左右それぞれ1製品ずつです。 ) 又は同梱のコントローラー以外のものを接続 する際、 「 設定」 > 「 コントローラー」 > 「 コントローラーを追加」 にお進みください。 インジ ケーターランプが赤と青に交互に点滅するまでコントローラーのホームボタンとトリガ ーボタンを同時に長押ししてください。 以降はHMD本体のスクリーン上に表示される 手順に従って設定を行ってください。 • • コントローラー本体のリセット方法 HMD本体のスクリーン上でコントローラーがフリーズした場合や、 ホームボタンや決定 ボタンからの反応がない場合にはコントローラーのホームボタンを10秒以上長押しし て、 コントローラー本体のリセッ トを行ってください。 ※コントローラー未接続時は、 ご使用者様の頭部の動きとHMD本体側面の決定ボタンで操作いただけます。 Pico Neo 2_User Guide(无11ad)-四国语言-20191127.indd 70-71 2019/12/9 上午9:54...
- Page 37 • ごくまれにVR機器やビデオゲーム、 3D映像の視聴によってめまいや吐き気、 動悸や気 絶等の症状が現れる場合がございます。 上記の症状が見られた場合はお医者様にご相 談ください。 • 本製品は12歳以下のお客様のご使用を推奨しておりません。 HMD本体、 コントローラ ーおよび付属品についてはお子様の手の届かない場所に保管してください。 12歳以上 のお子様が本製品をご使用になる場合は、 必ず大人の監視下でご使用ください。 • 本製品は素材にプラスチック、 合皮、 繊維等の素材を使用しているため、 ごくまれにアレ ルギー症状が見られる場合がございます。 長時間の使用によってご使用者様のお肌に 赤みや腫れ、 炎症等が見られた場合には直ちに使用を中止し、 上記の症状についてお *•Note:• フェイスパッドは医療用の消毒用ワイプでクリーニングが可能です。 ご使用の度清潔にお使いいただ 医者様にご相談ください。 けます。 クリーニング用品についての詳細はクリーニング用品メーカーまでお問い合わせください。 水洗い、 ド ライクリーニング、 および日干しはしないでください。 Pico Neo 2_User Guide(无11ad)-四国语言-20191127.indd 72-73 2019/12/9 上午9:54...
- Page 38 保証についての権利と規定を侵害する可能性がございます。 メーカー純正品については • 本製品と付属品類を接続してご使用される際は、 お使いの医療機器 (ペースメーカー、 カスタマーセンターまでお問い合わせください。 人工内耳等) から少なく とも15cm以上距離を取った状態でご使用ください。 環境保護について ご使用環境について • 本製品および付属品類は家庭ごみとして廃棄しないでください。 • 製品をちりやほこりの多い場所、 多湿環境下、 汚れの多い場所や強力な磁力のそばで • 本製品および付属品類の廃棄については電気および電子機器廃棄物に関する廃棄規 は使用しないでください。 内部回路故障の原因となることがございます。 定に従って廃棄ください。 • 雷雨時は本製品を使用しないでください。 故障や感電を引き起こす場合がございます。 聴力保護について • HMD本体のレンズに直射日光が差し込まないようご注意ください。 特に窓際やダッシ • 必要以上の大音量でのご使用はお控え ください。 ご使用者様の聴力に重大な損害を与 Pico Neo 2_User Guide(无11ad)-四国语言-20191127.indd 74-75 2019/12/9 上午9:54...
- Page 39 さい。 漏電や故障、 感電の危険があります。 - 本保証書の所定事項 (⃝) が未入力の時、 字句を書き換えたもの及び販売店 • 濡れたり、 水滴のついた充電器はご使用しないでください。 名の表示および捺印の無い時。 - 火災、 地震、 水害、 落雷その他天災地変による故障および損害。 バッテリーについて - 説明書の記載と違う方法で取り扱った場合や、 または注意に反するお取り扱 • HMD本体には取り外し不可のバッテリーが内蔵されています。 お客様ご自身でバッテ いによって生じた故障および損傷。 リーの交換を行うと火災や人体への損害等、 重大な事故を引き起こす原因となること - 不当な改造が認められる故障および損傷。 がございます。 バッテリー交換についてはメーカーにお問い合わせください。 - 製品について知識のない方の取扱によって起きた故障および損害 Pico Neo 2_User Guide(无11ad)-四国语言-20191127.indd 76-77 2019/12/9 上午9:54...
- Page 40 • 本保証書は日本国内で飲み有効です。 • 本保証書は再発行いたしませんので。 紛失しないように保管してください。 保証書は、 本書に明示した期間、 条件のもとにおいて保証対応をお約束するものです。 し たがって、 この保証書によってお客様の法律上の権限を制限するものではありません。 保証期間経過後の交換等についてはお買い上げ時の販売店または下記までお問い合 わせください。 製品に関しての法令 Copyright © 2015-2020 Pico Technology Co., Ltd. All Rights Reserved. 本情報は参照であり、 製品について発生する物理的な影響には限定されません。 사용 설명서 ユーザーソフトウェアライセンス契約について 本製品をご使用いただく前に、 ソフトウェア使用許諾契約をよくお読みください。 製品仕様 Pico Neo 2 시리즈 開始時に、 ライセンス契約に拘束されることに同意します。 この契約条件に同意しない場 合は製品とソフトウェアを使用せず、 お買い求めの販売店に返金してください。...
- Page 41 User Guide AC어댑터 x2 설명서 x1 USB-C 2.0 2in1 USB-C 컨트롤러 렌즈 세척용 천 x1 데이터 케이블 x1 충전 케이블 x1 연결 줄 x2 * 제품의 외관 및 기능과 관련하여 해당 설명서는 단지 참고용입니다. Pico Neo 2_User Guide(无11ad)-四国语言-20191127.indd 80-81 2019/12/9 上午9:54...
- Page 42 VR헤드셋의 전원 버튼 2초 동안 길게 누르기 3. 전원을 켠 후 화면 안내에 따라 게임 구역을 설정하세요. (상태 표시등: 파란색) TIP: 이 제품의 ‘가상 안전구역 안내’ 기능은 사용자의 안전을 100% 보호할 수 없으므로 사용 시 항상 안전에 유의하세요. Pico Neo 2_User Guide(无11ad)-四国语言-20191127.indd 82-83 2019/12/9 上午9:54...
- Page 43 VR헤드셋 착용 홈 버튼 짧게 누르기 조절 다이얼을 시계방향으로 돌려 머리 밴드 (상태 표시등: 파란색 깜빡임) 를 위로 올린 후 충분한 공간 확보 TIP: 이 제품에는 근시 조절 기능이 없으므로 근시 사용자는 안경을 착용해주세요. Pico Neo 2_User Guide(无11ad)-四国语言-20191127.indd 84-85 2019/12/9 上午9:54...
- Page 44 머리 밴드를 아래위로 움직여 얼굴보호쿠션을 머리 뒤쪽에 맞춘 뒤 시야가 빨간색: 충전 중, 배터리 20% 이하 꺼짐: 슬립모드 또는 전원 꺼짐 깨끗해질 때까지 밴드 길이와 위치 조절 녹색: 충전 완료, 배터리 90% 이상 Pico Neo 2_User Guide(无11ad)-四国语言-20191127.indd 86-87 2019/12/9 上午9:54...
- Page 45 밥법2: VR헤드셋의 전원 버튼을 짧게 누르면 대기 모드 또는 대기 모드 해제가 가능합 니다. 메인 마이크 음량조절버튼 Micro SD 이어폰 포트 카드 슬롯 802.11ad 60GHz 안테나 시선 추적 * Pico Neo 2 WiGig만 지원 * Pico Neo 2 Eye만 지원 Pico Neo 2_User Guide(无11ad)-四国语言-20191127.indd 88-89 2019/12/9 上午9:54...
- Page 46 파랑 깜빡임: 연결 중 빨간색: 충전 중 빨강 깜빡임: 배터리 부족 녹색: 배터리 충전 완료 흰색 깜빡임: 컨트롤러 업데이트 중 흰색: 컨트롤러 업데이트 꺼짐: 전원 꺼짐 빨강/파랑 깜빡임(0.5초): 컨트롤러 등 록 진행 중 Pico Neo 2_User Guide(无11ad)-四国语言-20191127.indd 90-91 2019/12/9 上午9:54...
- Page 47 컨트롤러/VR헤드셋을 움직여 원하는 콘텐츠를 가리킬 수 있으며, 컨트롤러 트리거 버튼 또는 VR헤드셋 확인 버튼을 눌러 선택할 수 있습니다. 손목줄 연결 구멍 USB-C 충전 포트 TIP: 컨트롤러를 연결하지 않은 경우, 머리를 움직이거나 VR헤드셋의 버튼을 눌러서 조작할 수 있습니다. Pico Neo 2_User Guide(无11ad)-四国语言-20191127.indd 92-93 2019/12/9 上午9:54...
- Page 48 VR헤드셋을 착용한 채로 전방을 주시하세요. 컨트롤러의 홈 버튼을 1초 이상 눌러 화면 중심을 맞추고 메뉴 화면이 현재 시야의 앞쪽에 보이도록 조정하세요. * 유의 사항:착용감 악화 또는 안경 착용 시 광학렌즈의 손상 가능성이 있으므로 얼굴보호 쿠션의 물 세탁, 드라이 크리닝, 자외선 노출, 유기용제 접촉을 금지합니다. Pico Neo 2_User Guide(无11ad)-四国语言-20191127.indd 94-95 2019/12/9 上午9:54...
- Page 49 • 기기 고장 또는 전기 감전의 위험을 방지하기 위해 천둥번개가 치는 날에는 제품을 사용 에 따라 휴식 빈도나 시간을 늘리고 한 번에 최소 10분 이상 휴식하세요. 시각적 이상 증 하지 마세요. 세(화면이 겹치거나 왜곡됨, 눈 주위 불편함, 통증 등), 과도한 땀 분비, 메스꺼움, 어지러 Pico Neo 2_User Guide(无11ad)-四国语言-20191127.indd 96-97 2019/12/9 上午9:54...
- Page 50 구성품 관련 요구사항 하는 충전기를 사용하세요. • 화재, 폭발 및 기타 위험을 방지하기 위해 Pico에서 지정한 이동 장치 구성품, 인증된 호환 • 기기 충전 시 전원 콘센트는 기기 근처 또는 손쉽게 닿을 수 있는 곳에 있어야 합니다. 가능한 전원, 데이터 케이블을 사용하세요.
- Page 51 • 이 제품에는 분리 불가능한 배터리가 내장되어 있습니다. 배터리 임의 교체 시 배터리 손 - 화재, 수해, 낙뢰 등 불가항력에 의한 파손. 상, 과열, 화재 또는 신체 상해 등 돌발 사고가 발생할 수 있습니다. 배터리는 Pico 또는 - 보증 유효 기간을 초과한 경우.
- Page 52 • 고객님의 소중한 개인 정보를 어떻게 보호하고 있는지 궁금하시다면 아래 사이트를 방문 하여 본사의 개인정보보호 정책을 열람하세요. https://www.pico-interactive.com/cn/terms/privacy.html 공식 커뮤니티 위챗 공식계정 더 자세한 사용 설명, 더 많은 Pico 제품, A/S 정책, 서비스 센터 정보를 알고 싶다면 Pico 위 챗 공식계정을 구독하거나 아래 공식 홈페이지를 방문해주세요. www.pico-interactive.com Pico 고객센터 400-6087-666 제품...
- Page 53 Copyright © 2015-2020 Pico Technology Co., Ltd. All Rights Reserved. Pico Neo 2_User Guide(无11ad)-四国语言-20191127.indd 104 2019/12/9 上午9:54...
Need help?
Do you have a question about the Neo 2 and is the answer not in the manual?
Questions and answers