
Summary of Contents for EAST COAST MGI zip Series
- Page 1 User Manual VERSION 4.1 P: (02) 6652 8816 W: EASTCOASTGOLFCARTS.COM.AU E: INFO@EASTCOASTGOLFCARTS.COM.AU A: 2/164 PACIFIC HIGHWAY COFFS HARBOUR, NSW 2450 ABN: 21 613 629 146...
-
Page 3: Table Of Contents
Contents Registration What Is Included Assembling the Zip X3 Attaching the Rear Wheels Rear Wheel Positions Unfolding Folding Fourth Foldable Rear Wheel GPS Holder and Top Handle Compartment Inverting Rear Wheels Battery Charging & Connection Initial Charge Connecting the Battery onto the Zip X3 Charging the Battery after Use Fitting the Golf Bag Front Wheel... -
Page 4: Registration
1.0 Registration It is most important you register your MGI Zip X3 online immediately as registration: • Records your Zip X3 for warranty purposes • Speeds up any servicing required on your Zip X3 • Assist us to contact you with any updates to your Zip X3 To register your Zip X3, visit www.mgigolf.com You will need to record your MGI serial number. -
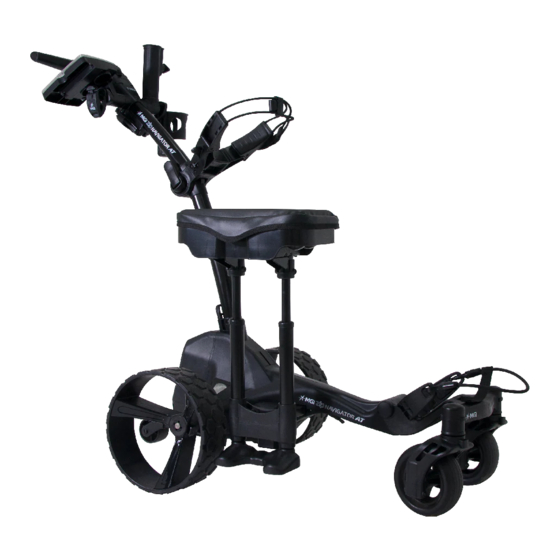
Page 5: Attaching The Rear Wheels
3.0 Assembling Your Zip X3 3.1 Attaching the Rear Wheels First, lubricate both axles using the black grease cloth provided in the box. Lubrication of the axles should be performed regularly to keep your cart in optimal condition. Lefthand Righthand side side Step 1. -
Page 6: Rear Wheel Positions
3.2 Rear Wheels Positions The MGI Zip X3 is designed to allow the rear wheels to be in two positions. The position is determined by where the wheel is locked on the axle in either of the two grooves [see picture]. The drive position is used during the normal operation of the Zip X3. -
Page 7: Unfolding
3.3 Unfolding Please see below the steps to unfold a Zip X3 Handle. Step 1: Ensure both rear Step 2: Release Fold Lever. wheels are attached. Step 3: Move Top Bag Step 4: The handle is now free to pull Support away from front upwards. -
Page 8: Folding
3.4 Folding Step 1: Disconnect the battery by lifting the battery handle. It can be left on or removed from the Zip X3. Step 2: Open the fold lever to release the handle. Step 3: Pull up the latch at the bottom of the handle. -
Page 9: Fourth Foldable Rear Wheel
3.5 Fourth Foldable Rear Wheel The MGI Zip X3 comes standard with a fourth foldable rear wheel. This wheel MUST be unfolded into position at all times when the Zip X3 is in use. This will reduce damaging the Zip X3, and provide the ultimate in stability across all terrains. -
Page 10: Battery Charging & Connection
4.0 Battery Charging & Connection The Zip X3 is designed to take either Zip battery: • MGI 24v 250Wh Lithium battery [Standard] • MGI 24v 380Wh Lithium battery [Optional] 4.1 Initial Charge • Before using your MGI Zip X3 for the first time you must fully charge the battery overnight. -
Page 11: Charging The Battery After Use
4.3 Charging the Battery after Use • Disconnect the battery by lifting the handle. • The battery can be left on or removed from the Zip X3 for charging. • Plug the charger AC lead into a power point - the Green LED illuminates to indicate the charger is power on. -
Page 12: Front Wheel
6.0 Front Wheel Unlocking & Locking the Front Wheel The front swivel wheel can be set in two positions. 1) Unlocked position to allow for 360˚ swivel for optimum turning ability. Move the knob, on top of the front wheel assembly, to the left hand side. -
Page 13: Start / Stop The Zip X3
7.2 Start / Stop the Zip X3 Speed Control Zip X3 Speed Control Please note the following points regarding the Zip X3 Speed Control. 1. To select the desired speed, rotate the speed control button. Turning the speed control button clockwise will increase the speed, whilst anti-clockwise will decrease speed. -
Page 14: Battery Level Indicator
7.4 Battery Level Indicator Battery indication is located on the left side of the top box screen. Four coloured bars are highlighted showing full charge. The lesser number of bars displayed, means there is less battery life available. You should always check the battery status before you play golf to ensure the four bars are there. -
Page 15: Competition Mode
7.8 Competition Mode In the unlikely event the club you are playing at does not allow the use of distance devices you will need to disable the distances feature on the MGI Zip X3. To disable the distance recording feature, simply hold down the left and right buttons at the same time for 3 seconds and “COMP MODE”... -
Page 16: Adjusting And Aligning The Front Wheel
8.0 Adjusting and Aligning the Front Wheel Each Zip X3 is checked for straight tracking prior to leaving the factory. In the unlikely event the Zip X3 is not tracking straight, the front wheel can be adjusted to regain straight tracking as follows; Lock the swivelling front wheel [6.0] and run the Zip X3 forward to see if the Zip X3 veers left or right. -
Page 17: Warranty
9.0 Warranty 9.1 Warranty Policy The MGI Zip X3 is covered by a limited 2 year manufacturer’s warranty from the date of purchase. Duration of this warranty is: – 2 years on parts* – 2 years on Lithium batteries and chargers *MGI or an authorised service centre will repair or replace any parts found to be defective in materials or workmanship under normal use provided that:... -
Page 18: Warranty Exclusions
9.2 Warranty Exclusions The following events will void warranty: • Any alteration performed by non-authorised people or companies. • Fitting of parts or accessories not recommended by MGI. • Any damage caused by continued operation of the product after it is known to be defective. •... -
Page 19: Parts Installed During Warranty
9.3 Parts Installed During Warranty Warranty coverage for components installed during a motorised Zip X3’s warranty period shall consist of the duration of the Zip X3’s warranty period, provided the warranty installation is performed by MGI, an authorised service centre or the Zip X3 owner on approval. -
Page 20: Upper And Lower Bag Strap
10.3 Upper and Lower Bag Strap Maintenance [See Maintenance Schedule] The bag straps should be replaced as per the Service Schedule. The upper bag strap can be replaced by: • Removing the left and right hand straps form the upper bag support •... -
Page 21: Service Record
10.5 Service Record 6 month Date: Serviced by: inspection Invoice #: Signature: 1 year inspection Date: Serviced by: Invoice #: Signature: 1 ½ year Date: Serviced by: inspection Invoice #: Signature: 2 year Date: Serviced by: inspection Invoice #: Signature: 2 ½... -
Page 22: Service And Repair Centres
11.0 Service and Repair Centres For all servicing, please do not go back to your place of purchase. To find your nearest Service centre visit www.mgigolf.com For warranty repairs to be authorised you MUST provide proof of purchase. Please keep this with you as well as your Serial number you can record in this manual. -
Page 23: Contacting Local Agent
14.0 Contacting Local Agent Please refer to www.mgigolf.com to find the distributor in your country. 15.0 FAQ Q: My Zip X3 is not tracking straight. A: You can do a simple realignment on the two front wheels. See section 5.2 Adjusting and aligning the front wheels. Q: I would like to have my MGI Zip X3 serviced. - Page 24 P: (02) 6652 8816 W: EASTCOASTGOLFCARTS.COM.AU E: INFO@EASTCOASTGOLFCARTS.COM.AU A: 2/164 PACIFIC HIGHWAY COFFS HARBOUR, NSW 2450 ABN: 21 613 629 146...
Need help?
Do you have a question about the MGI zip Series and is the answer not in the manual?
Questions and answers