Table of Contents
Advertisement
Quick Links
Advertisement
Table of Contents

Related Manuals for Garmin Foretrex 601 Ballistic


Summary of Contents for Garmin Foretrex 601 Ballistic
- Page 1 FORETREX 601/701 BALLISTIC EDITION ® Owner’s Manual...
- Page 2 © 2017 Garmin Ltd. or its subsidiaries All rights reserved. Under the copyright laws, this manual may not be copied, in whole or in part, without the written consent of Garmin. Garmin reserves the right to change or improve its products and to make changes in the content of this manual without obligation to notify any person or organization of such changes or improvements. Go to www.garmin.com...
-
Page 3: Table Of Contents
Navigating a Saved Track....9 Pairing Your ANT+ Sensors....16 Using the Pan and TracBack® Tips for Pairing ANT+ Accessories with Feature..........9 Your Garmin Device......17 Viewing Track Details......9 tempe............. 17 Editing the Name of a Track....9 Displaying tempe Data...... 17 Clearing the Active Track.... - Page 4 Sending a Route Wirelessly....19 Sending a Waypoint Wirelessly..19 Troubleshooting......20 Product Updates........20 Setting Up Garmin Express....20 Improving GPS Satellite Reception..20 Maximizing Battery Life......20 My device is in the wrong language..20 Resetting the Device......20 Restoring All Default Settings....
-
Page 5: Introduction
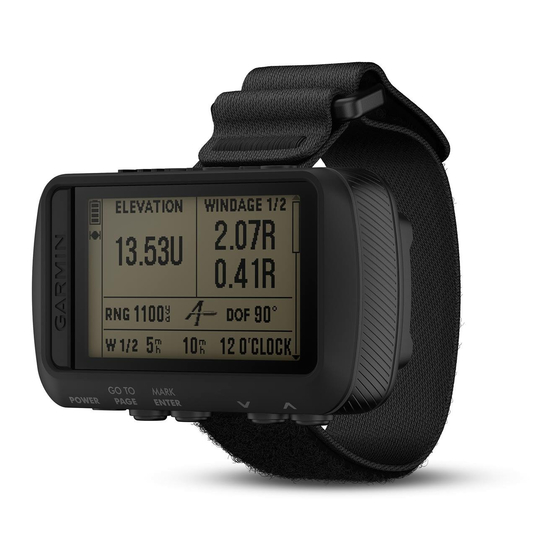
Introduction WARNING See the Important Safety and Product Information guide in the product box for product warnings and other important information. Device Overview Battery cover D-ring Micro-USB port (under battery cover) Installing the Batteries You can use alkaline, NiMH, or lithium AAA batteries. Use NiMH or lithium batteries for best results. 1 Loosen the fabric strap that covers the battery door. -
Page 6: Attaching The Wrist Strap
Attaching the Wrist Strap 1 Insert the strap behind the pin at the top of the device. 2 Pull the strap length through to the end. 3 Insert the strap behind the pin at the bottom of the device. 4 If necessary, attach the strap extender to the wrist strap. Keys Introduction... -
Page 7: Turning On The Device
Hold to turn the device on and off, enter night vision mode, and enter watch mode. Select to turn the backlight on and off. POWER Select to scroll through the main pages in sequence. Select to go back to the previous view from a menu or option. PAGE Hold to navigate to a waypoint. -
Page 8: Main Pages
Main Pages You can select PAGE to scroll through the main pages. You can select ENTER to open the settings menu for each page. You can select to scroll through menus and pages and zoom in and out. Map page: The map page shows your position and heading on the map (Map Page, page 5). -
Page 9: Map Page
Map Page Displays your position on the map. Displays the direction you are heading. Displays your track log. About the Compass The electronic compass is similar to a magnetic compass when you are stationary or walking. If you maintain a higher speed, such as traveling in an automobile, the compass uses GPS signals to determine your direction. -
Page 10: Using The Countdown Timer
VIRB Remote ® The VIRB remote function allows you to control your VIRB action camera using your device. Go to www.garmin .com/VIRB to purchase a VIRB action camera. Controlling a VIRB Action Camera Before you can use the VIRB remote function, you must enable the remote setting on your VIRB camera. See the VIRB Series Owner's Manual for more information. -
Page 11: Measuring The Distance Between Two Waypoints
Measuring the Distance Between Two Waypoints You can measure the distance between two locations. 1 From the map page, select ENTER > MEASURE DISTANCE. 2 Select FROM:, and select a starting waypoint. 3 Select TO:, and select an ending waypoint. 4 Select ESTIMATED SPEED:. -
Page 12: Viewing Celestial Data And Almanacs
Viewing Celestial Data and Almanacs You can view daily almanac information for the sun and moon, and hunting and fishing. 1 From the menu page, select WAYPOINTS > LIST ALL. 2 Select a waypoint. 3 Select OPTIONS. 4 Select an option: •... -
Page 13: Navigating A Saved Track
Navigating a Saved Track 1 From the menu page, select TRACKS > LIST SAVED. 2 Select a track. 3 Select NAVIGATE. Using the Pan and TracBack Feature ® While navigating, you can use the TracBack feature to navigate back to the beginning of your activity. This can be helpful when finding your way back to camp or the trail head. -
Page 14: Map Options
Map Options From the map page, select ENTER. PAN TRACK LOG: Allows you to use to pan the track log and view additional options (Using the Pan and TracBack Feature, page 9). ® CLEAR TRACK LOG: Deletes the recorded track log. MEASURE DISTANCE: Allows you to measure the distance between two waypoints (Measuring the Distance Between Two Waypoints,... -
Page 15: Calibrating The Barometric Altimeter
Calibrating the Barometric Altimeter You can manually calibrate the barometric altimeter if you know the correct elevation or the correct barometric pressure. 1 Go to a location where the elevation or barometric pressure is known. 2 From the menu page, select SETUP > ALTIMETER > CALIBRATE ALTIMETER. 3 Follow the on-screen instructions. -
Page 16: Setting The Base Range
Setting the Base Range 1 From the Applied Ballistics page, select ENTER > RANGE CARD > ENTER > BASE RANGE. 2 Follow the on-screen instructions. Editing the Target Card 1 From the Applied Ballistics page, select ENTER > TARGET CARD. 2 Select ENTER >... -
Page 17: Editing Gun Properties
3 Select an option: • To calibrate the muzzle velocity, select CALIBRATE MUZZLE VELOCITY, enter the range and true drop, and select USE. NOTE: Garmin recommends you calibrate the muzzle velocity prior to the drop scale factor. Calibrating ® the muzzle velocity provides a more accurate solution in the supersonic range for your specific firearm. -
Page 18: Menu Page Options
ROUTES: Allows you to create a new route, list all routes, and delete all routes. SETUP: Allows you to customize the device (Device Settings, page 14). CONNECT: Allows you to connect to compatible Garmin devices and ANT+ sensors (Optional Fitness ®... -
Page 19: Jumpmaster
System Settings From the menu page, select SETUP > SYSTEM. GPS MODE: Sets the satellite system to GPS, GPS + GLONASS, GPS + GALILEO, ULTRATRAC, or DEMO (GPS off). The ULTRATRAC option records track points and sensor data less frequently. WAAS: Enables the system to use Wide Area Augmentation System/European Geostationary Navigation Overlay Service (WAAS/EGNOS) data. -
Page 20: Connected Features
Software Updates: Allows you to update your device software. Pairing a Smartphone with Your Device To use the connected features of the Foretrex device, it must be paired directly through the Garmin Connect app, instead of from the Bluetooth settings on your smartphone. -
Page 21: Tips For Pairing Ant+ Accessories With Your Garmin Device
2 Select ENTER to switch to sky view. The location of the satellites from which you are receiving signals appears. The device withstands incidental exposure to water of up to 1 m for up to 30 min. For more information, go to www.garmin.com/waterrating. Device Information... -
Page 22: Device Care
1 Wipe the device using a cloth dampened with a mild detergent solution. 2 Wipe it dry. After cleaning, allow the device to dry completely. TIP: For more information, go to www.garmin.com/fitandcare. Data Management NOTE: The device is not compatible with Windows... -
Page 23: Deleting Files
When data is received, the status changes to TRANSFER COMPLETE. Sending a Route Wirelessly Before you can send a route wirelessly, you must be within 3 m (10 ft.) of a compatible Garmin device. 1 From the menu page, select ROUTES > LIST ALL. -
Page 24: Troubleshooting
• Frequently sync the device to your Garmin Connect account: ◦ Connect your device to a computer using the USB cable and the Garmin Express application. ◦ Sync your device to the Garmin Connect Mobile app using your Bluetooth enabled smartphone. -
Page 25: Restoring All Default Settings
Restoring All Default Settings You can reset all settings back to their factory default values. From the menu page, select SETUP > RESET > RESTORE DEFAULTS > YES. Appendix Data Fields AMB PRESS: The uncalibrated ambient pressure. AVG ASCENT: The average vertical distance of ascent since the last reset. AVG DESCNT: The average vertical distance of descent since the last reset. - Page 26 ODOMETER: A running tally of the distance traveled for all trips. This total does not clear when resetting the trip data. OFF COURSE: The distance to the left or right by which you have strayed from the original path of travel. You must be navigating for this data to appear.
-
Page 27: Applied Ballistics Glossary Of Terms
Applied Ballistics Glossary of Terms NOTE: The Applied Ballistics feature is available only on the Foretrex 701 device. Shooting Solution Fields DOF: The direction of fire, with north at 0 degrees and east at 90 degrees. Input field. TIP: You can use the compass to set this value by pointing the top of the device toward the direction of fire. - Page 28 AMB/STN PRESSURE: The ambient (station) pressure. Ambient pressure is not adjusted to represent sea level (barometric) pressure. Ambient pressure is required for the ballistics shooting solution. Input field. TIP: You can manually enter this value, or you can select the USE CURRENT PRESSURE option to use the pressure value from the internal sensor in the device.
- Page 29 OUTPUT UNITS: The output units of measure. A milliradian (mil) is 3.438 inches at 100 yards. A minute of angle (MOA) is 1.047 inches at 100 yards. SIGHT HEIGHT: The distance from the center axis of the rifle barrel to the center axis of the scope. Input field. TIP: You can easily determine this value by measuring from the top of the bolt to the center of the windage turret, and adding half of the diameter of the bolt.
- Page 30 August 2022 GUID-DB18CD76-26F4-4716-AC41-71F9D2BA4420 v4...
Need help?
Do you have a question about the Foretrex 601 Ballistic and is the answer not in the manual?
Questions and answers