
Subscribe to Our Youtube Channel
Related Manuals for YOKOGAWA AQ2180


Summary of Contents for YOKOGAWA AQ2180
- Page 1 User’s AQ2180 Manual Optical Power Meter User’s Manual IM AQ2180-01EN 1st Edition Yokogawa Meters & Instruments Corporation...
- Page 2 3. In this manual, the TM and R symbols do not accompany their respective registered trademark or trademark names. 4. Other company and product names are registered trademarks or trademarks of their respective holders. 1st Edition: October 2012(YMI) All Rights Reserved, Copyright© 2012, Yokogawa Meters & Instruments Corporation...
- Page 3 Product Registration Thank you for purchasing YOKOGAWA products. YOKOGAWA provides registered users with a variety of information and services. Please allow us to serve you best by completing the product registration form accessible from our homepage. http://tmi.yokogawa.com/...
- Page 4 The general safety precautions described herein must be observed during all phases of operation.If the instrument is used in a manner not specified in this guide ,the protection provided by the instrument may be impaired .YOKOGAWA assumes no liability for the customer's failure to comply with these requirements.
-
Page 5: Table Of Contents
Table of contents 1. Introduction ........................1 2. Warranty ..........................2 3 .Preparing for Operation .....................3 4. Specifications ........................5 5. Operation .........................7 6. Installing Software ......................18 7. Trouble Shooting ......................31 8. Recommended Replacement Parts ...................32 9. Maintenance ........................33 10. Outline drawing ......................34 11. -
Page 6: Introduction
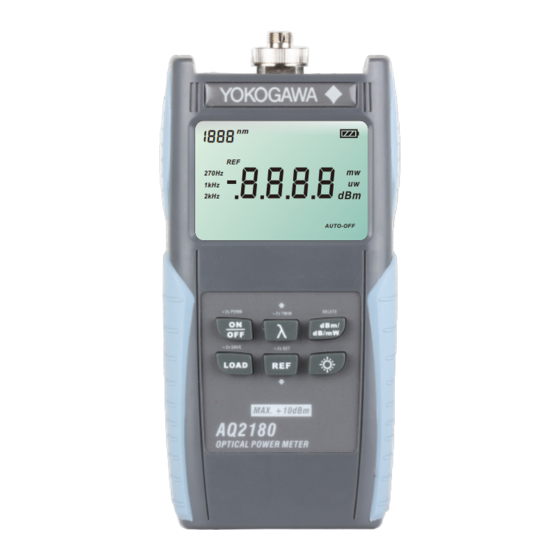
1 Introduction The AQ2180 series are full featured palm sized and lightweight optical power meters designed for use with 1888 an optical Light source to perform optical loss .8.8.8.8 measurements on optical fiber cables. 270Hz 1kHz 2kHz AUTO-OFF optical connections to the AQ2180 are made via the universal adapter interface on the top of the unit. -
Page 7: Warranty
Misuse, negligence, or accident Returning Product To return product, you may contact YOKOGAWA to obtain additional information if necessary. To serve you better, please specify the reasons for the return. All delivery and mails should be sent to the following nearest YOKOGAWA dealer. -
Page 8: Preparing For Operation
We suggest that you keep the original packing material. Using the original packing material is your guarantee of protecting the instrument during transit. Checking the package contents The standard accessories of AQ2180 are as follows: Product Name Qty. Main Unit Dry battery AA Connector Adapter(FC,SC,LC,Ø1.25 ferrule,Ø2.5 ferrule) - Page 9 3.2 Discharged batteries There is a battery indicator on the screen to show the remaining charge. There are four possibilities the indicator may show, full, with 2 blacks, with 1 black and empty. If an empty battery indicator means the power is almost out please replace it with a new one.
-
Page 10: Specifications
4 Specifications 4.1 Sensor Specifications Model AQ2180 AQ2180H Wavelength Range (nm) 850/1300/1310/1490/1550/1625/1650 nm 1310/1490/1550/1625/1650 nm Detector InGaAs Applicable Fibers Type Light emitted from SM(ITU-T G.652), Light emitted from SM(ITU-T G.652), GI(50/125 µm),GI(62.5/125 µm)optical fiber optical fiber Optical Connector FC, SC, LC, Ø... - Page 11 4.2 General Specifications Model AQ2180 AQ2180H Displayed Resolution 0.01dB, 0.01dBm, 0.0001uW Absolute values: dBm, mW, µW Relative values: dB Displayed Unit CW, CHOP (270Hz, 1kHz, 2kHz) Modulation Mode Measurement Interval Approximately150 ms Absolute value measurement Measurement mode Relative value measurement : Relative value measurement relative to a set reference value Relative value measurement based on a displayed measurement ...
-
Page 12: Operation
5 Operation 5.1 Installing the Batteries Turn the screw on the rear panel with a coin or other flat object to remove the cover, then install the batteries. Turning the screw locks/unlocks the cover as shown in the figure. Unlock Lock Insert two AA batteries into the holder following the polarity markings. - Page 13 Note Use the correct size and type of battery specified by the manufacturer of your device. Keep battery contact surfaces and battery compartment contacts clean by rubbing them with a clean pencil eraser or a rough cloth each time you replace batteries. Remove batteries from a device when it is not expected to be in use for several months.
- Page 14 5.2 Attaching a Connector Adapter A specialized connector adapter is required for connecting an optical connector to the instrument. Choose an adapter that matches the optical connector you will use. The screw mechanism that attaches the connector adapter to the instrument is of precision manufacture. Please handle all parts with care so as not to damage the screw threads.
- Page 15 5.3 Attaching/Detaching a Protector (1) Please insert in the upper part to a protector. (2) Please insert the lower part in a protector. Note We recommend that you replace the protector when damaged.
- Page 16 5.4 Tilts the instrument. Note • Do not use the stand as a handle to carry the AQ2180/H. • Use the stand only to tilt the AQ2180/H. • If you are tilting the AQ2180/H, check that the stand is fixed in place.
- Page 17 5.5 Keypad The AQ2180 keypad is used to access a wide range of instrument functions. AQ2180/AQ2180H Function Switches instrument on / off. Long key press over 2seconds while powering on to activate the instrument without Auto-off function. 1888 .8.8.8.8 Selects measurement wavelength in sequence of 850/1300/1310/1490/...
- Page 18 5.6 LCD Wavelength 1888 Battery Charge Reference .8.8.8.8 270Hz Frequency 1kHz Measurement Unit 2kHz TWIN AUTO-OFF Auto-off SAVE Auto-wavelength recognition Power...
- Page 19 1550 1490 Press the “λ” key repeatedly until the desired wavelength is displayed. 1650 You can select fromseven optional wavelengths: 1300 13 1 0 850nm,1300nm,1310nm,1490nm, 1550nm,1625nm,1650nm(AQ2180) 2 0.0 0 1310nm,1490nm,1550nm,1625nm,1650nm(AQ2180H) The instrument defaults to the wavelength 1550nm. AUTO-OFF 1625 1550...
- Page 20 Once the new keypress 2 0.0 0 5.8 8 0 5.8 8 reference level is set, the AQ2180 switches to the dB AUTO-OFF measurement mode. The displayed value only lasts 1 second. AUTO-OFF AUTO-OFF Note 1.Long keypress...
- Page 21 5.12 Switching backlighting of the LCD on and off 1 310 1 310 Press the backlighting key. Backlighting switches on. Press the backlighting key again. Backlighting switches off. AUTO-OFF AUTO-OFF 5.13 Frequency detecting 13 1 0 If the tested wavelength is carrying a tone of 270Hz, 1kHz, or 2 0.0 0 2kHz, the respective frequency indicates on the screen 1kHz...
- Page 22 2s, the SAVE flashes on the screen once with the sounds of the buzzer. It indicates the setting is finished. It will display the stored value and the serial number of the storage. Then, the AQ2180 will return to the test state automatically. 5.16 Check the storage records Press key, it will display the FIRST record.
-
Page 23: Installing Software
6. Installing Software 6.1 System Requirement System Requirements: Windows XP/7 Minimum Configuration: CPU: Pentium 600MHz RAM:128MB Graphics Card: Standard VGA256 colors Hard Disc: Typical Installation 300MB spare capacity Hard Driver: 8 times speed CD-ROM Recommended Configuration: CPU: Pentium 1000MHZ or better RAM: 256MB or better Graphics Card: SVGA16 colors or better... - Page 24 6.2 Software Installation 6.2.1.Please find the file "setup.exe", and double click it to activate the installation guide, then it displays as following on the screen:...
- Page 25 6.2.2. Click "Next" to confirm the installation. If you wish to change the default installation path, you can click "Browse" button to change the path.
- Page 26 6.2.3. Click "Next" to continue installing the Meter data manager software.
- Page 27 6.2.4. Installing Meter Data Manager and choose "Close" after the installation finished...
- Page 28 6.3 Software Start After installed " Meter Data Manager Software", users can use it by: 1. Click "Start" menu -- "Programs" , and select program group of the software. Click the " Meter Data Manager" to start the program. 2. After the installation, there will be an icon of " Meter Data Manager" on the desk. Click this icon to start the program.
- Page 29 6.4 Software Operation After installation, user can operate the saved data in the instrument. The main dialogue of the program is as follow:...
- Page 30 6.4.1. Click "Upload" to upload the test results to PC.
- Page 31 6.4.2. Click "Save" to save the uploaded test results as csv file.
- Page 32 6.4.3. Click "Clear" to clear the data in the Meter.
- Page 33 6.4.4. Click "Print" to print the data.If there’s no data in “Data area”,it will show “No data print!”.
- Page 34 6.4.5. Click "Preview" to preview the data.If there’s no data in “Data area”,it will show “No data 6.4.6. Click “Exit” to exit the software.
- Page 35 6.5 Software Uninstallation Meter Data Manager Software provides auto uninstallation function. You can remove all the components, program groups and shortcuts of the Meter Data Manager Software. 1. Click the windows "Start" menu -- "Programs" and open the program files “Meter Data Manager”. Select "Uninstall.exe".
-
Page 36: Trouble Shooting
7 Trouble Shooting Malfunction Type possible Cause Recommended solution Remarks Battery exhausted Change battery DIY Abailable Failure to turn on/off Re-install battery DIY Abailable Reverse-installed battery Return to factory (Still doesn’t work) Change battery On&off disorder Low battery DIY Abailable Swab the dust by using an alcohol- Contaminated connector Inaccurate... -
Page 37: Recommended Replacement Parts
8 Recommended Replacement Parts YOKOGAWA guarantees the AQ2180 for the period and under the conditions of the product warranty. Under the conditions of the warranty, the following consumable parts and parts with limited service lives are excluded. For part replacement, contact your nearest YOKOGAWA dealer. -
Page 38: Maintenance
When you put the battery in the battery case, make sure that the battery is facing the right direction. If you will not use the battery for an extended period of time, remove it from the AQ2180 and store it in... -
Page 39: Outline Drawing
10 Outline drawing... -
Page 40: Connector Adapter
11 Connector adapter Ø2.5 Ø1.25...
Need help?
Do you have a question about the AQ2180 and is the answer not in the manual?
Questions and answers