Advertisement
Please read the manual thoroughly before operating and keep this book in a safe place for future reference.
Included items: V115, Lithium battery, USB cable, Operational manual
Precautions
Before using this pocket-sized radio recorder, be sure to follow the basis safety tips to guarantee safe and liable use of the product.
- Read and understand all safety guidelines and use information.
- Recommended to use the original lithium battery.
- Please Use the charging device with the output voltage 5V, 500mA-1000A to avoid damaging the lithium battery and device.
- If the lithium battery will not be used for an extended period of time, please remove it, store it separately, and remember to charge it once a month.
- Do not allow the radio to come into direct contact with rain, moisture, or any liquid drops.
- Avoid direct heat sources. Do not bake or blow dry the product.
- Do not expose the device to direct sunshine for an extended period of time.
- Do not drop the product or applying heavy pressure.
System Menu
| 中 文 | English | Espanol |
| 定 时 关 机 | Auto power | Off Time |
| 对 比 调 节 | Contrast | Contraste |
| 背 光 时 间 | Back light time | Tiempo brillante |
| 语 言 选 择 | Language | Idioma |
| 录 音 设 置 | Record set | Record set |
| AM 步 进 设 置 | AM Stepping set | AM Stepping set |
| 返 回 主 界 面 | Back | Espada |
Screen Display
Displaying on TF Music Play Screen

Displaying on the Radio Screen

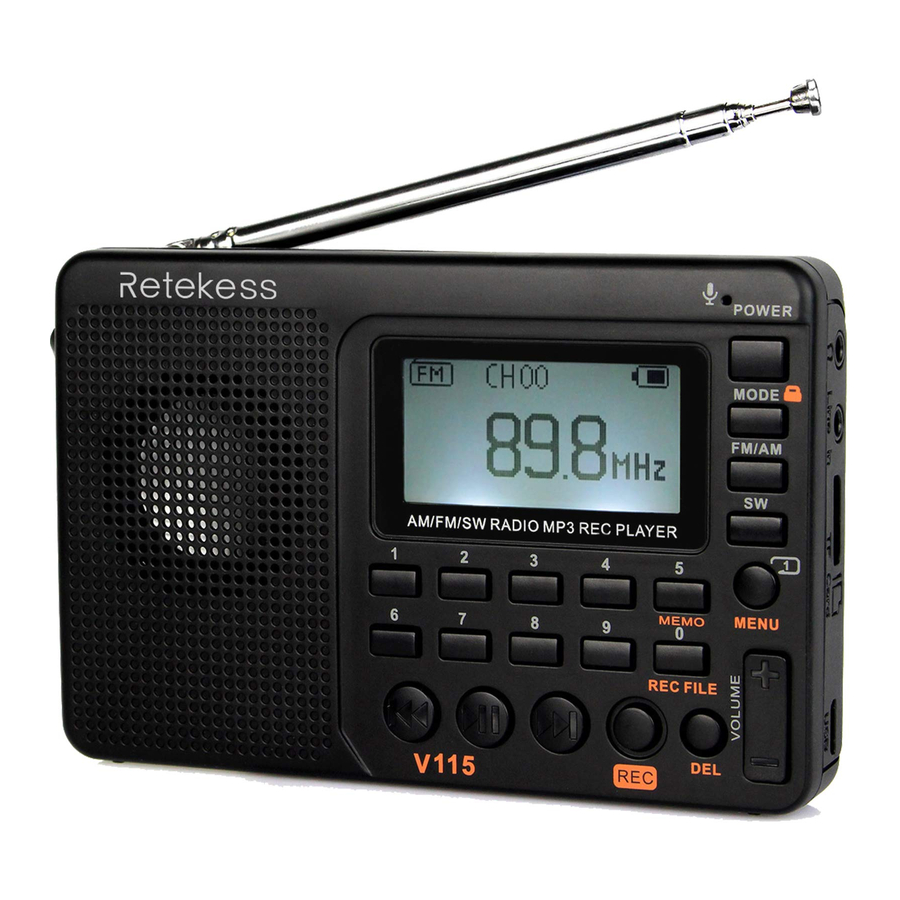
Diagram Location of Controls

Introduction
AM/FM/SW Pocket-sized Full Band Radio Recorder is an integrated digital electric tuning radio that can play MP3 and WMA files, Multilingual menu operation, that display lyric synchronously, supports MIC Recording, Radio Recording, LINE IN Recording, and stereo earphone output, with a rechargeable lithium battery (battery can be replaceabled with a larger capacity BL-5C battery to achieve longer playtime).
Definition of key operations
There are 3 operation ways of pressing the keys: short press, long press and hold on. Unless expressly stated all the operations are short press.
Short press: press the key once, and the function starts to work.
Long press: press and hold for more than 1.2 seconds and the function starts to work, and works only one time.
Hold on: press the key and hold on till stop, the function works several times in a certain frequency, such as fast forward/backward.
Battery Power Supply
Install/Replace the battery:
- Open the battery cover.
- Insert the lithium battery according to the polarity indicated.
- Close the battery cover.
- Prior to using for the first time charge the lithium battery for 6 hours. After the first charge, charge time should be about 4 hours.
- Recommend: use the 5V, 500mA charger provided.
- In normal cases, before charging the battery, please make sure the product is in the radio OFF mode. During charging the LCD displays the "Charging Screen". The flashing battery power icon indicates that the charging is in progress. When the battery is fully charged
,the battery power icon will not flash and will show full battery power. At this moment, it is suggested to continue to charge for 1-2 hours to guarantee the lithium battery reaches the maximum charging capacity.
Battery Consumption indicator:
- Full

- Medium

- Low

- Exhausted


Charging the Lithium Battery:
- External Adapter (not included). Please use a matched adapter (5V DC/500mA, USB port) to charge the radio.
- Install the lithium battery.
- To charge the battery, connect the Micro-USB cable to the radio, the other end to a USB adapter.
- While charging, the battery symbol shown on the displaymoves from right to left, and stops when the battery is full charged. Then disconnect the radio and the adapter.
Note: When charging, alternating current can interfere with receive radio signals, so it is not recommended to use the radio when charging.
Do not use AC adapter or computer to power the radio to play music or listen to the radio when the battery is unloaded.
Please unload the battery or fully charge it once in 2 months if the radio is not used for a long time.
Charged by PC:
- Connect the radio to the computer with the provided USB cable.
- While charging, the battery symbol shown on the display moves from right to left.
- The battery symbol stops moving when the battery is full charged.
Radio Operation
Power on/off radio:
- Long press the Power button to turn on the device.
- Extend the antenna.
- Press the AM/FM or SW key to select the band.
- Long press the Power button again to turn off the device.
Automatically search and store Station:
In the radio mode, long press the ![]() key to enter Automatic search and store Stations. The available stations have been automatically numbered and stored from low to high frequencies. When stations have finished storing, press the
key to enter Automatic search and store Stations. The available stations have been automatically numbered and stored from low to high frequencies. When stations have finished storing, press the ![]() or
or ![]() key to invoke the radio stations stored and begin listen. If any interfering radio station is saved automatically, long press the DEL key to delete it.
key to invoke the radio stations stored and begin listen. If any interfering radio station is saved automatically, long press the DEL key to delete it.
To save a radio station manually:
- In radio mode, long press the
![]() or
or ![]() key to search radio stations forward or backward. When a radio station is received, the search will stop and the radio station received will begin to play.
key to search radio stations forward or backward. When a radio station is received, the search will stop and the radio station received will begin to play. - Directly input the frequency of a radio station: For example, the frequency of the radio station is 88.5MHz. Press the number keys 8, 8 and 5, then press the
![]() key to confirm the input. The radio will jump to 88.5MHz.
key to confirm the input. The radio will jump to 88.5MHz.
*AM: the numbers that are 522+Multiples of 9 are valid; for North America 520+ Multiples of 10 are valid - Shortwave Operation: Press the SW key to invoke metric waves in order:
60m (4.750MHz), 49m (5.950MHz), 41m (7.100MHz), 31m (9.500MHz), 25m (11.650MHz), 22m (13.600MHz), 19m (15.100MHz), 16m (17.500MHz), 13m (21.45MHz)
After selecting a metric wave, long press the![]() key to search radio stations.
key to search radio stations.
Invoke a radio station with the method described in the following A, B or C, and long press the MEMO "5" key, when the "CH00" flashing on the display, press the numeric keys to enter the location of the storage station, and press the "PLAY" button, the screen prompts to save, then press the "PLAY" button again to confirm can be stored in the specified location.
Note: There is a limit on the number of preset stations in each band. (FM: 80 presets, MW: 60 prestes, SW: 300 presets)
AM Stepping set:
In the AM radio mode, long press MENU key to the system main menu, press ![]() or
or ![]() key, to select AM Stepping submenu choose step 9 KHz or 10 KHz (North America), Press the
key, to select AM Stepping submenu choose step 9 KHz or 10 KHz (North America), Press the ![]() key to confirm.
key to confirm.
To delete a radio station:
Invoke a radio station and long press the DEL key, the display will display radio station deletion confirmation. Press the ![]() key to confirm the deletion of the current radio station.
key to confirm the deletion of the current radio station.
* If the above operation is not finished within 5 seconds, the system will return to the radio mode.
To mute the radio:
In the radio mode, press the ![]() key and the
key and the ![]() icon will flash on the screen, which indicates the radio is in the mute mode. Press the
icon will flash on the screen, which indicates the radio is in the mute mode. Press the ![]() key again to deactivate mute.
key again to deactivate mute.
Music Play Operation
- Correctly insert the music TF card in MP3 or WMA format.
- Press the Power key to turn on the device.
- Press the MODE key to enter the play mode. The screen will display the music name, format, time lapsed, etc.
- Press the
![]() or
or ![]() key to select the next or previous song or press the numeric keys to select a song, and then Press the
key to select the next or previous song or press the numeric keys to select a song, and then Press the ![]() key to confirm the selection. The radio will directly jump to the song number to play the corresponding song.
key to confirm the selection. The radio will directly jump to the song number to play the corresponding song. - Press the Repeat key to repeat a song (
![]() indicates repeating a song) or repeat all songs in order (
indicates repeating a song) or repeat all songs in order (![]() indicates repeating all songs).
indicates repeating all songs).
Play Setup:
*This has been set in the factory. It is not recommended to set it again.
- In the play mode, long press the
![]() key to enter the main screen of Play.
key to enter the main screen of Play.
- Main Directory (Select this item to select the songs in the folders under the directory)
- Play Mode: Repeat All, Repeat One, Repeat Directory (select this option to play the songs in the selected folder only)
- Sound effect (NATURAL, POP, ROCK, JAZZ, COUNTRY, HEAVY BASS)
- Return to the main screen
- Press the
![]() or
or ![]() key to select the sub-menu and press the
key to select the sub-menu and press the ![]() key to enter the submenu. Press the
key to enter the submenu. Press the ![]() or
or ![]() key to select the corresponding sub-item and press the key to confirm the selection. The setup will be successful and the system will exit the setup mode.
key to select the corresponding sub-item and press the key to confirm the selection. The setup will be successful and the system will exit the setup mode.
Computer Data Transmission:
Turn on the device, and connect to the computer with the Micro USB cable. Press any key of the device and the computer will install the driver software automatically. The screen of the device will display the computer connected icon to indicate the connection is successful. Here the computer can read, copy, and delete the files in the TF card in the device (can be used as a card reader) and can also be used as an external USB speaker of the computer. (Certain computers of different configuration may not be compatible)
Recording Operation
MIC Recording:
Insert the TF card and turn on the device. Press the MODE key to enter the play mode. Long press the REC key to enter the MIC recording mode. During recording press the REC key to finish and exit the recording mode.
LINE IN Recording:
Connect the external audio cable ("Line in" is identified automatically) Make sure an external song is being played. Adjust the volume of the external audio and long press the REC key to enter "LINE IN Recording". During recording press the REC key to finish and exit.
Radio Recording:
Press the FM key to enter the radio mode and adjust the radio station. Long press the REC key to enter the radio recording mode. During recording, Press ![]() key can Pause recording, Press
key can Pause recording, Press ![]() key again can Resume recording. Press the REC key to finish the recording and exit the recording mode.
key again can Resume recording. Press the REC key to finish the recording and exit the recording mode.
*In the recording mode the volume is locked at the level set before recording. If you press the Volume key the volume will not be changed.
Recording File Invoking Operation:
Long press the REC FILE "0" key to invoke recording file. Press the ![]() or
or ![]() key to select the recording file to be played. The file name "MIC" indicates a MIC Recording file; "LIN" indicates a LINE I n Recording file; "RAD" indicates a Radio Recording file.
key to select the recording file to be played. The file name "MIC" indicates a MIC Recording file; "LIN" indicates a LINE I n Recording file; "RAD" indicates a Radio Recording file.
Recording File Deletion Operation:
Long press the REC FILE "0" key to invoke a recording file. Press the or key to select the recording file to be deleted. Long press the "DEL" key and the screen will pop up "Are you sure to delete the file" Press the ![]() key to delete the recording file.
key to delete the recording file.
Key Locking Operation:
Long press the MODE key, the lock icon will appear on the screen, which indicates the system has entered the keys locked mode. If you press other keys they will not function and the lock icon will appear on the screen. Long press the MODE key and the unlock icon will appear on the screen, which indicates the keys have been unlocked.
System Setup
- Long press the MENU key to enter the System Setup screen(The system will return to the main screen automatically if no operation within 5 seconds.)
System Screen:- Auto power (the time of automatic shutdown can be set to 0-90 min)
- Contrast (the contrast ratio of the screen can be set to 1-15 level)
- Back light Time (the back light can be set to Normal ON, OFF or a duration)
- Language (Chinese/English/Spanish)
- Record set (compression ratio: Simple record 64kbps / Quality record 96 kbps / Super record 128kbps )
- Back (Return to the main screen)
Note: For the convenience of customers use, the machine default language setting is English
- After the system enters the System Setup screen, press the
![]() or
or ![]() key to select the corresponding sub-item and press the
key to select the corresponding sub-item and press the ![]() key to enter the sub-menu. Press the
key to enter the sub-menu. Press the ![]() or
or ![]() key to select the corresponding sub-item and press the
key to select the corresponding sub-item and press the ![]() key to confirm the selection to finish the setup.
key to confirm the selection to finish the setup.
Sleep Shutdown Setup Operation
Enter the system setup screen, press the ![]() or
or ![]() key to select "Auto Power" and press the.
key to select "Auto Power" and press the. ![]() key to enter the sub-item. Press the
key to enter the sub-item. Press the ![]() or
or ![]() key to set the time (00-90 minutes) and press The
key to set the time (00-90 minutes) and press The ![]() key to confirm the setup. When the sleep shutdown is successfully set the timing shutdown icon
key to confirm the setup. When the sleep shutdown is successfully set the timing shutdown icon ![]() will appear on the screen, which indicates the system has entered the timing shutdown mode. The timer will begin countdown till the time set arrives and then the device will shut down automatically. When the time is set to 00 or when you turn off the power switch
will appear on the screen, which indicates the system has entered the timing shutdown mode. The timer will begin countdown till the time set arrives and then the device will shut down automatically. When the time is set to 00 or when you turn off the power switch, the sleep shutdown function will be canceled.
Troubleshooting
Q: Can not turn on the radio.
A: Possibly the battery drained, please charge the battery.
Q: Can not be connected to a computer.
A: Please do the connection in radio off mode. The USB cable maybe damaged, please try another one.
Q: Speaker does not sound.
A: Check if the volume level is too low, turn it up.
Q: Can not play audio from the Micro SD(TF) card or USB drive.
A: Check if the card or the USB drive has poor compatibility, try another card or USB drive. The files are damaged or with incorrect format, delete the file and try again.
Q: Can not charge the radio.
A: Check if the external adapter or the USB cable was connected correctly. Check if the adapter or USB cable is damaged.
Q: Why the radio sound out of the speaker, when using ear buds?
A: Because the ear buds have MIC function, in fact, this radio can't work with the ear buds which have MIC function. So you can try a ear buds without MIC function, if still can't solve, please email me freely
Q: Why the SW reception is not good?
A: Shortwave is a delicate medium. Little things like time of day, the sunspot cycle, weather and atmospheric issues can play the devil with reception. But once the sun goes down, the shortwave bands come alive with music, news, propaganda and even some pirate radio stations. so the signal strength will be weak indoors than outdoors. So the best way to listen to shortwave should be: extend antenna, in night, and outdoor.
VideosRetekess V115 - Features and How to Use Video
Documents / ResourcesDownload manual
Here you can download full pdf version of manual, it may contain additional safety instructions, warranty information, FCC rules, etc.
Advertisement


Need help?
Do you have a question about the V115 and is the answer not in the manual?
Questions and answers