Advertisement
Quick Links
Advertisement

Related Manuals for Retekess TR640


Summary of Contents for Retekess TR640
- Page 1 RETEKESS TR640 Portable Internet Radio User Manual Apply to TR640...
-
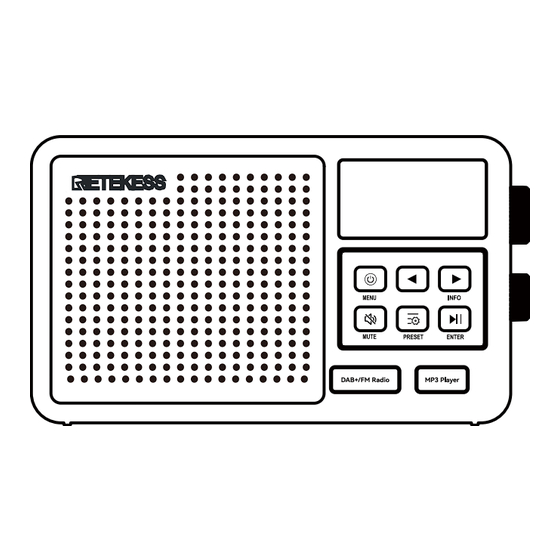
Page 2: Product Diagram
1. Product diagram Radio Diagram: 1. Display: display radio information 2. Tune/Select: station selection button, select the menu task, and adjust the time, etc. 3. Power/Menu: power on/off, and enter the menu. 4. Left/Move Back: select the previous song when playing music/In USB, TF card play, long press is fast backward play. -
Page 3: Specification Parameters
8. Setting/Preset: enter station selection list/enter manual station storage mode 9. Mute:start muting or cancel muting 10. AC-IN: plug in AC power cable to power the machine. 11. TF card slot: insert TF card, and play the music of TF card. 12. -
Page 4: Accessory List
DAB:174.928MHZ-239.200MHZ FM≦15 dB Reception sensitivity DAB≦-48dB Static current ≤200uA Maximum current ≤890MA 4 寸,4Ω,8W Speaker 40 dB SNR(Signal to Noise Ratio) 90 (30 network Station storage number* radio mode、 30 FM radio mode、 30 DAB radio mode) Bluetooth version VER 5.0 Bluetooth receiving distance ≤10m Bluetooth band... - Page 5 The radio is connected to AC or installed with four batteries. The screen displays the characters ‘Boot up and connect to network’ (indicating a prompt to start and connect to the network). Configure network? (Indicates whether the network needs to be installed) ----YES / NO (Two choices:...
- Page 6 WLAN(WPS PBC) Short press【ENTER】to enter WPS auto connection. If a network is connected, the name of the connected network is displayed. SSID:【**】 Displays the network signal strength value Signal【**】 】&【 】, move left and right, up and down to select a WLAN In the password entry area, lightly press【...
- Page 7 】to choose time zone in GTM:-12.0,-11.0, At this time, rotate【 -10.0,-9.0,-8.0,-7.0,-6.0,-5.0,-4.0,-3.0,-2.0,-1.0 ,+0,+1.0,+2.0,+3.0,+4.0,+5.0,+6.0,+7.0,+8.0,+9.0,+10.0, +11.0,+12.0. after choosing time zone, slightly press【ENTER】to confirm. ※: The date displayed is automatically updated with the network connection. 4.1.2 Network Radio Reception Choose the icon of “ ”, and slightly press【ENTER】to enter.
- Page 8 4.1.3 Internet Radio Search Station Operation (Search) For example, to play ‘Apple FM’, perform the following steps: 【ENTER】 to enter the search interface. Press 【 】&【 】 to Select Search and press move left and right , up and down to enter the name of the station, and use it with the key 【ENTER】.
- Page 9 Station selection: slightly press 【PRESET】 to enter 【 preset list】 . If there are existing stations, rotate 【 】 to choose and switch to the favorite station. If there is no previous station storage, the list displays the character of 【empty】.
- Page 10 storage number, and press【ENTER】to enter, displays “PRESET **SAVED”: Radio Reception (DAB version only) Choose the icon of “ ”, press【ENTER】to enter: FM Radio receiving frequency range: 87.50-108.00MHZ(Step value:0.05MHZ) 】button in the clockwise direction and 4.3.1 Manual tuning: in the FM mode, rotate the【 anticlockwise direction according to the minimum step value "0.05MHZ"...
- Page 11 Bluetooth Play Choose the icon of “ ”, and press【ENTER】to enter. Bluetooth connection code for this radio:‘TR640’. Once connected, turn on your Bluetooth device to listen to music. 】&【 】to choose previous song or next song.
- Page 12 TF Card Play ,press【ENTER】to enter TF card playing mode. Choose the icon of Press the TF card icon “ ” to insert TF card. LCD display: play time/number of songs being played/total number of songs. 】&【 】to choose the previous song or next song. Short press【...
- Page 13 】to Press【ENTER】to enter alarm time setting, and rotate【 choose. Enable : Off Off / Daily / Once /Weekdays / Weekends After choosing, press【ENTER】to confirm. Set the alarm time. 】to choose the hour of alarm time. Rotate【 Time: 00:00 】, minute flickers, rotate【 】to choose minute, and Press【...
- Page 14 Sleep Time Settings Choose the icon of , and press【ENTER】to enter sleep time (auto shutdown time) setting mode. 15minutes 】to choose, and press ENTER to confirm. Rotate【 30minutes 】to choose, and press ENTER to confirm. Rotate【 45minutes 】to choose, and press ENTER to confirm. Rotate【...
- Page 15 】button to show the following settings, and press【ENTER】to confirm. Rotate【 Network Date &Time Language DAB setup (DAB version FM setup (DAB version only) only) Dimmer Buffer time: [*seconds] Information Software update Reset to default 4.9.1 Connect the network as detailed in "4.1.1 WI-FI Network Connection", and then automatically update time and date.
- Page 16 】to show the following settings, and press【ENTER】to confirm. Rotate【 Note: manual time setting, to operate when NTP Set Date and Time is set to DO not use network. Use network time (Use the network to update the time automatically) NTP: [Use network time] * network (Update time...
- Page 17 Русский (俄语) Nederlands(荷兰语) Espanol(西班牙语) Polski(波兰语) 4.9.4 DAB setup (DAB version only) Note: the full menu is only displayed in DAB playback mode, and the general menu only displays DAB full scan and DAB station list. 】to get the following settings, and press【ENTER】to confirm. Rotate【...
- Page 18 FM station list Stored radio station Scan setting All station / strong station only 4.9.6 Dimmer Backlight Settings 】to show the following settings, and press【ENTER】to confirm. Rotate【 Normal/Dim Model:【Dim】 Level Bright: [60%] / Dim:[20%] 4.9.7 EQ Sound Effect Setting 】to set the following, and press【ENTER】to confirm. Rotate【...
- Page 19 Bass Treble 】to select a value of ±14. After choosing, rotate【 Press【ENTER】to confirm the chosen value. 4.9.8 Buffer time: [2 seconds] buffer time 】to choose between the 2-second and 5-second Rotate【 settings, and press【ENTER】to confirm. 4.9.9 Information (Network Information and System Information) 】to have the following settings, and press【ENTER】to confirm.
-
Page 20: Software Update
4.9.10 Software update 】&【 】to choose, and then press【ENTER】to confirm. Press【 4.9.11 Reset to default 】&【 】to choose, and then press【ENTER】to confirm. Press【 5. Matters Needing Attention Before use, it needs to obey the following basic safety tips to ensure the safe and reliable use of the product: ♦... - Page 21 •HENAN ESHOW ELECTRONIC COMMERCE CO., LTD declares that the radio equipment type is in compliance with the essential requirements and other relevant provisions of RED Directive 2014/53/EU and the ROHS Directive 2011/65/EU and the WEEE Directive 2012/19/EU; the full text of the EU declaration of conformity is available at the following internet address: www.retekess.com. Disposal 环保回收告示...
- Page 22 The crossed-out wheeled-bin symbol on your product, literature, or packaging reminds you that all electrical and electronic products, batteries, or accumulators must be taken to designated collection locations at the end of their working life. Do not dispose of these products as unsorted municipal waste.
- Page 23 免证发射机专用 Dedicated to license-free transmitter This radio is designed for and classified as “General population/uncontrolled use”. General population/uncontrolled environments are defined as locations where there is exposure of individuals who have no knowledge or control of RF exposure level. Electromagnetic Interference/Compatibility 提醒无线电干扰(电子产品适用) Nearly every electronic device is susceptible to electromagnetic interference (EMI) if inadequately shielded, designed, or otherwise configured for electromagnetic compatibility.
- Page 24 •Do not dismantle, open or shred batteries. Batteries should be dismantled only by trained people. 请勿拆解或粉碎电池。只有经过培训的人员才能拆 卸电池。 •Disposal of a battery into fire, or a hot oven, or mechanically crushing or cutting of a battery, that can result in explosion;将电池放入火中或热烤箱中, 或机械粉碎或切割可能导致电池爆炸;...
- Page 25 The plug of the adapter is considered a disconnect device. The socket-outlet shall be installed near the equipment and shall be easily accessible. 13.1 Authorized Accessories List 机器可选配件列表 •Contact Retekess for assistance regarding repairs and service. •For a list of Retekess-approved accessories for your radio model, visit the website http://www.retekess.com 法国环保回收标: 说明书...
- Page 26 FCC Warnning: This equipment has been tested and found to comply with the limits for a Class B digital device, pursuant to part 15 of the FCC Rules. These limits are designed to provide reasonable protection againstharmful interference in a residential installation. This equipment generates, uses and can radiateradio frequency energy and, if not installed and used in accordance with the instructions, maycause harmful interference to radio communications.
Need help?
Do you have a question about the TR640 and is the answer not in the manual?
Questions and answers